tutorial

How to Link an Image in React

Related: How to Use an Image as a Link in React

To link a local image in React, import the image at the top of the file and assign it to the src prop of an img element.

For example:

App.js

// 👇 import image from file
import myImage from './my-image.jpg';

export default function App() {
  return (
    <div>
      {/* 👇 show image */}
      <img src={myImage} alt="Trees" height="200" />

      <br />

      <span
        style={{
          color: 'green',
          fontSize: '1.2em',
          fontWeight: 'bold',
        }}
      >
        Trees
      </span>
    </div>
  );
}
Linking and displaying an image on the webpage.

This approach works when using a Webpack-based tool like Create React App.

Note that the image file must be within the project directory to be imported successfully. An error will occur if the file is outside the project directory.

Alternatively, we can use the require() function to link an image in React.

The following code example will produce precisely the same result on the page as the first example.

App.js

export default function App() {
  return (
    <div>
      {/* 👇 */}
      <img
        src={require('./my-image.jpg')}
        alt="Trees"
        height="200"
      />

      <br />
      <span
        style={{
          color: 'green',
          fontSize: '1.2em',
          fontWeight: 'bold',
        }}
      >
        Trees
      </span>
    </div>
  );
}

The advantage require() has here is that it doesn’t need to be at the top of the page. We can simply assign the result of require() to the src prop without having to store it in a variable.

Another way to link an image in React is to place it in the public folder and reference it with its relative path.

For example, if we placed the my-image.png file in the public folder, we’ll be able to display it in the page like this:

App.js

export default function App() {
  return (
    <div>
      {/* 👇 show image */}
      <img src="./my-image.jpg" alt="Trees" height="200" />

      <br />

      <span
        style={{
          color: 'green',
          fontSize: '1.2em',
          fontWeight: 'bold',
        }}
      >
        Trees
      </span>
    </div>
  );
}

Using the public folder is advantageous when we have many images that we want to display dynamically.

In the following examples, we dynamically display 100 images placed in a grid subfolder under public, and named with a certain pattern (image-1.jpg, image-2.jpg, …, image-100.png) in a grid.

App.js

export default function App() {
  return (
    <div>
      <div
        style={{
          display: 'grid',
          gridTemplateColumns:
            'repeat(auto-fit, minmax(min-content, 250px))',
          gap: '8px',
        }}
      >
        {[...Array(100)].map((_, i) => {
          return (
            <div>
              {/* 👇 linking images dynamically */}
              <img
                key={i}
                src={`./grid/image-${i + 1}.jpg`}
                style={{ width: '100%', height: 'auto' }}
              />
            </div>
          );
        })}
      </div>
    </div>
  );
}

If the image is stored online, then we’ll just have to set the URL of the image to the src prop to link and display it, like we do in plain HTML.

App.js

export default function App() {
  return (
    <div>
      {/* 👇 show remote image */}
      <img
        src="http://example.com/trees/my-image.jpg"
        alt="Trees"
        height="200"
      />

      <br />

      <span
        style={{
          color: 'green',
          fontSize: '1.2em',
          fontWeight: 'bold',
        }}
      >
        Trees
      </span>
    </div>
  );
}

How to Subtract Years From a Date in JavaScript

1. Date setFullYear() and getFullYear() methods

To subtract years from a Date in JavaScript:

  1. Call the getFullYear() method on the Date to get the year.
  2. Subtract the years.
  3. Pass the result of the subtraction to the setFullYear() method.

For example:

function subtractYears(date, years) {
  date.setFullYear(date.getFullYear() - years);
  return date;
}

// Feb 20, 2022
const date = new Date('2022-02-20T00:00:00.000Z');

const newDate = subtractYears(date, 3);

// Feb 20, 2019
console.log(newDate); // 2019-02-20T00:00:00.000Z

Our subtractYears() function takes a Date object and the number of years to subtract as arguments. It returns the same Date object with the years subtracted.

The Date getFullYear() method returns a number that represents the year of a particular Date.

The Date setFullYear() method sets the year of a Date to a specified number.

Avoid side effects

The setFullYear() method mutates the Date object it is called on. This introduces a side effect into our subtractYears() function. To avoid modifying the passed Date and create a pure function, make a copy of the Date and call setFullYear() on this copy, instead of the original.

function subtractYears(date, years) {
  // 👇 make copy with "Date" constructor
  const dateCopy = new Date(date);

  dateCopy.setFullYear(date.getFullYear() - years);

  return dateCopy;
}

const date = new Date('2022-02-20T00:00:00.000Z');

const newDate = subtractYears(date, 3);

// Feb 20, 2019
console.log(newDate); // 2019-02-20T00:00:00.000Z

// 👇 Original not modified
console.log(date); // 2022-02-20T00:00:00.000Z

Tip: Functions that don’t modify external state (i.e., pure functions) tend to be more predictable and easier to reason about, as they always give the same output for a particular input. This makes it a good practice to limit the number of side effects in your code.

2. date-fns subYears() function

Alternatively, we can use the subYears() function from the date-fns NPM package to quickly subtract years from a Date. It works like our pure subtractYears() function.

import { subYears } from 'date-fns';

const date = new Date('2022-02-20T00:00:00.000Z');

const newDate = subYears(date, 3);

// Feb 20, 2019
console.log(newDate); // 2019-02-20T00:00:00.000Z

// 👇 Original not modified
console.log(date); // 2022-02-20T00:00:00.000Z

How to Set Focus on an Input in Vue

To set focus on an input in Vue:

  1. Set a ref on the input element.
  2. Access the new ref from the $refs property of the Vue instance.
  3. Call the focus() method on the ref element object.

Set focus on input on button click

For example:

App.js

<template>
  <div id="app">
    <input
      ref="name"
      placeholder="Name"
    />{{ ' ' }}
    <button @click="focusInput">Focus</button>
  </div>
</template>

<script>
export default {
  methods: {
    focusInput() {
      this.$refs.name.focus();
    },
  },
};
</script>
Clicking the button sets focus on the input.

First, we create a new Vue instance ref by setting the input ref prop to a value (name).

<input
  ref="name"
  placeholder="Name"
/>

After doing this, we are able to access the $refs property of the Vue instance to access the object that represents the input element. We then call the focus() method on this object to set focus on the input.

this.$refs.name.focus();

We set the focusInput() method as a handler for the click event of the Focus button. So when the button is clicked, focusInput() is called and the input gains focus.

<button @click="focusInput">Focus</button>

Set focus on custom input component

Custom input components are useful for abstracting logic built around an input element and for reusing an input element styled in a particular way.

For custom components, calling focus() on its ref object will cause an error. For it to work, we’ll need to add a focus() method to the custom component that calls the focus() method of its root input element.

For example:

components/CustomInput.vue

<template>
  <input
    placeholder="Name"
    class="custom-input"
    ref="input"
  />
</template>

<script>
export default {
  methods: {
    // 👇 Create custom "focus" method
    focus() {
      this.$refs.input.focus();
    },
  },
};
</script>

<style scoped>
.custom-input {
  font-family: 'Segoe UI';
  font-weight: bold;
  font-size: 16px;
  color: blue;
  height: 30px;
  width: 200px;
}
</style>

App.js

<template>
  <div id="app">
    <custom-input ref="name"></custom-input>
    <br />
    <br />
    <button @click="focusInput">Focus</button>
  </div>
</template>

<script>
import CustomInput from './components/CustomInput.vue';

export default {
  methods: {
    focusInput() {
      // 👇 call custom "focus" method
      this.$refs.name.focus();
    },
  },
  components: { CustomInput },
};
</script>

Now we can set focus on the custom input component when the button is clicked.

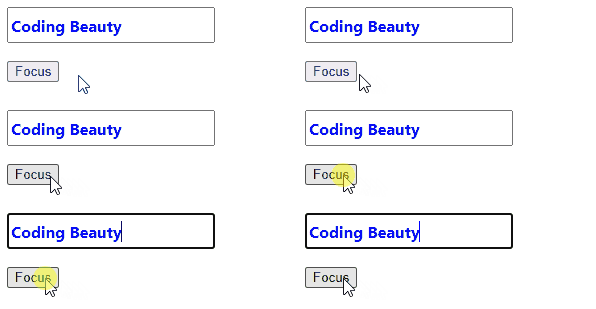
Clicking the button sets focus on the custom input component.

Set focus on input after page load

To give the input focus immediately after the page loads, we can call the focus() method from the mounted lifecycle hook of the Vue instance with the input ref. The mounted method is called after a component is added to the DOM, which happens when a page is loading.

For example:

App.js

<template>
  <div id="app">
    <input
      ref="name"
      placeholder="Name"
    />
  </div>
</template>

<script>
export default {
  mounted() {
    this.focusInput();
  },
  methods: {
    focusInput() {
      this.$refs.name.focus();
    },
  },
};
</script>
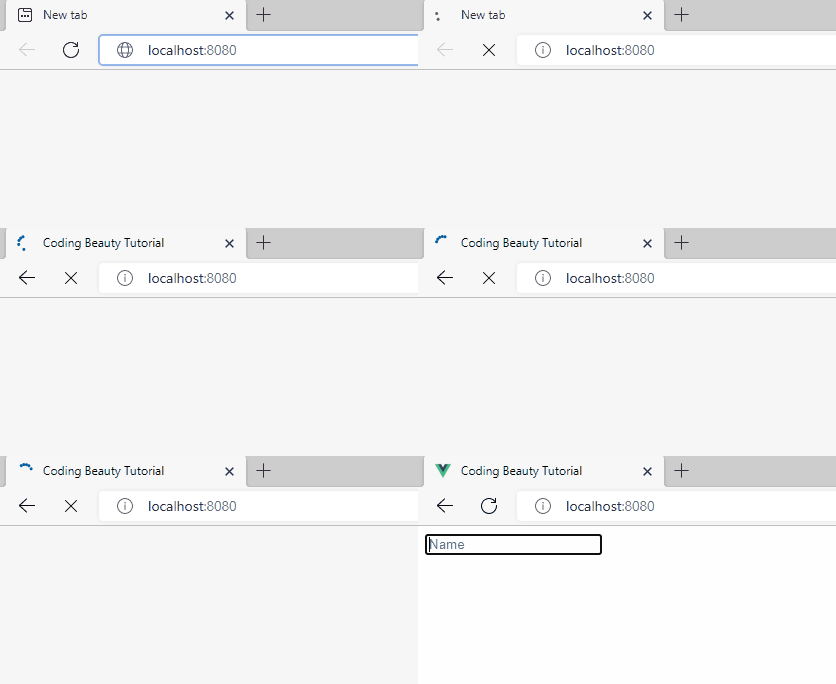
The input gains focus after the page loads.

Set focus on input after re-render

There are scenarios where we’ll need to wait for the DOM to be updated before calling focus() to give the input element focus.

For example, we might be using a boolean variable to determine whether an input element should be present in the DOM or not.

Because Vue batches state updates, the input element might not be added to the DOM immediately, and we won’t be able to access its ref right away.

We can use the nextTick() instance method to ensure that the DOM has been updated to include the input after modifying the boolean variable before calling focus().

<template>
  <div id="app">
    <!-- 👇 conditional rendering with "v-if" directive -->
    <input
      v-if="showInput"
      ref="name"
      placeholder="Name"
    />
    <br /><br />
    <button @click="focusInput">Show and focus</button>
  </div>
</template>

<script>
export default {
  data() {
    return {
      showInput: false,
    };
  },
  methods: {
    focusInput() {
      // 👇 Set boolean variable to show input
      this.showInput = true;

      this.$nextTick(() => {
        // This callback will only be called after the
        // DOM has been updated
        this.$refs.name.focus();
      });
    },
  },
};
</script>
The input gains focus after the DOM is updated to include it.

Set focus on next input after Enter press

Let’s say we have multiple input elements that need to be filled on the page. We could improve the UX by focusing on the succeeding text input when the user presses the Enter key to signify that they are done with filling in one input.

We do this by assigning a listener to the keypress event on the first input. Because of the enter event modifier, the event listener is only called when a key is pressed and the key is Enter.

We create a ref for the second input, and in the keypress.enter event listener we call the focus() method on the ref object to set focus on the second input.

<template>
  <div id="app">
    <form>
      <input
        placeholder="1st name"
        @keypress.enter="focusName2"
      />
      <br /><br />
      <input
        ref="name2"
        placeholder="2nd name"
      />
    </form>
  </div>
</template>

<script>
export default {
  methods: {
    focusName2() {
      this.$refs.name2.focus();
    },
  },
};
</script>
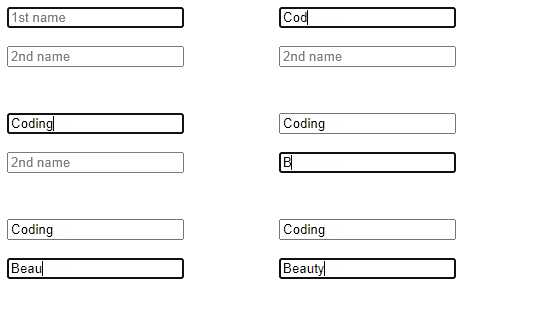
Pressing Enter sets focus on the next input.

How to Remove the Hash From URLs in Vue Router

To remove the hash from URLs in Vue Router in Vue 3, set the history option in createRouter() to the result of createWebHistory().

main.js

const router = VueRouter.createRouter({
  history: VueRouter.createWebHistory(),
  ...
});

If you’re using Vue 2, set the mode option to 'history' in the VueRouter() constructor.

main.js

const router = new VueRouter({
  mode: 'history',
  ...
});

Remove hash from URL in Vue 3 and Vue Router 4

Here’s a sample Vue 3 app, where we make use of Vue Router 4.

main.js

import { createApp } from 'vue';
import { createRouter } from 'vue-router';
import App from './App.vue';
import HomePage from '@/views/HomePage.vue';
import ContactPage from '@/views/ContactPage.vue';
import AboutPage from '@/views/AboutPage.vue';

const app = createApp(App);

const routes = [
  { path: '/', component: HomePage },
  { path: '/about', component: AboutPage },
  { path: '/contact', component: ContactPage },
];

const router = createRouter({
  routes,
});

app.use(router);

app.mount('#app');

App.vue

<template>
  <div id="app">
    <router-link to="/">Home</router-link>{{ ' ' }}
    <router-link to="/about">About</router-link>{{ ' ' }}
    <router-link to="/contact">Contact</router-link>
    <router-view></router-view>
  </div>
</template>

views/HomePage.vue

<template>
  <div><h2>Welcome</h2></div>
</template>

views/AboutPage.vue

<template>
  <div><h2>About us</h2></div>
</template>

views/ContactPage.vue

<template>
  <div><h2>Contact us</h2></div>
</template>

Here’s what the home page of this web app will look like:

The router has a hash character before the path of the route.
There is a hash character before the index route path.

You can see that there is a hash character (#) before the index path (/) in the URL of the page. This happens because Vue Router uses hash history mode to represent the URLs of different routes. In hash mode, a hash character is placed before the route path, and this prevents the page from reloading when a Router link is clicked.

The router has a hash character before the "/about" path.
There is a hash character before the “/about” path.

The createRouter() function from vue-router creates a Router instance to be used by the Vue app. We can pass an object with a bunch of options to the function to customize the behavior of the router.

main.js

import { createApp } from 'vue';
import { createRouter, createWebHistory } from 'vue-router';
import App from './App.vue';
import HomePage from '@/views/HomePage.vue';
import ContactPage from '@/views/ContactPage.vue';
import AboutPage from '@/views/AboutPage.vue';

const app = createApp(App);

const routes = [
  { path: '/', component: HomePage },
  { path: '/about', component: AboutPage },
  { path: '/contact', component: ContactPage },
];

// 👇
const router = createRouter({
  history: createWebHistory(),
  routes,
});

app.use(router);

app.mount('#app');

Setting the history option to the result of the createWebHistory() function from vue-router switches the router from hash history mode to HTML5 history mode. This removes the hash from the URLs.

There is no hash character before the index route path.
There is no hash character before the "/about" route path.
There is no hash character before the “/about” route path.

Remove hash from URL in Vue 2 and Vue Router 3

Vue 2 apps use Vue Router 3, so the Router initialization logic will differ.

Your main.js file might look like this at the moment:

main.js

import Vue from 'vue';
import App from './App.vue';
import VueRouter from 'vue-router';
import HomePage from '@/views/HomePage.vue';
import ContactPage from '@/views/ContactPage.vue';
import AboutPage from '@/views/AboutPage.vue';

Vue.config.productionTip = false;
Vue.use(VueRouter);

const routes = [
  { path: '/', component: HomePage },
  { path: '/about', component: AboutPage },
  { path: '/contact', component: ContactPage },
];

const router = new VueRouter({
  routes,
});

new Vue({
  router,
  render: (h) => h(App),
}).$mount('#app');

Here we use a VueRouter() constructor to create a new router instance. Like createRouter(), we can pass a set of options to customize its behavior. To change from hash history mode to HTML5 history mode and remove the hash from the URLs, set the mode option to 'history'.

main.js

import Vue from 'vue';
import App from './App.vue';
import VueRouter from 'vue-router';
import HomePage from '@/views/HomePage.vue';
import ContactPage from '@/views/ContactPage.vue';
import AboutPage from '@/views/AboutPage.vue';

Vue.config.productionTip = false;
Vue.use(VueRouter);

const routes = [
  { path: '/', component: HomePage },
  { path: '/about', component: AboutPage },
  { path: '/contact', component: ContactPage },
];

// 👇
const router = new VueRouter({
  mode: 'history',
  routes,
});

new Vue({
  router,
  render: (h) => h(App),
}).$mount('#app');

How to Get the Short Name of a Month in JavaScript

To get the short name of a month in JavaScript, create a Date object with the given month, then call the toLocaleString() method on the Date with a given locale and a set of options. One of the options should specify that the month name should be in a short form.

For example, here’s how we can get the 3-letter month name:

function getMonthShortName(monthNo) {
  const date = new Date();
  date.setMonth(monthNo - 1);

  return date.toLocaleString('en-US', { month: 'short' });
}

console.log(getMonthShortName(1)); // Jan
console.log(getMonthShortName(2)); // Feb
console.log(getMonthShortName(3)); // Mar

We can get the 1-letter month name by setting month to narrow:

function getMonthShortName(monthNo) {
  const date = new Date();
  date.setMonth(monthNo - 1);

  return date.toLocaleString('en-US', { month: 'narrow' });
}

console.log(getMonthShortName(1)); // J
console.log(getMonthShortName(2)); // F
console.log(getMonthShortName(3)); // M

Our getMonthShortName() function takes a position and returns the short name of the month with that position.

The setMonth() method sets the month of a Date object to a specified number.

Note

The value passed to setMonth() is expected to be zero-based. For example, a value of 0 represents January, 1 represents February, 2 represents March, and so on. This why we pass the value of 1 subtracted from the month number (monthNumber - 1) to setMonth().

Date toLocaleString() method

We used the Date toLocaleString() method to get the name of the month of the date. toLocaleString() returns a string with a language-sensitive representation of a date.

This method has two parameters:

  1. locales: A string with a BCP 47 language tag, or an array of such strings. There are many locales we can specify, like en-US for US English, en-GB for UK English, and en-CA for Canadian English.
  2. options: An object used to adjust the output format of the date.

In our examples, we pass en-US as the language tag to use US English, and we set values of short and narrow to the month property of the options object to display the short name of the month.

We can pass an empty array ([]) as the first argument to make toLocaleString() use the browser’s default locale:

function getMonthShortName(monthNo) {
  const date = new Date();
  date.setMonth(monthNo - 1);

  // Use the browser's default locale
  return date.toLocaleString([], { month: 'short' });
}

console.log(getMonthShortName(1)); // Jan
console.log(getMonthShortName(2)); // Feb
console.log(getMonthShortName(3)); // Mar

This is good for internationalization, as the output will vary depending on the user’s preferred language.

Intl.DateTimeFormat object

Using the toLocaleString() means that you have to specify a locale and options each time you want a language-sensitive short name of the month. To use the same settings to format multiple dates, we can use an object of the Intl.DateTimeFormat class instead.

For example:

function getTwoConsecutiveMonthNames(monthNumber) {
  const date1 = new Date();
  date1.setMonth(monthNumber - 1);

  const date2 = new Date();
  date2.setMonth(monthNumber);

  const formatter = new Intl.DateTimeFormat('en-US', { month: 'short' });

  // Format both dates with the same locale and options
  const firstMonth = formatter.format(date1);
  const secondMonth = formatter.format(date2);

  return `${firstMonth} & ${secondMonth}`;
}

console.log(getTwoConsecutiveMonthNames(1)); // Jan & Feb
console.log(getTwoConsecutiveMonthNames(2)); // Feb & Mar
console.log(getTwoConsecutiveMonthNames(3)); // Mar & Apr

3 Easy Ways to Make Any Text Bold in React

To make text bold in React, wrap the text with a span element, and set the fontWeight style property of the span to bold.

For example:

App.js

export default function App() {
  return (
    <div>
      Coding{' '}
      <span style={{ fontWeight: 'bold' }}>Beauty</span>
    </div>
  );
}
Making text bold in React

We used inline styles to make the text bold. The style attribute of a React element accepts a JavaScript object with camelCased properties instead of a CSS kebab-cased string. So, fontWeight sets the font-weight CSS property.

If we don’t need to control the boldness with a condition, then we can just wrap the text with a b element.

App.js

export default function App() {
  return (
    <div>
      Coding <b>Beauty</b>
    </div>
  );
}

Conditionally bold text with inline styles

Sometimes we might want to make a piece of text bold only if a certain condition is true. Here’s how we can do this:

App.js

import { useState } from 'react';

export default function App() {
  const [bold, setBold] = useState(false);

  const handleBoldChange = (event) => {
    setBold(event.target.checked);
  };

  return (
    <div>
      Coding{' '}
      <span
        style={{ fontWeight: bold ? 'bold' : 'normal' }}
      >
        Beauty
      </span>

      <br></br>

      <input
        name="bold"
        type="checkbox"
        value={bold}
        onChange={handleBoldChange}
      ></input>

      <label htmlFor="bold">Bold</label>
    </div>
  );
}
The text is bold only if the checkbox is checked.

We use a state variable named bold to store the current checked state of the checkbox and to determine whether the relevant text should be bold or not.

We attach an event listener to the onChange event, so it is called when the checkbox is checked or unchecked. In this listener, we use the setBold function to update the value of bold and change the boldness of the text.

Bold text with custom component

If we frequently need make text bold, we can abstract the logic into a reusable custom component.

App.js

function BoldText({ children }) {
  return (
    <span style={{ fontWeight: 'bold' }}>{children}</span>
  );
}

export default function App() {
  return (
    <div>
      Coding <BoldText>Beauty</BoldText>
    </div>
  );
}

This code will produce the same result on the web page.

Whatever text is place within the <BoldText> and </BoldText> tags will have a bold font.

Conditionally bold text with custom component

To make text bold conditionally with a custom component, we can create a boolean bold property that will determine whether the child text of the component should be bold or not.

App.js

import { useState } from 'react';

function BoldText({ children, bold }) {
  return (
    <span style={{ fontWeight: bold ? 'bold' : 'normal' }}>
      {children}
    </span>
  );
}

export default function App() {
  const [bold, setBold] = useState(false);

  const handleBoldChange = (event) => {
    setBold(event.target.checked);
  };

  return (
    <div>
      Coding <BoldText bold={bold}>Beauty</BoldText>

      <br></br>

      <input
        name="bold"
        type="checkbox"
        value={bold}
        onChange={handleBoldChange}
      ></input>

      <label htmlFor="bold">Bold</label>
    </div>
  );
}
The text is bold only if the checkbox is checked.

Bold text with class

Alternatively, we can make text bold in React by defining a bold class in a CSS file, e.g., App.css:

App.css

.bold {
  font-weight: bold;
}

We would then import the App.css file and apply the bold class to a span element to make all the text within it bold.

App.js

import './App.css';

export default function App() {
  return (
    <div>
      Coding <span className="bold">Beauty</span>
    </div>
  );
}

And this would produce exactly the same result as the previous two methods:

Conditionally bold text with class

Here’s how we would use a class name to make text bold only if a particular condition is true:

App.js

import { useState } from 'react';
import './App.css';

export default function App() {
  const [bold, setBold] = useState(false);

  const handleBoldChange = (event) => {
    setBold(event.target.checked);
  };

  return (
    <div>
      Coding{' '}
      <span className={bold ? 'bold' : ''}>Beauty</span>

      <br></br>

      <input
        name="bold"
        type="checkbox"
        value={bold}
        onChange={handleBoldChange}
      ></input>
      
      <label htmlFor="bold">Bold</label>
    </div>
  );
}

Using the ternary operator, we set the className property to the bold class if the bold variable is true. Otherwise, we set className to an empty string ('').

The text is bold only if the checkbox is checked.

Tip: Instead of the ternary operator, you can use the clsx utility from NPM to more easily construct class names from a set of conditions in React.

How to Create a Script Element in JavaScript

To create a script element in JavaScript:

  1. Use the document.createElement() method to create the script element.
  2. Set the src attribute on the element object to a script file.
  3. Include the script element in the HTML using the appendChild() method.

Consider this sample HTML markup:

index.html

<!DOCTYPE html>
<html>
  <head>
    <title>Coding Beauty Tutorial</title>
  </head>
  <body>
    <div id="box"></div>

    <script src="index.js"></script>
  </body>
</html>

Here’s how we can use JavaScript to create a script element in the HTML:

index.js

const script = document.createElement('script');

// use local file
// script.src = 'script.js';

script.src =
  'https://cdnjs.cloudflare.com/ajax/libs/jquery/3.6.1/jquery.min.js';

script.async = true;

// make code in script to be treated as JavaScript module
// script.type = 'module';

script.onload = () => {
  console.log('Script loaded successfuly');
  const box = document.getElementById('box');
  box.textContent = 'The script has loaded.';
};

script.onerror = () => {
  console.log('Error occurred while loading script');
};

document.body.appendChild(script);

The document.createElement() method creates an HTML element specified by the tag name and returns the element. By passing a script tag, we create a script element.

const script = document.createElement('script');

We set the src property on the script element to specify the script file to be loaded. We specify a remote file with a URL, but we could also specify a local file with a relative or absolute file path.

// use local file
// script.src = 'script.js';

script.src =
  'https://cdnjs.cloudflare.com/ajax/libs/jquery/3.6.1/jquery.min.js';

By setting the async property to true, the browser won’t have to load and evaluate the script before continuing to parse the HTML. Instead, the script file will be loaded in parallel to reduce delays and speed up the processing of the page.

script.async = true;

The type attribute indicates what type of script the file is. If it is a JavaScript module, we’ll need to set the type attribute to module to show this.

script.type = 'module';

For a complete list of all attributes supported by the script element, visit the MDN docs on the script element.

We listen for the onload event in order to perform an action when the script file has been loaded successfully.

script.onload = () => {
  console.log('Script loaded successfuly');
  const box = document.getElementById('box');
  box.textContent = 'The script has loaded.';
};

We listen for the onerror event so that we can perform a different action in case there was an error with loading the script.

script.onerror = () => {
  console.log('Error occurred while loading script');
};

The appendChild() method adds a DOM element as the last child of a specified parent element. By calling appendChild() on document.body, we add the script file to the body.

document.body.appendChild(script);
The script file is included in the body of the document.

To add the script file to the head of the document instead, we can replace document.body with document.head.

document.head.appendChild(script);
The script file is included in the head of the document.

How to Add Weeks to a Date in JavaScript

In this article, we’ll learn how to easily add any number of weeks to a Date object in JavaScript.

1. Date setDate() and getDate() methods

To add weeks to a Date in JavaScript:

  1. Use the getDate() method on the Date to get the day of the month of the Date.
  2. Add the result of getDate() to 7 multiplied by the number of weeks to add.
  3. Call the setDate() method with this sum as an argument.

For example:

function addWeeks(date, weeks) {
  date.setDate(date.getDate() + 7 * weeks);

  return date;
}

// May 20, 2022
const date = new Date('2022-05-20T00:00:00.000Z');

const newDate = addWeeks(date, 1);

// May 27, 2022
console.log(newDate); // 2022-05-27T00:00:00.000Z

Our addDays() function takes a Date object and the number of days to add as arguments, and returns the same Date object with the newly added days.

The Date getDate() method returns a number between 1 and 31 that represents the day of the month of the particular date.

The Date setDate() method changes the day of the month of the Date object to the number passed as an argument.

If the number you specify would change the month or year of the Date, setDate() automatically updates the Date information to reflect this.

function addWeeks(date, weeks) {
  date.setDate(date.getDate() + 7 * weeks);

  return date;
}

// May 20, 2022
const date = new Date('2022-05-20T00:00:00.000Z');

const newDate = addWeeks(date, 3);

// June 10, 2022
console.log(newDate); // 2022-06-10T00:00:00.000Z

Adding 3 weeks adds 21 days (20 + 21 = 41 days), but May has only 31 days, so the month is incremented by 1 and the day is set to 10 (41 – 31).

Avoid side effects

The setDate() method mutates the Date object it is called on. This introduces a side effect into our addDays() function. To avoid modifying the passed Date and create a pure function, make a copy of the Date and call setDate() on this copy, instead of the original.

function addWeeks(date, weeks) {
  const dateCopy = new Date(date);

  dateCopy.setDate(dateCopy.getDate() + 7 * weeks);

  return dateCopy;
}

const date = new Date('2022-05-20T00:00:00.000Z');

const newDate = addWeeks(date, 3);

console.log(newDate); // 2022-06-10T00:00:00.000Z

// Original not modified
console.log(date); // 2022-05-20T00:00:00.000Z

Functions that don’t modify external state (i.e., pure functions) tend to be more predictable and easier to reason about, as they always give the same output for a particular input. This makes it a good practice to limit the number of side effects in your code.

2. date-fns addWeeks() function

Alternatively, you can use the pure addWeeks() function from the date-fns NPM package to quickly add weeks to a Date. It works similarly to our addWeeks() function.

import { addWeeks } from 'date-fns';

const date = new Date('2022-05-20T00:00:00.000Z');

const newDate = addWeeks(date, 3);

console.log(newDate); // 2022-06-10T00:00:00.000Z

// Original not modified
console.log(date); // 2022-05-20T00:00:00.000Z

How to Remove a Query String From a URL in JavaScript

To remove a query string from a URL in JavaScript:

  1. Create a URL object from the URL string using the URL() constructor.
  2. Set the search property of the URL object to an empty string ('').
  3. Get the resulting URL with the toString() method of the URL object.
const url = 'https://example.com/posts?page=5&sort=desc#hash';

const urlObj = new URL(url);

urlObj.search = '';

const result = urlObj.toString();

console.log(result); // https://example.com/posts#hash

We can use the URL class to parse, construct, normalize, and encode URLs.

The URL() constructor returns a newly created URL object representing the URL string passed as an argument. URL objects have properties that allow us to easily read and modify the components of a URL.

const url = 'https://example.com/posts?page=5&sort=desc#hash';

const urlObj = new URL(url);

console.log(urlObj.host); // example.com

console.log(urlObj.origin); // https://example.com

console.log(urlObj.protocol); // https:

The search property returns the query string of the URL, including the ? character. It doesn’t include the hash.

const url = 'https://example.com/posts?page=5&sort=desc#hash';

const urlObj = new URL(url);

console.log(urlObj.search); // ?page=5&sort=desc

By setting search to an empty string (''), we remove the query string from the URL.

Remove query string along with hash from URL

To remove the hash of the URL along with the query string, also set the hash property to an empty string:

const url = 'https://example.com/posts?page=5&sort=desc#hash';

const urlObj = new URL(url);

urlObj.search = '';
urlObj.hash = '';

const result = urlObj.toString();

console.log(result); // https://example.com/posts

The hash property returns the fragment identifier of the URL, including the # character.

const url = 'https://example.com/posts?page=5&sort=desc#hash';

const urlObj = new URL(url);

console.log(urlObj.hash); // #hash

By setting hash to an empty string (''), we remove the hash from the URL along with the query string.

How to Remove an Element On Click in React

In this article, we’ll learn how to easily remove an element onclick in React, whether it’s in a list or it’s a standalone element.

Remove stand-alone element onclick in React

To remove a stand-alone element onclick:

  1. Store the visibility state in a state variable as a Boolean value, and use its value to conditionally render the element.
  2. Attach an event handler to the onClick event of the element.
  3. In the event handler, negate the value of the visibility state to remove the element from the DOM.

One example should make this clear:

import { useState } from 'react';

export default function App() {
  const [visible, setVisible] = useState(true);

  const removeElement = () => {
    setVisible((prev) => !prev);
  };

  return (
    <div>
      Click to remove element
      <br />
      {visible && (
        <button onClick={removeElement}>Remove</button>
      )}
    </div>
  );
}
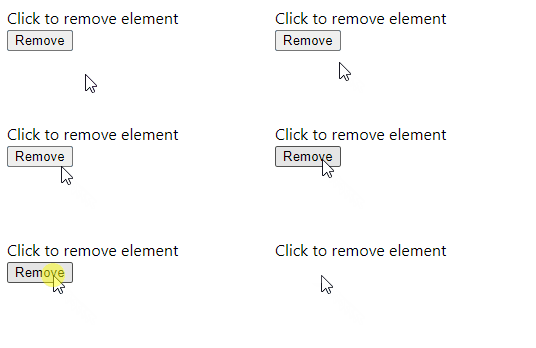
Removing an element onclick in React

We use the useState() to create a state variable in the component. This hook returns an array of two variables, generally called state and setState. The state variable (visible) holds the current visibility state, and the setState function (setVisible) updates it.

const [visible, setVisible] = useState(true);

We set an event handler to the onClick event of the button, so when the button is clicked, the handler function will be called.

<button onClick={removeElement}>Remove</button>

In the handler function, we use the setState function for the visibility state to update the state.

const removeElement = () => {
  setVisible((prev) => !prev);
};

Instead of passing the negated value directly, we pass a callback function to setState that returns the negated value. This ensures that we always get the most recent state value.

Tip

React batches state changes for performance reasons, so the state may not be updated immediately after setState is called, in the order we might expect. This is why we always pass a function to setState when the new state is computed from the data of the previous state.

Remove element from list onclick

To remove an element from a list onclick:

  1. Attach an event handler to the onClick event of every element in the array representing the list.
  2. In the event handler for a particular element, call the filter() method on the array, specifying a condition that is true for every element in the array apart from the one to be removed.
  3. Use setState to update the state array with the result returned from filter().

For example:

import { useState } from 'react';

export default function App() {
  const [fruits, setFruits] = useState([
    'Orange',
    'Banana',
    'Apple',
  ]);

  const removeElement = (index) => {
    const newFruits = fruits.filter((_, i) => i !== index);
    setFruits(newFruits);
  };

  return (
    <div>
      {fruits.map((fruit, index) => (
        <div key={index}>
          <button
            onClick={() => removeElement(index)}
          >
            {fruit}
          </button>
          <br />
          <br />
        </div>
      ))}
    </div>
  );
}
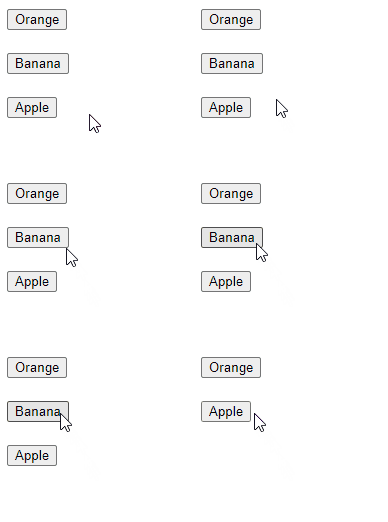
Removing an element from a list onclick in React
Removing an element from a list onclick

With the map() method, we render a button for each element in the array. For each button, we attach an event handler that will call the removeElement() method, passing as an argument the index of the element that the button represents.

{fruits.map((fruit, index) => (
  <div key={index}>
    <button
      onClick={() => removeElement(index)}
    >
      {fruit}
    </button>
    <br />
    <br />
  </div>
))}

removeElement() removes an element by returning a condition from the filter() callback that is true only for elements in the array that don’t have the index passed to removeIndex(). Doing this excludes the element with that index from the array, so when the array state is updated, the button representing that element is no longer rendered.

const fruits = ['Orange', 'Banana', 'Apple'];

const newFruits = fruits.filter((_, index) => index !== 1);

console.log(newFruits); // [ 'Orange', 'Apple' ]

Note: don’t modify state directly in React

Trying to remove the element from the array by modifying it using a function like splice() will not work:

const removeElement = (index) => {
  // ⚠️ Mutating the array like this will not update the view
  fruits.splice(index, 1);
};

State is meant to be immutable in React, so we can’t update the array by mutating it. It has to be replaced with a new array returned from filter() for the view to update.

Remove object element from list onclick

We can also use this approach to remove an element represented by an object from a list onclick.

import { useState } from 'react';

export default function App() {
  const [fruits, setFruits] = useState([
    { id: 1, name: 'Orange' },
    { id: 2, name: 'Banana' },
    { id: 3, name: 'Apple' },
  ]);

  const removeElement = (id) => {
    const newFruits = fruits.filter(
      (fruit) => fruit.id !== id
    );
    setFruits(newFruits);
  };

  return (
    <div>
      {fruits.map((fruit) => (
        <div key={fruit.id}>
          <button onClick={() => removeElement(fruit.id)}>
            {fruit.name}
          </button>
          <br />
          <br />
        </div>
      ))}
    </div>
  );
}

Instead of filtering by index, this time we filter by the id property to remove an item from the array and remove the element from the list in the DOM.

const fruits = [
  { id: 1, name: 'Orange' },
  { id: 2, name: 'Banana' },
  { id: 3, name: 'Apple' },
];

const newFruits = fruits.filter((fruit) => fruit.id !== 2);

console.log(newFruits);
// [ { id: 1, name: 'Orange' }, { id: 3, name: 'Apple' } ]