Tari Ibaba is a software developer with years of experience building websites and apps. He has written extensively on a wide range of programming topics and has created dozens of apps and open-source libraries.
Job searching with sites like LinkedIn and Indeed can be really frustrating, especially if you’re self-taught, just out of college, or spent months looking for work.
Low response rates, insane experience requirements, countless rounds of interviews…
Luckily today we’ll dive deep into Wellfound (formerly AngelList), a powerful way to get freelance and full-time jobs without much work experience quickly.
A way others have used and found massive success:
With Wellfound you gain access to tens of thousands of remote jobs from the world’s hottest startups.
Rising startups are much more willing to hire you than the huge, well-established FAANG companies. You’ll get to have a significant impact on the company at the critical formative stages.
And don’t think this means they pay low. Many of them pay from $100k to $120k and above. They’re swimming in investor money and expanding quickly, which means they need as many hands as they can get.
Their rapid growth also means you stand to gain a lot with their lucrative stock options.
How to apply for remote jobs at Wellfound
Once you go to wellfound.com/remote you’ll see a massive number of well-paying remote tech & startup jobs.
Right now you can see they’re almost 50,000 jobs! Not enough people to fill them — something I heard is pretty common for tech jobs.
Serious opportunity here…
Look how detailed the information is for each job; Here we have GitLaba powerful GitHub alternative.
We see they have 3 juicy jobs all over $150,000, their actively hiring, they’re wildly acclaimed, they’ve got strong financial backing, and a great work-life balance.
That’s a lot of information in one go.
You can use the right side pane to narrow down your search to specific roles like the full-stack engineer role, for full-stack web developers.
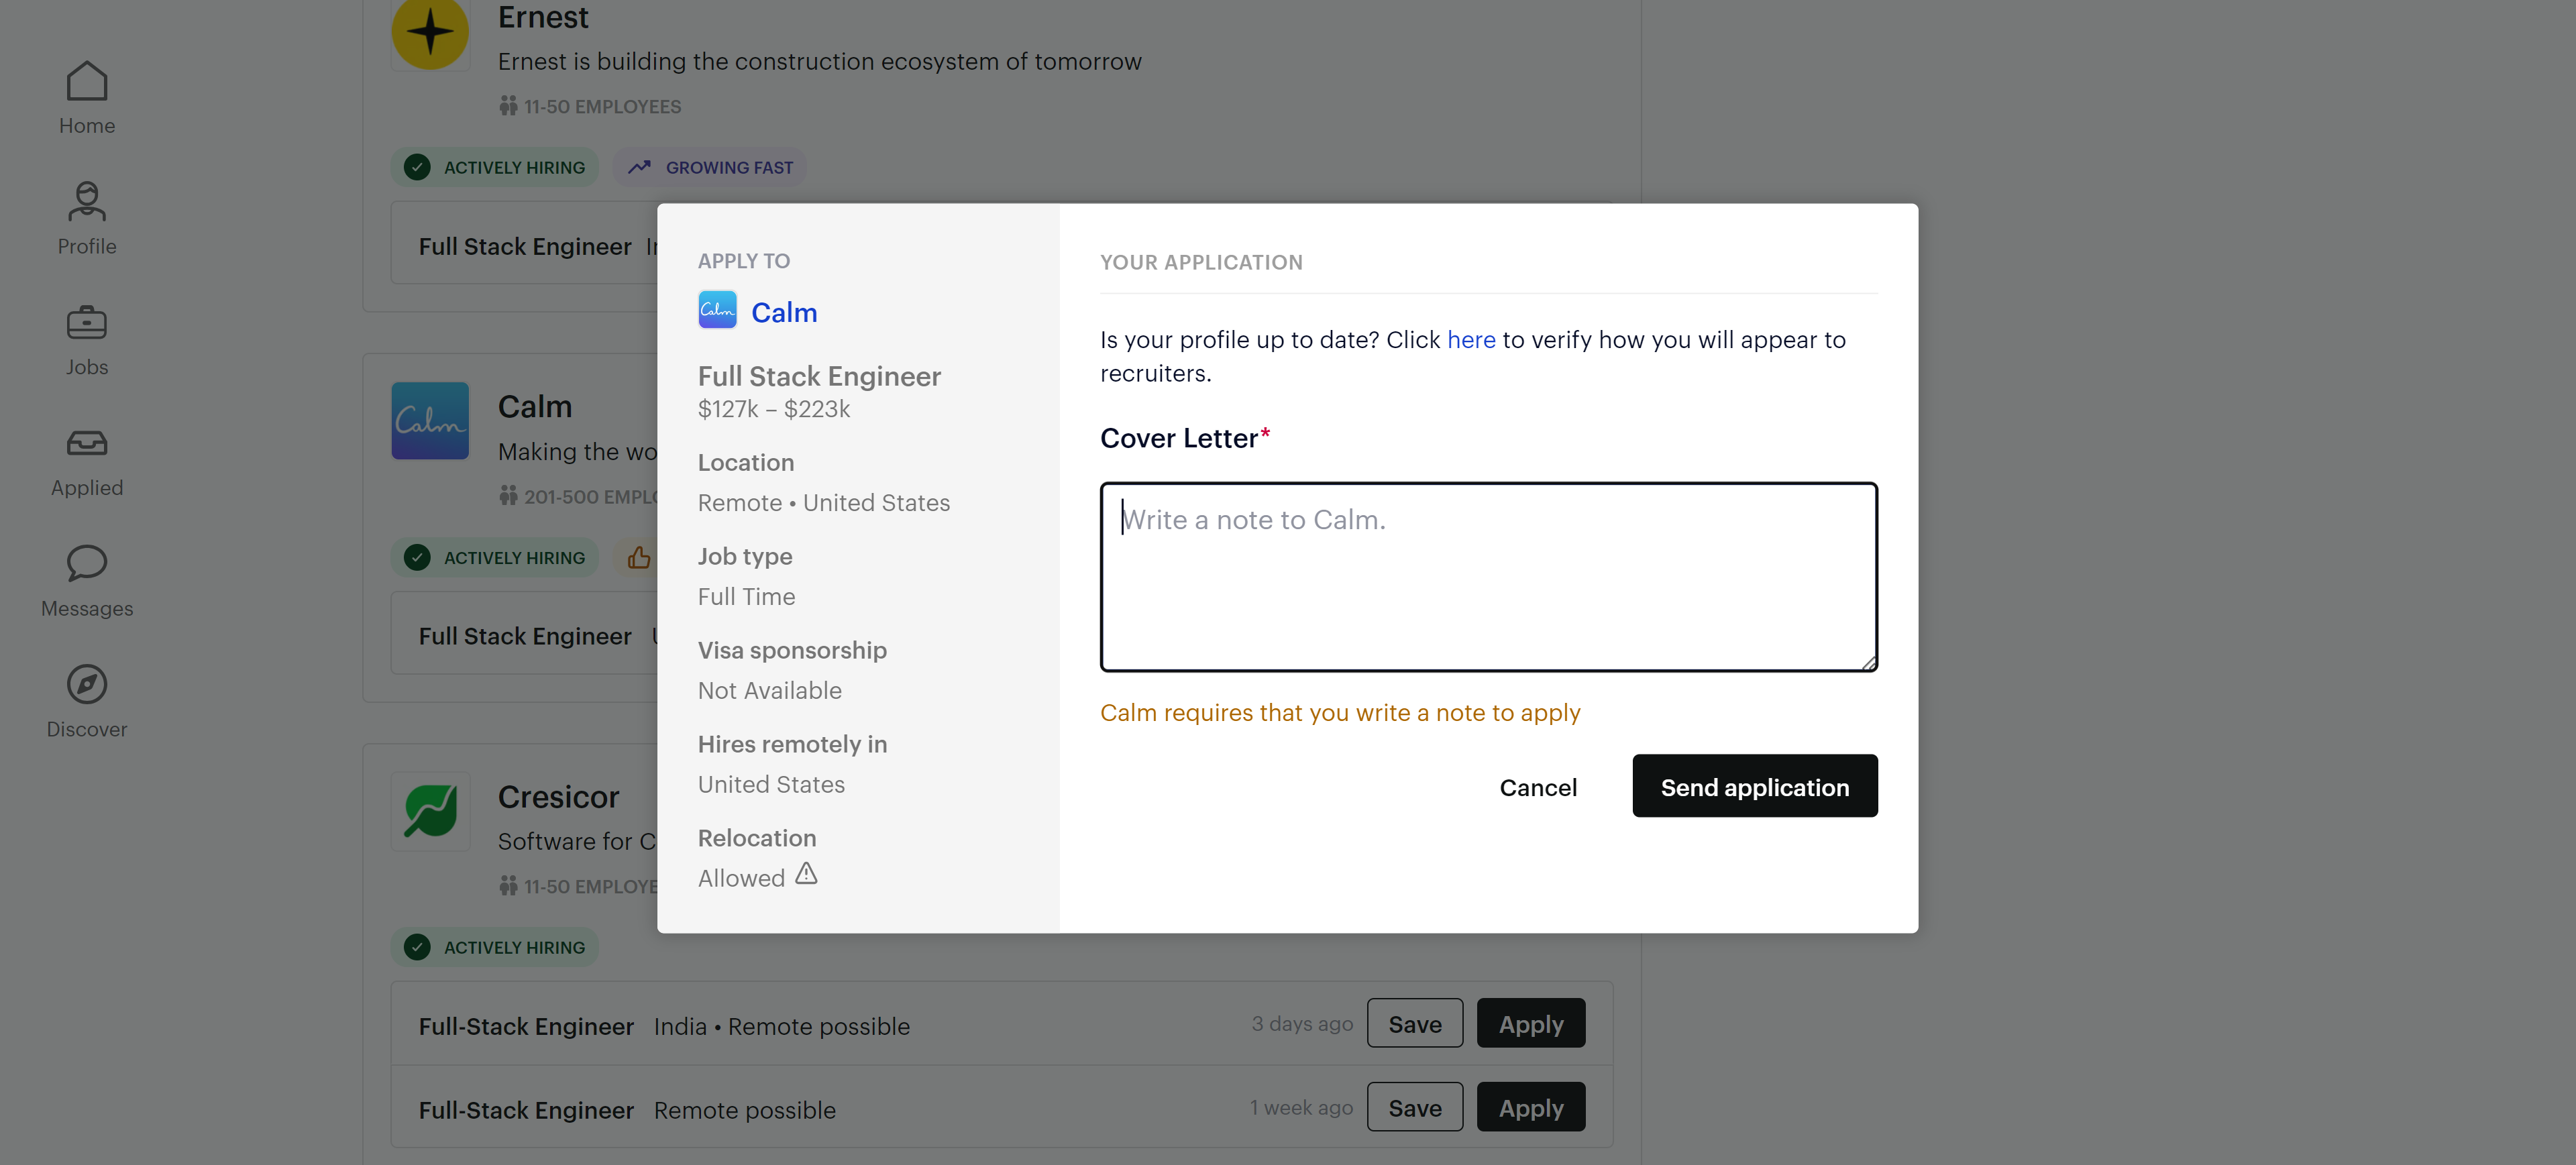
Look it’s Calm, a wildly popular meditation and sleep app with over 50 million downloads on the Play Store alone.
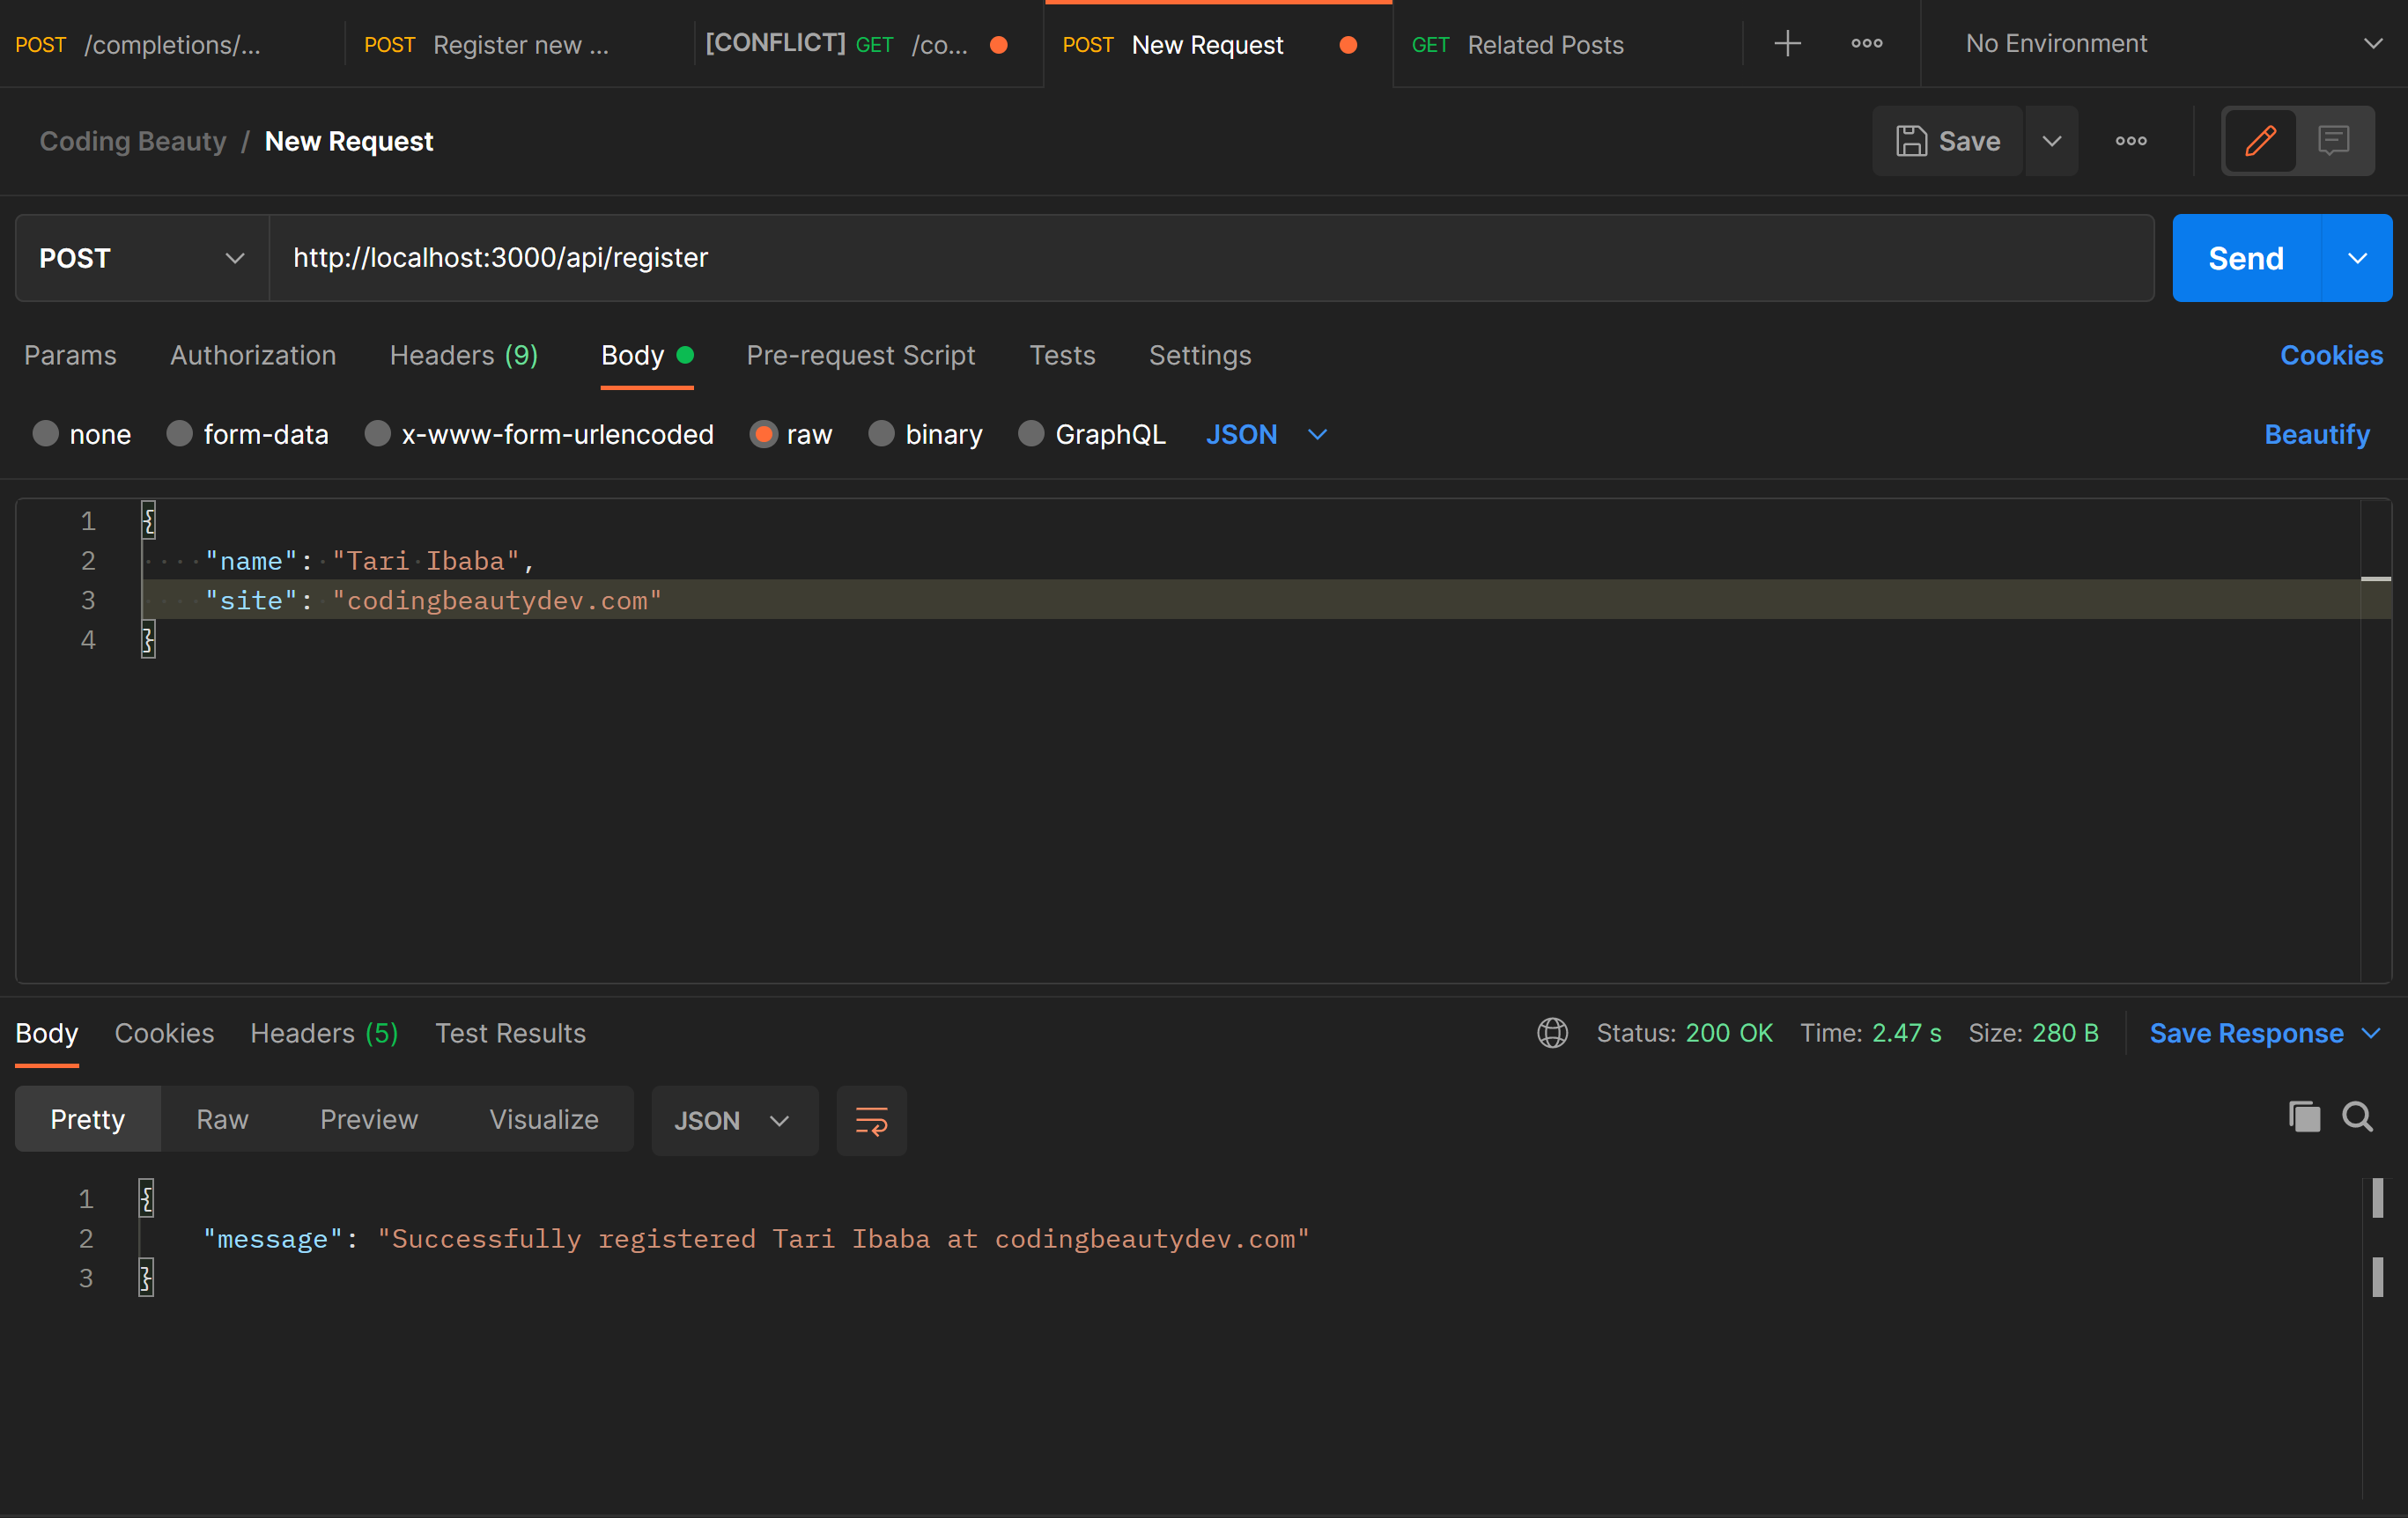
To apply you’ll fill out a bunch of fields to create your Wellfound account and upload your resume.
Full name, email, password, location, years of experience, desired salary, cover letter, CV, and more.
That’s definitely a lot, but don’t worry: Once you create an account all the information you entered will be used for every successive application.
So you’ll just have to enter one or two details, like the cover letter.
The best companies to target if you have no experience
If you don’t have any professional experience then you’ll have much higher success targeting those seed to mid-size startups just getting started and in incredibly high demand for employees.
So maybe not Calm. Perhaps something like…
Xverse – less than 50 employees.
Or Sprinter Health – early and growing fast!
You’ll take on such a powerful and influential role at these crucial growing stages in the company lifetime.
Tips for writing a good application letter
1. Tailor it to the job
Don’t use a generic cover letter.
Look at the job description closely and identify the skills and experience they’re looking for to write something personalized to the role.
2. Hook them early
Start with a strong opening that grabs their attention.
Talk about how excited you are for the position and highlight a relevant accomplishment or two. If you don’t have much of that, then focus more on your zeal to make a difference and your desire to learn as much as possible.
3. Solutions over features
Focus more on how you can solve the problems the role demands, not just your skills and experiences.
4. Keep it clear and short
Go straight to the point with 3-4 paragraphs. Don’t try to show off your vocab – they don’t care. Use conversational language.
Final thoughts
Wellfound offers a goldmine of high-paying remote jobs at exciting startups. Skip the brutal FAANG competition and make a real impact with companies overflowing with opportunity.
Don’t let a lack of experience hold you back – target fast-growing startups for your big break. With Wellfound, your dream remote job is just a click away.
EVERY new extension you add to VS Code increases the memory and CPU power it gobbles up:
We need to keep this number as low as possible to minimize this resource usage — and stop these extensions from clashing with one another or with native functionality.
And you know, there’s a significant number of extensions in the Marketplace that provide functionality VSCode already has built-in.
Usually they were made when the feature wasn’t added yet; but once that happened they became largely redundant additions.
So below, I cover a list of these integrated VSCode features and extensions that provide them. Uninstalling these now dispensable extensions will increase your editor’s performance and efficiency.
1. HTML tag auto-renaming
A powerful feature I didn’t discover for months after I started using VS Code!
You just start editing the starting tag and the ending tag auto-updates to match:
Extensions for this
Auto Rename Tag (17.7M downloads): “Automatically rename paired HTML/XML tag, same as Visual Studio IDE does”.
But feature already built-in
I use this setting to easily get tag auto-rename without installing anything:
Editor: Linked Editing: “Controls whether the editor has linked editing enabled. Depending on the language, related symbols e.g. HTML tags, are updated while editing.” Default is false“
2. Auto-trim trailing spaces
This handy feature removes ending whitespace from all the lines of your file to maintain consistent formatting.
Extensions for this
Trailing Spaces (2.0M downloads): “Highlight trailing spaces and delete them in a flash!”.
AutoTrim (35.4K downloads): “Trailing whitespace often exists after editing lines of code, deleting trailing words, and so forth. This extension tracks the line numbers where a cursor is active, and removes trailing tabs and spaces from those lines when they no longer have an active cursor”.
But feature already built-in
VSCode has a built-in setting that can automatically remove trailing spaces from a file.
It automatically trims the file when it is saved, making it a background operation you no longer have to think about.
Trailing spaces are removed from the file on save.
Here’s the setting:
Files: Trim Trailing Whitespace: “When enabled, will trim trailing whitespace when saving a file”. It’s false by default.
The auto trimming setting in the Settings UI.
Add this to your settings.json file to enable auto trimming:
settings.json
JavaScriptCopied!
{
  "files.trimTrailingWhitespace": true,
}
You might want to turn this setting off for Markdown files since you have to put two or more spaces at the end of a line to create a hard line break in the output, as stated in the CommonMark specification. Add this to your settings.json file to do so.
Alternatively, you can simply use a backslash (\) instead of spaces to create a hard line break.
3. HTML tag auto-wrapping
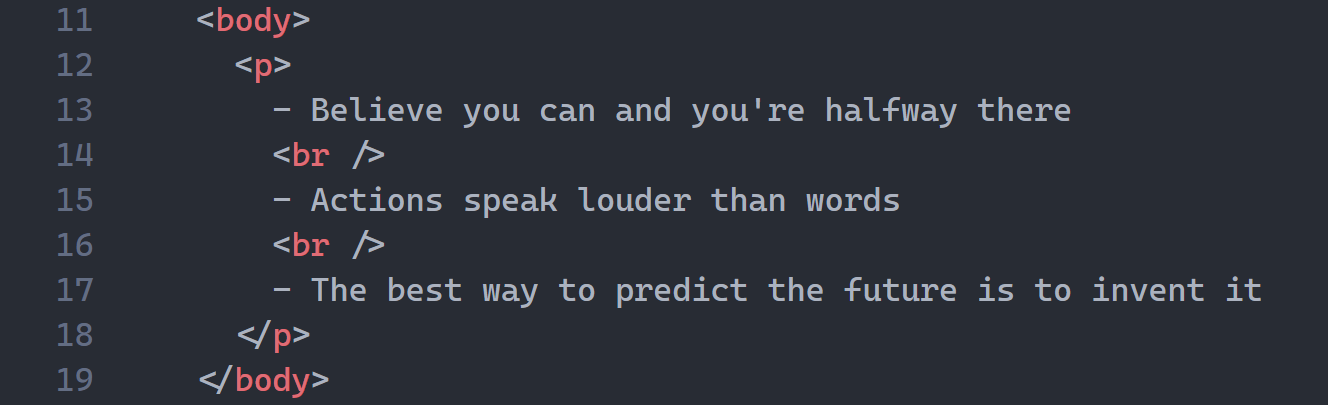
I can’t count how many times I’ve needed to wrap one HTML element in a new one — usually a div.
With this feature I can instantly wrap the <p> tag in a <div> without painfully inserting one <div> above and one </div> below.
Extensions for this
htmltagwrap (674K downloads): “Wraps selected code with HTML tags”.
html tag wrapper (458K downloads): “wrap selected html tag by press ctrl+i, you can change the wrapper tag name simply too”.
But feature already built-in
Thanks to the built-in Wrap with Abbreviation command I can rapidly wrap a tag in any tag type.
Did you see how the new wrapper’s name changed according to your input?
4. Colorful indentation
Indentation guides make it much easier for you to trace out the different indentation levels in your code.
Extensions for this
Indent Rainbow: “This extension colorizes the indentation in front of your text, alternating four different colors on each step”
But feature already built-in
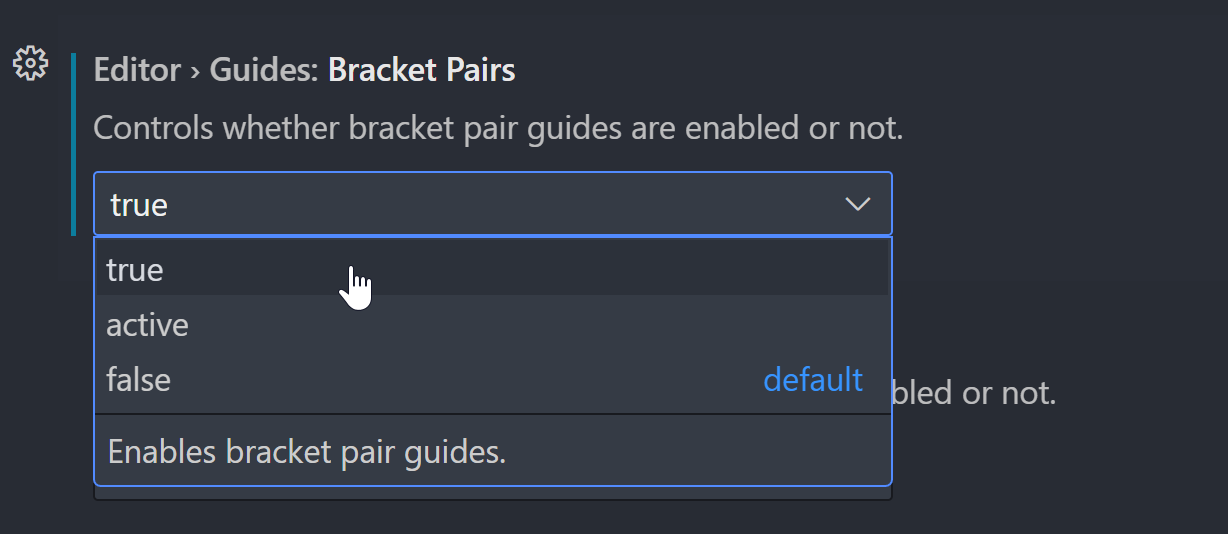
So yeah, once again VS Code has this as a built-in feature.
We just change the Editor > Guides: Bracket Pairs setting from active to always show the colorful indents.
To go from this:
To this✅:
Beautiful.
5. NPM integration
In every serious project you’ll probably have tools to automate testing, linting, building, and other tasks.
So this feature makes it easier to start those tasks with as little as the click of a button. No need to switch context whatsoever.
Extensions for this
NPM (6.8M installs): “This extension supports running npm scripts defined in the package.json file”. I always saw this as a recommended extension after opening any project with package.json
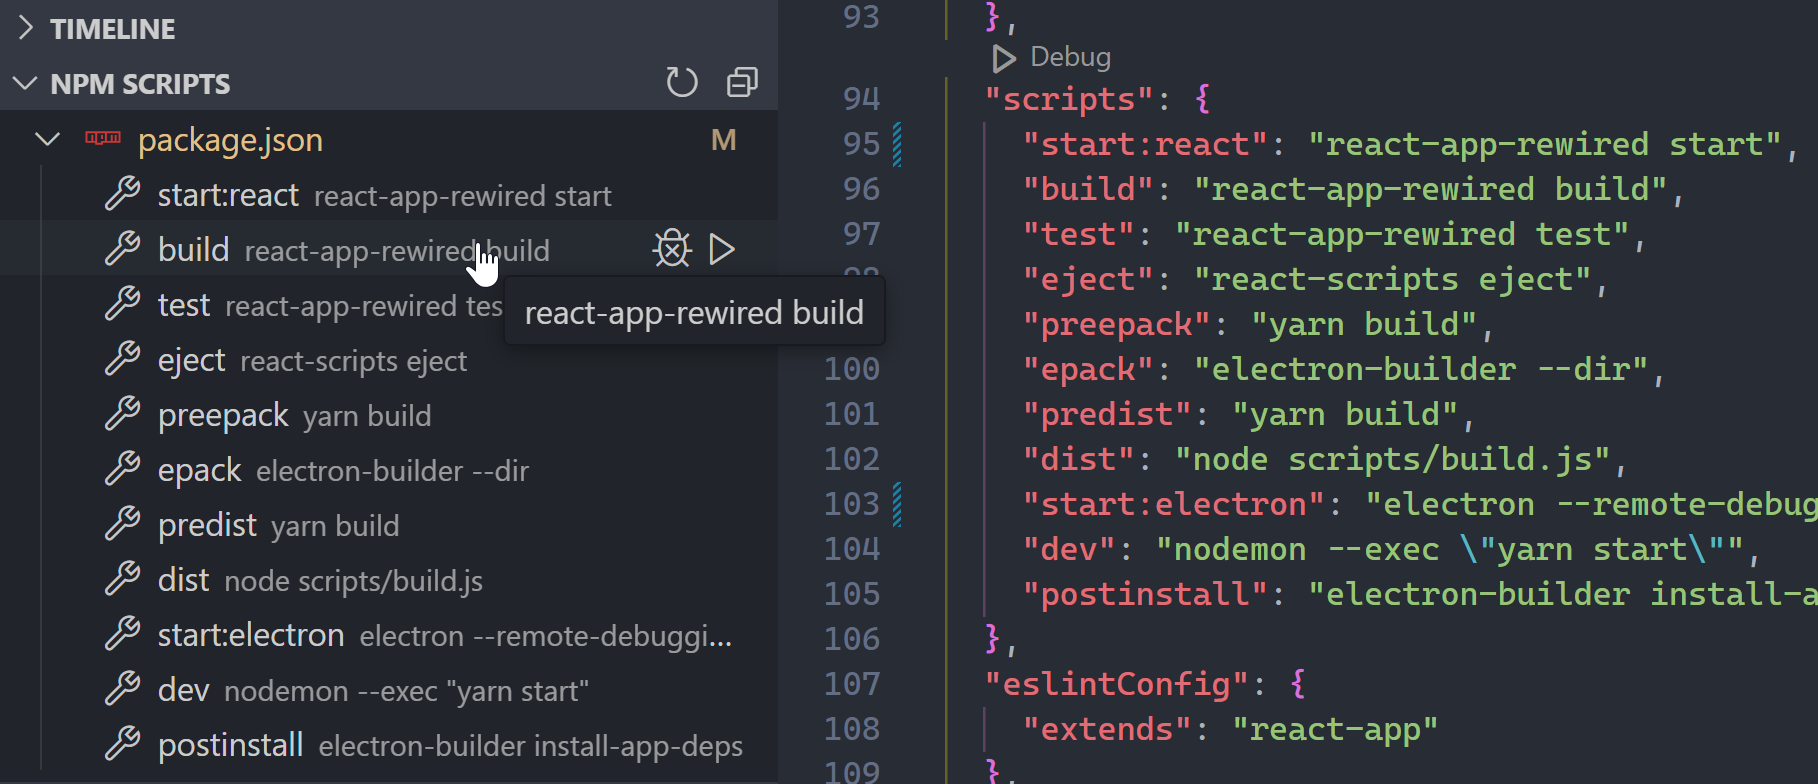
But feature already built-in
With the built-in NPM scripts view I can easily see all the scripts in my project’s package.json and run any I want:
Ugh, but now you have to drag your mouse all the way over there just to run a simple task.
So much better to go with the Tasks: Run Task command:
“Tari it’s still too slow!!”
Alright fine, if you know the exact script you want, then just Ctrl + ` to open the built-in terminal and feed your CLI desires:
Final thoughts
These extensions might have served a crucial purpose in the past, but not anymore for the most part, as much of the functionality they provide have been added as built-in VSCode features. Remove them to reduce the bloat and increase the efficiency of Visual Studio Code.
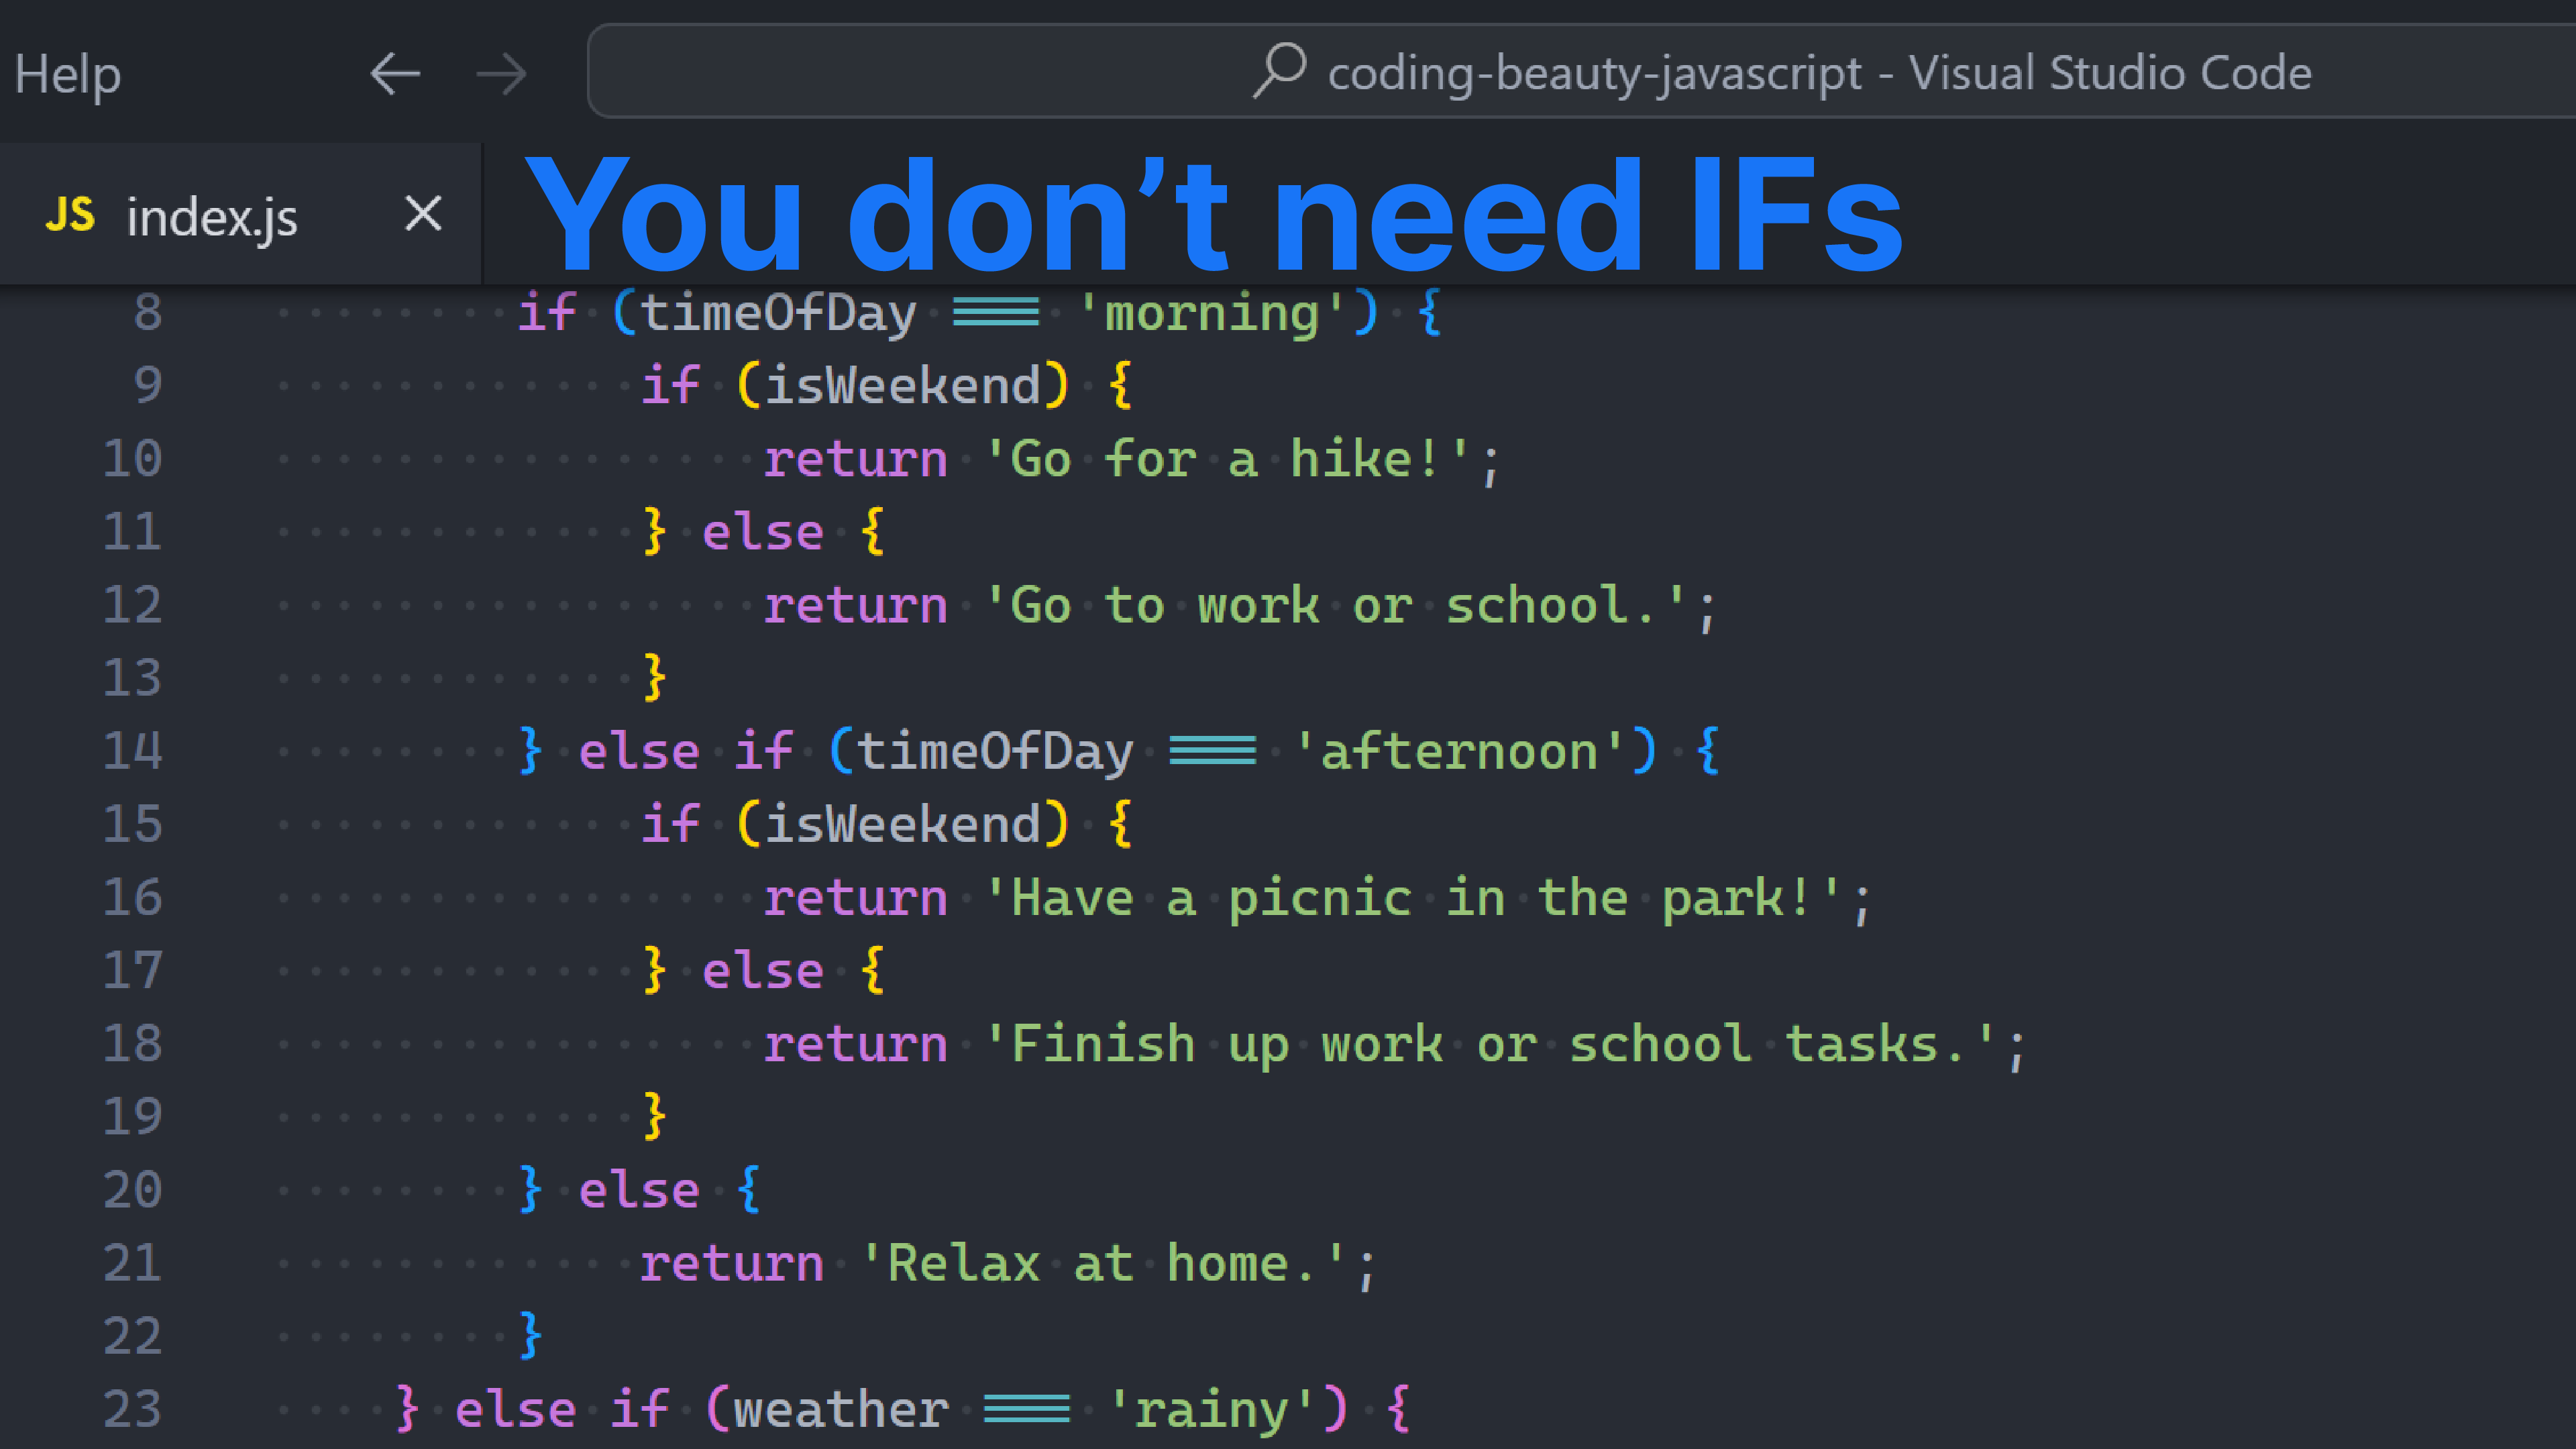
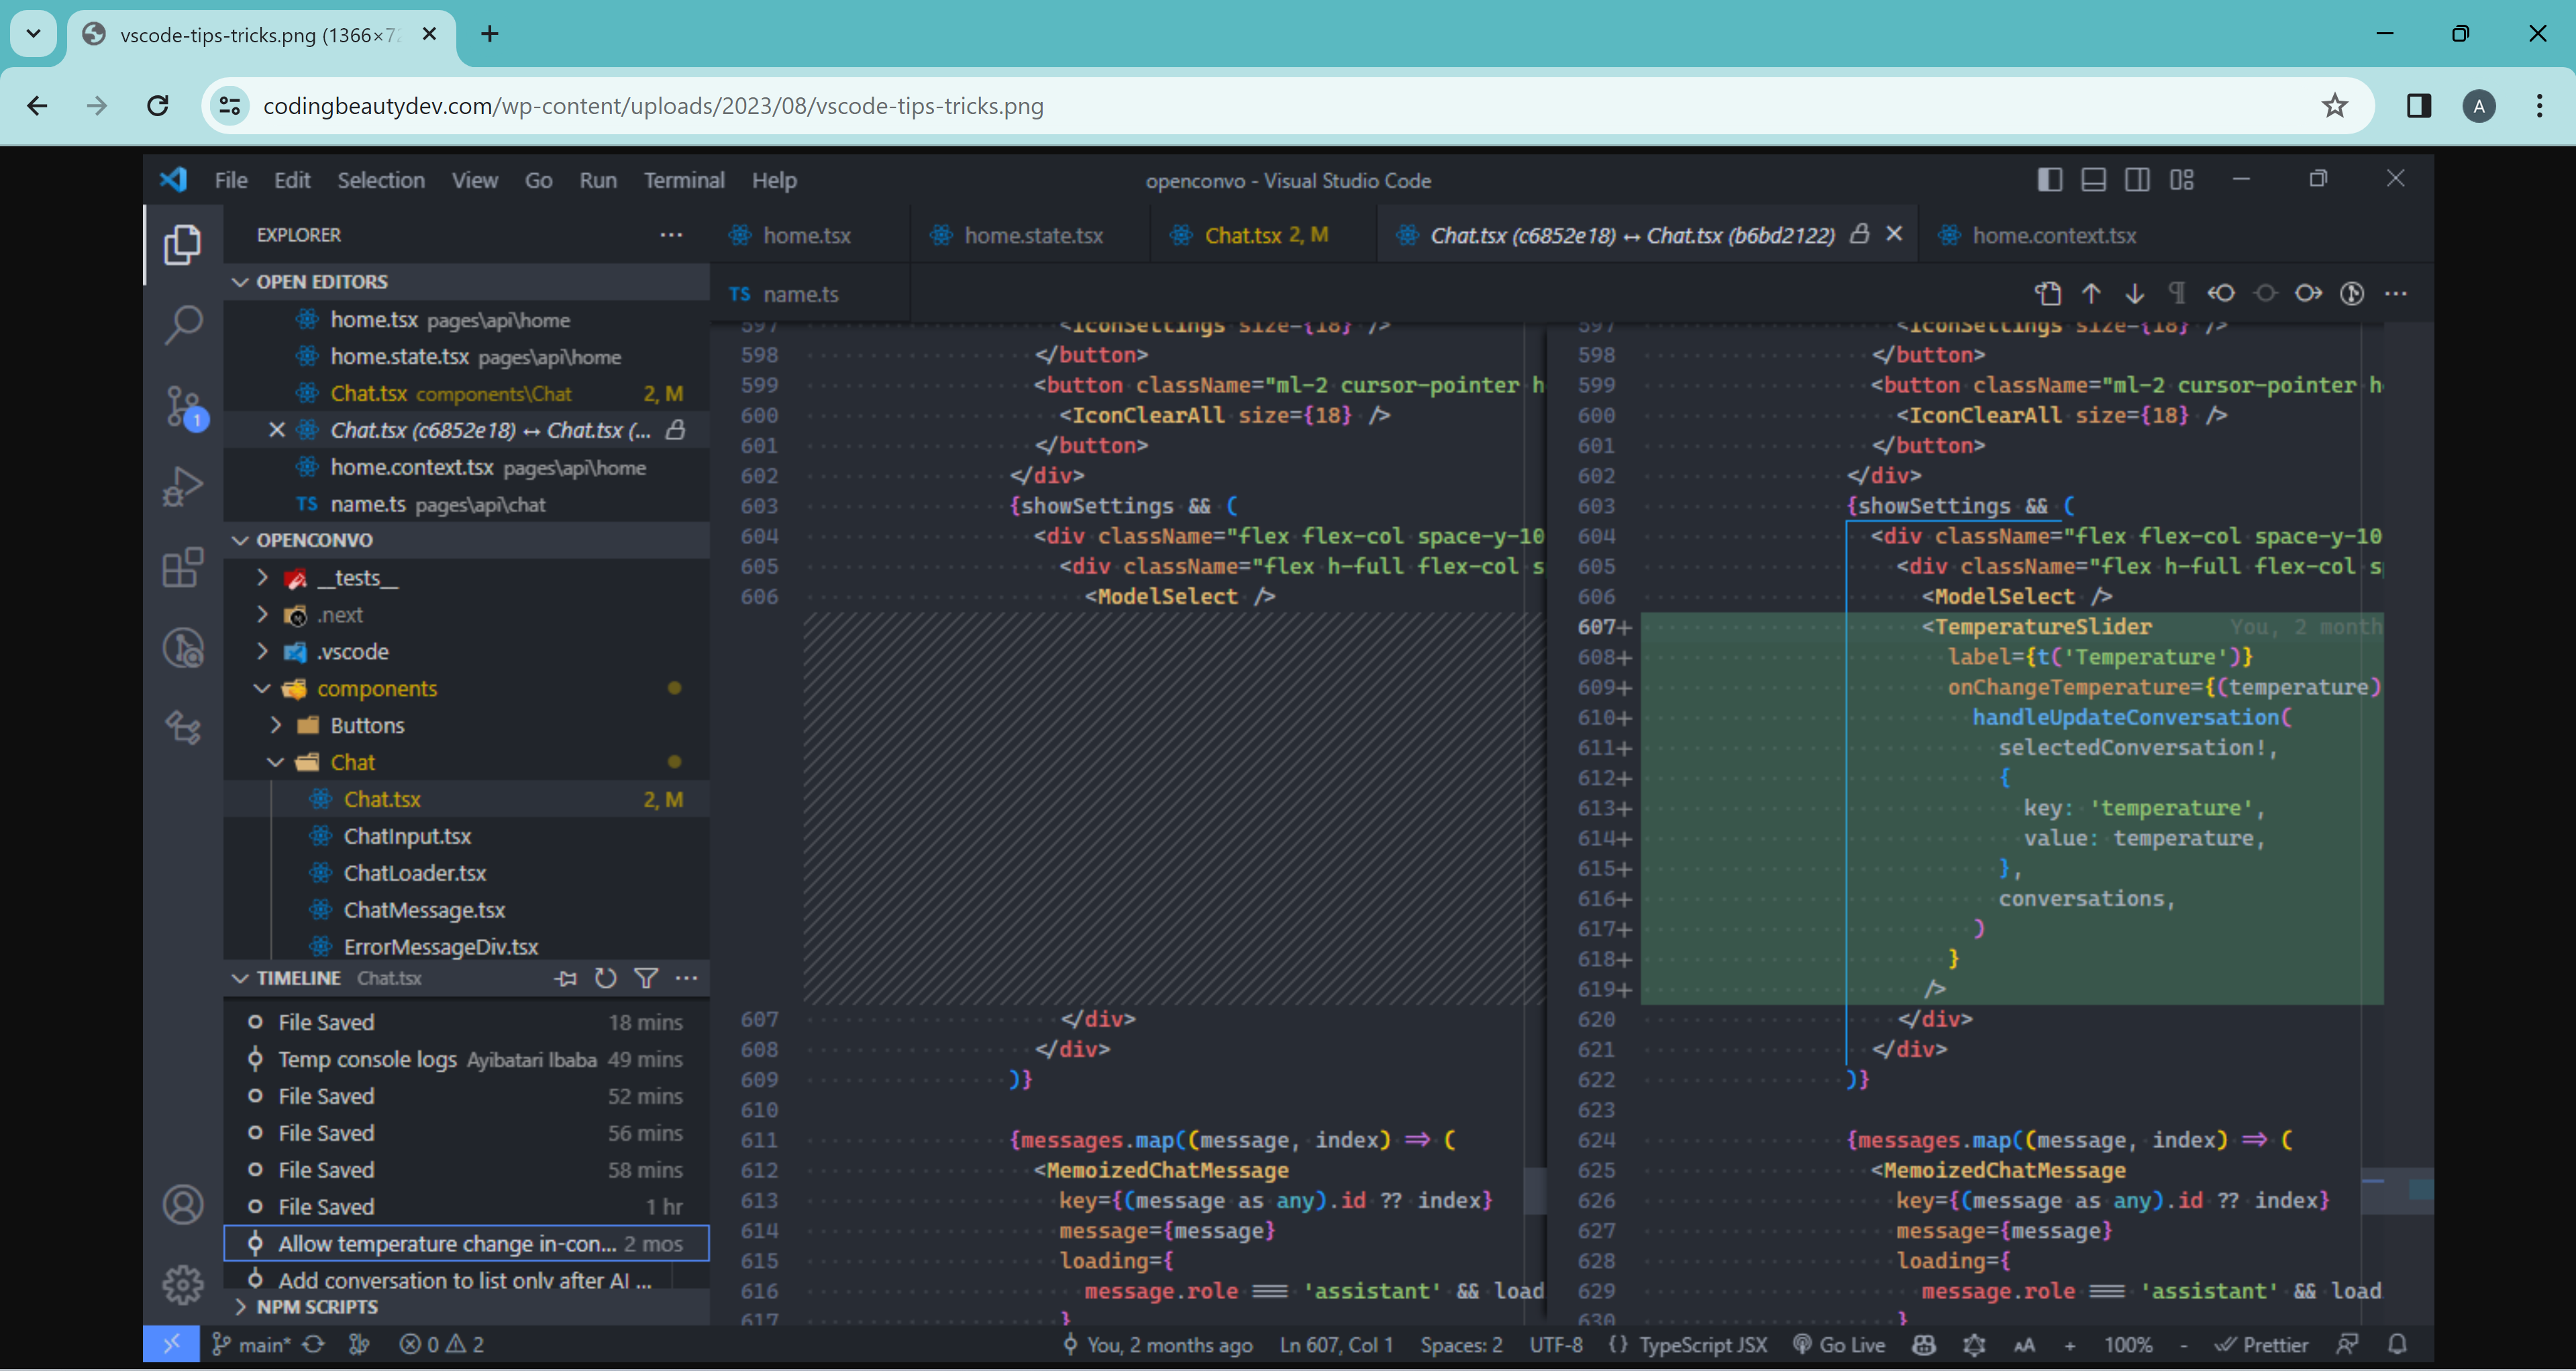
Sure they’re a nice and easy way to create control flow, but you can write many billions of lines of conditional JS code without a SINGLE if statement.
And there are many situations where a different construct shows what you wanna do way more clearly — something we can’t ignore as long we write code for humans. Not to mention lower verbosity and shorter code.
So: let’s look at some powerful if statement upgrades.
1. The AND (&&) operator
The && operator, unique to JavaScript.
We it I quickly go from this:
JavaScriptCopied!
function visitSite(user) {
  if (user.isLoggedIn) {
      console.log(`You are ${user.name}`);
  }

  console.log('Welcome to Coding Beauty.');
}
To this:
JavaScriptCopied!
function visitSite(user) {
  user.isLoggedIn && console.log(`You are ${user.name}`);
  console.log('Welcome to Coding Beauty.');
}
I’ve eradicated the nested and compacted the branching logic into a one-liner.
You want to use this when there’s an if but no matching else; especially when the if block has only one line.
Even if there are multiple lines you can abstract them into a separate function and apply && again. After all the console.log() in our example is an abstraction itself.
So this:
JavaScriptCopied!
function visitSite(user) {
  if (user.isLoggedIn) {
    console.log(`Welcome back, ${user.name}!`);
    console.log(
      `Your last login was on ${user.lastLoginDate}`
    );
    console.log(`Your account type is ${user.accountType}`);
  }

  console.log('Welcome to Coding Beauty.');
}
Transforms to this:
JavaScriptCopied!
function visitSite(user) {
  user.loggedIn && handleUser(user);

  console.log('Welcome to Coding Beauty.');
}

function handleUser(user) {
  console.log(`Welcome back, ${user.name}!`);
  console.log(
    `Your last login was on ${user.lastLoginDate}`
  );
  console.log(`Your account type is ${user.accountType}`);
}
2. Ternary operator
Ternary operators let us compact if-else statements into a one-liner.
They’re great if-else replacements when all conditional cases only involve assigning a value to the same variable.
Here’s an example:
JavaScriptCopied!
let word;
if (num === 7) {
  word = 'seven';
} else {
  word = 'unknown';
}
Even though the DRY principle isn’t a hard and fast rule, for this instance things will be much cleaner if we used ternaries to avoid writing the variable assignment twice:
JavaScriptCopied!
const word = num === 7 ? 'seven' : 'unknown';
Now we can even use const to keep things immutable and pure.
Nested ternaries
And when we have 3 or more branches in the if-else statement or we nest ifs, the cleaner ternary replacement will contain inner ternaries.
const getNumWord = (num) =>
  num === 1
    ? 'one'
    : num === 2
    ? 'two'
    : num === 3
    ? 'three'
    : num === 4
    ? 'four'
    : 'unkwown';
Some people do cry about nested ternaries though, arguing that they’re complicated and cryptic. But I think that’s more of a personal preference, or maybe poor formatting.
And it’s formatting, we have tools like Prettier that have been doing this job (and only this job) for centuries.
Ever had code this badly formatted?
As long as there’s sufficient indentation you should have no problems with readability. If the branching gets much more complex than above you probably want to move some of the lower-level logic into preceding variables or tiny functions.
The current style uses a clever combination of flat and tree-like nesting; adding further indentation for nested ternaries in the truthy branch, but keeping things flat for those in the in the falsy branch.
JavaScriptCopied!
const animalName = pet.canSqueak()
  ? 'mouse'
  : pet.canBark()
  ? pet.isScary()
    ? 'wolf' // Only nests this because it's in the truthy section
    : 'dog'
  : pet.canMeow()
  ? 'cat'
  : pet.canSqueak() // Flat because it's in the falsy section
  ? 'mouse'
  : 'probably a bunny';
But very soon Prettier will format the above like this:
The main change is the ?‘s are all now at the ending of the same line of its ending, instead of the next one.
3. Switch statement
You will find this in C-style languages like Java, C#, and Dart — and it looks exactly the same in those languages with a few semantic differences.
If ternaries are best for generating output for one variable, then switch statements are best for processing input *from* one variable:
JavaScriptCopied!
function processUserAction(action) {
  switch (action) {
    case 'play': // if (action === 'play')
      console.log('Playing the game...');
      startGame({ mode: 'multiplayer' });
      break;
    case 'pause': // else if (action === 'pause')
      console.log('Pausing the game...');
      pauseGame();
      break;
    case 'stop':
      console.log('Stopping the game...');
      endGame();
      goToMainMenu();
      break;
    case 'cheat':
      console.log('Activating cheat mode...');
      enableCheatMode();
      break;
    default: // else
      console.log('Invalid action!');
      break;
  }
}
The unique power of switch statements comes from being able to omit the break at the end of each case and let execution “fallthrough” to the next case:
JavaScriptCopied!
// Generate a random number between 1 and 6 to simulate rolling a dice
const diceRoll = Math.floor(Math.random() * 6) + 1;

console.log(`You rolled a ${diceRoll}!`);

switch (diceRoll) {
  case 1:
    console.log('Oops, you rolled a one!');
    console.log('You lose a turn.');
    break;
  case 2:
    console.log(
      'Two heads are better than one... sometimes'
    );
  case 4:
  case 6:
    // else if (diceRoll === 2 || diceRoll === 4 || diceRoll === 6)
    console.log('Nice roll!');
    console.log('You move forward two spaces.');
    break;
  // ...
  default:
    console.log('Invalid dice roll.');
}
Most other languages with switch-case allow this, with the notable exception of C#.
4. Key-value object
Key-value objects let us declaratively map inputs to outputs.
JavaScriptCopied!
const weatherActivities = {
  sunny: 'go to the beach',
  rainy: 'watch a movie at home',
  cloudy: 'take a walk in the park',
  snowy: 'build a snowman',
};

const weather = 'sunny';

console.log(`Okay, so right now it's ${weather}.`);
console.log(`Why don't you ${weatherActivities[weather]}?`);
I found this invaluable when creating screens in React Native apps – each with its own loading, error and success states. Here’s a snippet of a screen in one of our apps:
So if statements aren’t bad at all and are great for writing conditional logic in an easily understandable way. But it’s important to consider alternative approaches to make code shorter, clearer and even more expressive. It’s not about eliminating if statements entirely, but rather adopting effective techniques that make our code more efficient and elegant.
Can you break out of a “forEach” loop in JavaScript?
It’s an amazing question to challenge just how well you really know JavaScript.
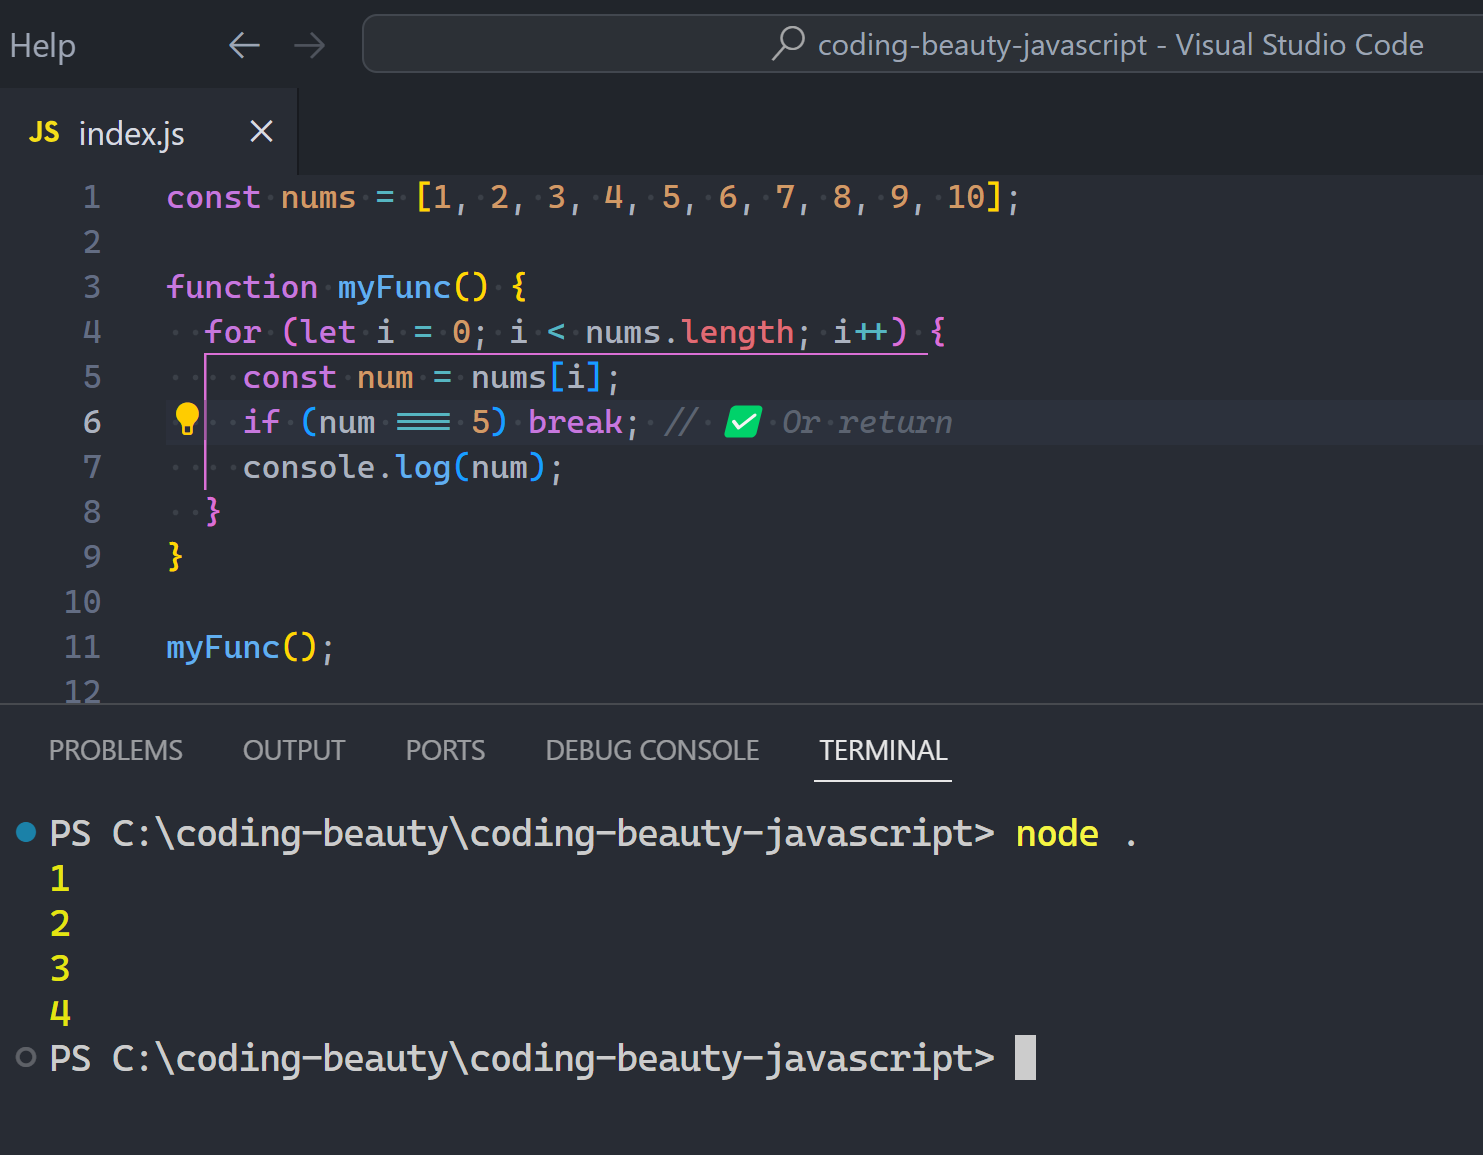
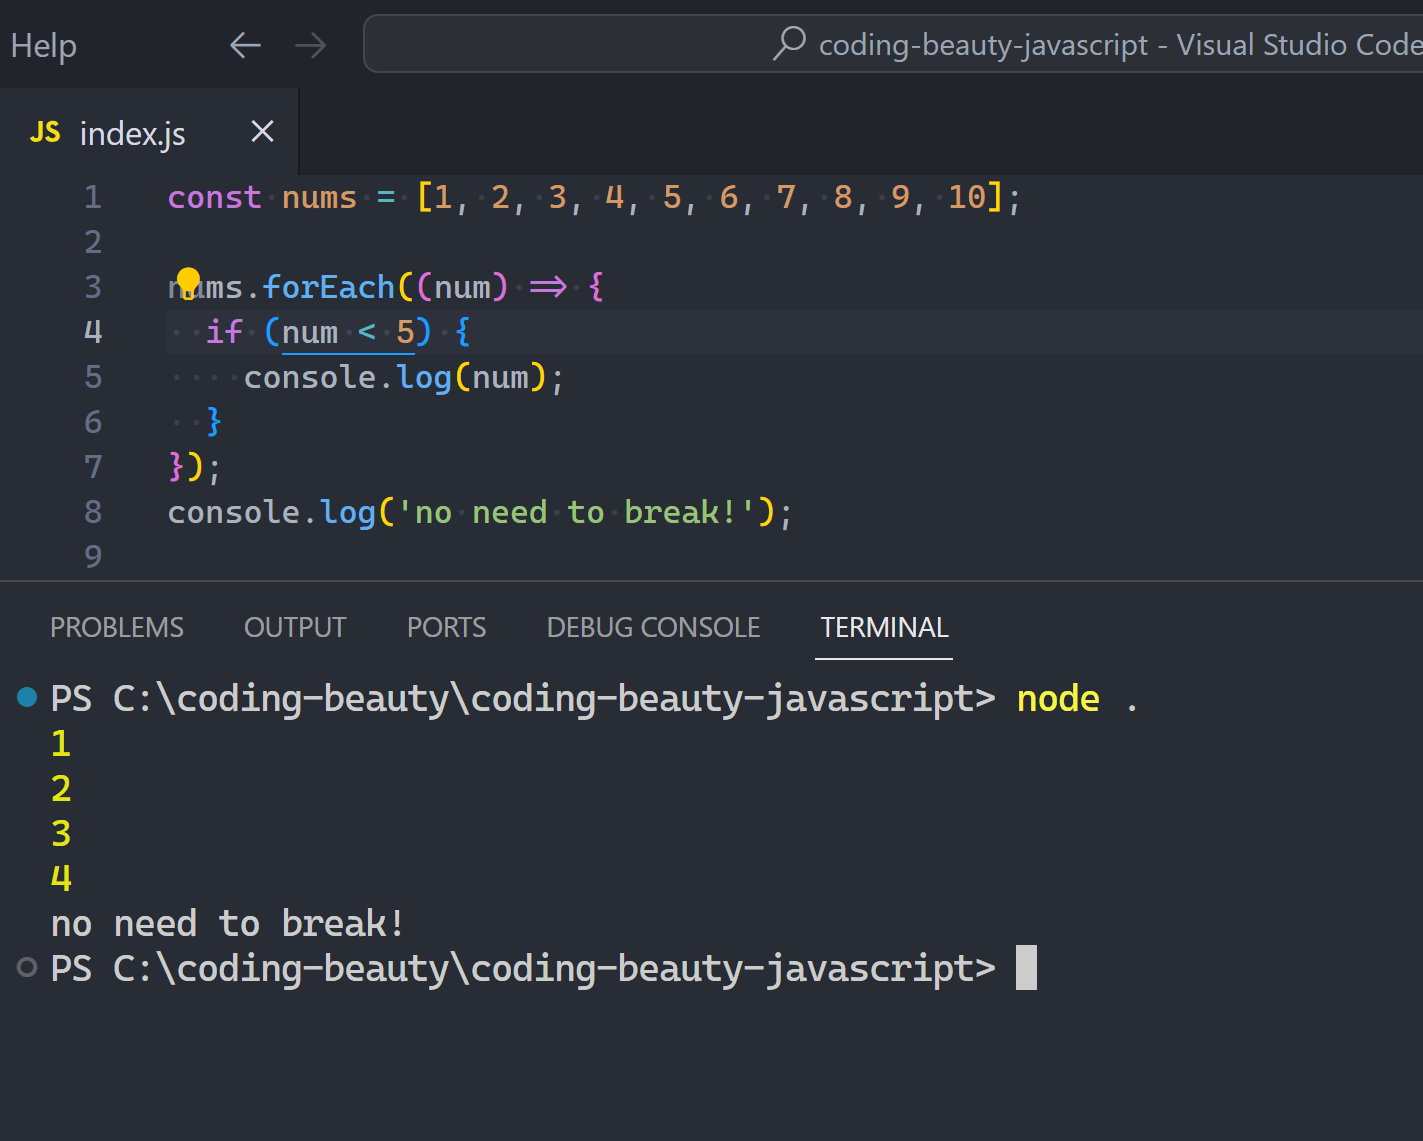
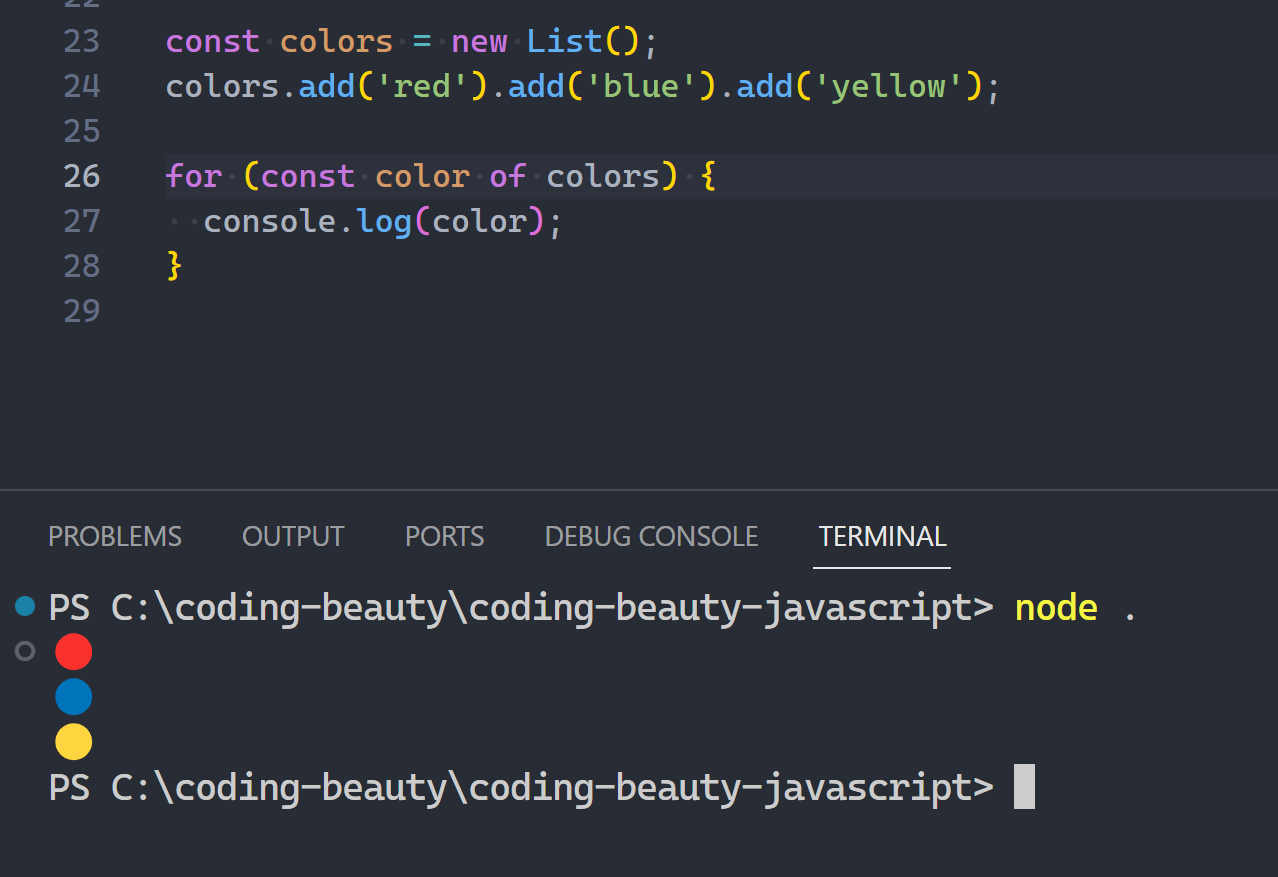
Because we’re not talking for loops — or this would have been ridiculously easy: you just break:
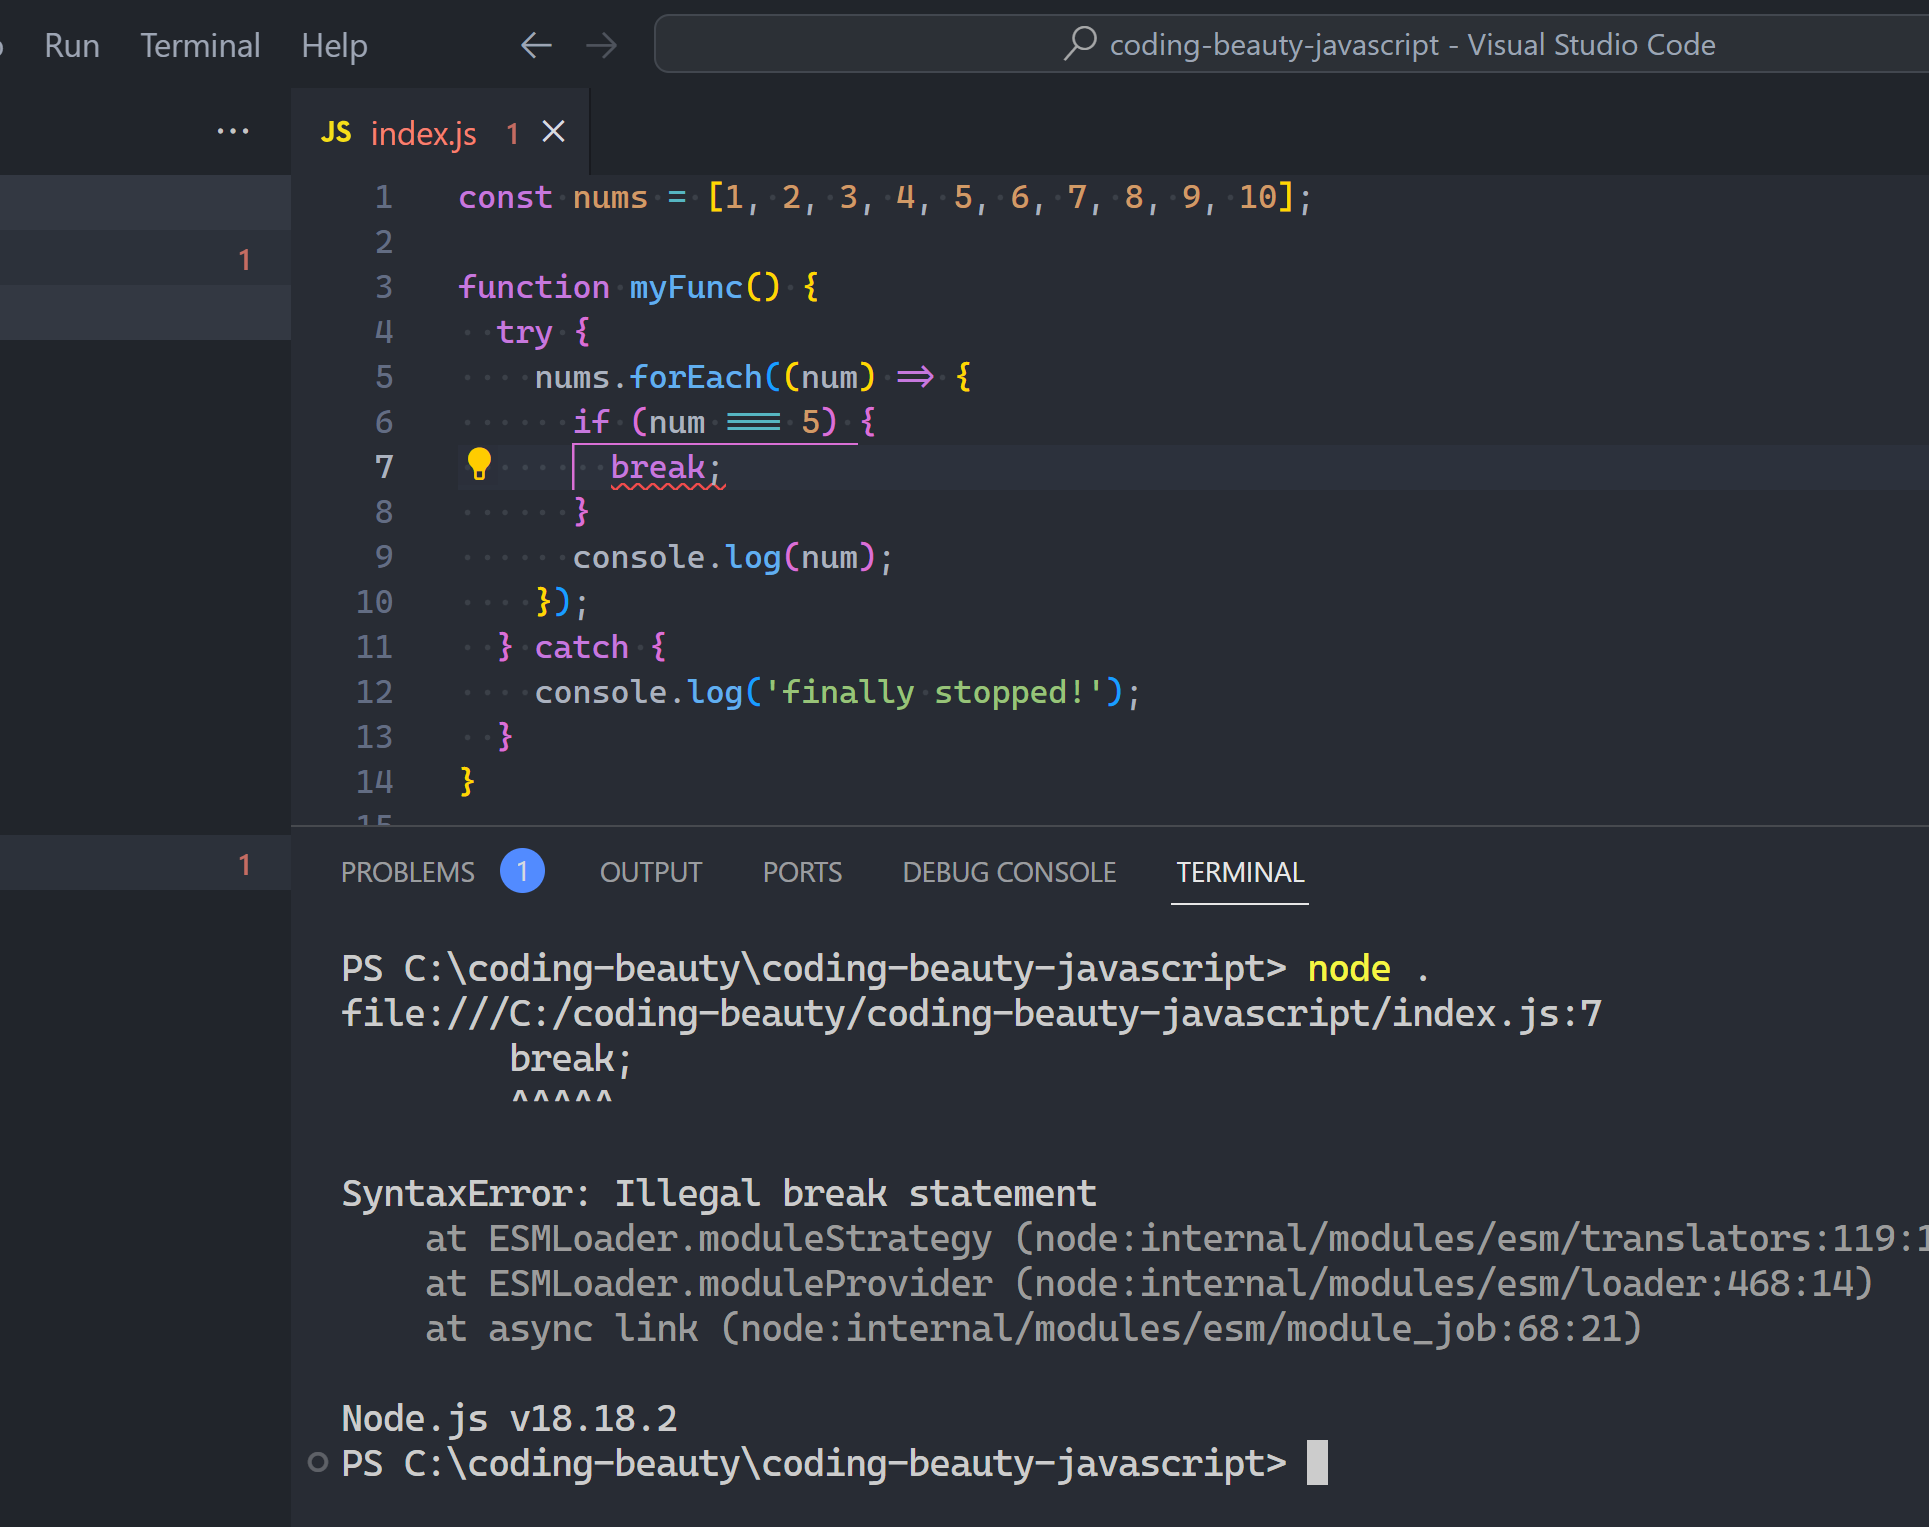
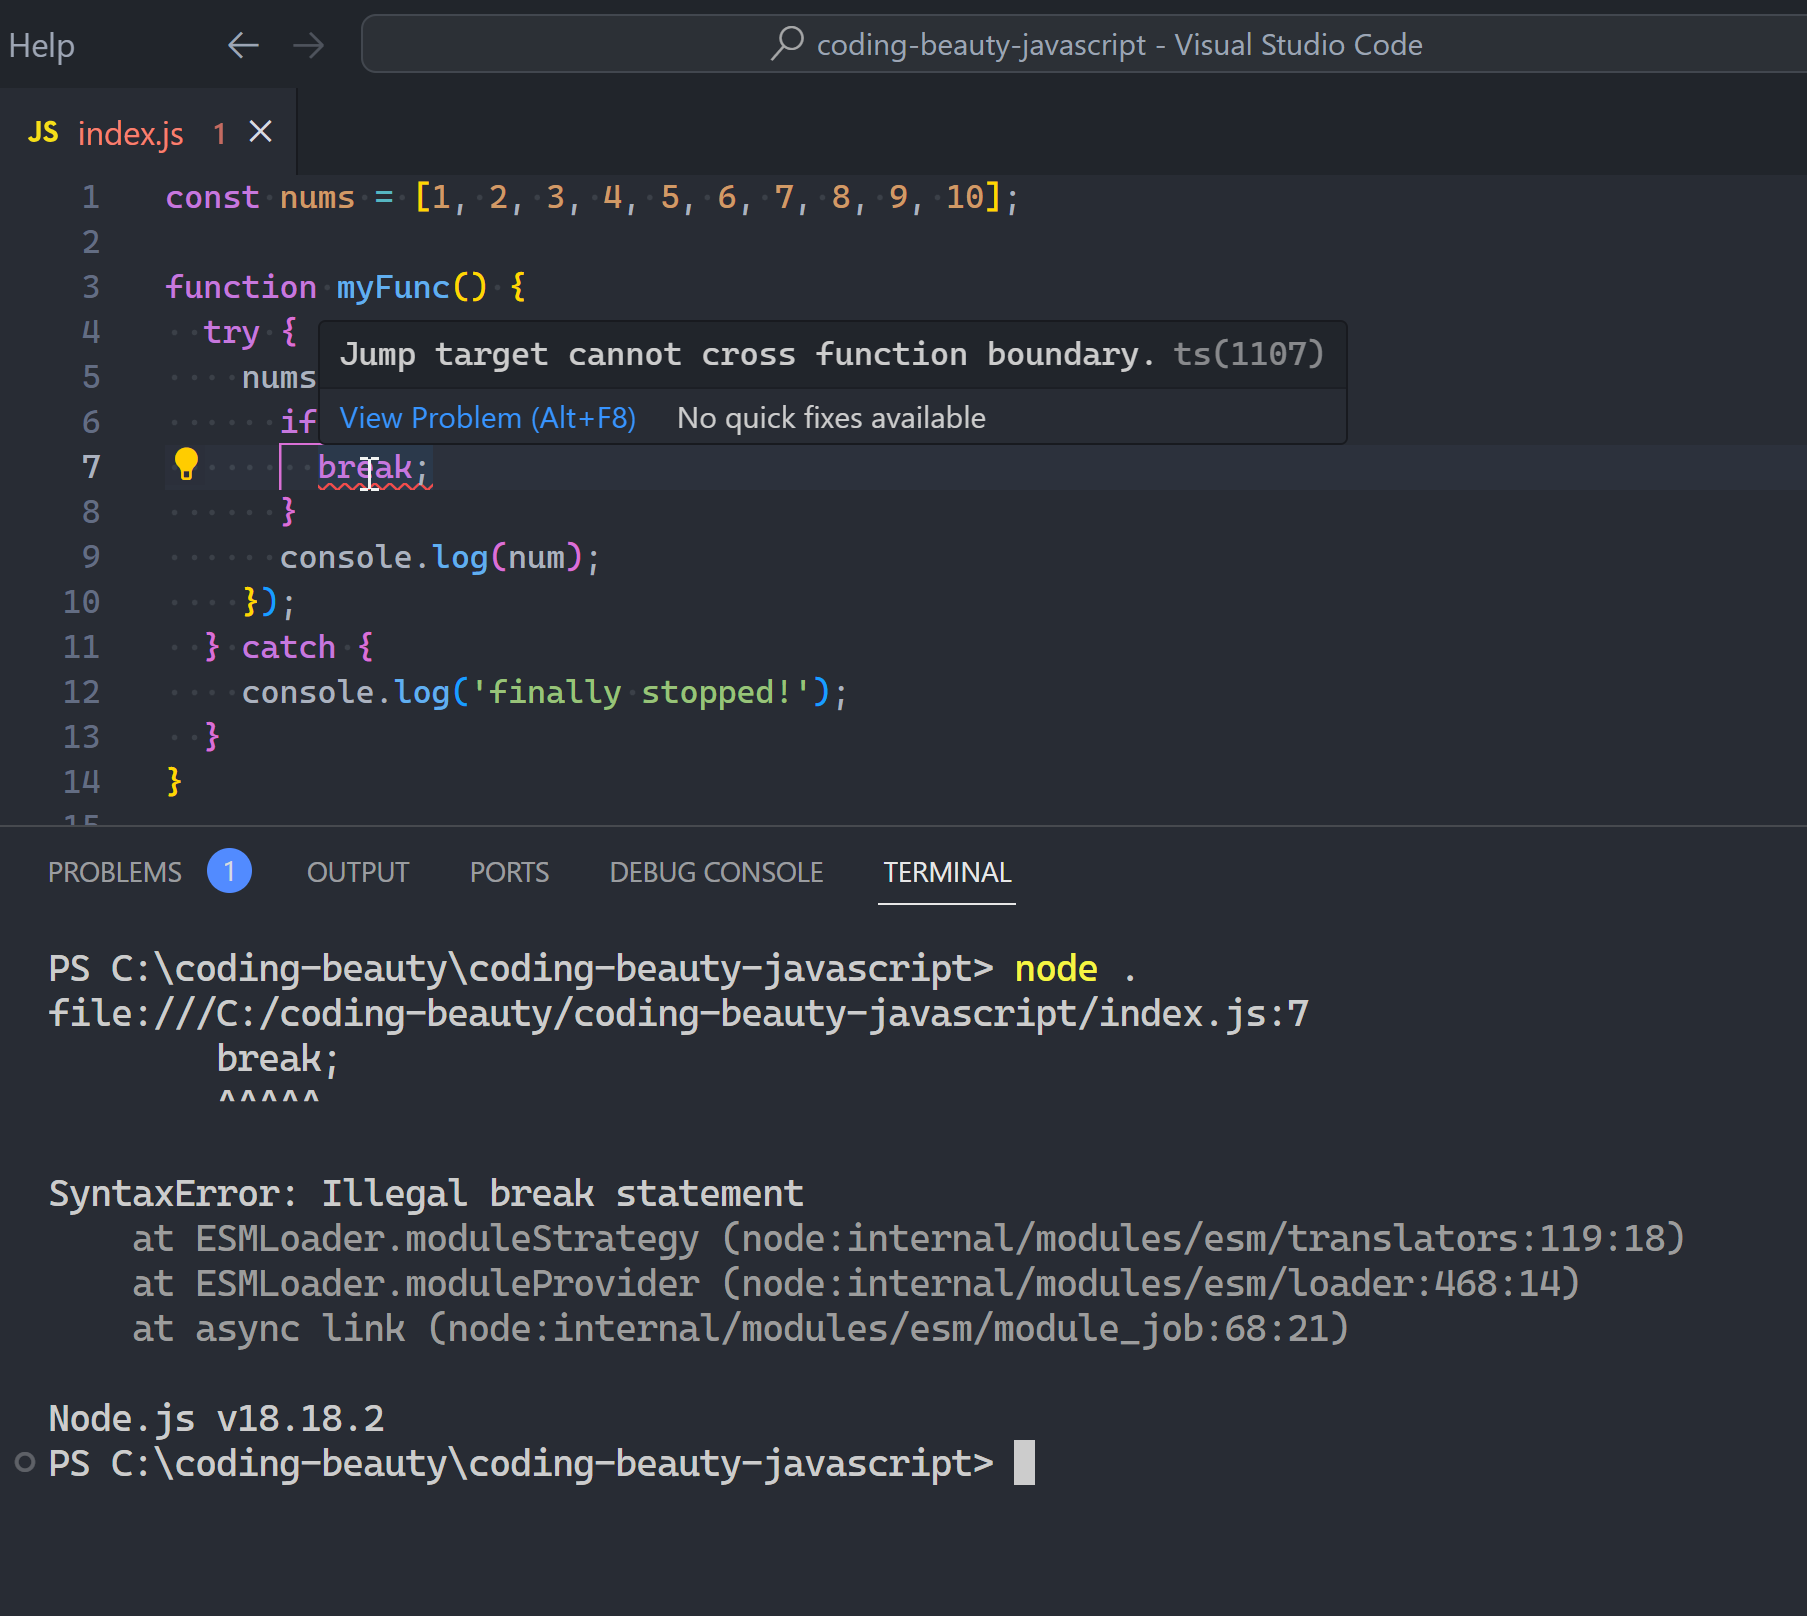
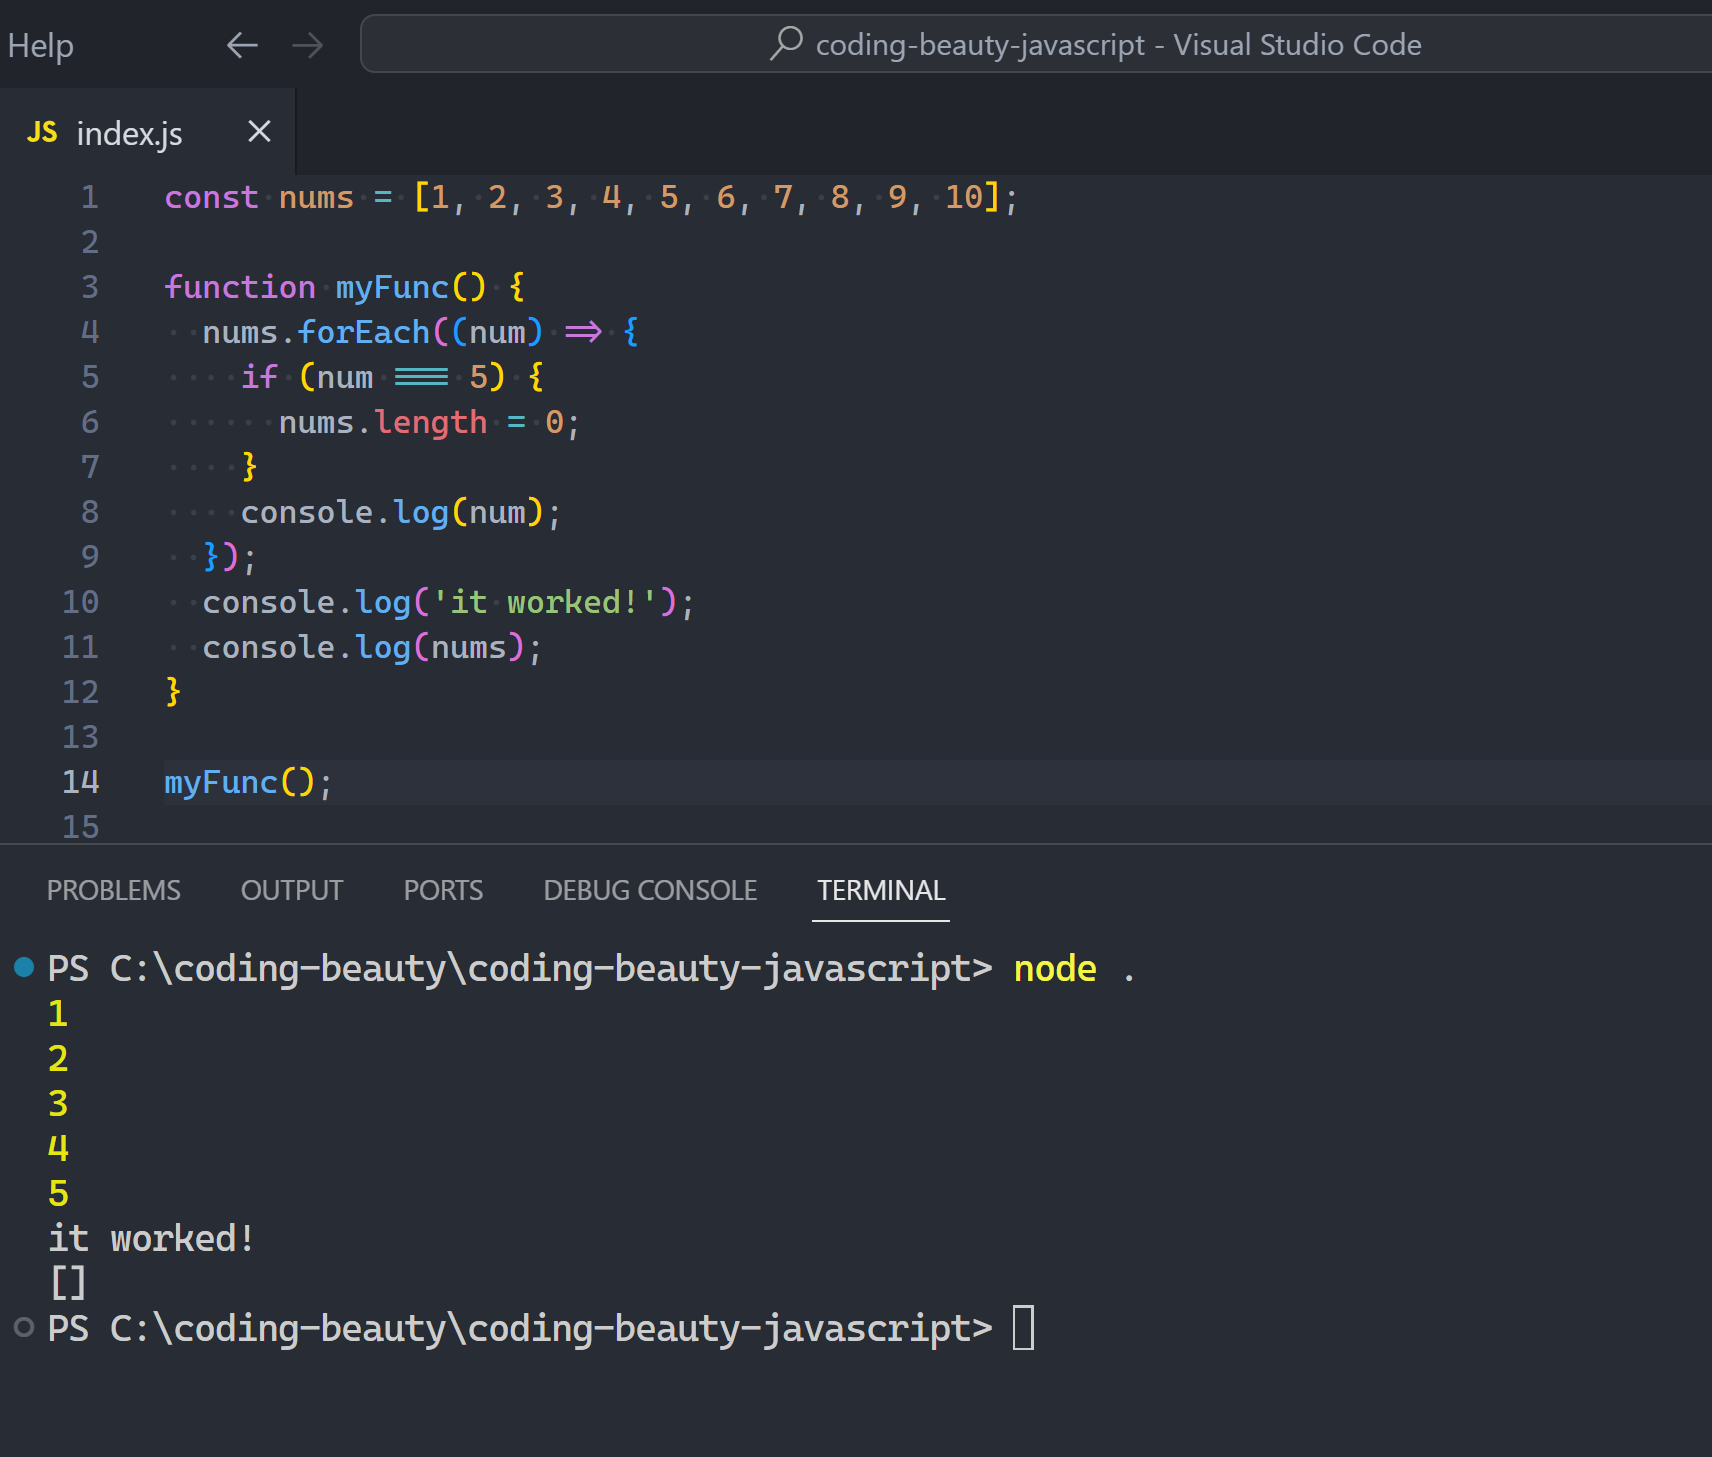
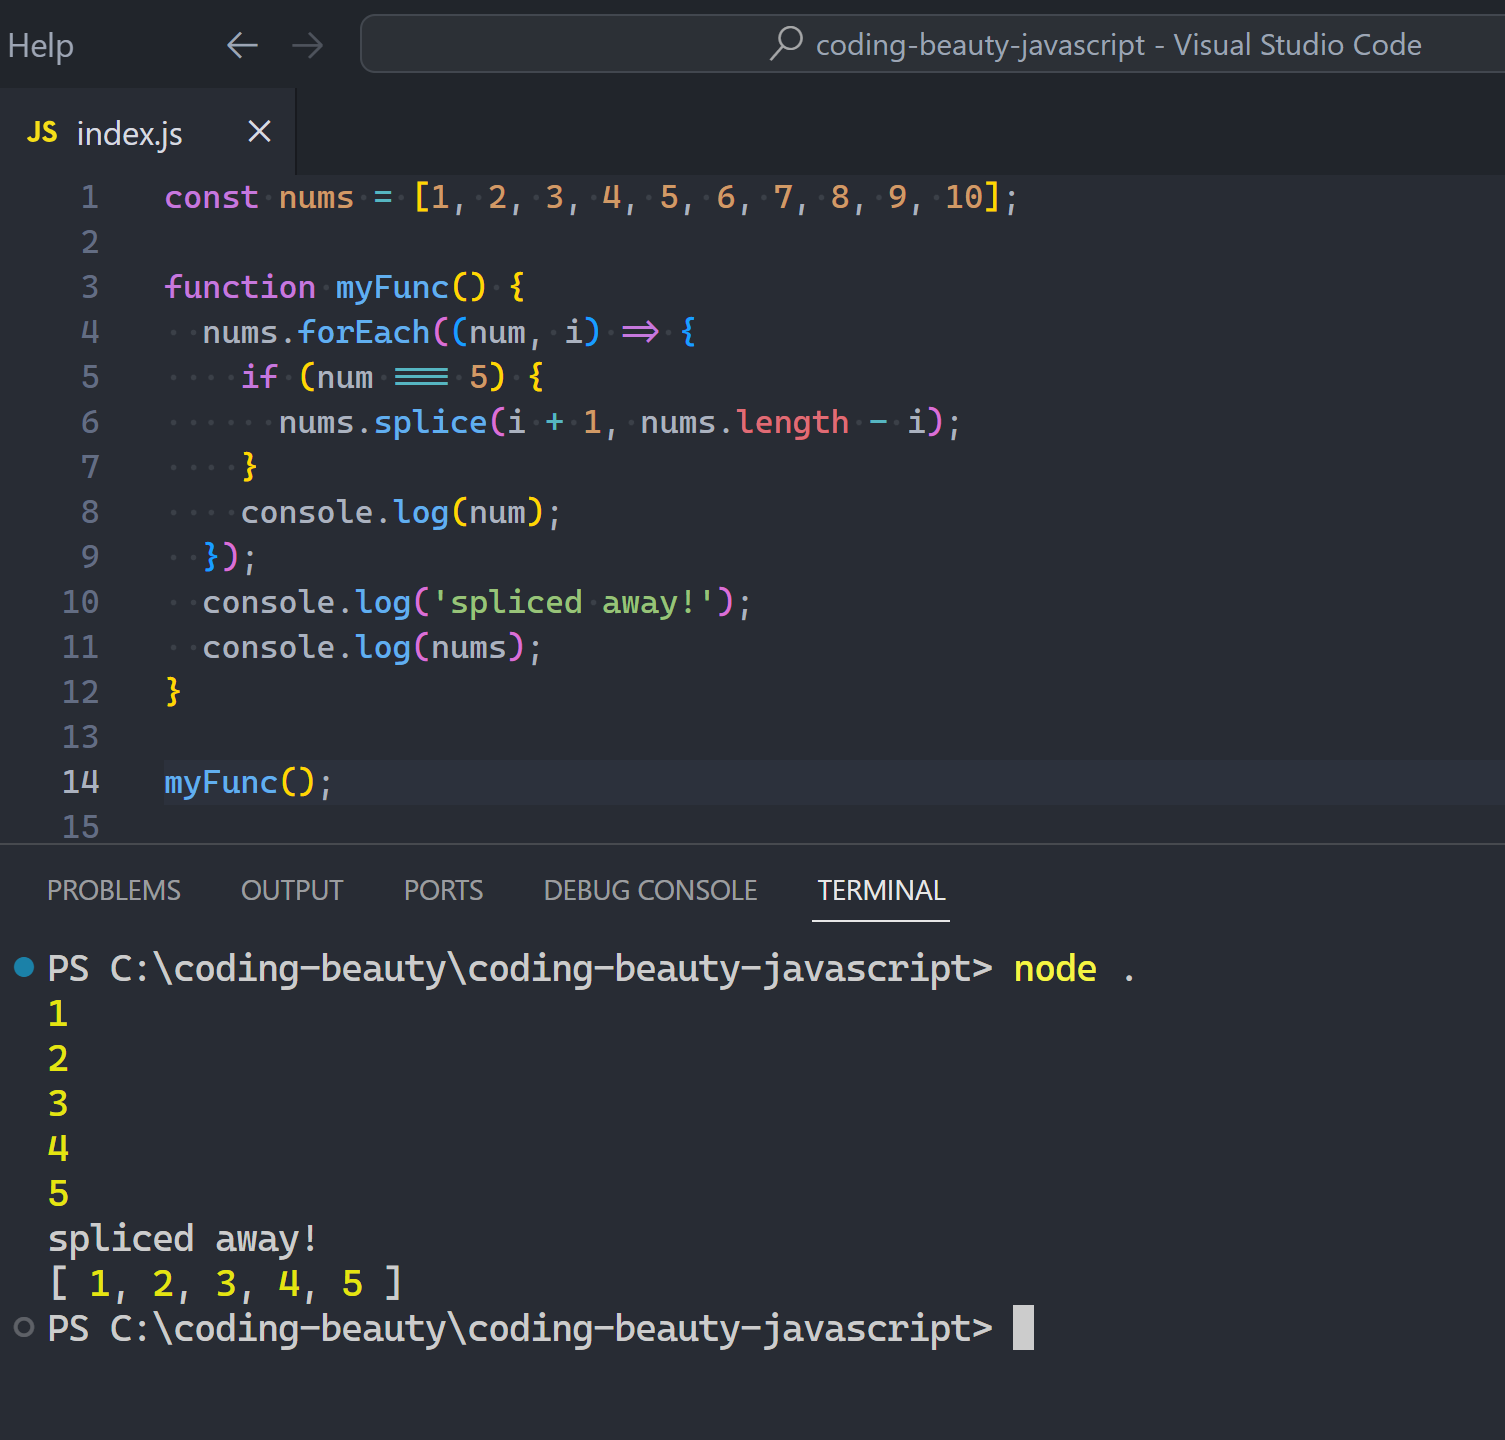
But you wouldn’t dare do this with forEach, or disaster happens:
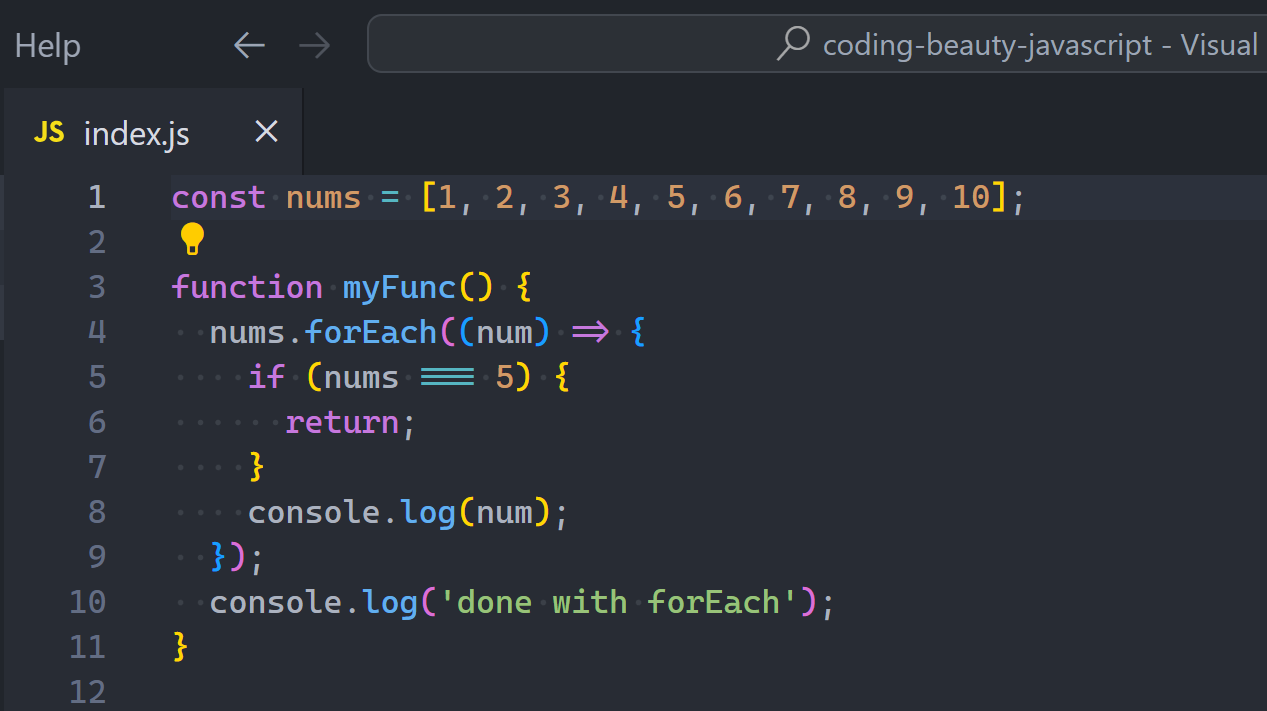
What about return… mhmm.
What do you think is going to happen here:
return should easily end the loop at 5 and take us to the outer log right?
Wrong:
Remember: forEach takes a callback and calls it FOR EACH item in the array.
JavaScriptCopied!
// Something like this:
Array.prototype.forEach = function (callback, thisCtx) {
  const length = this.length;
  let i = 0;

  while (i < length) {
    // 👇 callback run once and only once
    callback.call(thisCtx, this[i], i, this);
    i++;
  }
};
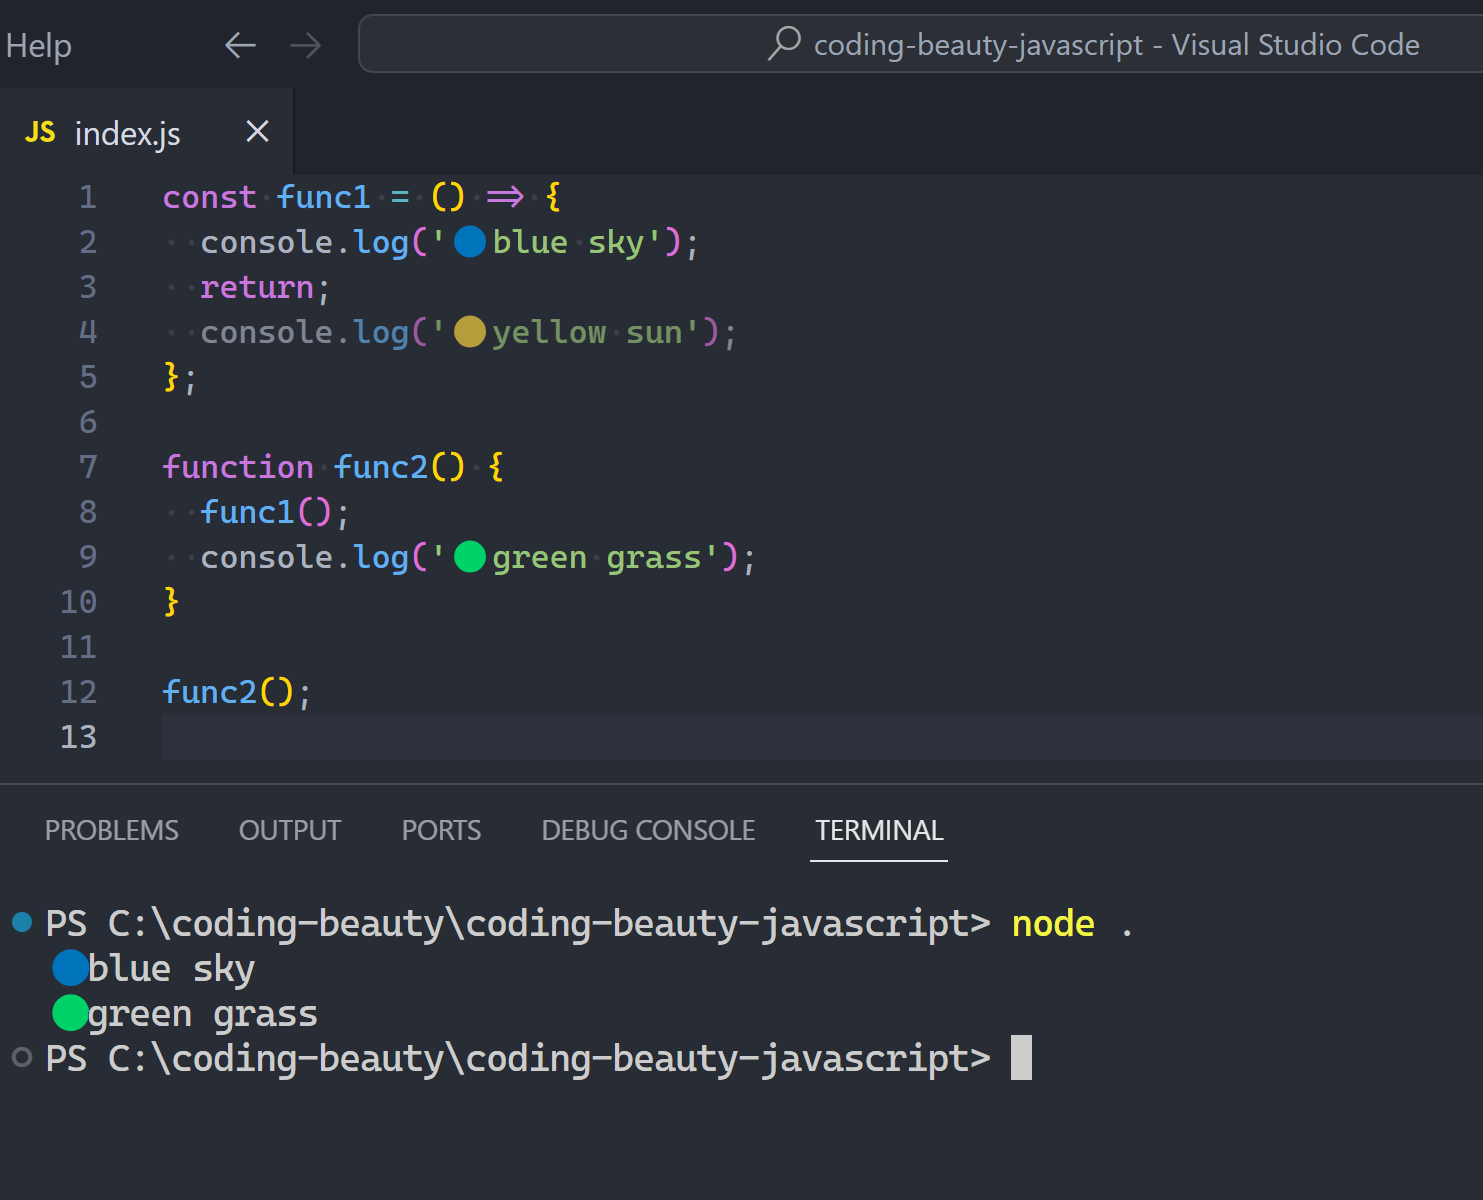
So return only ends the current callback call and iteration; doing absolutely nothing to stop the overall loop.
It’s like here; trying to end func2() from func1() — obviously not going to work:
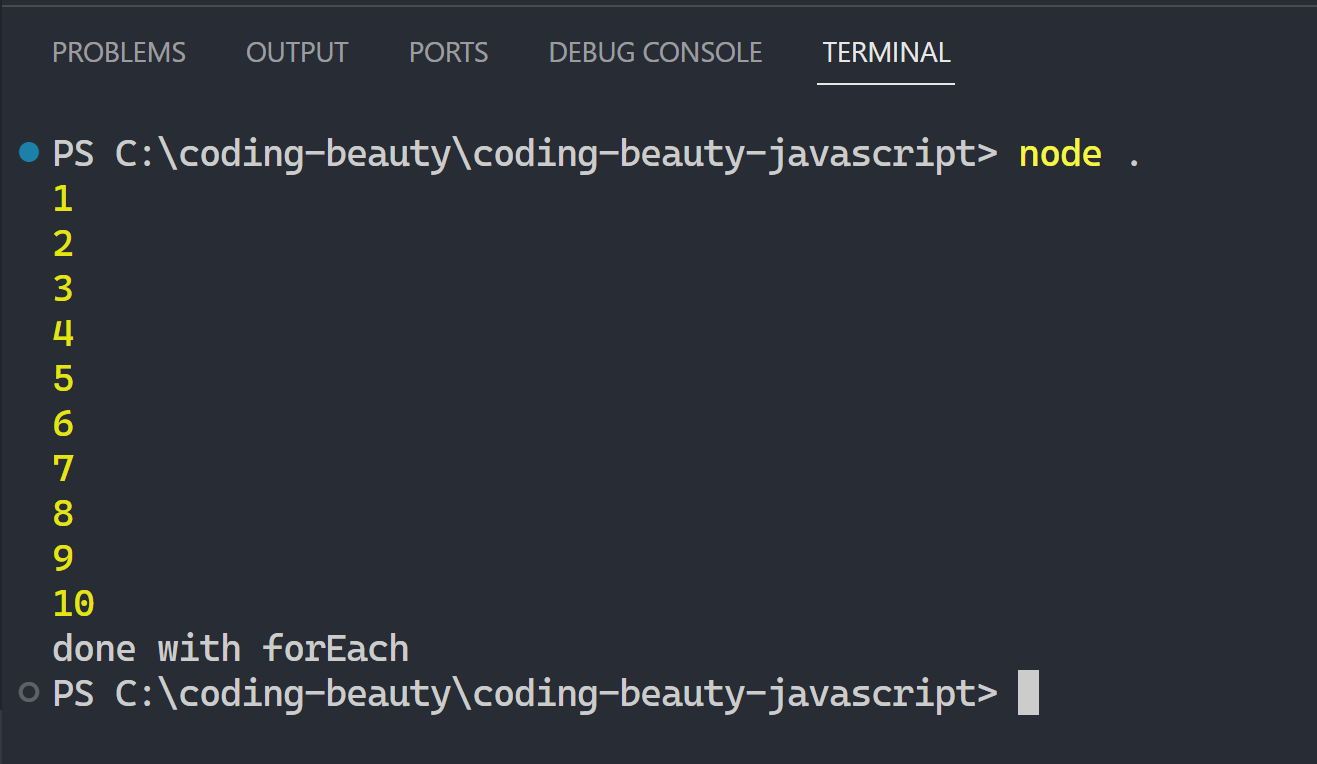
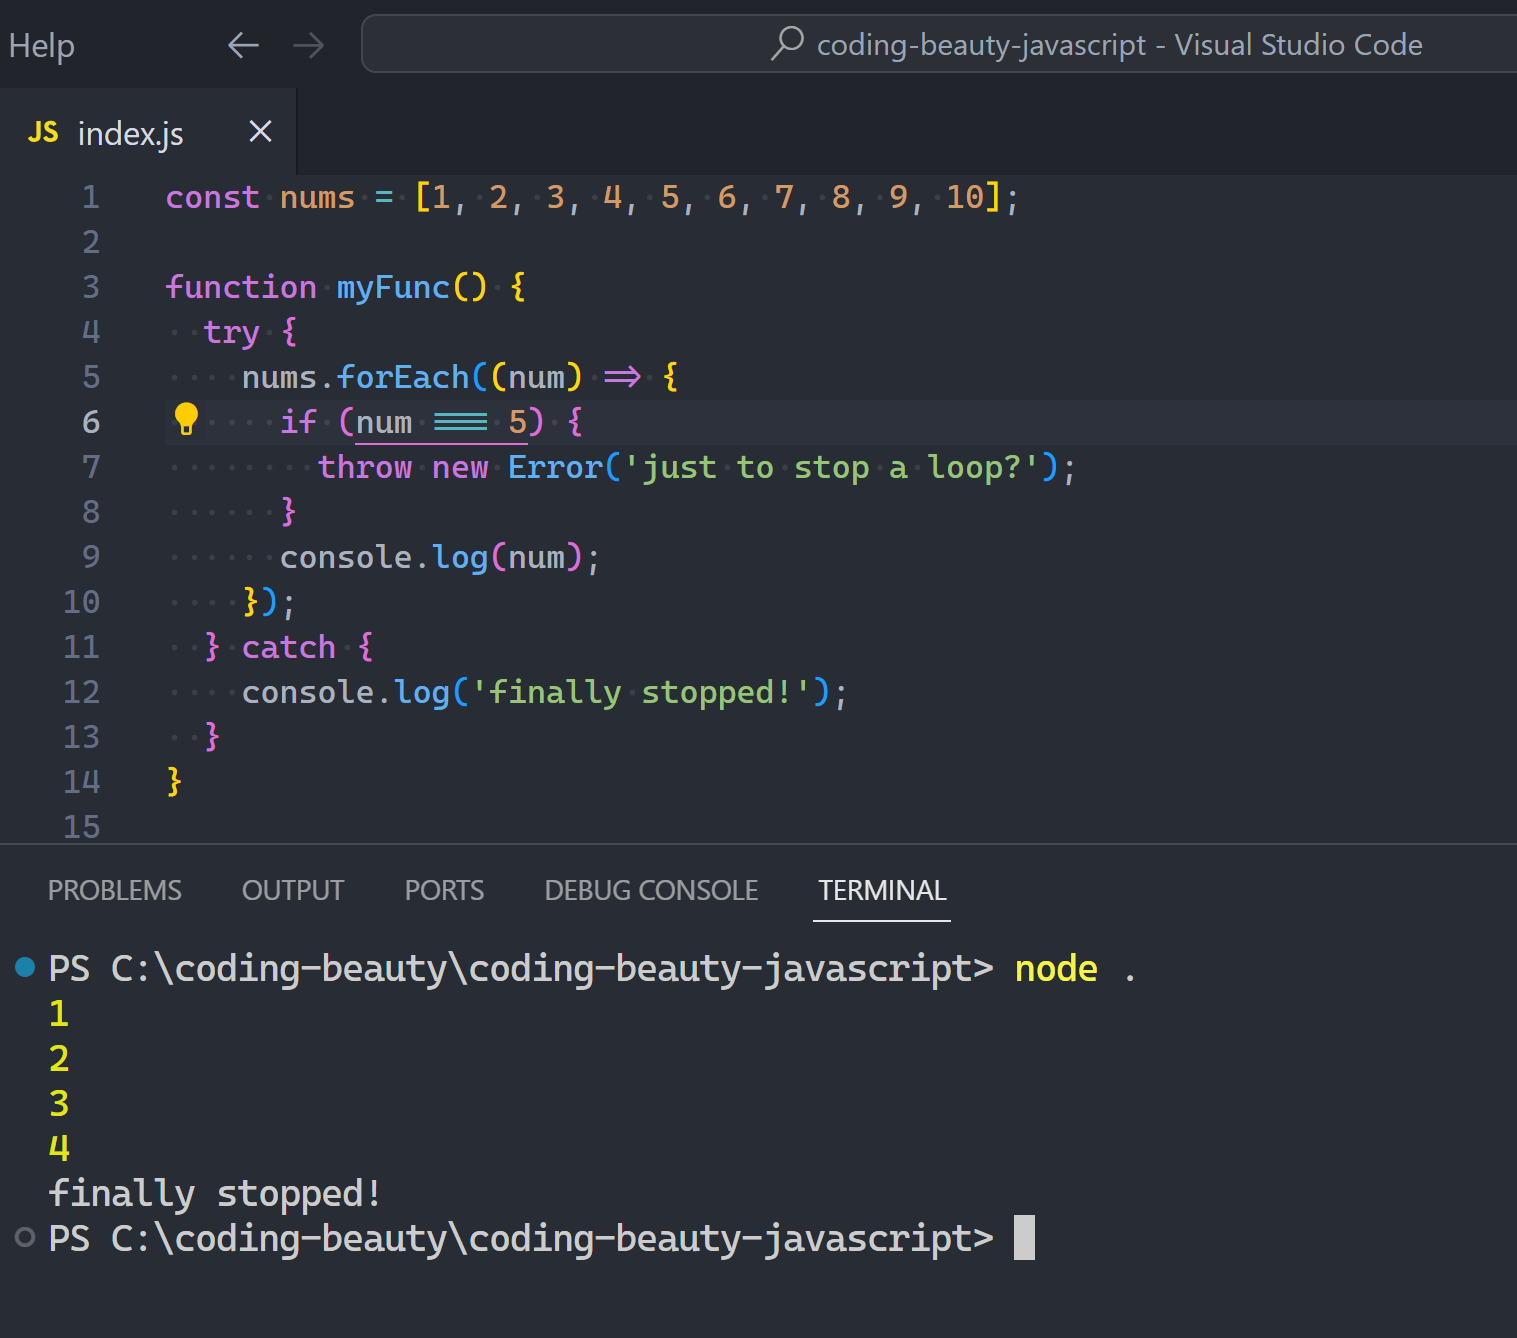
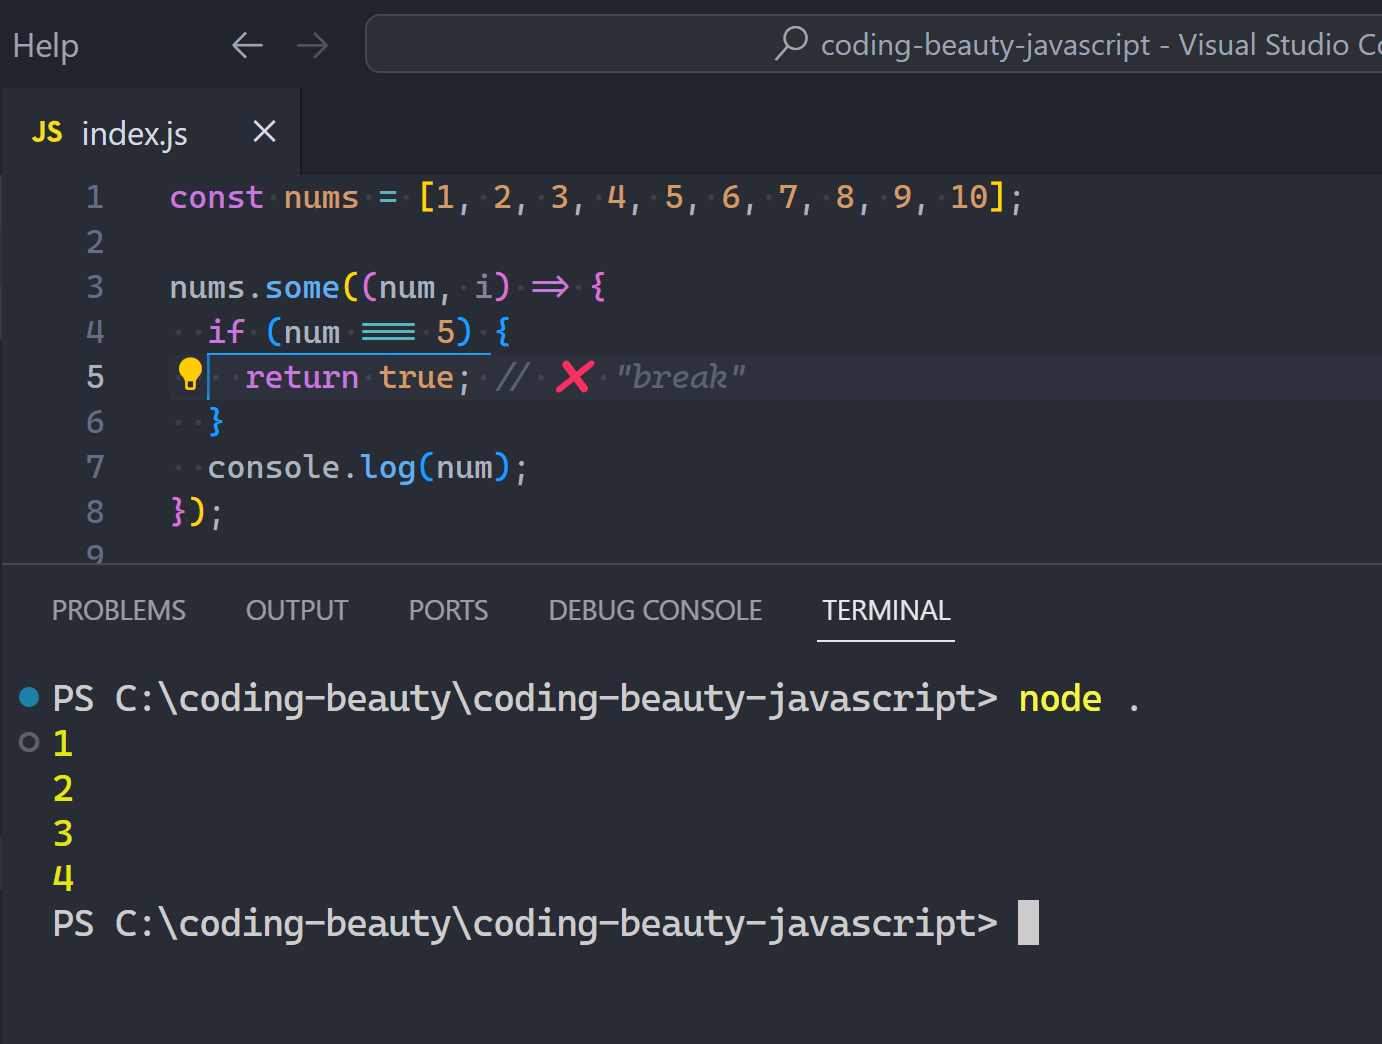
5 terrible ways to stop a forEach loop
1. Throw an exception
You can stop any forEach loop by throwing an exception:
JavaScriptCopied!
const nums = [1, 2, 3, 4, 5, 6, 7, 8, 9, 10];

try {
  nums.forEach((num) => {
    if (num === 5) {
      throw new Error('just to stop a loop?');
    }
    console.log(num);
  });
} catch {
  console.log('finally stopped!');
}
Of course we’re just having fun here — this would be horrible to see in real-world code. We only create exceptions for problems, not planned code like this.
What if we don’t want to completely override it, but instead extend it in an intuitive way?
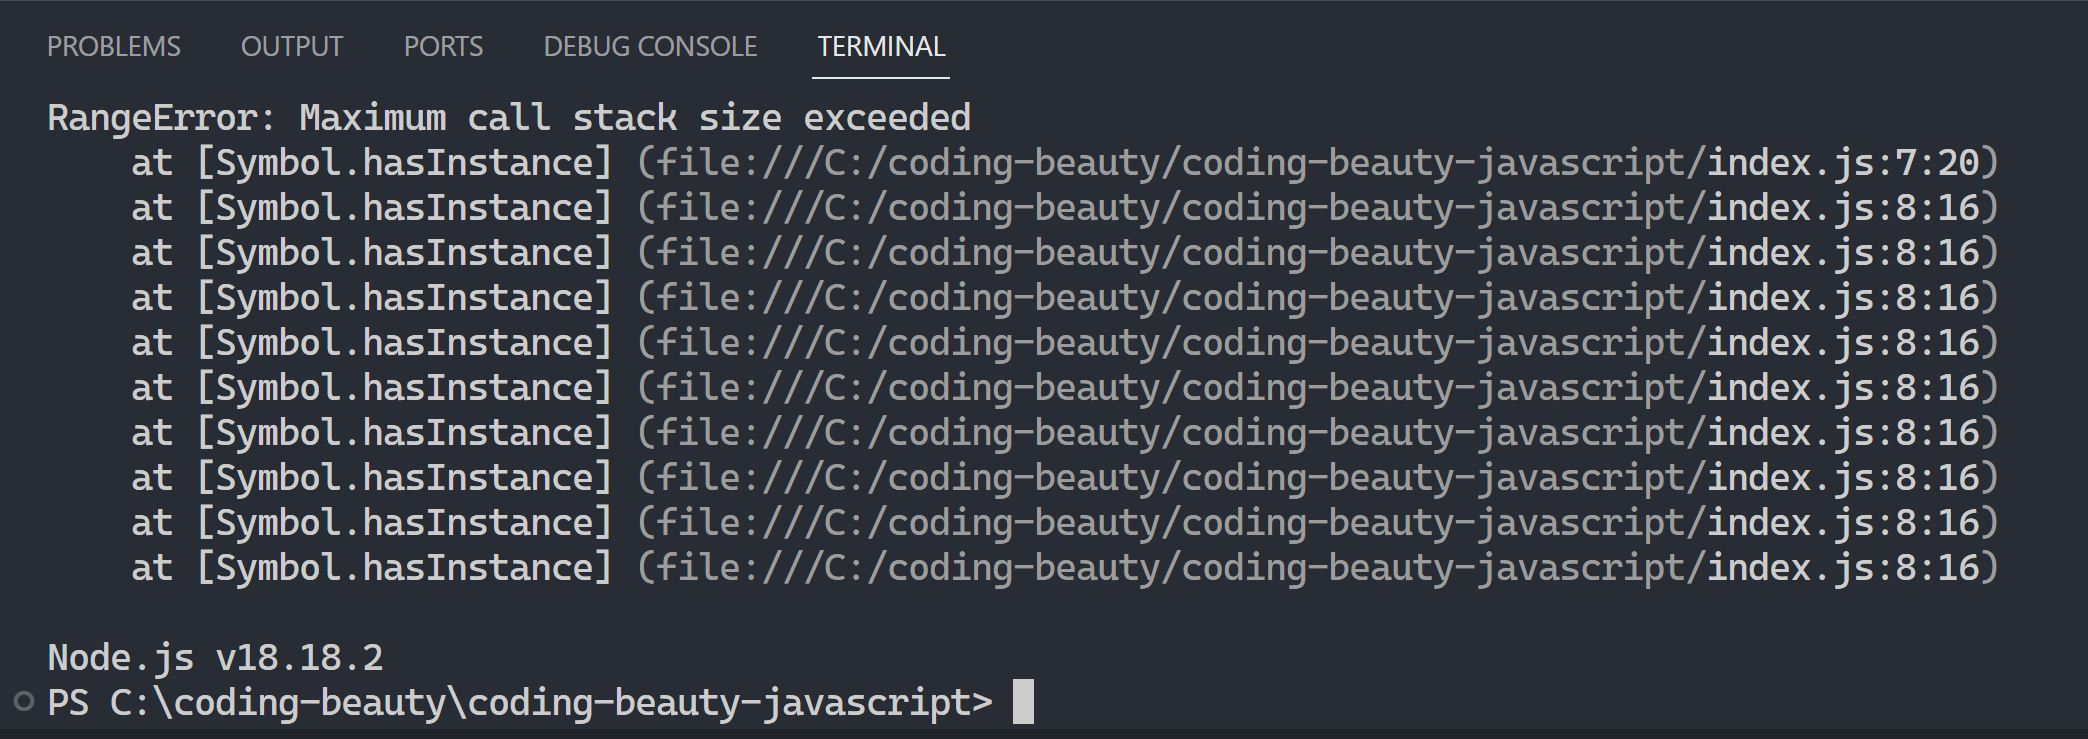
We can’t use instanceof inside the symbol because that’ll quickly lead to an infinite recursion:
Instead we compare the special constructor property of the object to our own:
JavaScriptCopied!
class Fruit {
  constructor(name) {
    this.name = name;
  }

  [Symbol.hasInstance](obj) {
    const fruits = ['🍍', '🍌', '🍉', '🍇'];
    // this == this.constructor in a static method
    return obj.constructor === this || fruits.includes(obj);
  }
}

const fruit = new Fruit('apple');
If you’re just hearing of .constructor, this should explain everything:
From looping to splitting to searching, well-known symbols let us redefine our core functionalities to behave in unique and delightful ways, pushing the boundaries of what’s possibly in JavaScript.
Lottie takes the magic from Adobe After Effects and brings it straight to your mobile and web apps.
Imagine the experience needed to create this 👇 Then imagine recreating it with raw CSS.
So no more hand-coding – Lottie uses a special plugin to turn those After Effects animations into a lightweight JSON format that works flawlessly on any device.
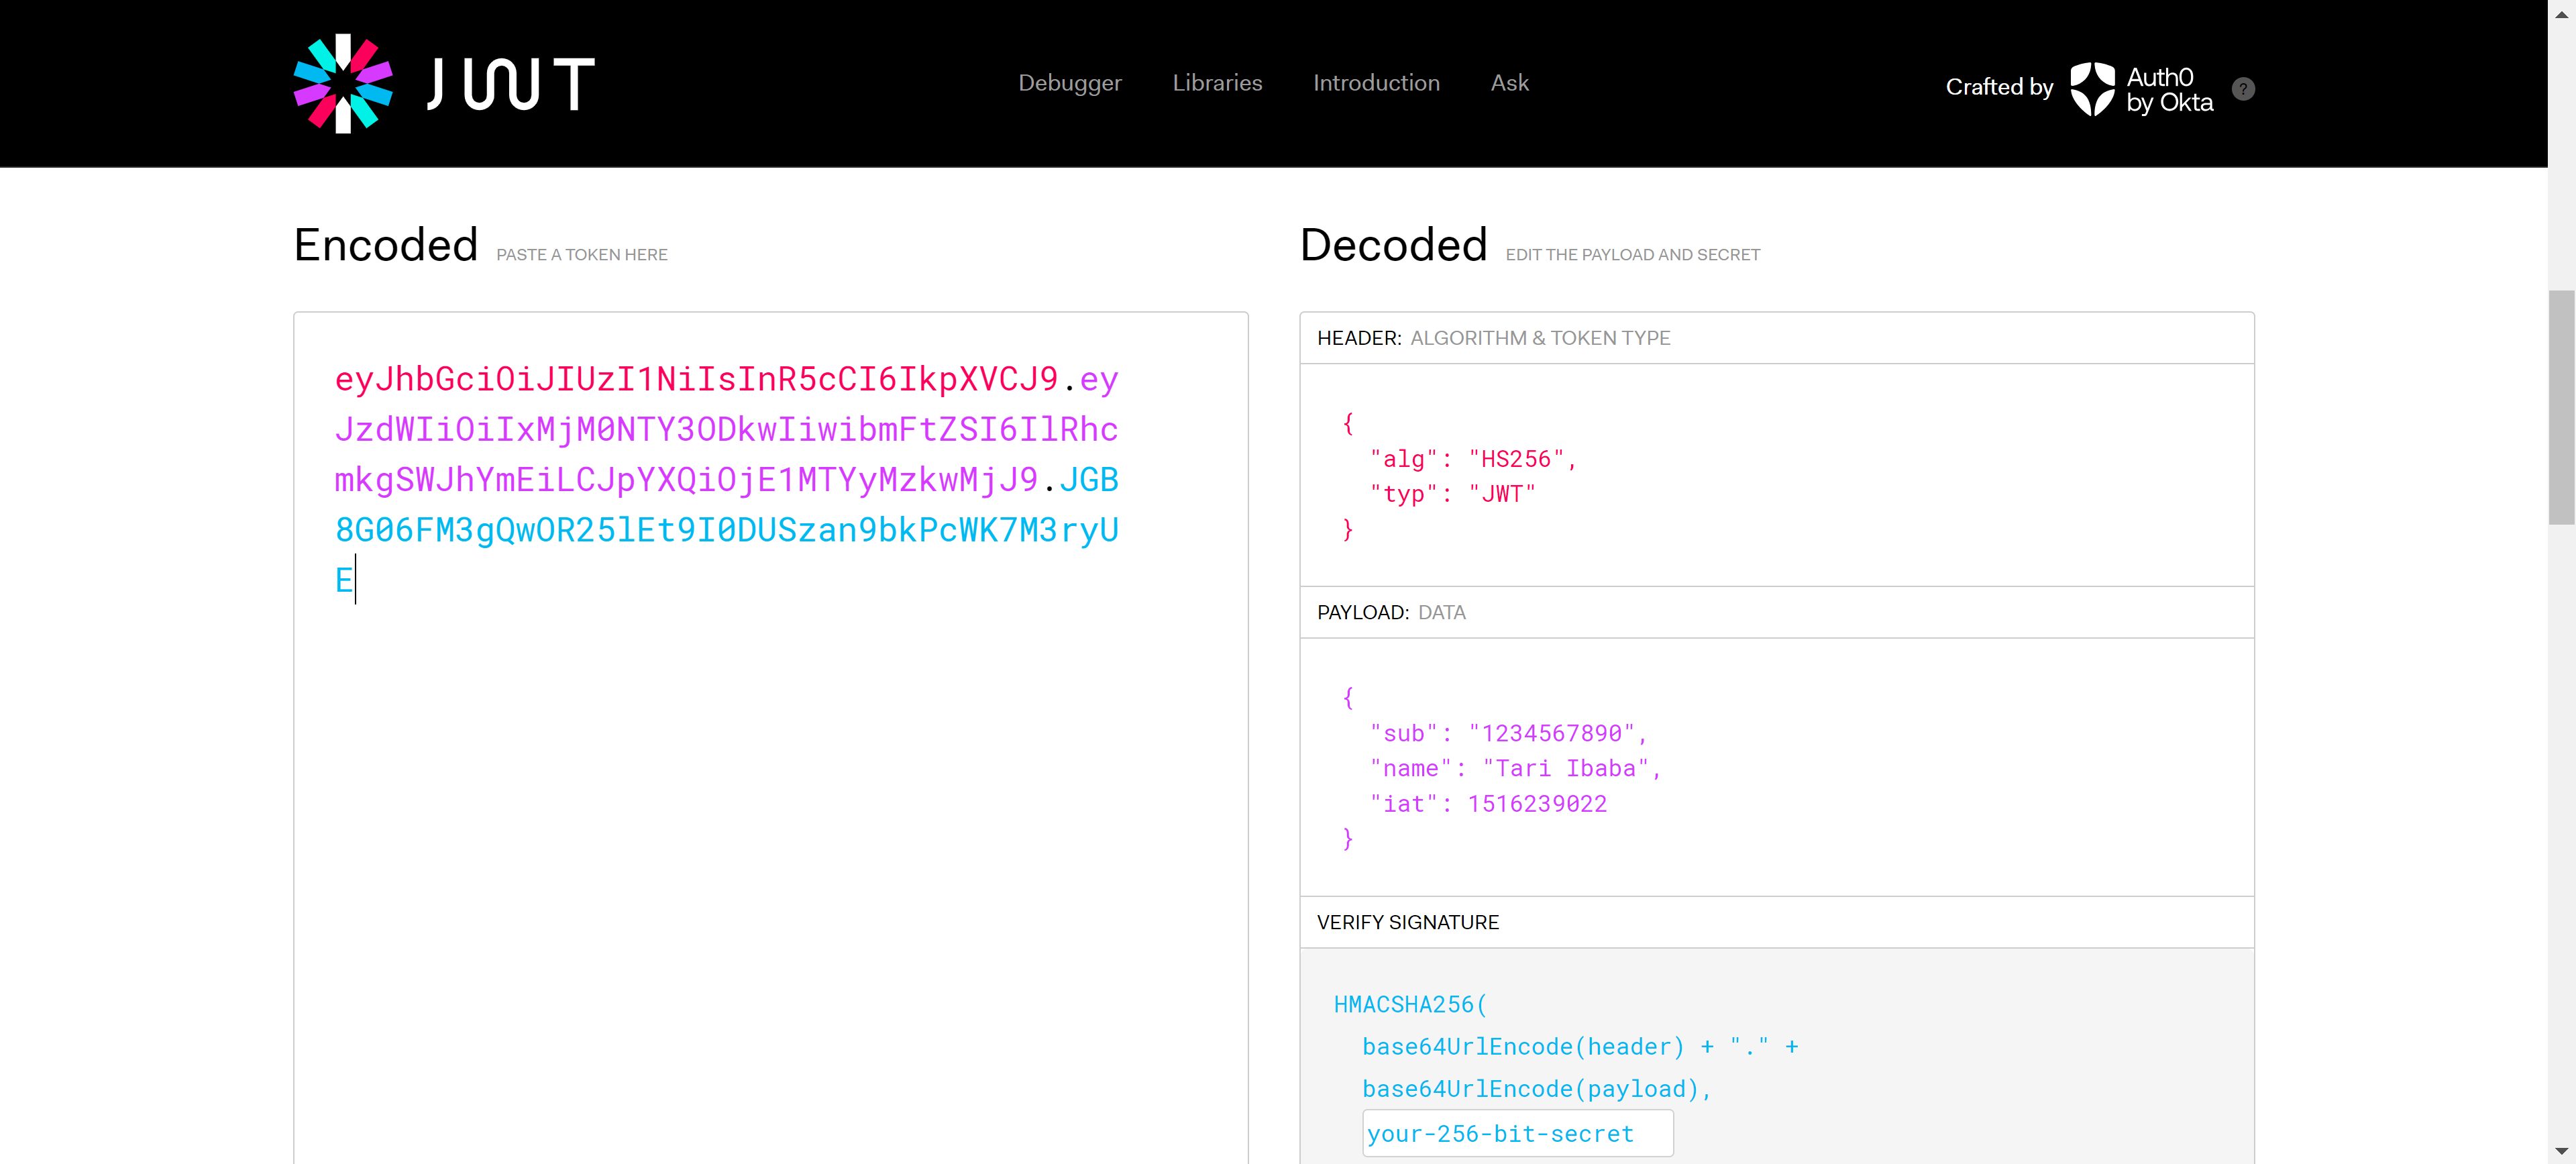
I use this often when having nasty bugs with JSON web token from Firebase Auth or some stuff.
You just paste your token on the left and you instantly see the decoded value on the right.
And using this got me confused at first; I thought JWT was like an encryption where only the receiver could know what was there with the secret?
But no; it turned out JWT is for verifying the source of the message, not hiding information. Like in crypto wallets and transactions private and public keys.
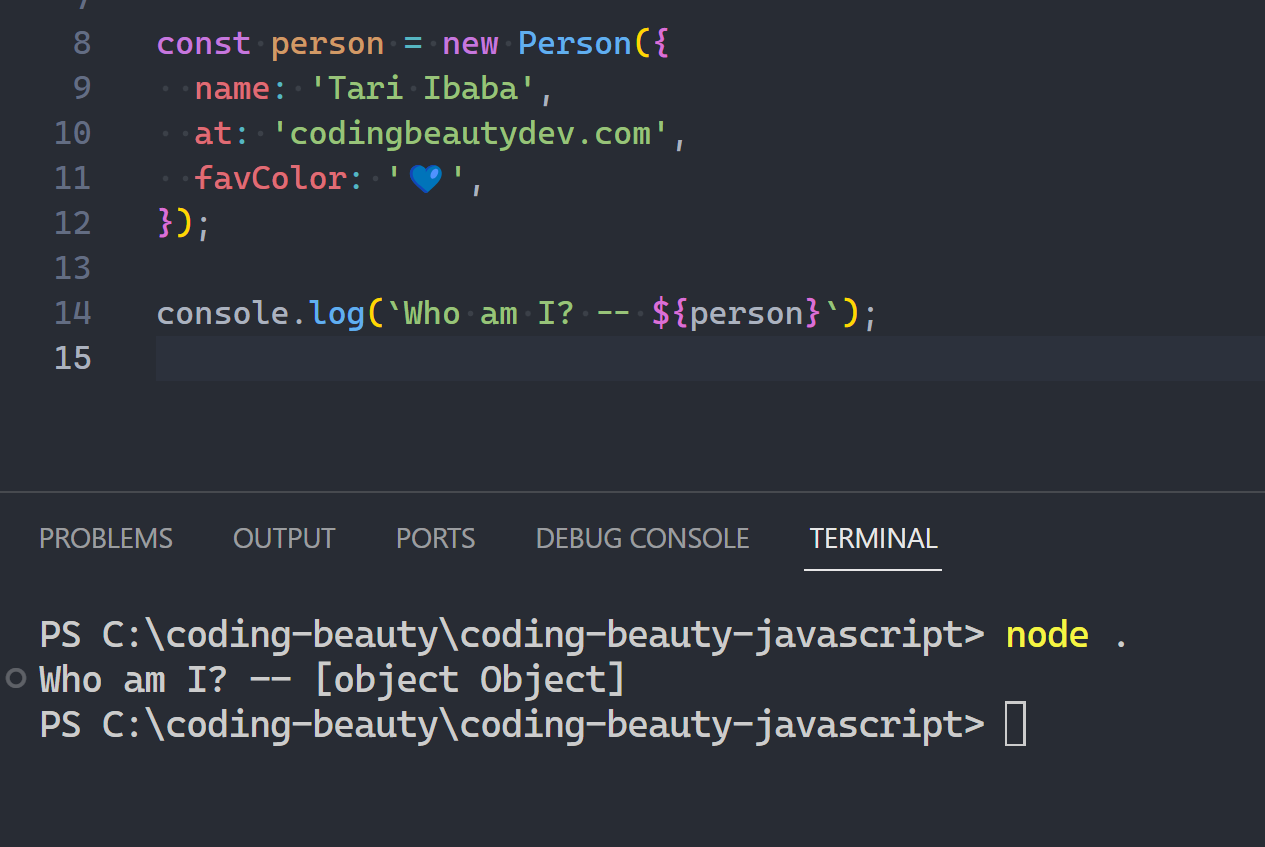
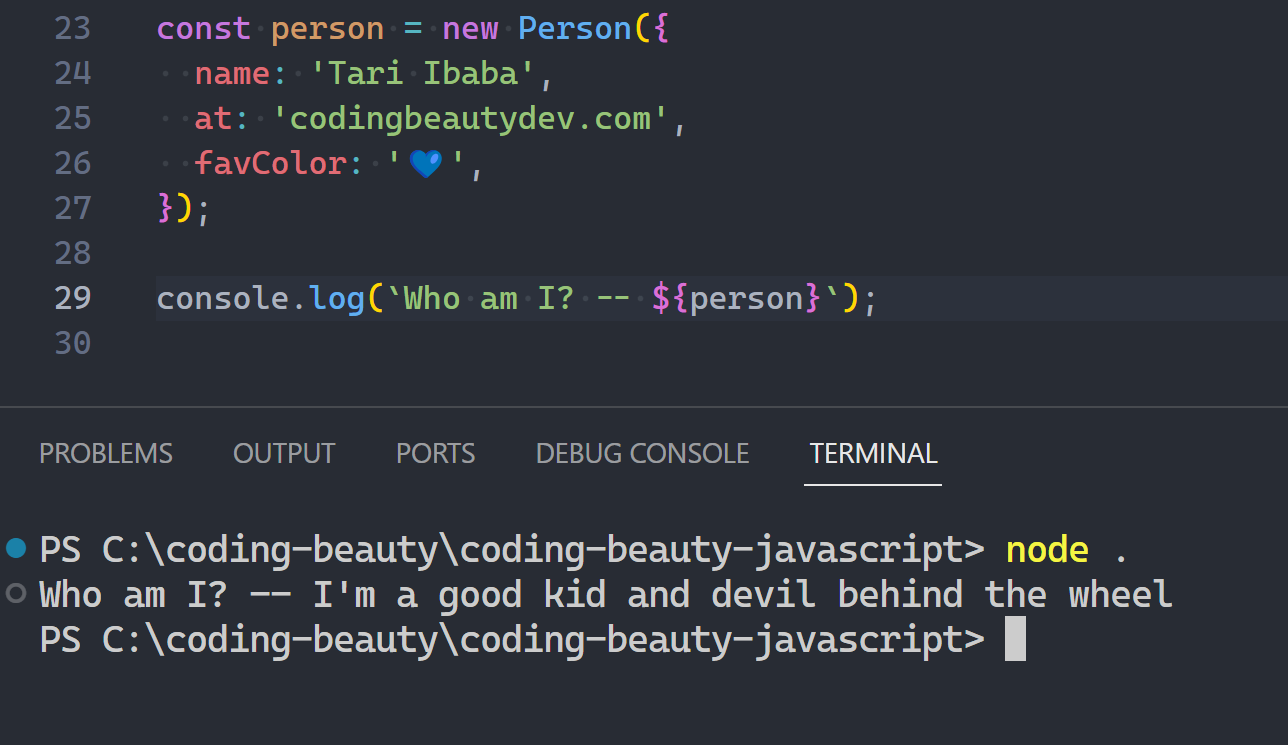
Coding is the art of bringing thoughts into digital and physical reality.
I love this definition; so many gems to unpack from 1 concise statement.
With coding we wield the power to shape the digital realm according to our imagination and needs.
Picture this: You’re sitting in front of a blank canvas, armed with nothing but your thoughts and a bunch of dev tools.
With a few lines of code, you summon objects into existence, breathe life into algorithms, and orchestrate systems that operate with precision and purpose.
In this digital realm you are the architect, the creator, the god of your own universe. Every line of code is a brushstroke, painting the landscape of your creation.
You design the story of execution, from the inception of an idea to its realization, with the potent aid of lightning-fast computers that transform your commands into tangible results.
Coding is a force amplifier.
Thanks to iteration, recursion, and more, tiny scripts can easily complete unbelievable amounts of work in fractions of a second; work that no one on their own could possibly hope to finish in 10 life times.
Or operating continuously, 24/7, even when everyone is asleep, and throughout all seasons and holidays.
You breathe life into those inert lines of text, imbuing them with functionality and purpose. Bringing forth programs and applications that serve myriad functions; from simplifying mundane tasks to revolutionizing entire industries.
The mere challenge of carefully constructing a complex software system from the growing gives you a strong sense of self-accomplishment, achievement and inner power.
Even going beyond ourselves, coding is a gateway to solving real-world problems that surround us. From streamlining business operations to revolutionizing healthcare, coding empowers us to tackle challenges with efficiency and innovation.
Coding enables us to innovate continually, pushing the boundaries of what is possible and driving progress forward. Whether it’s developing groundbreaking applications, pioneering new technologies, or optimizing existing systems, coding empowers us to make an impact on a global scale.
Consider the countless innovations that have reshaped our world: from social media to e-commerce to the AI tools many of us have gone crazy about; each breakthrough stems from the minds of individuals who dared to dream and had the skills to code their visions into reality.
Apps that never once existed; now brought into existence with the power of thought; now installed in the devices of billions across all the nations of the globe; now influencing lives every single day.
In our information age being able to code is like possessing a superpower—an ability to wield technology as a force for good, to shape the world in ways previously unimaginable. With coding we have the power to improve the quality of life for billions, to democratize access to information and opportunity, and to pave the way for a brighter, more connected future.
Coding is more than just a technical skill—it is a catalyst for change, a tool for empowerment, and a gateway to infinite possibilities. With it we can shape a future that’s not only technologically advanced but also as close to utopia as we can get.
Simply put: Coding a better world into existence for all, enjoying every step along the way.
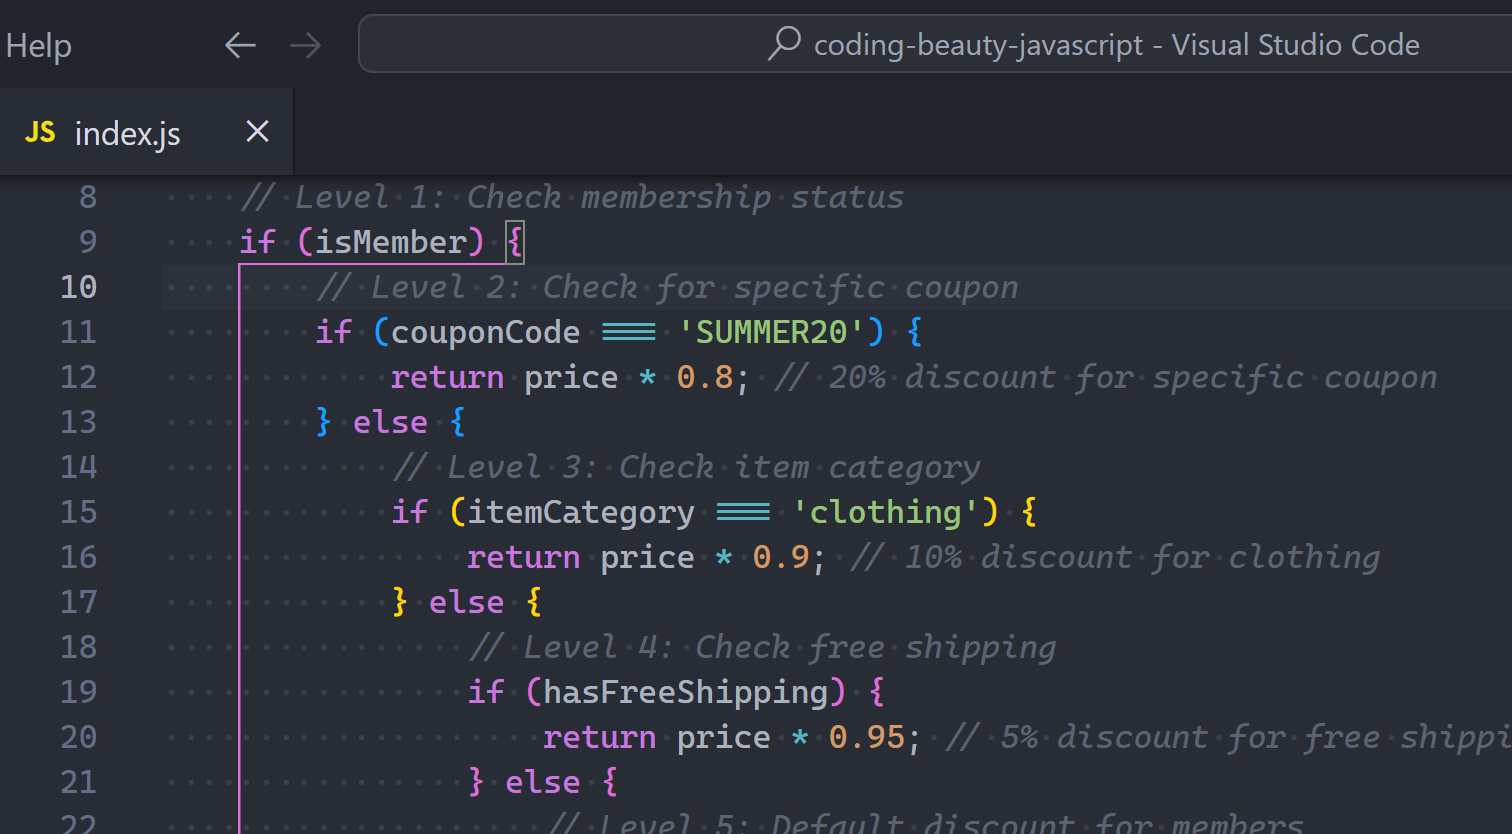
Typical use case for nested ifs: you want to perform all sorts of checks on some data to make sure it’s valid before finally doing something useful with it.
Don’t do this! 👇
JavaScriptCopied!
function sendMoney(account, amount) {
  if (account.balance > amount) {
    if (amount > 0) {
      if (account.sender === 'user-token') {
        account.balance -= amount;
        console.log('Transfer completed');
      } else {
        console.log('Forbidden user');
      }
    } else {
      console.log('Invalid transfer amount');
    }
  } else {
    console.log('Insufficient funds');
  }
}
There’s a better way:
JavaScriptCopied!
function sendMoney(account, amount) {
  if (account.balance < amount) {
    console.log('Insufficient funds');
    return;
  }

  if (amount <= 0) {
    console.log('Invalid transfer amount');
    return;
  }

  if (account.sender !== 'user-token') {
    console.log('Forbidden user');
    return;
  }

  account.balance -= amount;
  console.log('Transfer completed');
}
See how much cleaner it is? Instead of nesting ifs, we have multiple if statements that do a check and return immediately if the condition wasn’t met. In this pattern, we can call each of the if statements a guardclause.
If you do a lot of Node.js, you’ve probably seen this flow in Express middleware:
Because the lines must be printed, we print them in the guard clause before returning. And then, we print it in all(!) the following guard clauses. And once again, in the main function body if all the guard clauses were passed.
So what can we do about this? How can we use guard clauses and still stick to the DRY principle?
Well, we split the logic into multiple functions:
JavaScriptCopied!
function func(cond1, cond2) {
  checkCond1(cond1, cond2);
  console.log('after cond1 check');
}

function checkCond1(cond1, cond2) {
  if (!cond1) {
    console.log('failed condition 1');
    return;
  }
  checkCond2(cond2);
  console.log('after cond2 check');
}

function checkCond2(cond2) {
  if (!cond2) {
    console.log('failed condition 2');
    return;
  }
  console.log('PASSED!');
  console.log('taking success action...');
}
Let’s apply this to the Express middleware we saw earlier:
In a way, we’ve replaced the if/else statements with a chain of responsibility pattern. Of course, this might be an overkill for simple logic like a basic Express request middleware, but the advantage here is that it delegates each additional check to a separate function, separating responsibilities and preventing excess nesting.
Key takeaways
Using nested ifs in code often leads to complex and hard-to-maintain code; Instead, we can use guard clauses to make our code more readable and linear.
We can apply guard clauses to different scenarios and split them into multiple functions to avoid repetition and split responsibilities. By adopting this pattern, we end up writing cleaner and more maintainable code.
JavaScript has come a long way in the past 10 years with brand new feature upgrades in each one.
Still remember when we created classes like this?
JavaScriptCopied!
function Car(make, model) {
  this.make = make;
  this.model = model;
}

// And had to join strings like this
Car.prototype.drive = function() {
  console.log("Vroom! This " + this.make +
    " " + this.model + " is driving!");
};
Yeah, a lot has changed!
Let’s take a look at the 5 most significant features that arrived in ES14 (2023); and see the ones you missed.
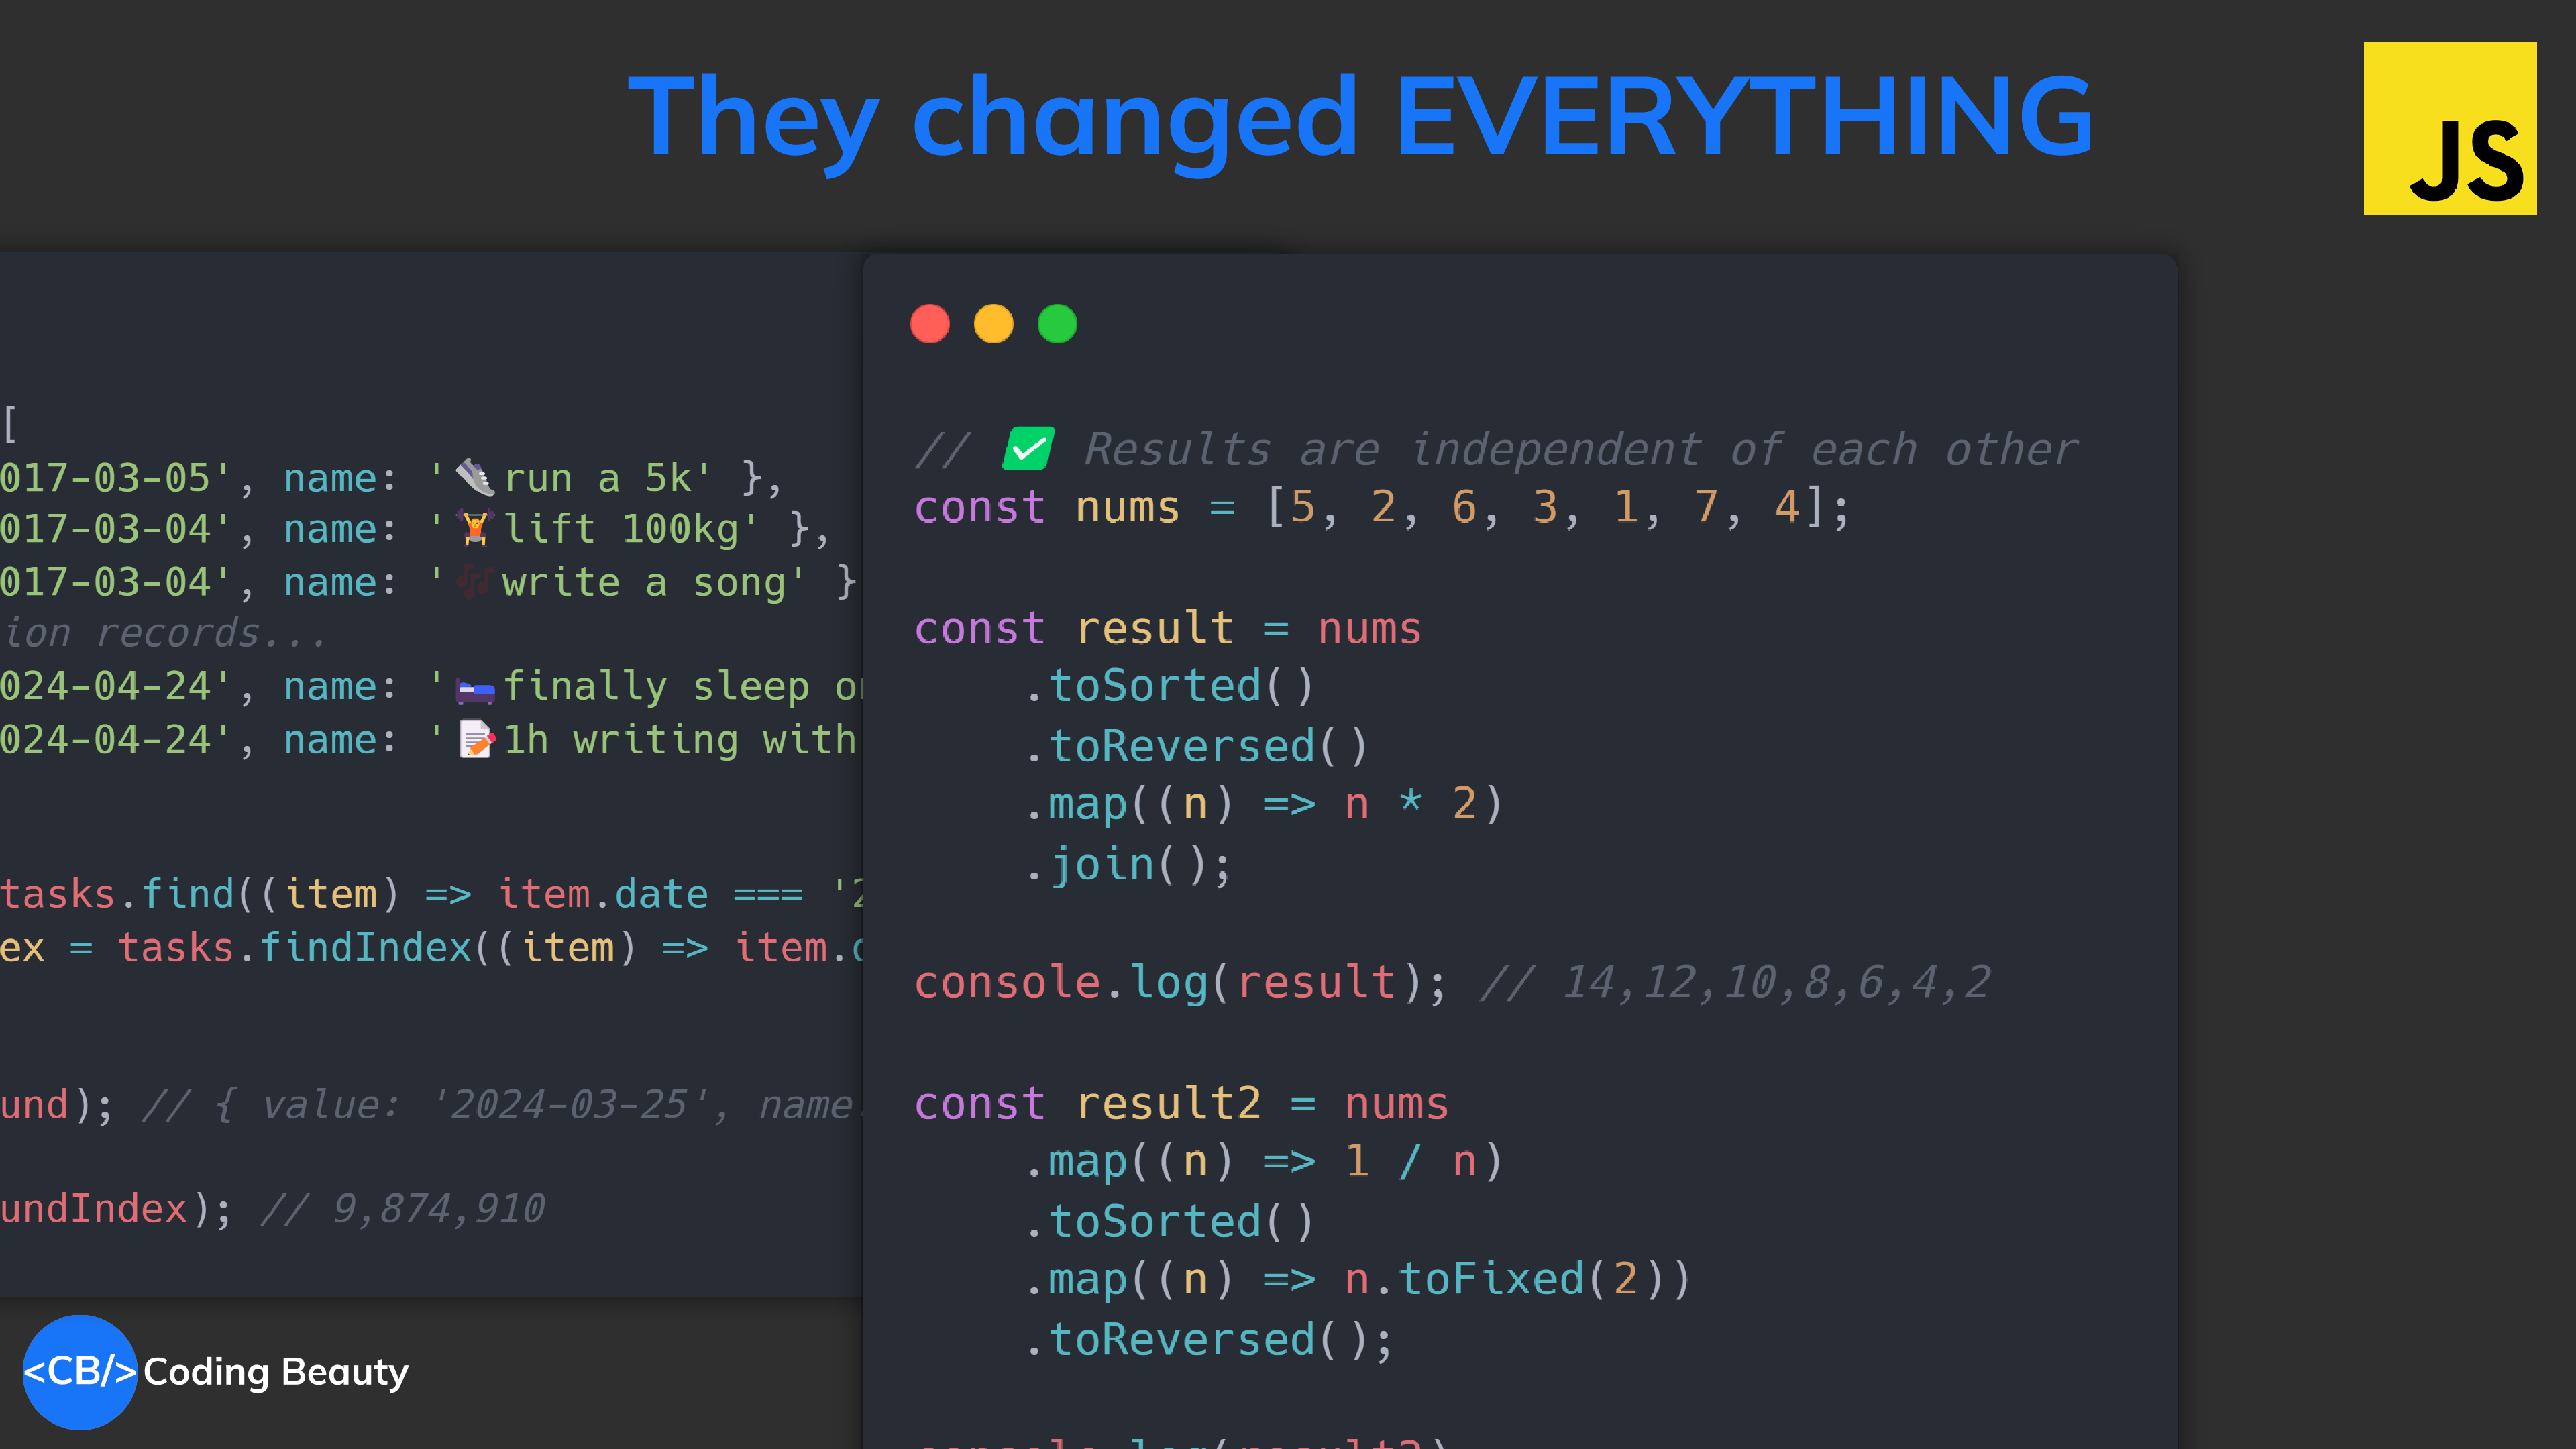
1. toSorted()
Sweet syntactic sugar.
ES14’s toSorted() method made it easier to sort an array and return a copy without mutation.
They were other features but ES14 was all about easier functional programming and built-in immutability.
With the rise of React we’ve seen declarative JavaScript explode in popularity; it’s only natural that more of them come baked into the language as sweet syntactic sugar.
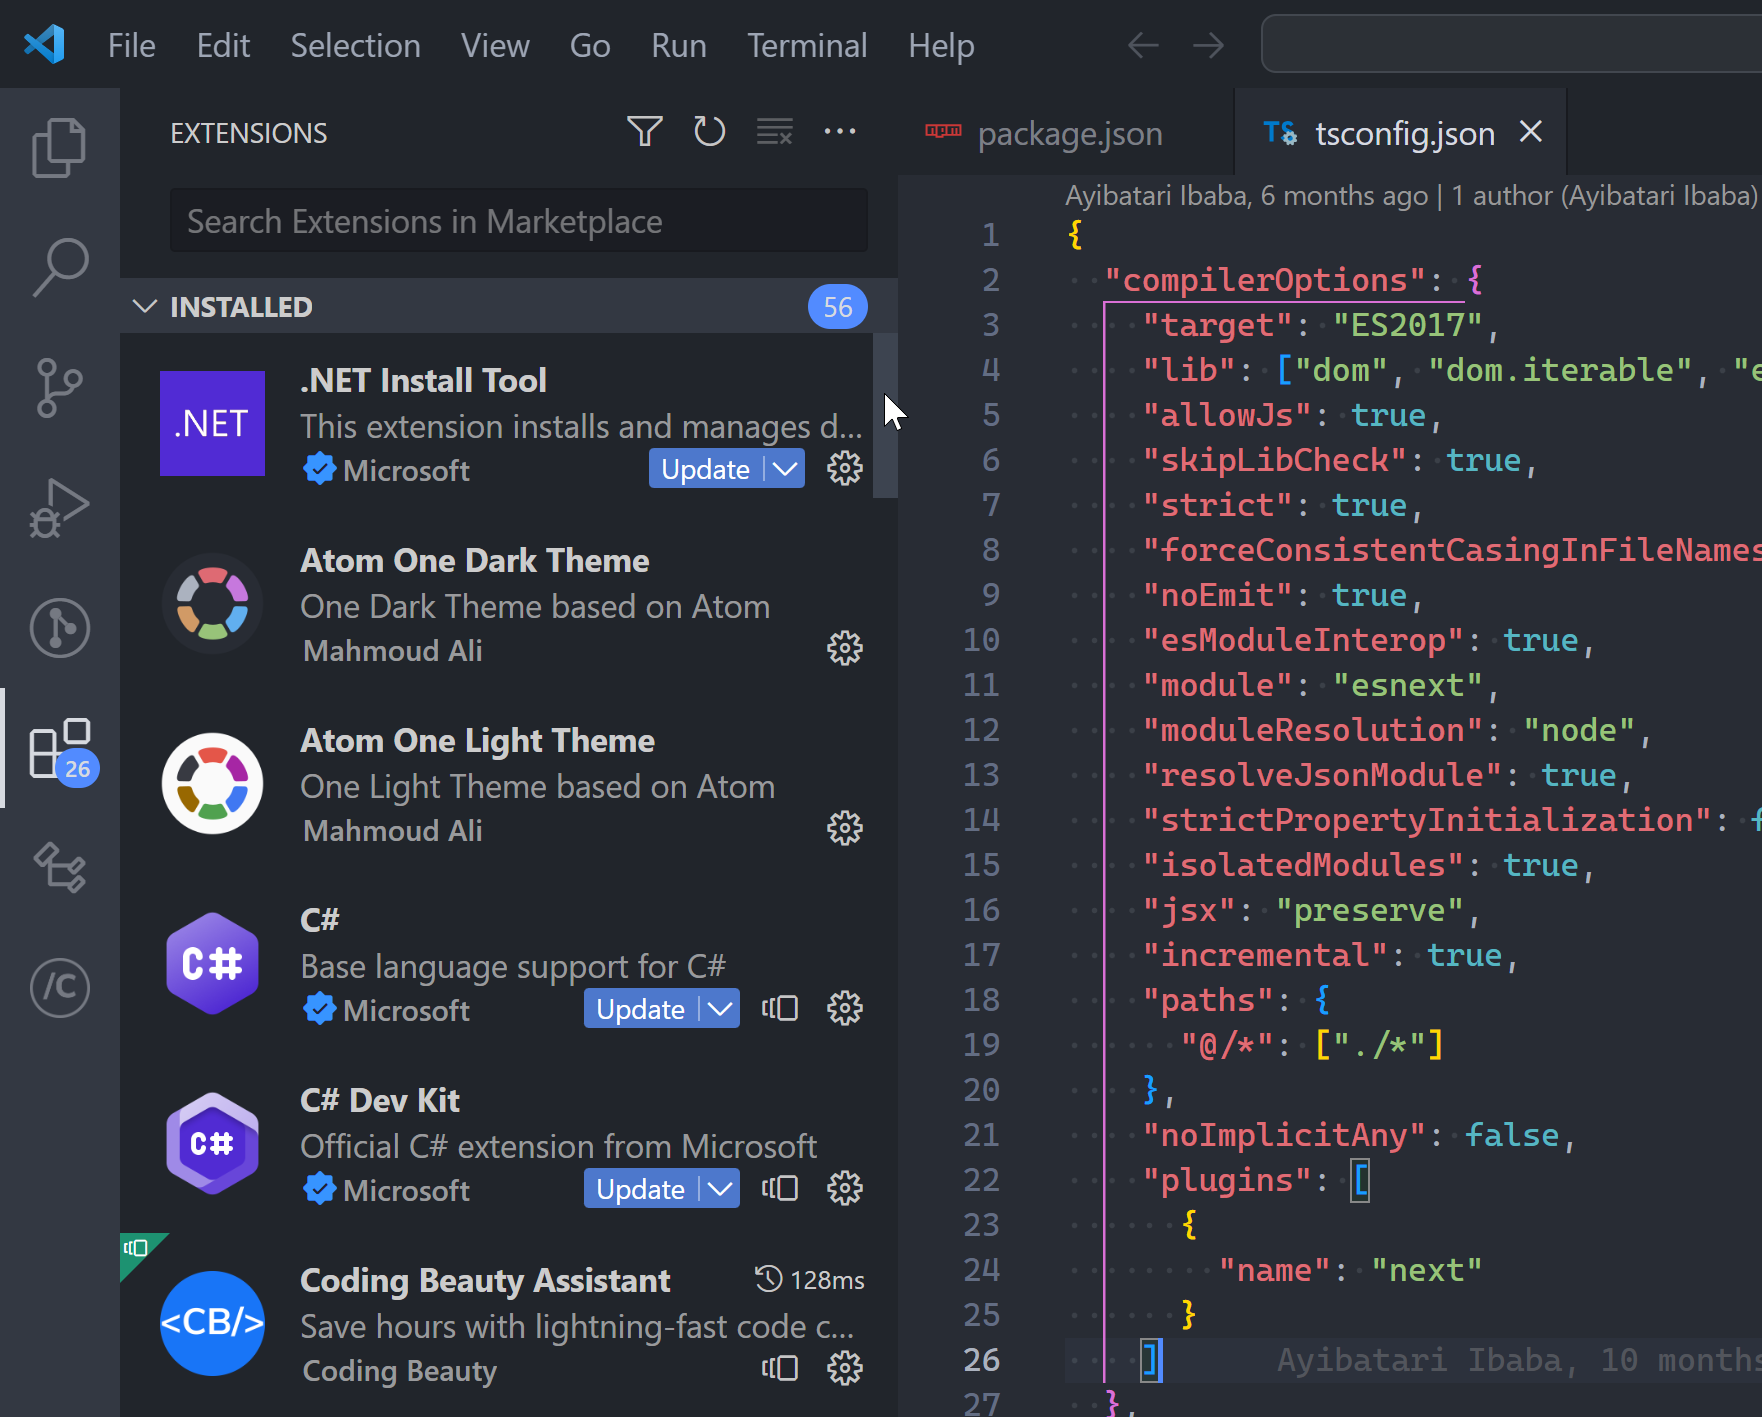
Can you count how many VS Code extensions you have right now?
Me: A whooping 56.
If you’re finding VS Code getting slower and more power-hungry with time, this number could well be the reason.
Because EVERY new extension added increases the app’s memory and CPU usage.
Coding is already challenging enough; Nobody need contend with this:
Maybe I should just give up music instead.
So we need to keep this number as low as possible to minimize this resource usage; ad also stopping these extensions from clashing with one another or with native functionality.
And you know, there’s a significant number of extensions in the Marketplace that provide functionality VSCode already has built-in.
Usually they were made when the feature wasn’t added yet; but once that happened they became largely redundant additions.
So below, I cover a list of these integrated VSCode features and extensions that provide them. Uninstalling these now dispensable extensions will increase your editor’s performance and efficiency.
I’ll be listing settings that control the behavior of these features. If you don’t know how to change settings, this guide will help.
The path autocompletion feature provides a list of files in your project to choose from when importing a module or linking a resource in HTML.
Extensions for this
These extensions add the path autocompletion feature to VSCode:
Path IntelliSense (12.5M+ downloads): “Visual Studio Code Plugin that autocompletes filenames”.
Path Autocomplete (1.7M+ downloads): “Provides path completion for Visual Studio Code and VS Code for the web”.
But feature already built in
VS Code already has native path autocompletion.
When I type in a filename to import (typically when the opening quote is typed), a list suggested project files shows up for me to quickly choose from.
3. Snippets for HTML and CSS
These extensions help you save time by adding common HTML and CSS snippets using abbreviations you can easily recall.
Extensions for this
These extensions bring convenient HTML and/or CSS snippets to VSCode:
HTML Snippets (10.1M+ downloads): “Full HTML tags including HTML5 snippets”.
HTML Boilerplate (3.2M+ downloads): “A basic HTML5 boilerplate snippet generator”.
CSS Snippets (225K+ downloads): “Shorthand snippets for CSS”.
But feature already built-in
Emmet is a built-in VSCode feature that provides HTML and CSS snippets like these extensions. As you’ll see in the official VSCode Emmet guide, it’s enabled by default in html, haml, pug, slim, jsx, xml, xsl, css, scss, sass, less, and stylus files.
Comprehensive to say the least.
When you start typing an Emmet abbreviation, a suggestion will pop up with auto-completion options; You’ll also see a preview of the expansion as you type in the VSCode’s suggestion documentation fly-out (if it is open).
Notice how similar the abbreviations are to CSS selectors. It’s by design; as stated on the official website, Emmet syntax is inspired by CSS selectors.
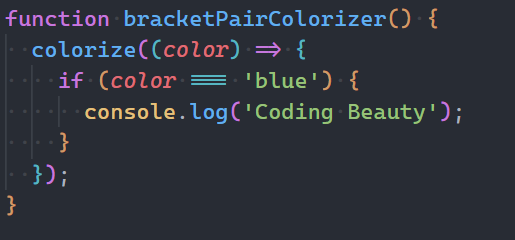
4. Bracket pair colorization
Bracket pair coloring is a popular syntax highlighting feature that colors brackets differently based on their order.
It makes it easier to identify scope and helps in writing expressions that involve many parentheses, such as single-statement function composition.
Extensions for this
Until VSCode had it built-in, these extensions helped enable the feature in the editor:
Bracket Pair Colorizer 2 (6.1M+ downloads): “A customizable extension for colorizing matching brackets”. It has now been deprecated.
Rainbow Brackets: (1.9M downloads): “A rainbow brackets extension for VS Code”.
I noticed Colorizer 2 has actually been deprecated since 2021 — wasn’t enough to stop millions from installing it every single year till date.
But feature already built in
After seeing the demand for bracket pair coloring and the performance issues involved in adding the feature as an extension, the VSCode team decided to integrate it into the editor.
In this blog, they say that the native bracket pair coloring feature is more than 10,000 times faster than Bracket Pair Colorizer 2.
Here’s the setting to enable/disable bracket pair colorization.
Editor > Bracket Pair Colorization: “Controls whether bracket pair colorization is enabled or not”. It is true by default, there’s been some debate about whether this should be the case here.
The bracket pair colorization option in the Settings UI.
You can enable this by adding the following to your settings.json
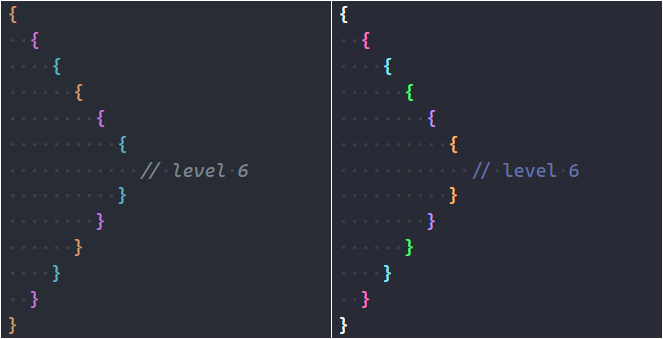
There is a maximum of 6 colors that can be used for successive nesting levels. Although each theme will have its maximum. For example, the Dracula theme has 6 colors by default, but the One Dark Pro theme has only 3.
Left: bracket pair colors in One Dark Pro theme. Right: bracket pair in Dracula theme.
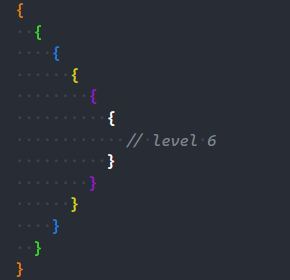
Nevertheless, you can customize the bracket colors for any theme with the workbench.colorCustomizations setting.
We specify the name of the theme in square brackets ([ ]), then we assign values to the relevant properties. The editorBracketHighlight.foregroundN property sets the color of the Nth set of brackets, and 6 is the maximum.
Now this will be the bracket pair colorization for One Dark Pro:
Customized bracket pair colorization for One Dark Pro theme.
5. Auto importing of modules
With an auto-importing feature, when a function, variable, or some other member of a module is referenced in a file, the module is automatically imported into the file, saving time and effort.
The function is automatically imported from the file when referenced.
If the module files are moved, the feature will help automatically update them.
Imports for a file are automatically updated on move.
Extensions for this
Here are some of the most popular extensions providing the feature for VSCode users:
Auto Import (3.8M downloads): “Automatically finds, parses, and provides code actions and code completion for all available imports. Works with Typescript and TSX”.
Move TS (810K downloads): “extension for moving typescript files and folders and updating relative imports in your workspace”.
But feature already built in
You can enable or disable auto-importing modules in VSCode with the following settings.
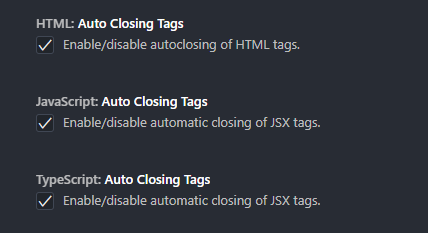
JavaScript > Suggest: Auto Imports: “Enable/disable auto import suggestions”. It is true by default.
TypeScript > Suggest: Auto Imports: “Enable/disable auto import suggestions”. It is true by default.
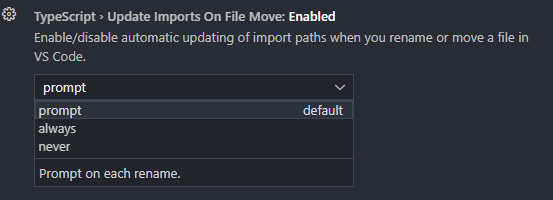
JavaScript > Update Imports on File Move: “Enable/disable automatic updating of import paths when you rename or move a file in VS Code”. The default value is prompt, meaning that a dialog is shown to you, asking if you want to update the imports of the moved file. Setting it to alwayswill cause the dialog to be skipped, and never will turn off the feature entirely.
TypeScript > Update Imports on File Move: “Enable/disable automatic updating of import paths when you rename or move a file in VS Code”. Like the previous setting, it has possible values of prompt, always, and never, and the default is prompt.
One of the auto import settings in the Settings UI.
You can control these settings with these settings.json properties:
This will remove unused import statements and arrange import statements with absolute paths on top, providing a hands-off way to clean up your code.
Final thoughts
These extensions might have served a crucial purpose in the past, but not anymore for the most part, as much of the functionality they provide has been added as built-in VSCode features. Remove them to reduce the bloat and increase the efficiency of Visual Studio Code.