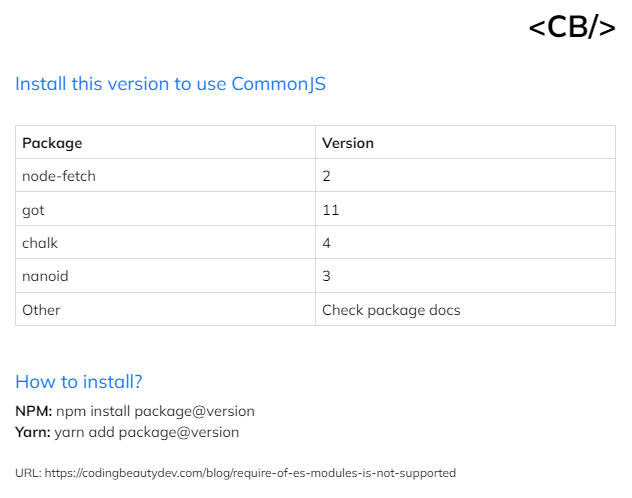
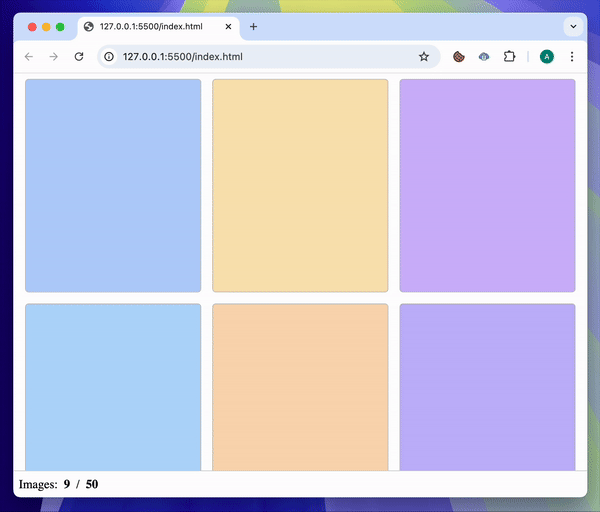
Incredible infinite scroll with JavaScript
Infinite scroll: Loading more and more content as the user scrolls down to the end.

No need for pagination + increases time spent on the site
With simple JavaScript we can recreate this easily:
We start with the basic HTML:
HTML
<div id="load-trigger-wrapper">
<!-- Grid of images>
<div id="image-container"></div>
<!-- Intersection Observer observes this -->
<
<div id="load-trigger"></div>
</div>
<!-- Number of loading images -->
<div id="bottom-panel">
Images:
<b><span id="image-count"></span>
</b>/
<b><span id="image-total"></span></b>
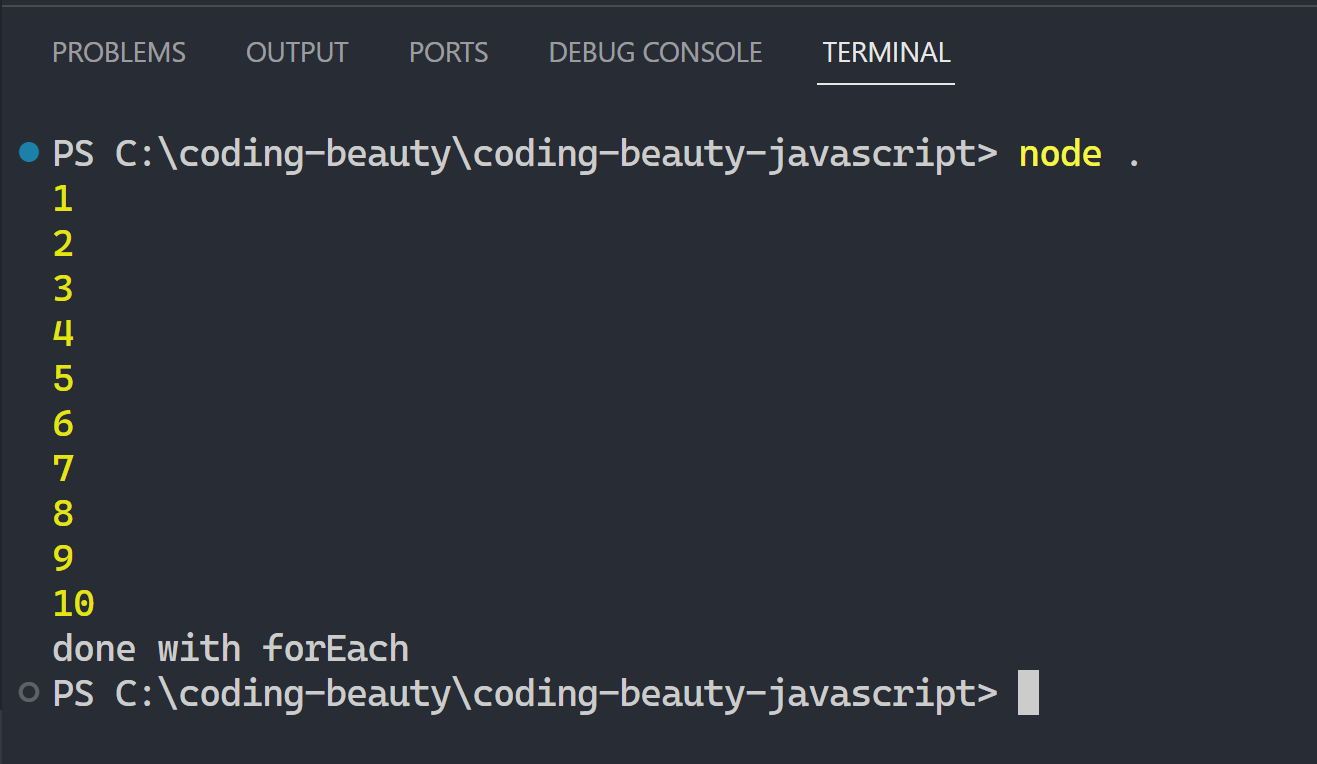
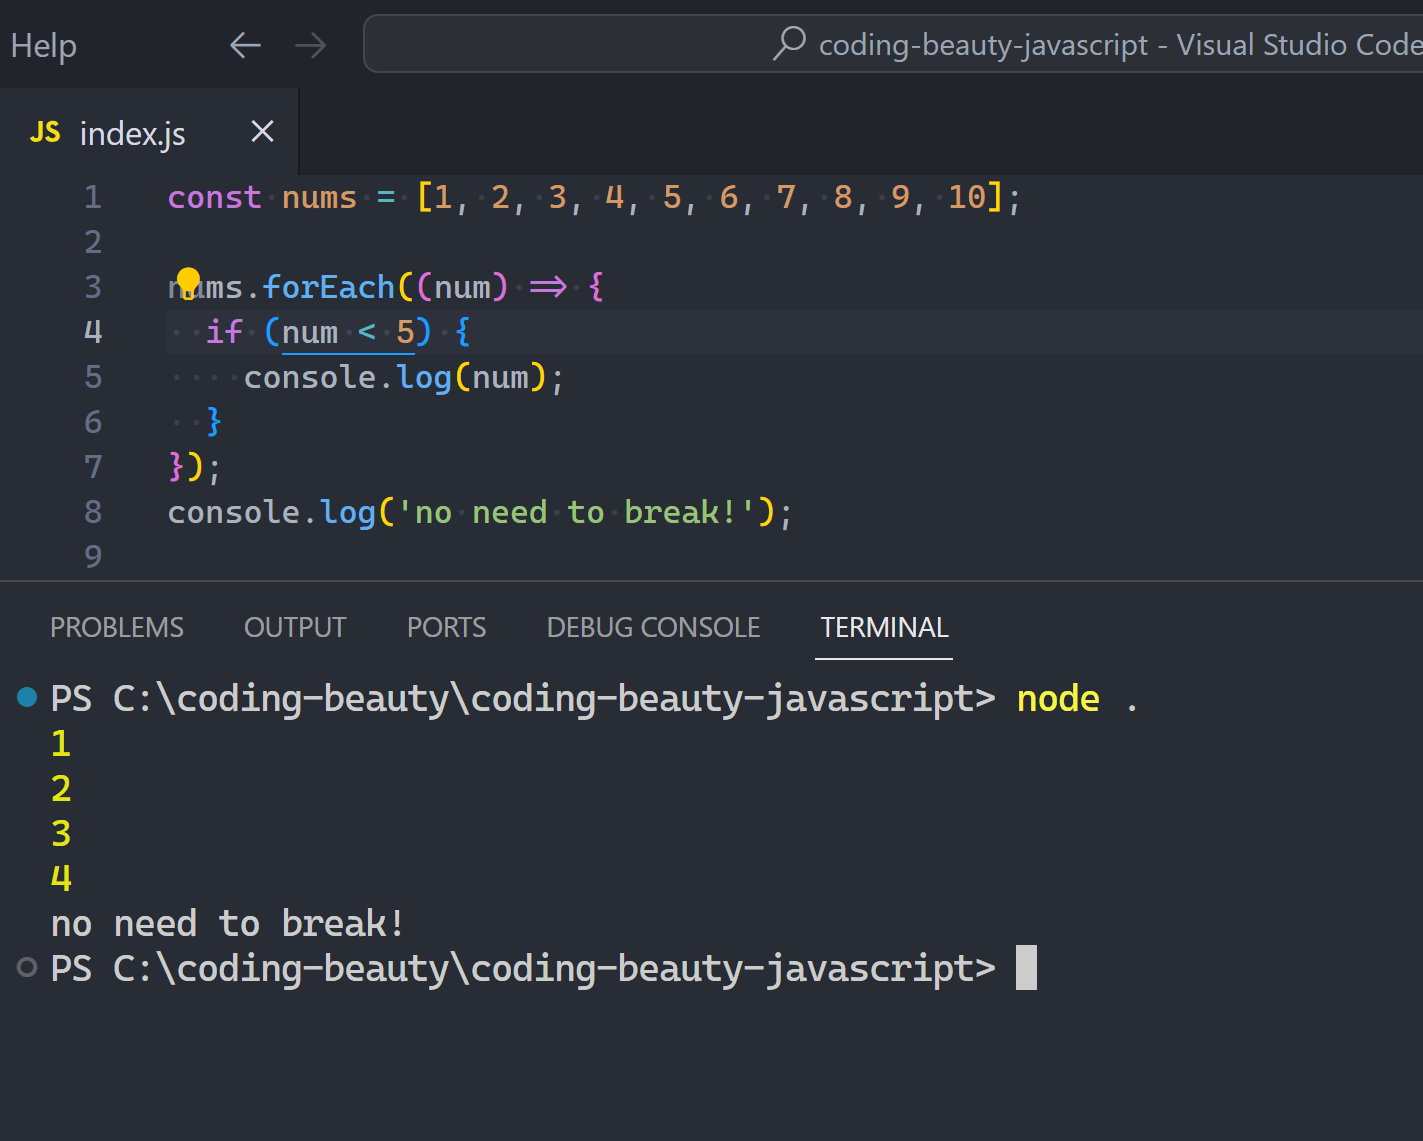
</div>Now it’s time to detect scrolling to the end with the Intersection Observer API:
JavaScript
const loadTrigger = document.getElementById('load-trigger');

// ...

const observer = detectScroll();

// ...

// Detect when
function detectScroll() {
  const observer = new IntersectionObserver(
    // Callback also runs after observe()
    (entries) => {
      for (const entry of entries) {
        // ...
            loadMoreImages();
        // ...
      }
    },
    // Set "rootMargin" because of #bottom-panel height
    // 30px upwards from the bottom
    { rootMargin: '-30px' }
  );

  // Start watching #load-trigger div
  observer.observe(loadTrigger);

  return observer;
}
Now let’s show the initial skeleton images:
JavaScript
const imageClass = 'image';
const skeletonImageClass = 'skeleton-image';

// ...

// This function would make requests to an image server
function loadMoreImages() {
  const newImageElements = [];
  // ...

  for (let i = 0; i < amountToLoad; i++) {
    const image = document.createElement('div');

    // 👇 Display each image with skeleton-image class
    image.classList.add(imageClass, skeletonImageClass);

    // Include image in container
    imageContainer.appendChild(image);

    // Store in temp array to update with actual image when loaded
    newImageElements.push(image);
  }

  // ...
}
CSS
.image,
.skeleton-image {
  height: 50vh;
  border-radius: 5px;
  border: 1px solid #c0c0c0;
  /* Three per row, with space for margin */
  width: calc((100% / 3) - 24px);

  /* Initial color before loading animation */
  background-color: #eaeaea;

  /* Grid spacing */
  margin: 8px;

  /* Fit into grid */
  display: inline-block;
}

.skeleton-image {
  transition: all 200ms ease-in;

  /* Contain ::after element with absolute positioning */
  position: relative;

  /* Prevent overflow from ::after element */
  overflow: hidden;
}

.skeleton-image::after {
  content: "";

  /* Cover .skeleton-image div*/
  position: absolute;
  top: 0;
  right: 0;
  bottom: 0;
  left: 0;

  /* Setup for slide-in animation */
  transform: translateX(-100%);

  /* Loader image */
  background-image: linear-gradient(90deg, rgba(255, 255, 255, 0) 0, rgba(255, 255, 255, 0.2) 20%, rgba(255, 255, 255, 0.5) 60%, rgba(255, 255, 255, 0));

  /* Continue animation until image load*/
  animation: load 1s infinite;
}

@keyframes load {
  /* Slide-in animation */
  100% {
    transform: translateX(100%)
  }
}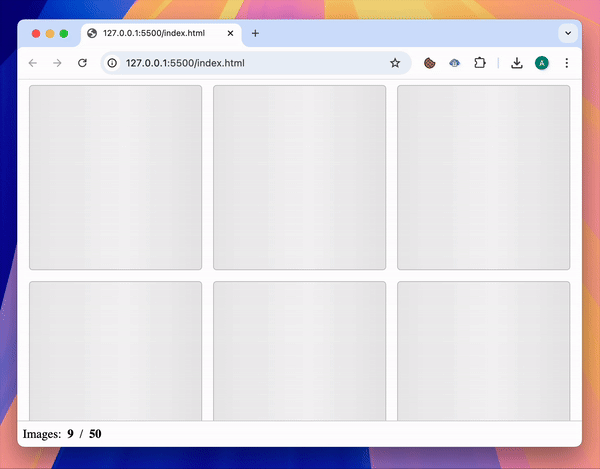
Update skeleton images
We get colors instead of images.
JavaScript
function loadMoreImages() {
// ...
// Create skeleton images and stored them in "newImageElements" variable
// Simulate delay from network request
setTimeout(() => {
// Colors instead of images
const colors = getColors(amountToLoad);
for (let i = 0; i < colors.length; i++) {
const color = colors[i];
// 👇 Remove skeleton loading indicator and show color
newImageElements[i].classList.remove(skeletonImageClass);
newImageElements[i].style.backgroundColor = color;
}
}, 2000);
// ...
}
function getColors(count) {
const result = [];
let randUrl = undefined;
while (result.length < count) {
// Prevent duplicate images
while (!randUrl || result.includes(randUrl)) {
randUrl = getRandomColor();
}
result.push(randUrl);
}
return result;
}
function getRandomColor() {
const h = Math.floor(Math.random() * 360);
return `hsl(${h}deg, 90%, 85%)`;
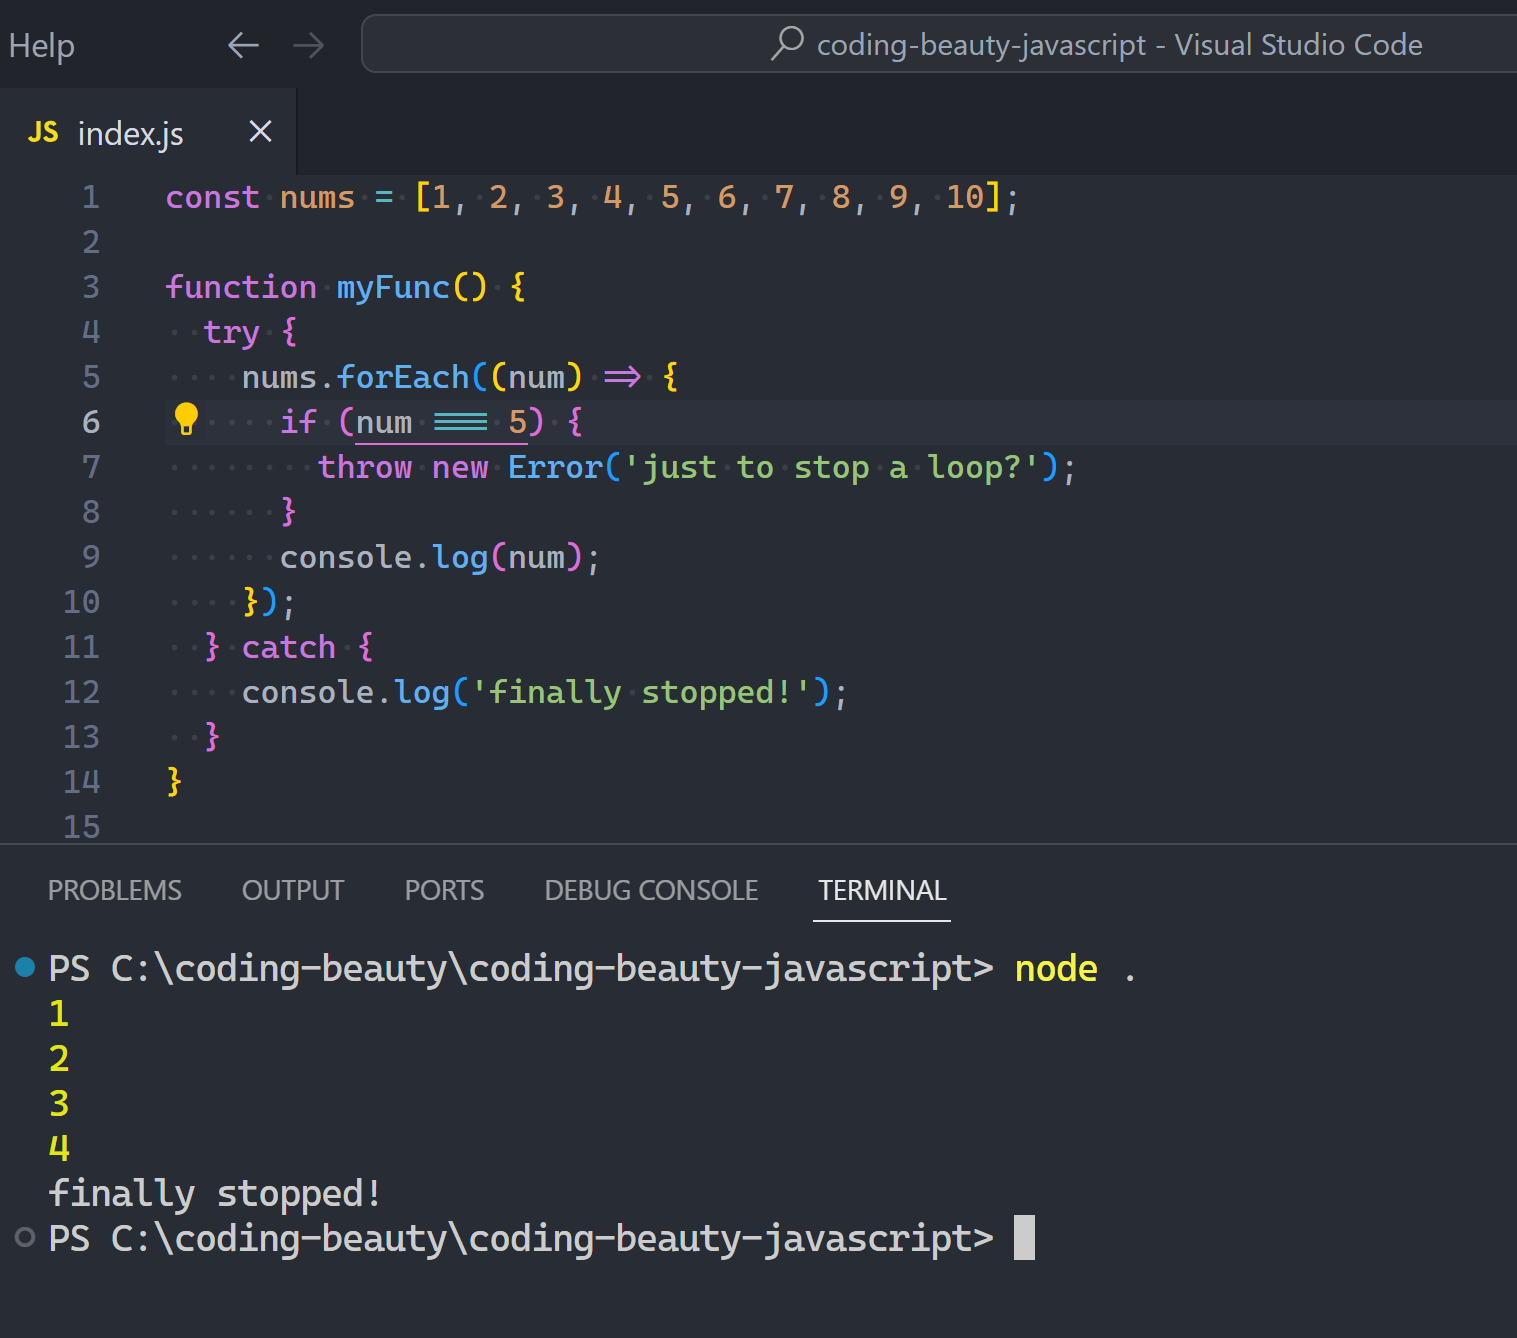
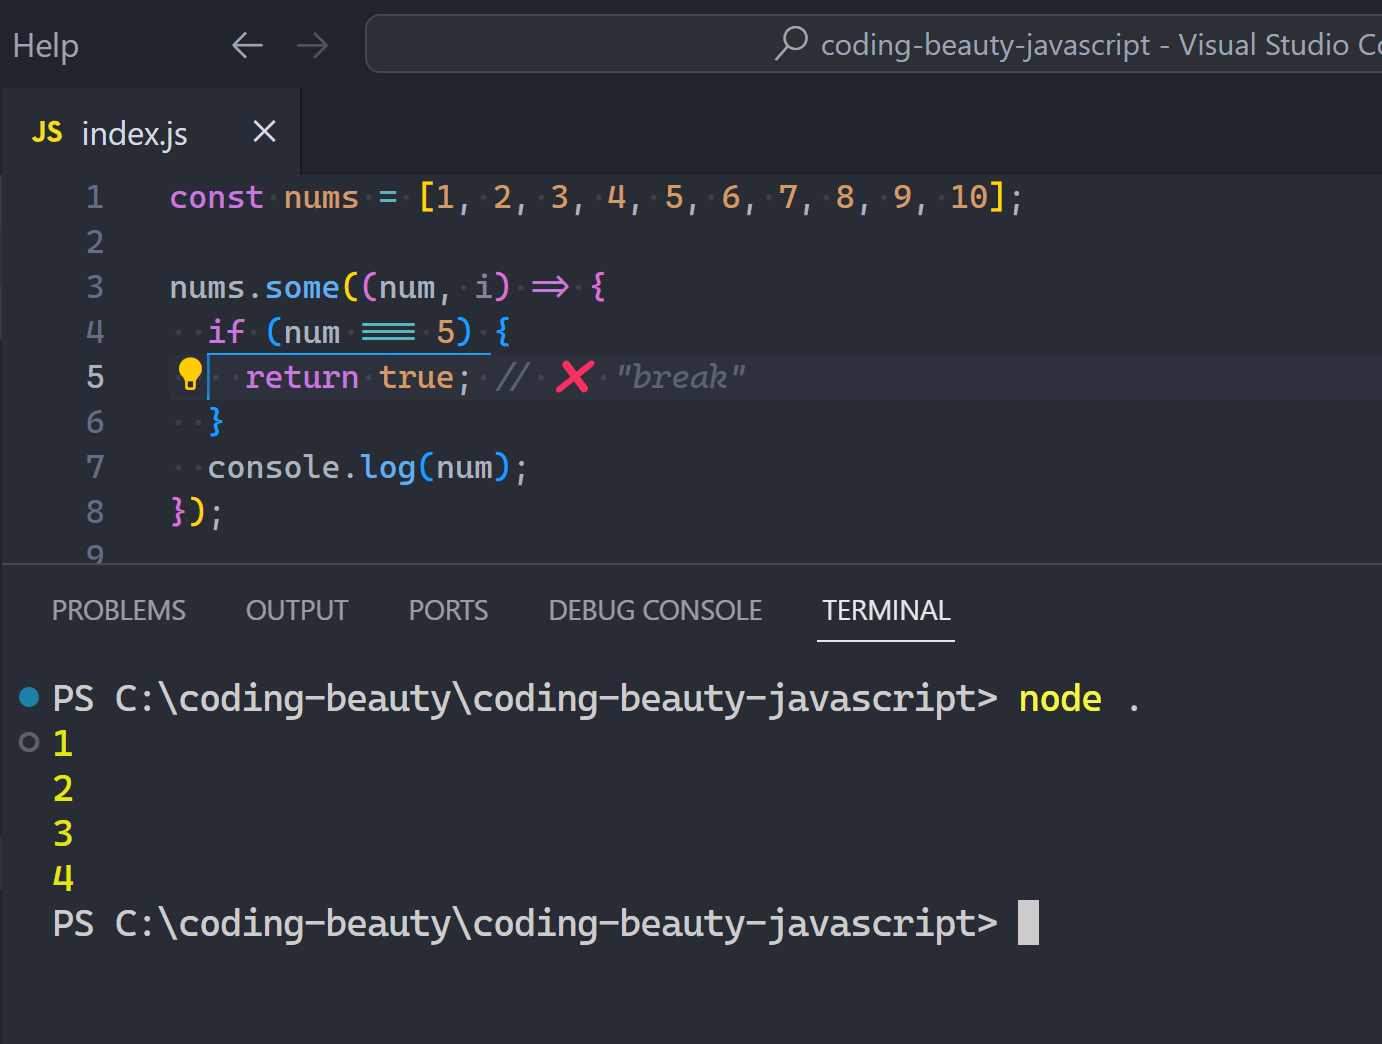
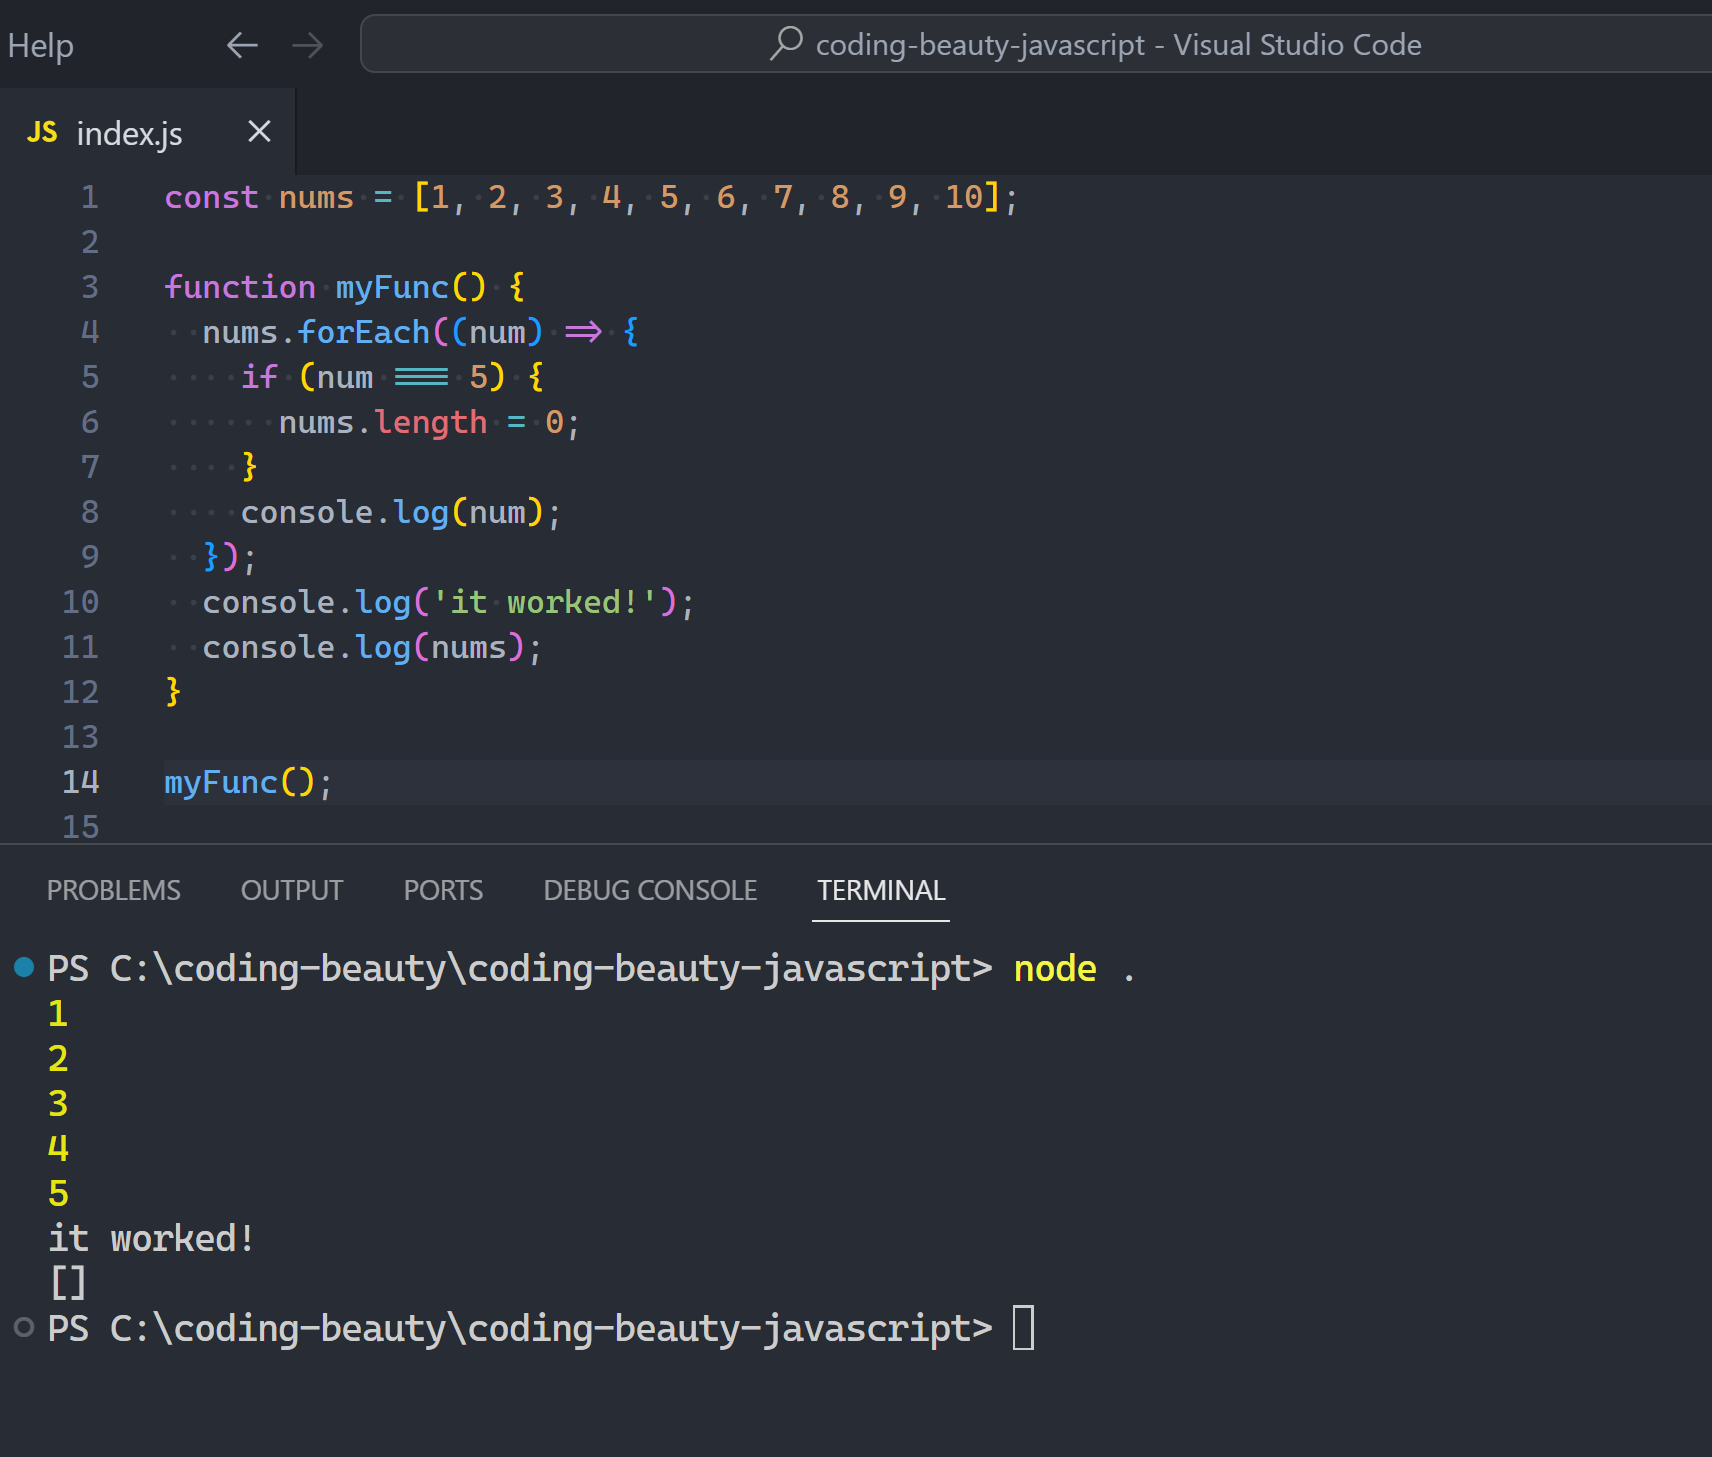
}Stop infinite scroll
This is a demo so we’ll have a artificial number of images like 50.
JavaScript
const imageCountText = document.getElementById('image-count');
// ...
let imagesShown = 0;
// ...
function loadMoreImages() {
// ...
const amountToLoad = Math.min(loadLimit, imageLimit - imagesShown);
// Load skeleton images...
// Update skeleton images...
// Update image count
imagesShown += amountToLoad;
imageCountText.innerText = imagesShown;
if (imagesShown === imageLimit) {
observer.unobserve(loadTrigger);
}
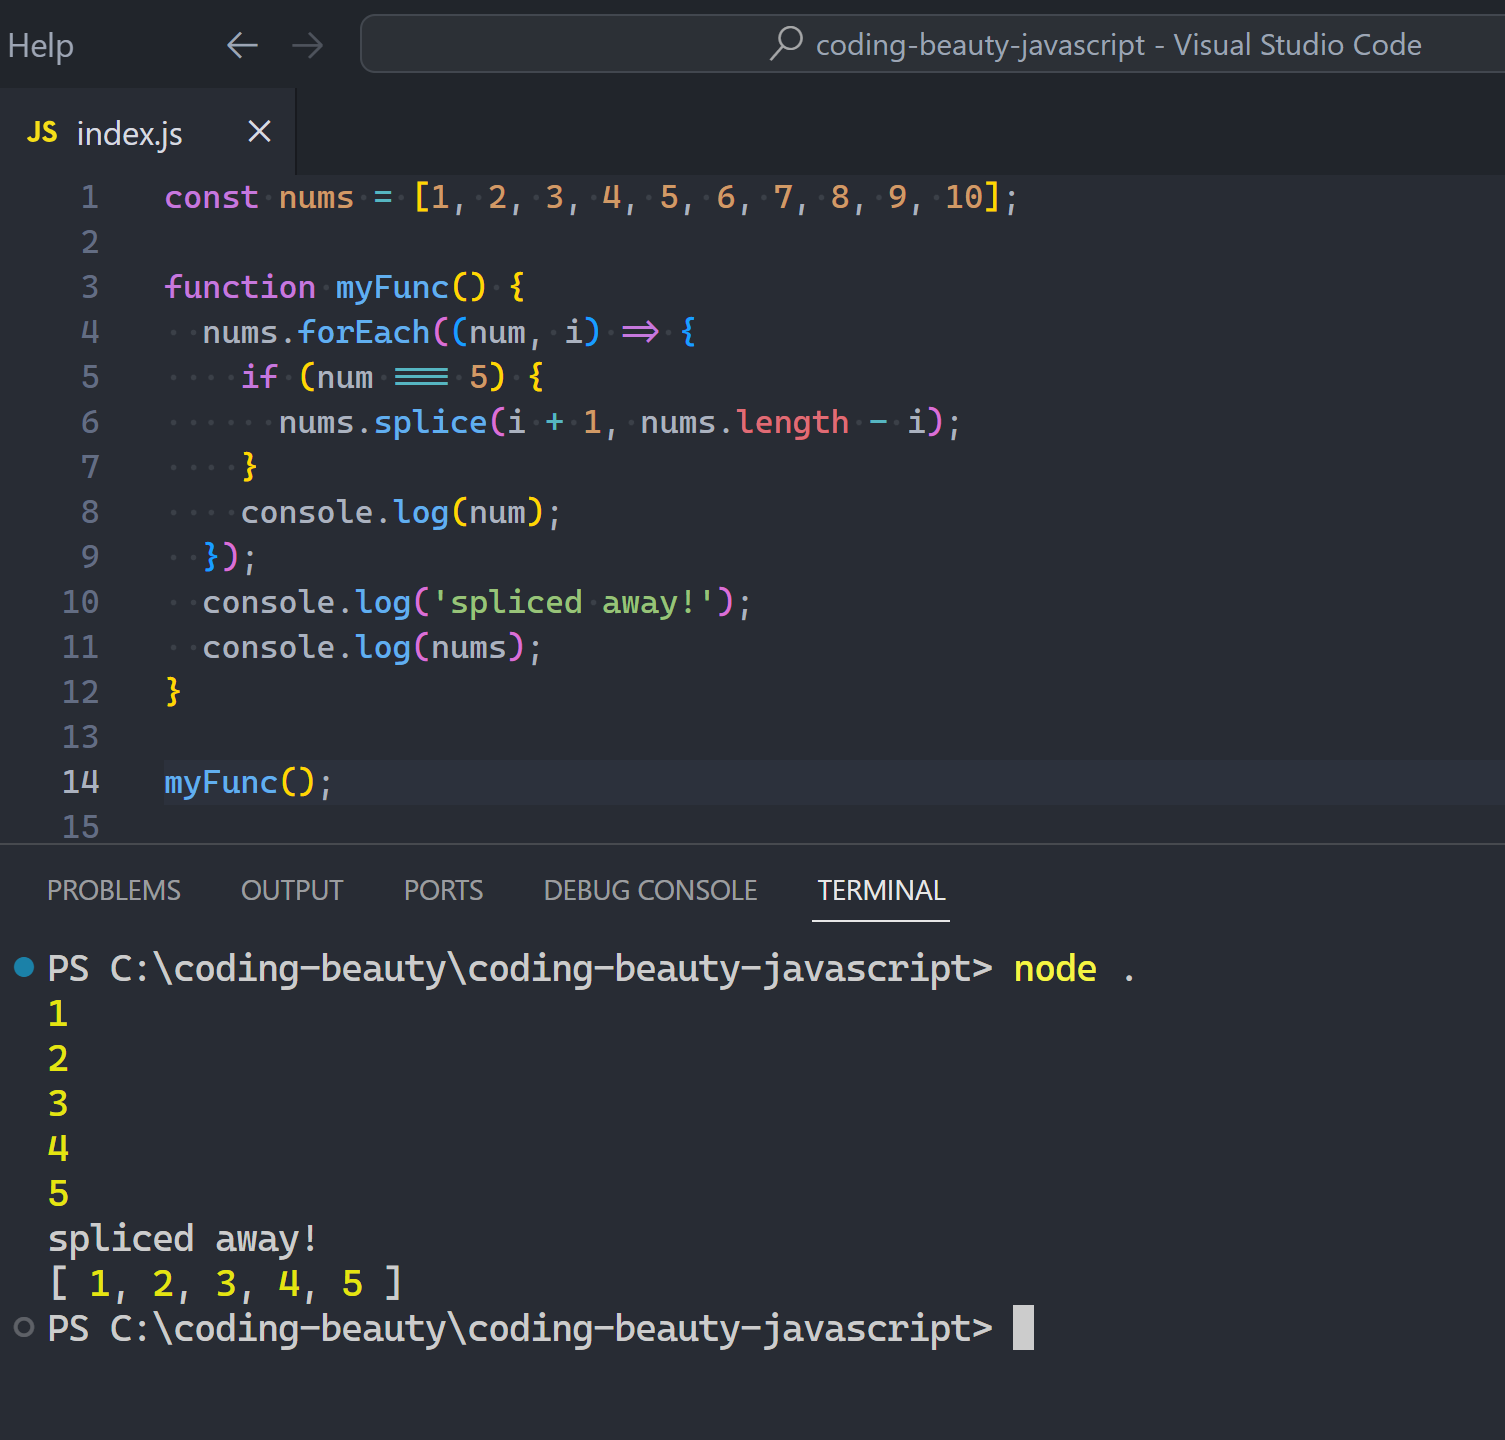
}Optimize performance with throttling
By using a throttle function to only allow new loadings within a certain time.
JavaScript
let throttleTimer;

// Only one image batch can be loaded within a second
const throttleTime = 1000;

// ...

function throttle(callback, time) {
  // Prevent additional calls until timeout elapses
  if (throttleTimer) {
    console.log('throttling');
    return;
  }
  throttleTimer = true;

  setTimeout(() => {
    callback();

    // Allow additional calls after timeout elapses
    throttleTimer = false;
  }, time);
}
By calling throttle() in the Intersection Observer’s callback with a time of 1000, we ensure that loadMoreImages() is never called multiple times within a second.
JavaScript
function detectScroll() {
  const observer = new IntersectionObserver(
    (entries) => {
          // ...
          throttle(() => {
            loadMoreImages();
          }, throttleTime);
        }
      }
    },
    // ...
  );

  // ...
}