Our capitalizeWords() function takes an array of words and returns a new array with all the words capitalized, without mutating the original array.
Firstly, we call the map() method on the array, passing a callback function as an argument. This function will be called and return a result for each word in the array.
In the callback, we get the word’s first character with charAt(), convert it to uppercase with toUpperCase(), and concatenate it with the rest of the string.
We use the Stringslice() method to get the remaining part of the string. Passing 1 to slice() makes it return the portion of the string from the second character to the end.
Note: String (and array) indexing is zero-based JavaScript, so the first character in a string is at index 0, the second at 1, and the last at str.length-1
After capitalizing the word, we lowercase it with the StringtoLowerCase() method. You can remove this toLowerCase() call if it’s not necessary for the non-first letter of each word in the array to be capitalized.
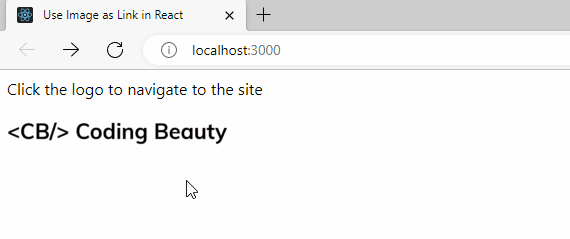
To use an image as a link in React, wrap the image in an anchor (a) tag. Clicking an image link will make the browser navigate to the specified URL.
For example:
App.js
import cbLogo from './cb-logo.png';

export default function App() {
  return (
    <div>
      Click the logo to navigate to the site
      <br />
      <br />
      <a href="https://codingbeautydev.com" target="_blank" rel="noreferrer">
        <img src={cbLogo} alt="Coding Beauty logo"></img>
      </a>
    </div>
  );
}
The browser navigates to the URL when the image link is clicked.
We use an import statement to link the image into the file, and assign it to the src prop of the img element to display it.
The properties set on an a element will work as usual when it wraps an image. For instance, in the example, we set the a element’s target property to _blank, to open the URL in a new tab. Removing this will make it open in the same tab as normal.
We also set the rel prop to noreferrer for security purposes. It prevents the opened page from gaining access to any information about the page from which it was opened from.
Use image as React Router link
For React Router, you can use an image as link by wrapping the image in a Link element.
For example:
ImagePages.jsx
import { Link } from 'react-router-dom';

export default function ImagesPage() {
  return (
    <div>
      <Link to="/nature" target="_blank" rel="noreferrer">
        <img src="/photos/tree-1.png" alt="Nature"></img>
      </Link>
    </div>
  );
}
To sort an array of objects by a boolean property in JavaScript, call the sort() method on the array with a callback as an argument. In the function, use the boolean property to return an expression that evaluates to a positive number, a negative number, or zero. This will sort the array in place, by the boolean property, i.e.:
const trueFirst = users.sort((a, b) => b.boolProp - a.boolProp);

const falseFirst = users.sort((a, b) => a.boolProp - b.boolProp);
The Arraysort() method takes a callback function as an argument. It uses the value returned from this callback to determine the order in which to sort the values. For each item pair in the array, a and b:
If the returned value is negative, a is placed before b in the sorted array.
If the value is positive, b is placed before a.
If the value is 0, the order of a and b is not changed.
const arr = [5, 3, 8, 1, 7];

// Sort in ascending order
arr.sort((a, b) => a - b);

console.log(arr); // [ 1, 3, 5, 7, 8 ]

// Sort in descending order
const desc = arr.sort((a, b) => b - a);

console.log(desc); // [ 8, 7, 5, 3, 1 ]
Because we used the subtraction operator (-) on the boolean values, they are coerced to numbers before the subtraction happens. Truthy values are coerced to 1, and falsy values 0.
After seeing how the sort() method and boolean coercion works, it’s easy to understand the way the was sorted to place the objects with a boolean property value of true above the ones with false, and vice versa.
Sort object array by boolean property without mutation
The sort() method sorts the array in place, which means it gets modified. To prevent this, we can use the spread syntax (...) to create a shallow copy of the array for the sort:
Let’s go through these terms in case you’re not familiar with them
XML (eXtensible Markup Language) is a markup language similar to HTML that was designed to store and transport data. Unlike HTML, XML doesn’t have any predefined tags. Instead, we define our own tags according to our requirements.
JSON (JavaScript Object Notation) is a text format used to store and transport data based on JavaScript object syntax and is commonly used to build RESTful APIs.
We use this object to specify various options for customizing the conversion process.
In our example, we don’t pass an object, so the default options are used. We can pass an object with a spaces option to properly format and indent the resulting JSON.
import { xml2json } from 'xml-js';

const xml = `<?xml version="1.0" encoding="UTF-8"?>
<languages>
   <language>
      English
   </language>
   <language>
      French
   </language>
   <language>
      Spanish
   </language>
</languages>`;

// 👇 Set "spaces" option
const json = xml2json(xml, { spaces: 2 });

console.log(json);
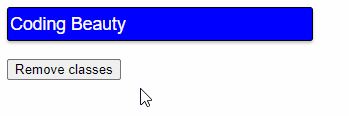
To remove all classes from an element in JavaScript, set the className property of the element to an empty string (''), i.e., element.className = ''. Setting the className property to an empty string will eliminate every class in the element.
const box = document.getElementById('box');

// 👇 Remove all classes from element.
box.className = '';
All classes from the input field are removed when the button is clicked.
The className property is used to get and set the value of the class attribute of a specified element.
Setting className to an empty string effectively removes all the classes from the element.
Remove all classes from element with removeAttribute() method
To remove all classes from an element with this approach, call the removeAttribute() method on the specified for the class attribute, i.e., element.removeAttribute('class'). This method will remove the class attribute from the element, effectively removing all the element’s classes.
const box = document.getElementById('box');

// 👇 Remove all classes from element
box.removeAttribute('class');
removeAttribute() takes a name and removes the attribute from an element with that name.
All classes from removed from the button when the other button is clicked.
In the first method, the class attribute remains on the element after setting the className property. But using the removeAttribute() method completely removes the class attribute from the element.
If the element doesn’t have a class attribute, removeAttribute() will return without causing an error.
Either of these two methods is fine, it’s up to you which one to pick. I think using the className property is better because it more clearly shows what you’re trying to do.
The “cannot read property ‘0’ of undefined” error occurs when you try to access the 0 index of an array-like variable, but the variable turns out to be undefined. To fix it, initialize the variable to a value of the correct data type before accessing the index.
Depending on your scenario, you might be able to resolve the error by doing one of the following:
Provide a defined fallback value for the variable.
Ensure that the variable has been initialized.
If accessing an index of a nested array, check that none of the outer arrays are undefined.
We’ll be touching on these three solutions in this article.
1. Provide defined fallback value
We can fix the “cannot read property ‘0’ of undefined” error in JavaScript by giving the variable a fallback value before accessing it at a specific index. This solution is beneficial when accessing an array property of an object that might return a value of undefined.
The “cannot read property ‘0’ of undefined” error in JavaScript will occur when you access the 0 index of a variable that is uninitialized. Unintialized variables in JavaScript have a default value of undefined.
let arr;

console.log(arr); // undefined

// ❌ Cannot read properties of undefined (reading '0')
console.log(arr[0]);

const str;

// ❌ Cannot read properties of undefined (reading '0')
console.log(str[0]);
Fixing the error in this case is easy; just set the variable to a value, e.g., an empty array ([]) for arrays, an empty string ('') for strings, etc.
let arr = [];

console.log(arr); // []

// ✅ No error
console.log(arr[0]); // undefined

const str = '';

// ✅ No error
console.log(str[0]); // undefined
3. Check outer arrays for undefined
The “cannot read property ‘0’ of undefined” error can also occur when accessing the 0 index in nested arrays.
For nullish values (undefined or null), the optional chaining operator (?.) returns undefined instead of trying to access the property and causing an error.
Since the 1 index of the outer array returned undefined, the optional chaining operator will prevent the property access.
If the value is not nullish, the ?. operator will perform the property access:
const words = [['javascript']];

console.log(words?.[0]?.[0]); // javascript

console.log(words?.[0]?.[0]?.[0]); // j
The Intersection Observer API is used to asynchronously observe changes in the intersection of an element with the browser’s viewport. It makes it easy to perform tasks that involve detecting the visibility of an element, or the relative visibility of two elements in relation to each other, without making the site sluggish and diminishing the user experience. We’re going to learn all about it in this article.
Uses of Intersection Observer
Before we start exploring the Intersection Observer API, let’s look at some common reasons to use it in our web apps:
Infinite scrolling
This is a web design technique where content is loaded continuously as the user scrolls down. It eliminates the need for pagination and can improve user dwell time.
Lazy loading
Lazy loading is a design pattern in which images or other content are loaded only when they are scrolled into the view of the user, to increase performance and save network resources.
Scroll-based animations
This means animating elements as the user scrolls up or down the page. Sometimes the animation plays completely once a certain scroll position is reached. Other times, the time in the animation changes as the scroll position changes.
Ad revenue calculation
We can use Intersection Observer to detect when an ad is visible to the user and record an impression, which affects ad revenue.
Creating an Intersection Observer
Let’s take a look at a simple use of an Intersection Observer in JavaScript.
The callback function receives an array containing objects of the IntersectionObserverEntry interface. This object contains intersection-related information about an element currently being watched by the Observer.
The callback is called whenever the target element intersects with the viewport. It is also called the first time the Observer is asked to watch the element.
We use the for...of loop to iterate through the entries passed to the callback. We’re observing only one element, so the entries array will contain just the IntersectionObserverEntry element that represents the box, and the for...of loop will have only one iteration.
The isIntersecting property of an IntersectionObserverEntry element returns a boolean value that indicates whether the element is intersecting with the viewport.
When isIntersection is true, it means that the element is transitioning from non-intersecting to intersecting. But when it is false, it indicates that the element is transitioning from intersecting to non-intersecting.
So we use the isIntersection property to set the color of the element to blue as it enters the viewport, and back to black as it leaves.
We call the observe() method on the IntersectionObserver object to make the Observer start watching the element for an intersection.
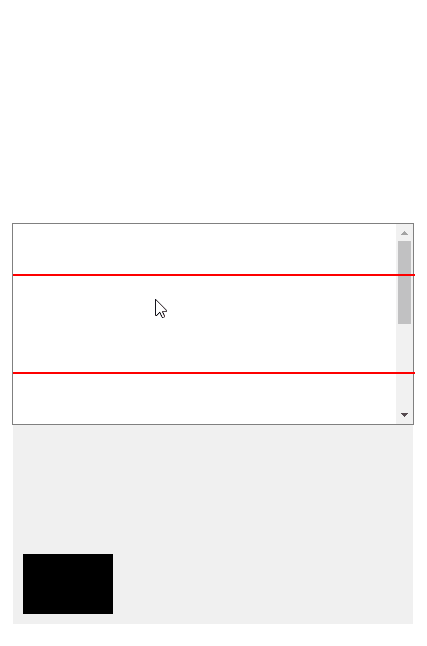
In the demo below, the white area with the scroll bar represents the viewport. The gray part indicates areas on the page that are outside the viewport and not normally visible in the browser.
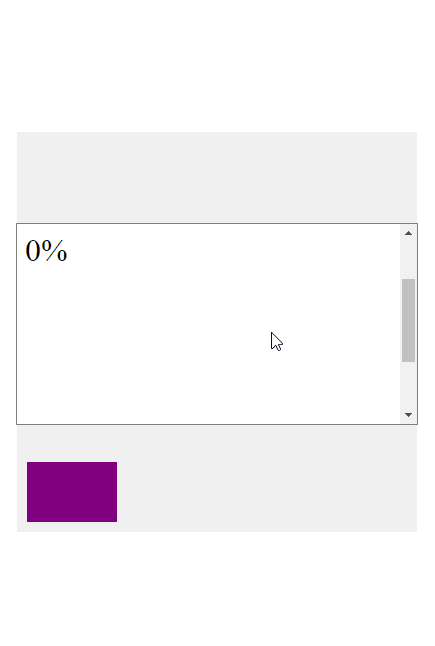
Watch how the color of the box changes as soon as one single pixel of it enters the viewport:
The element changes color once one single pixel of it enters the viewport.
Intersection Observer options
Apart from the callback function, the IntersectionObserver() constructor also accepts an options object we use to customize the conditions that must be met for the callback to be invoked.
threshold
The threshold property accepts a value between 0 and 1 that specifies the percentage of the element that must be visible within the viewport for the callback to be invoked. It has a value of 0 by default, meaning that the callback will be run once a single pixel of the element enters the viewport.
Let’s modify our previous example to use a threshold of 1 (100%):
We pass 5 percentage values in an array to the threshold property and display each value as the element reaches it. To do this we use the intersectionRatio property, a number between 0 and 1 indicating the current percentage of the element that is in the viewport.
The text is updated each time a percentage of the element in the viewport reaches a certain threshold.
Notice how the text shown doesn’t always match our thresholds, e.g., 2% was shown for the 0% threshold in the demo. This happens because when we scroll fast and reach a threshold, by the time the callback can fire to update the text, we have already scrolled in more of the element beyond the threshold.
If we scrolled more slowly the callback would have time to update the text before the element scrolls past the current threshold.
rootMargin
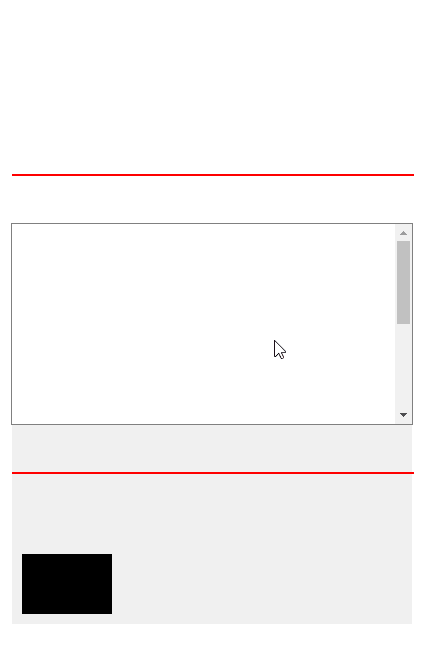
The rootMargin property applies a margin around the viewport or root element. It accepts values that the CSS margin property can accept e.g., 10px 20px 30px 40px (top, right, bottom, left). A margin grows or shrinks the region of the viewport that the Intersection Observer watches for an intersection with the target element.
Here’s an example of using the rootMargin property:
index.js
const observer = new IntersectionObserver(
  (entries) => {
    for (const entry of entries) {
      const intersecting = entry.isIntersecting;
      entry.target.style.backgroundColor = intersecting ? 'blue' : 'black';
    }
  },
  // 👇 Root margin 50px from bottom of viewport
  { rootMargin: '50px' }
);

const box = document.getElementById('box');

observer.observe(box);
After setting a rootMargin of 50px, the viewport is effectively increased in height for intersection purposes, and the callback function will be invoked when the element comes within 50px of the viewport.
The red lines in the demo indicate the bounds of the region watched by the Observer for any intersection.
The element changes color when it comes within 50px of the viewport.
We can also specify negative margins to shrink the area of the viewport used for the intersection.
Now the callback is fired when a single pixel of the element is more than 50px inside the viewport.
The element changes color when a single pixel of the element is more than 50px inside the viewport.
root
The root property accepts an element that must be an ancestor of the element being observed. By default, it is null, which means the viewport is used. You won’t need to use this property often, but it is handy when you have a scrollable container on your page that you want to check for intersections with one of its child elements.
For instance, to create the demos in this article, I set the root property to a scrollable container on the page, to make it easy for you to visualize the viewport and the areas outside it and gain a better understanding of how the intersection works.
Second callback parameter
The callback passed to the IntersectionObserver() constructor actually has two parameters. The first parameter is the entries parameter we looked at earlier. The second is simply the Observer that is watching for intersections.
This parameter is useful for accessing the Observer from within the callback, especially in situations where the callback is in a location where the Observer variable can’t be accessed, e.g., in a different file from the one containing the Observer variable.
Preventing memory leaks
We need to stop observing elements when they no longer need to be observed, like when they are removed from the DOM or after one-time scroll-based animations, to prevent memory leaks or performance issues.
We can do this with the unobserve() method.
new IntersectionObserver((entries, observer) => {
  entries.forEach(entry => {
    if (entry.isIntersecting) {
      doAnim(entry.target);
      observer.unobserve(entry.target);
    }
  });
});
The unobserver() takes a single element as its argument and stops observing that element.
There is also the disconnect() method, which makes the Observer stop observing all elements.
Conclusion
Intersection Observer is a powerful JavaScript API for easily detecting when an element has intersected with the viewport or a parent element. It lets us implement lazy loading, scroll-based animations, infinite scrolling, and more, without causing performance issues and having to use complicated logic.
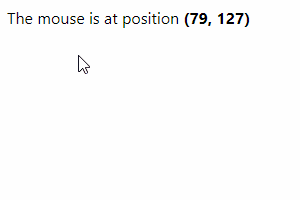
To get the position of the mouse in React, add a mousemove event handler to the window object and access the clientX and clientY properties of the MouseEvent object to get the X and Y coordinates of the mouse respectively.
The mousemove event is triggered on an element when the mouse hovers on it. To be more precise, it is fired when the mouse is moved and the hotspot of the cursor is within the bounds of the element.
We attach the event listener to the window object to trigger the event whenever the mouse is moved anywhere in the page.
We passed an empty dependencies array to the useEffect hook because we want to add a handler for the mousemove event only once – when the component mounts.
In the cleanup function, we use the removeEventListener() method to remove the event listener previously added and prevent a memory leak when the component is unmounted.
The mousemove event listener receives a MouseEvent object used to access information and perform actions related to the event. We use the clientX and clientY properties of this object to get the position of the mouse on the X-coordinate and Y-coordinate respectively in the viewport of the application.
Get mouse position relative to element in React
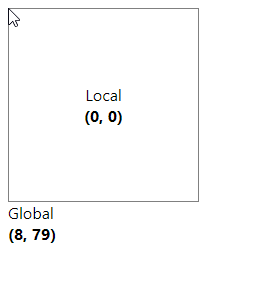
In the previous example we were able to get the mouse position in global coordinates.
In global coordinates position (0,0) is at the top left of the webpage and position (Xmax, Ymax) is at the bottom right.
We might instead want to get the mouse position within the region of an element.
To get the mouse position relative to an element in React, set an onMouseMove event handler on the element, then calculate the local X and Y position using properties of the MouseEvent object passed to the event handler.
Now the resulting X and Y coordinates will be relative to the element. For example, position (0,0) will be at the top left of the element, not the page:
The mouse position relative to the element is shown.
We subtract the offsetLeft property of the element from the clientX property of the MouseEvent object to get the X position relative to the element.
Similarly, to get the Y position, we subtract the offsetTop property of the element from the clientY property of the MouseEvent object.
const handleMouseMove = (event) => {
  // Calculate position within bounds of element
  const localX = event.clientX - event.target.offsetLeft;
  const localY = event.clientY - event.target.offsetTop;

  setLocalMousePos({ x: localX, y: localY });
};
The offsetLeft property returns the number of pixels between the left position of an element and that of its parent.
Likewise, the offsetTop property returns the number of pixels between the top position of an element and that of its parent.
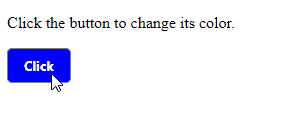
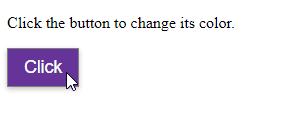
The active state variable determines the style that will be applied to the element. When it is false (the default), a certain style is applied.
We set a click event handler on the element, so that the handler will get called when it is clicked. The first time this handler is called, the active variable gets toggled to true, which changes the style of the element.
Note
To prevent the style from changing every time the element is clicked, we can set the state variable to true, instead of toggling it:
We used ternary operators to conditionally set the backgroundColor and color style on the element.
The ternary operator works like an if/else statement. It returns the value before the ? if it is truthy. Otherwise, it returns the value to the left of the :.
const treshold = 10;

const num = 11;

const result = num > treshold ? 'Greater' : 'Lesser';

console.log(result) // Greater
So if the active variable is true, the backgroundColor and color are set to white and black respectively. Otherwise, they’re set to blue and white respectively.
Change element style on click with classes
To change the style of an element on click in Vue, we can also create classes containing the alternate styles and conditionally set them to the class prop of the element, depending on the value of the boolean state variable.
We create two classes (active and non-active) with different styles, then we use the ternary operator to add the active class if the active variable is true, and add the non-active class if otherwise.
The advantage of using classes is that we get to cleanly separate the styles from the template markup. Also, we only need to use one ternary operator.
Change element style on click with event.currentTarget.classList
There are other ways to change the style of an element in Vue without using a state variable.
With classes defined, we can use the currentTarget.classList property of the Event object passed to the click event handler to change the style of the element.
We don’t use a state variable this time, so we add the non-active class to the element, to customize its default appearance.
The click event listener receives an Event object used to access information and perform actions related to the click event.
The currentTarget property of this object returns the element that was clicked and had the event listener attached.
We call the classList.remove() method on the element to remove the non-active class, then we call the classList.add() method on it to add the active class.
Notice that the style of the element didn’t change anymore after being clicked once. If you want to toggle the style whenever it is clicked, you can use the toggle() class of the element to alternate the classes on the element.