The useEffect hook is called in a component after the first render and every time the component updates. By the timer useEffect is called, the real DOM would have been updated to reflect any state changes in the component.
Let’s take a look at a quick example to practically observe this behavior:
The first time the component renders from page loading, useEffect is called and uses the document.title property to set the page title to a string whose value depends on a count state variable.
The page title is changed from useEffect being called after the component is rendered.
If you watch closely, you’ll see that the page title was initially “Coding Beauty React Tutorial”, before the component was added to the DOM and the page title was changed from the useEffect call.
useEffect will also be called when the state is changed:
The page title is changed from useEffect being called after the component is updated.
As you might know, useEffect accepts an optional dependency array as its second argument. This array contains the state variables, props, and functions that it should watch for changes.
In our example, the dependency array contains only the count state variable, so useEffect will only be called when the count state changes.
useEffect called twice in React 18?
React 18 introduced a new development-only check to Strict Mode. This new check automatically unmounts and remounts a component when it mounts for the first time, and restores the previous state on the second mount.
Note: The check was added because of a new feature that will be added to React in the future. Learn more about it here.
This means that the first render causes useEffect to actually be called two times, instead of just once.
Here’s an example that lets us observe this new behavior.
It’s a basic time-counting app that implements the core logic that can be used to build timer and stopwatch apps.
We create an interval listener with setInterval() that increments a time state by 1 every second. The listener is in a useEffect that has an empty dependency array ([]), because we want it to be registered only when the component mounts.
But watch what happens when we check out the result on the web page:
The seconds go up by 2 every second.
The seconds are going up by 2 every second instead of 1! Because React 18’s new check causes the component to be mounted twice, an useEffect is called accordingly.
We can fix this issue by unregistering the interval listener in the useEffect‘s cleanup function.
The cleanup function that the useEffect callback returns is called when the component is mounted. So when React 18 does the compulsory first unmounting, the first interval listener is unregistered with clearInterval(). When the second interval listener is registered on the second mount, it will be the only active listener, ensuring that the time state is incremented by the correct value of 1 every second.
The seconds go up by 1 every second – success.
Note that even if we didn’t have this issue of useEffect being called twice, we would still have to unregister the listener in the cleanup function, to prevent memory leaks after the component is removed from the DOM.
We create the boolean state with the useState hook. useState returns an array of two values, the first is the value of the state, the second is a function that updates the state when it is called.
We pass a callback function to setVisible because the callback is always passed the latest visible state.
Tip: Always pass a function to setState when the new state is computed from the current state data.
In our case, the callback simply negates the boolean value and returns the result to negate the state.
The logical NOT (!) operator converts a truthy value to false and a falsy value to true.
Note: In JavaScript there are only 6 falsy values: undefined, null, '' (empty string), NaN, 0, and false. Every other value is truthy and will result in false when negated.
Perform action on boolean state toggle
Sometimes you want to perform an action outside of re-rendering when the boolean state changes in the component, e.g., a network request. To carry out such an action, place the code in the useEffect hook and include the boolean state variable in useEffect‘s dependencies array.
The code in the useEffect hook runs after the component mounts or updates from a change in the visible state. Here, the state controls the visibility of an element, so in the hook, we check if the element is visible, and if so, we make a network request to a server to update view stats associated with the element.
Perform action on boolean state change but skip first render
Depending on your scenario, you might want the action to run when the component updates from a state change, but not it when it first mounts.
We can do this by creating a ref flag variable having an initial value of false in the first render, and change its value to true for all subsequent renders.
useRef returns a mutable ref object that doesn’t change value when a component is updated. Also, modifying the value of this object’s current property does not cause a re-render. This is in contrast to the setState update function returned from useState.
If the ref’s value is false, we prevent the action from happening in useEffect and change the value to true for the following renders. Otherwise, we execute the action.
In React apps, event listeners or observers perform certain actions when specific events occur. While it’s quite easy to create event listeners in React, there are common pitfalls you need to avoid to prevent confusing errors. These mistakes are made most often by beginners, but it’s not rare for them to be the reason for one of your debugging sessions as a reasonably experienced developer.
In this article, we’ll be exploring some of these common mistakes, and what you should do instead.
1. Accessing state variables without dealing with updates
Take a look at this simple React app. It’s essentially a basic stopwatch app, counting up indefinitely from zero.
However, when we run this app, the results are not what we’d expect:
Stuck at 1
This happens because the time state variable being referred to by the setInterval() callback/closure refers to the stale state that was fresh at the time when the closure was defined.
The closure is only able to access the time variable in the first render (which had a value of 0) but can’t access the new time value in subsequent renders. JavaScript closure remembers the variables from the place where it was defined.
The issue is also due to the fact that the setInterval() closure is defined only once in the component.
The time variable from the first render will always have a value of 0, as React doesn’t mutate a state variable directly when setState is called, but instead creates a new variable containing the new state. So when the setInterval closure is called, it only ever updates the state to 1.
Here are some ways to avoid this mistake and prevent unexpected problems.
1. Pass function to setState
One way to avoid this error is by passing a callback to the state updater function (setState) instead of passing a value directly. React will ensure that the callback always receives the most recent state, avoiding the need to access state variables that might contain old state. It will set the state to the value the callback returns.
The time is increased by 1 every second – success.
Now the time state will be incremented by 1 every time the setInterval() callback runs, just like it’s supposed to.
2. Event listener re-registration
Another solution is to re-register the event listener with a new callback every time the state is changed, so the callback always accesses the fresh state from the enclosing scope.
We do this by passing the state variable to useEffect‘s dependencies array:
Every time the time state is changed, a new callback accessing the fresh state is registered with setInterval(). setTime() is called with the latest time state added to 1, which increments the state value.
2. Registering event handler multiple times
This is a mistake frequently made by developers new to React hooks and functional components. Without a basic understanding of the re-rendering process in React, you might try to register event listeners like this:
If you do have a basic understanding of this, you should be able to already guess what this will lead to on the web page.
The seconds keep accelerating.It eventually gets as bad as this.
What’s happening?
What’s happening is that in a functional component, code outside hooks, and outside the returned JSX markup is executed every time the component re-renders.
Here’s a basic breakdown of what happens in a timeline:
1st render: listener 1 registered
1 second after listener 1 registration: time state updated, causing another re-render)
2nd render: listener 2 registered.
Listener 1 never got de-registered after the re-render, so…
1 second after last listener 1 call: state updated
3rd render: listener 3 registered.
Listener 2 never got de-registered after the re-render, so…
1 second after listener 2 registration: state updated
4th render: listener 4 registered.
1 second after last listener 1 call: state updated
5th render: listener 5 registered.
1 second after last listener 2 call: state updated
6th render: listener 6 registered.
Listener 3 never got de-registered after the re-render, so…
1 second after listener3 registration: state updated.
7th render: listener 7 registered…
Eventually, things spiral out of control as hundreds and then thousands (and then millions) of callbacks are created, each running at different times within the span of a second, incrementing the time by 1.
The fix for this is already in the first example in this article – put the event listener in the useEffect hook, and make sure to pass an empty dependencies array ([]) as the second argument.
useEffect runs after the first render and whenever any of the values in its dependencies array change, so passing an empty array makes it run only on the first render.
The time increases steadily, but by 2.
The time increases steadily now, but as you can see in the demo, it goes up by 2 seconds, instead of 1 second in our very first example. This is because in React 18 strict mode, all components mount, unmount, then mount again. so useEffect runs twice even with an empty dependencies array, creating two listeners that update the time by 1 every second.
We can fix this issue by turning off strict mode, but we’ll see a much better way to do so in the next section.
3. Not unregistering event handler on component unmount.
What happened here was a memory leak. We should have ensured that any created event listener is unregistered when the component unmounts. So when React 18 strict mode does the compulsory unmounting of the component, the first interval listener is unregistered before the second listener is registered when the component mounts again. Only the second listener will be left and the time will be updated correctly every second – by 1.
You can perform an action when the component unmounts by placing in the function useEffect optionally returns. So we use clearInterval to unregister the interval listener there.
useEffect‘s cleanup function runs after every re-render, not only when the component unmounts. This prevents memory leaks that happen when an observable prop changes value without the observers in the component unsubscribing from the previous observable value.
Conclusion
Creating event listeners in React is pretty straightforward, you just need to be aware of these caveats, so you avoid unexpected errors and frustrating debugging spells. Avoid accessing stale state variables, don’t register more event listeners than required, and always unregister the event listener when the component unmounts.
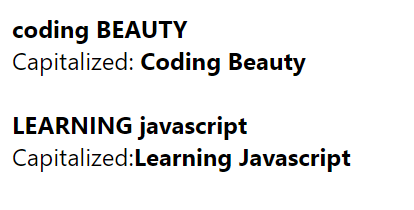
To capitalize the first letter of each word in a string in React:
Split the string into an array of words with .split('').
Iterate over the words array with .map().
For each word, return a new word that is an uppercase form of the word’s first letter added to the rest of the word, i.e., word.charAt(0).toUpperCase() + word.slice(1).
Join the words array into a string with .join(' ').
After creating the array of words, we call the map() method on it, with a callback function as an argument. This function is called by map() and returns a result for each word in the array.
In the function, we get the word’s first character with charAt(), convert it to uppercase with toUpperCase(), and concatenate it with the rest of the string.
We use the Stringslice() method to get the remaining part of the string. Passing 1 to slice() makes it return the portion of the string from the second character to the end.
Note: String (and array) indexing is zero-based JavaScript, so the first character in a string is at index 0, the second at 1, and the last at str.length-1
Lastly, we concatenate the words into a single string, with the Arrayjoin() method
Passing a space (' ') to join() separates the words by a space in the resulting string.
JavaScriptCopied!
// Welcome To Coding Beauty
console.log(['Welcome', 'To', 'Coding', 'Beauty'].join(' '));
After creating the capitalizeWords() function, we call it as the component is rendered by wrapping it in curly braces ({ }) in our JSX code.
We use the :hover pseudo-class to style an element when the user hovers over it with the mouse pointer.
Change element style on hover with inline styling
We can also change an element’s style on hover using inline styles and the element’s style prop. To do this, we need to create state that will determine whether the hover styles should be applied to the element or not. We also need to add event listeners for the mouseenter and mouseleave and change the state’s value in them.
We use the useState hook to create the boolean state variable that will determine whether the hover styles should be applied to the element or not. useState returns an array of two values. The first is a variable that stores the state, and the second is a function that updates the state when it is called.
We use the onMouseEnter prop to listen for the mouseenter event to detect when the mouse enters within the element’s bounds.
Note: While we could also listen for the mouseover event to detect hover, this event is triggered on an element and every single one of its ancestor elements in the DOM tree (i.e. it bubbles) and this could cause serious performance problems in deep hierarchies. mouseenter doesn’t bubble so we can use it without worrying about this.
Similarly, we use the onMouseLeave prop to listen for the mouseleave to detect when the mouse leaves the element’s bounds.
We use the ternary operator to conditionally set the style based on the boolean state.
Change element style on hover with custom component
If you frequently use the inline styles approach to change the element’s style on hover, it will be better if you encapsulate the logic into a custom component, so you can reuse it in multiple places in your codebase and avoid unnecessary duplication.
The Hover component takes a callback function as its child. It passes the state variable storing the hover state to this callback so that you can use it to change the style of the element returned from the callback. Hover calls the callback to render this element.
It wraps the element with a div, on which it listens for the mouseenter and mouseleave events to update the state variable. We set the display CSS property to contents on the wrapper because it plays no visual role on the page. It’s only there for the hover detection.
With the useState hook, we create a state variable (message) to store the input field’s current value. We also create another state variable (updated) that will be updated with the input field value when the button is clicked.
We set an onChange event handler on the input field to execute an action. In the handler, we use the Event object’s target property to access the object representing the input element. The value property of this object contains the input value, so we pass it to setMessage to update message, and this reflects on the page.
After setting up the controlled input, we can now use message outside the handleChange handler to get the current value of the input field.
So in the onClick event handler we set on the button, we use setUpdated(message) to update the updated variable with the input field’s current value.
Get input value with ref
Alternatively, we can use a ref to get the value of an input field in React. After setting the ref on the input, we’ll be able to use the ref object to access the input field’s current value in the event handler.
We set an onKeyDown event listener on the input to perform an action when a key is pressed. In this listener, we use the KeyboardEvent object’s key property to check if the key pressed is Enter, and if so, we use the ref object to get the input’s value and update the updated variable with it.
While the data in a controlled input is handled by React state, the data in an uncontrolled input is handled by the DOM itself. This is why the input in the example above doesn’t have a value prop or onChange event handler set. Instead, we access the input field value with a React ref. The DOM updates this value when the text in the input is changed.
We create a ref object with the useRef hook and set it to the ref prop of the input. Doing this sets the current property of the ref object to the DOM object that represents the input element.
useRef returns a mutable ref object that does not change value when a component is updated. Also, modifying the value of this object’s current property does not cause a re-render. This is in contrast to the setState update function returned from useState.
Although the React documentation recommends using controlled components, uncontrolled components offer some advantages. You might prefer them if the form is simple and doesn’t need instant validation, and values only need to be accessed on submission.
To open a link in a new tab programmatically in React, call the window.open() method with the link as an argument, e.g., window.open('https://codingbeautydev.com'). The open() method will open the link in a new browser tab.
In the following example, we programmatically open the link in a new tab at the end of a countdown:
App.js
import { useRef, useEffect, useState } from 'react';

export default function App() {
  const [timeLeft, setTimeLeft] = useState(3);
  const interval = useRef();

  useEffect(() => {
    interval.current = setInterval(() => {
      // Decrease "timeLeft" by 1 every second
      setTimeLeft((prev) => prev - 1);
    }, 1000);

    return () => clearInterval(interval.current);
  }, []);

  useEffect(() => {
    // Open the link in a new tab when the countdown ends
    if (timeLeft === 0) {
      clearInterval(interval.current);

      // 👇 Open link in new tab programmatically
      window.open('https://codingbeautydev.com', '_blank', 'noreferrer');
    }
  }, [timeLeft]);

  return (
    <div>
      The link will open in <b>{timeLeft}</b> second(s)
    </div>
  );
}
The link is opened in a new tab when the countdown ends.
We use the open() method of the window object to programmatically open a link in a new tab. This method has three optional parameters:
url: The URL of the page to open in a new tab.
target: like the target attribute of the <a> element, this parameter’s value specifies where to open the linked document, i.e., the browsing context. It accepts all the values the target attribute of the <a> element accepts.
windowFeatures: A comma-separated list of feature options for the window. noreferrer is one of these options.
Passing _blank to the target parameter makes the link get opened in a new tab.
Open link in new tab on button click
Being able to open a link in a new tab programmatically means that we can use a button in place of an anchor link to open a URL on click. We’d just set an onClick event listener on the button element and call the window.open() method in the listener.
For example:
App.js
export default function App() {
  const openInNewTab = (url) => {
    window.open(url, '_blank', 'noreferrer');
  };

  return (
    <div>
      <p>Visit codingbeautydev.com in a new tab</p>

      <button
        role="link"
        onClick={() => openInNewTab('https://codingbeautydev.com')}
      >
        Visit
      </button>
    </div>
  );
}
To open a link in a new tab in React, create an anchor (<a>) element and set its target attribute to _blank, e.g., <a href="https://codingbeautydev.com" target="_blank">Link</a>. The _blank value specifies that the link should be opened in a new tab.
The target property of the anchor element specifies where to open the linked document. By default target has a value of _self, which makes the linked page open in the same frame or tab where it was clicked. To make the page open in a new tab, we set target to _blank.
We also set the rel prop to noreferrer for security purposes. It prevents the opened page from gaining any information about the page that it was opened from.
Clicking the link opens it in a new tab.
Open link in new tab programmatically
We can use the window.open() method to programmatically open a link in a new tab in React, e.g., window.open(url, '_blank', 'noreferrer').
For example:
App.js
import { useRef, useEffect, useState } from 'react';

export default function App() {
  const [timeLeft, setTimeLeft] = useState(3);
  const interval = useRef();

  useEffect(() => {
    interval.current = setInterval(() => {
      // Decrease "timeLeft" by 1 every second
      setTimeLeft((prev) => prev - 1);
    }, 1000);

    return () => clearInterval(interval.current);
  }, []);

  useEffect(() => {
    // Open the link in a new tab when the countdown ends
    if (timeLeft === 0) {
      clearInterval(interval.current);

      // 👇 Open link in new tab programmatically
      window.open('https://codingbeautydev.com', '_blank', 'noreferrer');
    }
  }, [timeLeft]);

  return (
    <div>
      The link will open in <b>{timeLeft}</b> second(s)
    </div>
  );
}
The link is opened in a new tab when the countdown ends.
We use the open() method of the window object to programmatically open a link in a new tab. This method has three optional parameters:
url: The URL of the page to open in a new tab.
target: like the target attribute of the <a> element, this parameter’s value specifies where to open the linked document, i.e., the browsing context. It accepts all the values the target attribute of the <a> element accepts.
windowFeatures: A comma-separated list of feature options for the window. noreferrer is one of these options.
Passing _blank to the target parameter makes the link get opened in a new tab.
Open link in new tab on button click
Being able to open a link in a new tab programmatically means that we can use a button in place of an anchor link to open a URL on click. We’ll just set an onClick event listener on the button element and call the window.open() method in the listener.
For example:
App.js
export default function App() {
  const openInNewTab = (url) => {
    window.open(url, '_blank', 'noreferrer');
  };

  return (
    <div>
      <p>Visit codingbeautydev.com in a new tab</p>

      <button
        role="link"
        onClick={() => openInNewTab('https://codingbeautydev.com')}
      >
        Visit
      </button>
    </div>
  );
}
React now has concurrency support with the release of version 18. There are numerous features now that help to make better use of system resources and boost app performance. One such feature is the useDefferedValue hook, in this article we’re going to learn about useDeferredValue and understand the scenarios where we can use it.
Why do we need useDefferedValue?
Before we can see this hook in action, we need to understand something about how React manages state and updates the DOM.
Here we create a state variable with the useState hook, and a computed value (computedValue) derived from the state. We use the useMemo hook to recalculate the computed value only when the state changes.
So when the value of the input field changes, the name state variable is updated and the computed value is recomputed before the DOM is updated.
This usually isn’t an issue, but sometimes this recalculation process involves a large amount of computation and takes a long time to finish executing. This can reduce performance and degrade the user experience.
For example, we could be developing a feature that lets a user search for an item in a gigantic list:
In this example, we have a query state variable used to filter through a huge list of items. The longer the list, the more time it will take for the filtering to finish and the list variable to be updated for the DOM update to complete.
So when the user types something in the input field, the filtering will cause a delay in the DOM update and it’ll take time for the text in the input to reflect what the user typed immediately. This slow feedback will have a negative effect on how responsive your app feels to your users.
I simulated the slowness in the demo below so you can better understand this problem. There are only a few search results for you to properly visualize it, and they’re each just the uppercase of whatever was typed into the input field.
In this demo, I am typing each character one after the other as quickly as I can, but because of the artificial slowness, it takes about a second for my keystroke to change the input text.
The input doesn’t respond to keystrokes fast enough.
useDeferredValue in action
This is a situation where the useDeferredValue hook is handy. useDeferredValue() accepts a state value as an argument and returns a copy of the value that will be deferred, i.e., when the state value is updated, the copy will not update accordingly until after the DOM has been updated to reflect the state change. This ensures that urgent updates happen and are not delayed by less critical, time-consuming ones.
In the example above, our previous code has been modified to use the useDeferredValue hook. As before, the query state variable will be updated when the user types, but this time, useMemo won’t be invoked right away to filter the large list, because now deferredQuery is the dependency useMemo is watching for changes, and useDeferredValue ensures that deferredQuery will not be updated until after query has been updated and the component has been re-rendered.
Since useMemo won’t be called and hold up the DOM update from the change in the query state, the UI will be updated without delay and the input text will change once the user types. This solves the responsiveness issue.
After the query state is updated, thendeferredQuery will be updated, causing useMemo to filter through the large list and recompute a value for the list variable, updating the list of items shown below the input field.
The input field responds instantly to keystrokes.
As you can see in the demo, the text changes immediately as I type, but the list lags behind and updates sometime later.
If we keep changing the input field’s text in a short period (e.g., by typing fast), the deferredQuery state will remain unchanged and the list will not be updated. This is because the query state will keep changing before useDeferredValue can be updated, so useDeferredValue will continue to delay the update until it has time to set deferredQuery to the latest value of query and update the list.
Here’s what I mean:
Typing quickly prevents the list from updating right away.
This is quite similar to debouncing, as the list is not updated till a while after input has stopped.
Tip
Sometimes in our apps, we’ll want to perform an expensive action when an event occurs. If this event happens multiple times in a short period, the action will be done as many times, decreasing performance. To solve this, we can set a requirement that the action only be carried out “X” amount of time since the most recent occurrence of the event. This is called debouncing.
For example, in a sign-up form, instead of sending a request once the user types to check for a duplicate username in the database, we can make the request get sent only 500 ms since the user last typed in the username input field (or of course, we could perform this duplicate check after the user submits the form instead of near real-time).
Since the useDeferredValue hook defers updates and causes additional re-render, it’s important that you don’t overuse it as this could actually cause the performance problems we’re trying to avoid, as it forces React to do extra re-renders in your app. Use it only when you have critical updates that should happen as soon as possible without being slowed down by updates of lower priority.
Conclusion
The useDeferred value accepts a state variable and returns a copy of it that will not be updated until the component has been re-rendered from an update of the original state. This improves the performance and responsiveness of the app, as time-consuming updates are put off to a later time to make way for the critical ones that should be shown in the DOM without delay for the user to see.
To get the position of the mouse in React, add a mousemove event handler to the window object and access the clientX and clientY properties of the MouseEvent object to get the X and Y coordinates of the mouse respectively.
The mousemove event is triggered on an element when the mouse hovers on it. To be more precise, it is fired when the mouse is moved and the hotspot of the cursor is within the bounds of the element.
We attach the event listener to the window object to trigger the event whenever the mouse is moved anywhere in the page.
We passed an empty dependencies array to the useEffect hook because we want to add a handler for the mousemove event only once – when the component mounts.
In the cleanup function, we use the removeEventListener() method to remove the event listener previously added and prevent a memory leak when the component is unmounted.
The mousemove event listener receives a MouseEvent object used to access information and perform actions related to the event. We use the clientX and clientY properties of this object to get the position of the mouse on the X-coordinate and Y-coordinate respectively in the viewport of the application.
Get mouse position relative to element in React
In the previous example we were able to get the mouse position in global coordinates.
In global coordinates position (0,0) is at the top left of the webpage and position (Xmax, Ymax) is at the bottom right.
We might instead want to get the mouse position within the region of an element.
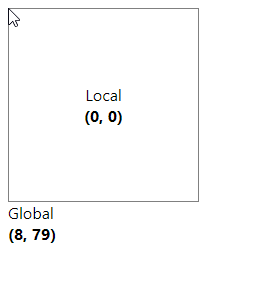
To get the mouse position relative to an element in React, set an onMouseMove event handler on the element, then calculate the local X and Y position using properties of the MouseEvent object passed to the event handler.
Now the resulting X and Y coordinates will be relative to the element. For example, position (0,0) will be at the top left of the element, not the page:
The mouse position relative to the element is shown.
We subtract the offsetLeft property of the element from the clientX property of the MouseEvent object to get the X position relative to the element.
Similarly, to get the Y position, we subtract the offsetTop property of the element from the clientY property of the MouseEvent object.
const handleMouseMove = (event) => {
  // Calculate position within bounds of element
  const localX = event.clientX - event.target.offsetLeft;
  const localY = event.clientY - event.target.offsetTop;

  setLocalMousePos({ x: localX, y: localY });
};
The offsetLeft property returns the number of pixels between the left position of an element and that of its parent.
Likewise, the offsetTop property returns the number of pixels between the top position of an element and that of its parent.