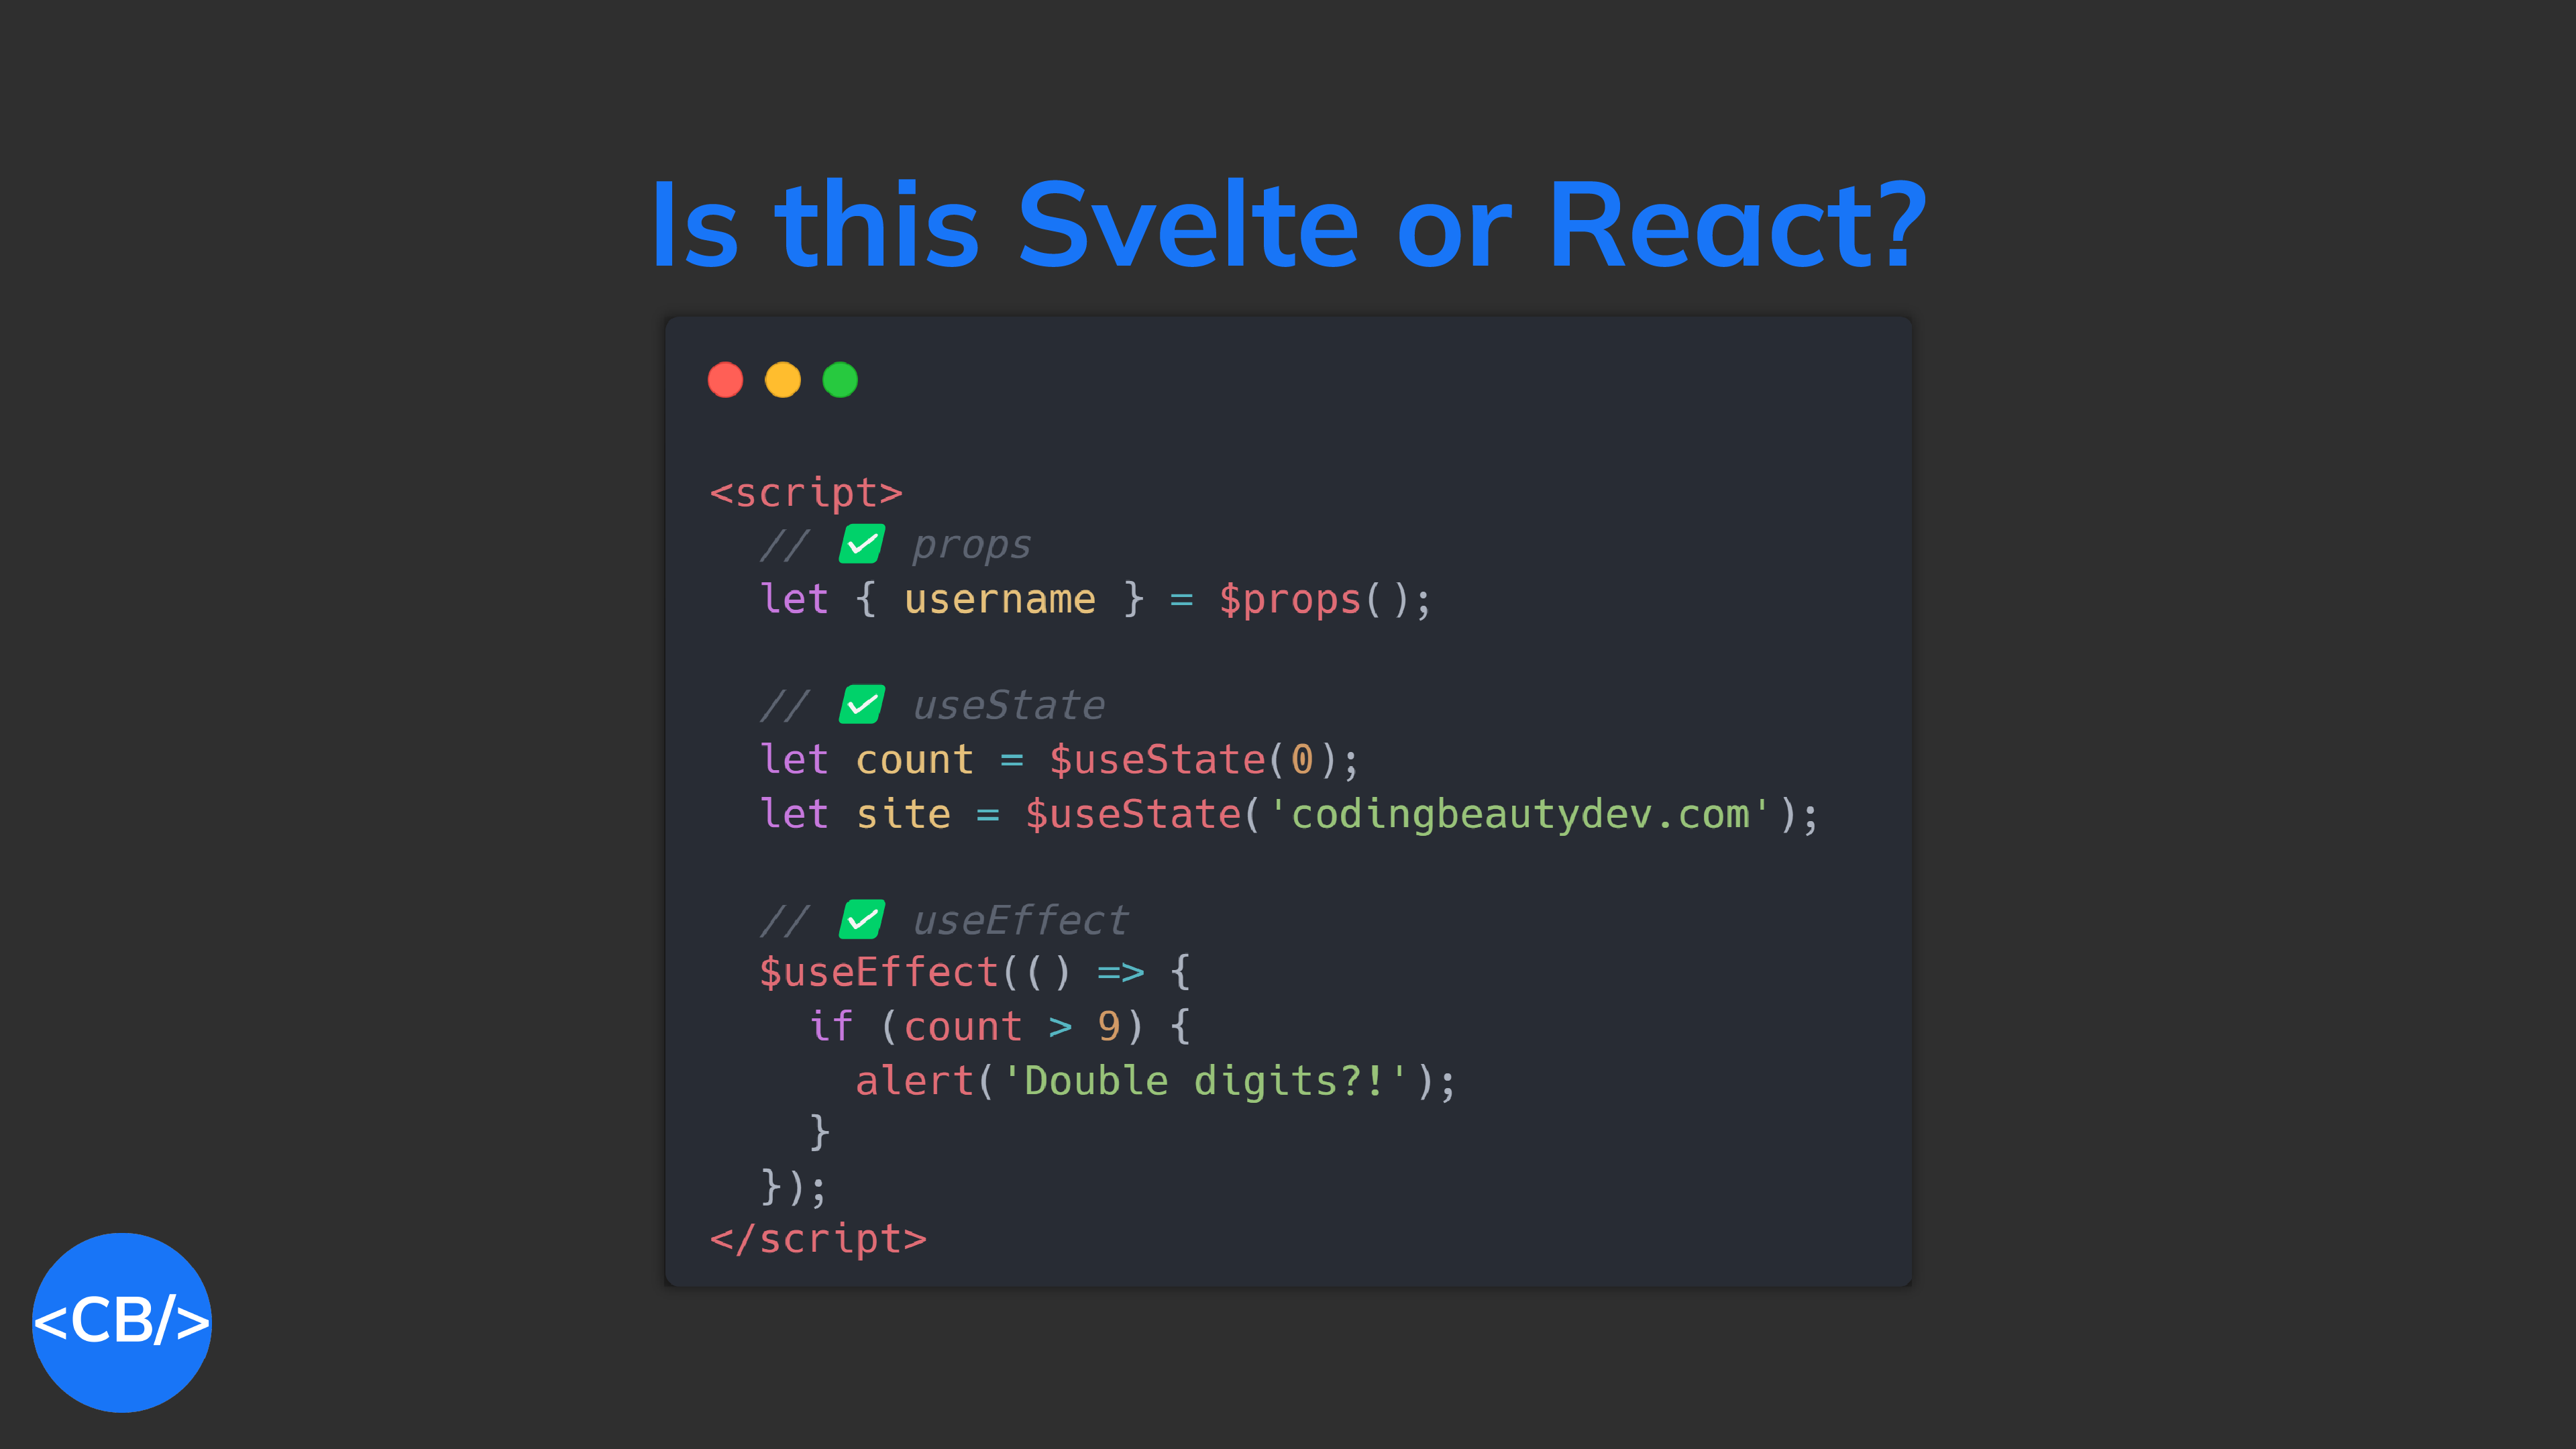
react.js

Fix “Cannot read property ‘map’ of undefined” in React

Are you currently experiencing the “Cannot read property ‘map’ of undefined” error in your React app?

The "Cannot read properties of undefined (reading 'map')" error in the browser console.
The “Cannot read properties of undefined (reading ‘map’)” error in the browser console.

This error happens when you call the map() method on a variable that was meant to be an array, but is actually undefined. The variable could be a property or state variable.

For example:

JavaScript
import { useState, useEffect } from 'react'; import { fetchBooks } from './books'; function App() { // ❌ `books` is `undefined` const [books, setBooks] = useState(undefined); useEffect(() => { (async () => { setBooks(await fetchBooks()); })(); }, []); return ( <div> {books.map((book) => ( <div key={book.id}> <h2>Title: {book.title}</h2> <p>Author: {book.author}</p> </div> ))} </div> ); } export default App;

We’ll use this example to learn some easy ways to quickly fix this error in React.

Fix: Use optional chaining operator (?.)

To fix the “Cannot use property ‘map’ of undefined” error in React.js, use the optional chaining operator (?.) to access the map() method:

JavaScript
import { useState, useEffect } from 'react'; import { fetchBooks } from './books'; function App() { const [books, setBooks] = useState(undefined); useEffect(() => { (async () => { setBooks(await fetchBooks()); })(); }, []); return ( <div> {/* ✅ Fix with optional chaining (?.) */} {books?.map((book) => ( <div key={book.id}> <h2>Title: {book.title}</h2> <p>Author: {book.author}</p> </div> ))} </div> ); } export default App;

The optional chaining operator lets us safely access a property on a value that may be undefined or null. If it is, the operator will return undefined immediately and prevent the property access or method call.

JavaScript
const auth = undefined; console.log(auth); // undefined // ✅ No error console.log(auth?.user?.name); // undefined

Fix: Use AND operator (&&)

You can also use the && operator to check if the value is undefined before access it in the JSX:

JavaScript
import { useState, useEffect } from 'react'; import { fetchBooks } from './books'; function App() { const [books, setBooks] = useState(undefined); useEffect(() => { (async () => { setBooks(await fetchBooks()); })(); }, []); return ( <div> {/* ✅ Fix with AND operator (&&) */} {books && books.map((book) => ( <div key={book.id}> <h2>Title: {book.title}</h2> <p>Author: {book.author}</p> </div> ))} </div> ); } export default App;

Here’s what a chain of && does: it returns the right-most variable if all the variables are truthy. Otherwise, it returns the left-most falsy variable:

JavaScript
console.log(undefined && 0 && []); // undefined console.log(10 && null && 'coding'); // null console.log(10 && [5, 7] && 'coding'); // coding

Note: These are the falsy values in JavaScript: undefined, null, 0, false, '' (empty string), and NaN. Every other value is truthy.

Fix: Initialize state variable to empty array

The applies when the array value is a state variable like in our example.

We set the state to an empty array ([]) at the point where it’s created, so it never becomes undefined, preventing the “Cannot read property ‘map’ of undefined” error.

JavaScript
import { useState, useEffect } from 'react'; import { fetchBooks } from './books'; function App() { // ✅ `books` starts out as an array, not `undefined` const [books, setBooks] = useState([]); useEffect(() => { (async () => { setBooks(await fetchBooks()); })(); }, []); return ( <div> {books.map((book) => ( <div key={book.id}> <h2>Title: {book.title}</h2> <p>Author: {book.author}</p> </div> ))} </div> ); } export default App;

Fix: Create a loading state when fetching data

Apart from initializing the state to an empty array you can also display a loading indicator when performing network request, or some other time-consuming operation:

JavaScript
import { useState, useEffect } from 'react'; import { fetchBooks } from './books'; function App() { const [books, setBooks] = useState(undefined); const [loading, setLoading] = useState(true); useEffect(() => { (async () => { setBooks(await fetchBooks()); })(); // ✅ Lists books with .map() after loading completes setLoading(false); }, []); let listEl; if (loading) { listEl = <div>Loading...</div>; } else { listEl = ( <div> {books.map((book) => ( <div key={book.id}> <h2>Title: {book.title}</h2> <p>Author: {book.author}</p> </div> ))} </div> ); } return <div>{listEl}</div> } export default App;

Most web user interfaces have at least three states – loading, error, and success state, and we could be better off representing all three of them:

JavaScript
import { useState, useEffect } from 'react'; import { fetchBooks } from './books'; // TypeScript // type UIState = 'loading' | 'error' | 'success'; function App() { const [books, setBooks] = useState(undefined); const [state, setState] = useState('loading'); // TypeScript // const [state, setState] = useState<UIState>('loading'); useEffect(() => { try { (async () => { setBooks(await fetchBooks()); setState('success'); })(); // ✅ Lists books with .map() after loading completes } catch (err) { setState('error'); } }, []); const listViewMap = { loading: <div>Loading...</div>, error: <div>An error occured, try again later.</div>, success: ( <div> {books.map((book) => ( <div key={book.id}> <h2>Title: {book.title}</h2> <p>Author: {book.author}</p> </div> ))} </div> ), }; const listEl = listViewMap[state]; return <div>{listEl}</div>; } export default App;

Fix: Check the value assigned to the array

Maybe you initialized the array properly and did everything else right, but you set it to undefined at some point in the code.

If the array is to be filled with API data, are you sure you’re making the network request properly.

For example, if our fetchBooks() function was defined like below, it will cause a “Cannot read property ‘map’ of undefined” error when there’s a network error on the user’s device.

JavaScript
export async function fetchBooks() { const res = fetch('https://api.example/books', { headers: { 'Content-Type': 'application/json', Accept: 'application/json', }, }); // ❌ Will return `undefined` if status code is not 200 return res.status === 200 ? (await res).json() : undefined; }

Make sure you handle all the edge cases in your app.

Fix: Check your variable names

Sometimes the error happens due to a error in your variable names.

JavaScript
import { useState, useEffect } from 'react'; import { fetchBooks } from './books'; function App() { const [books, setBooks] = useState([]); useEffect(() => { (async () => { setBooks(await fetchBooks()); })(); }, []); return ( <div> {books.map((books) => ( <div key={book.id}> <h2>Title: {book.title}</h2> <p>Author: {book.author}</p> </div> ))} </div> ); } export default App;

Here we mistakenly create a books variable in the map() callback but we use book identifier in the JSX, which is what we actually intended. The causes the unfortunate error, aside from the fact that it shadows the outer books state variable.

Create React App alternative: 5 times leaner, 0 vulnerabilities

Create React App is gone.

Yes, it’s no longer the recommended tool for starting React apps. Some of us were surprised, but many of us knew it was a long time coming.

There are much faster and leaner alternatives available today.

Why shouldn’t you use Create React App anymore?

Create React App was great.

Setting up React apps become as easy as ever without any need to bother with tedious Webpack and Babel configs. But despite the convenience, it had notable issues we just couldn’t ignore:

1. Bulky and slow

Create React App is a bloated tool.

It installs an unbelievable number of packages and takes forever to finish. If you’re a long-time CRA user like me, you’ve probably gotten used to this process, but it’s far from normal.

Once you enter the command to start a new project, you will quickly realize the insane number of packages CRA needs to set up.

Look at how large the node_modules folder is for CRA compared to Vite, a superior alternative. And both folders were just newly set up.

Many packages mean longer install times, even if you’re using PNPM or Yarn 2.

2. Insecure and outdated packages

Bundling so many packages makes it harder to keep track of them all, and many become abandoned and insecure later.

Things improved but any insecure package is something to worry about, and there are still quite a few.

Create React App has 8 high security vulnerabilities.
8 high security vulnerabilities! And that’s even better than what it used to be.

In my GitHub repos using CRA, I get several Dependabot alerts at every turn – even from one of my first GitHub projects.

And they’re almost always about security flaws in packages CRA installed.

Security weaknesses found in npm packages installed during Create React App setup.

3. Limited customization options

Create React App is a black box.

To add new libraries and customize it you usually have to depend on libraries like Craco – heck, before CRA version 5, Craco was pretty much our only way to get Tailwind CSS support.

I remember my earlier days of creating various Electron + React desktop apps, where I had to install react-app-rewired just to set the target to 'electron-renderer' to access Node modules in the React part of the app.

For total control, you can always do npm eject, but of course, then you become responsible for all the dependencies installed by CRA, which has trade-offs that may not be worth it for you.

What to use instead of Create React App

Old habits die hard, sure.

If you’ve been hesitating to switch to a superior tool, hopefully, the React team dumping CRA should finally do it for you. There are far more modern and better-maintained alternatives out there; let’s check out some of the most popular ones:

Vite

It’s a fast way to build modern web projects, designed for efficiency and smoother development.

The VueJS team is responsible for developing and maintaining Vite, so you can trust it’s a reliable tool.

  • “Extremely fast” Hot Module Replacement (HMR).
  • Out-of-the-box support for TypeScript.
  • A lightning-fast SWC compiler.

HMR means that code changes show instantly in the browser, avoiding full-page refreshes and saving valuable time.

It provides just about everything CRA does – but better and without the bloat. And it’s constantly being updated.

Vite logo

Here you don’t worry about outdated dependencies or vulnerable packages:

The Vite project has zero vulnerabilities.
Zero vulnerabilities.

Parcel

It’s a zero-config bundler with no setup required, yet it’s still more flexible than Create React App.

Parcel supports all the latest web technologies, including React, Vue, and TypeScript, and it can bundle any type of asset, from images and CSS to HTML and JavaScript.

Plus, it has excellent performance, thanks to its use of worker threads, which allows it to parallelize tasks and speed up builds.

Parcel logo

Parcel also has HMR support and is updated often with the latest features and optimizations like Vite. You can trust the team to keep up with the latest web technologies and best practices.

And what’s the result: your projects are built with the best tools available.

Custom Webpack configuration

Webpack is still king if you know what you’re doing.

The level of control of flexibility it gives you is unmatched as there are a massive number of options you can set, far more than just path and filename.

Another benefit to note: Webpack can generate a development build without a local server, unlike Parcel and others.

This particular feature saved me when I was debugging React in a VSCode extension. Loading data from localhost didn’t work properly for a Webview; I had to build to a local file and read the contents.

With source maps enabled and dev mode turned on, I could easily see the exact line where the error occurred in the TS code. Unlike with Parcel, where all I got was a minified build.

Of course, setting up a Webpack config can be complex and more involved – which is why CRA came around in the first place. You must configure various options to get everything working perfectly.

But once you’re set-up, you’ll have a heavily personalized build process for your project. It’s a trade-off that may or may not be worth it for you.

Frameworks to replace Create React App

Need React’s state and UI capabilities without extras? The tools we’ve seen are great.

Want high-performance apps with advanced features like SSR? Then consider frameworks with built-in routing, data fetching, etc.

Frameworks like:

Next.js

Many of us already know Next.js with advanced features like server-side rendering and static website generation.

Server-side rendering renders pages on the server and sends them to the client, greatly boosting performance, user experience, and SEO scores.

With intuitive file-based routing and built-in image optimization, Next.js is a smart option for building high-flying web apps with speed.

Remix

Another SSR-enable framework with powerful data features like:

  • Intelligent network error handling
  • Parallel fetching of CSS, JavaScript, and other assets to save time
  • Automatically ensuring the UI data is in sync with the server data after a user action.

One stand-out Remix feature is nested routes, which makes it possible to associate a specific section of a page with a particular route segment so that only that section updates when the route segment changes. This accelerates page transitions as no time is wasted re-rendering the entire page.

Gatsby

Gatsby is another awesome one – for scalable & fast-loading static sites.

There are a variety of starter kits and plugins to easily extend your site’s functionality and build a blog, e-commerce site, or portfolio site in no time at all.

With Gatsby, it’s effortless to power up your app with data from a CMS, especially with the GraphQL data layer for rapid integration with various APIs and services.

Final thoughts

CRA was a popular tool.

But it had its issues. It was bulky, outdated, and had limited customization.

Adaptation is crucial in the dynamic landscape of web development. By embracing modern tools, such as Vite, and Parcel, and in-depth frameworks like Next.js, Remix, and Gatsby, we can build faster and more efficient React apps.

How to quickly get the height or width of an element in React

To get the height or width of an element in React, use the useRef, useEffect, and useState hooks to access the element’s offsetWidth or offsetHeight property:

JavaScript
import React, { useEffect, useState, useRef } from 'react'; function ExampleComponent() { const [width, setWidth] = useState(0); const [height, setHeight] = useState(0); const elementRef = useRef(null); useEffect(() => { setWidth(elementRef.current.offsetWidth); setHeight(elementRef.current.offsetHeight); }, []); return ( <div ref={elementRef} style={{ width: '50%', height: '50%', border: '1px solid black' }} > <p>Coding Beauty</p> <p>{`Element size: (${width}, ${height})`}</p> </div> ); } export default function App() { return ( <div> <ExampleComponent /> </div> ); }
The height and width of the element is displayed with React.

useEffect() runs after the component mounts or re-renders, but useLayoutEffect() runs before. They both have a dependency array that triggers them when any of those dependencies change.

We create a ref for the target element with useRef(), and assign it to its ref prop, so we can access the HTMLElement object for this React element.

useRef returns a mutable ref object that doesn’t change its value when a component is updated. Also, modifying the value of this object’s current property does not cause a re-render. This is in contrast to the setState update function returned from useState.

We use useState() to create a state that we update when useEffect() gets called. This update makes the element’s width and height display on the page.

Get height and width of element with clientHeight and clientWidth

You can also get an element’s height and width in React with clientHeight and clientWidth. Unlike offsetWidth, it includes padding but excludes borders and scrollbars.

JavaScript
import React, { useRef, useState, useEffect } from 'react'; function ExampleComponent() { const [width, setWidth] = useState(0); const [height, setHeight] = useState(0); const elementRef = useRef(null); useEffect(() => { setWidth(elementRef.current.clientWidth); setHeight(elementRef.current.clientHeight); }, []); return ( <div ref={elementRef} style={{ width: '50%', height: '50%' }}> <p>Coding Beauty</p> <p> <b>{`Element size: (${width}, ${height})`}</b> </p> </div> ); } export default function App() { return ( <div> <ExampleComponent /> </div> ); }
Getting the size of an element in React with clientWidth and clientHeight.

Get height and width of element dynamically

You can get the height and width of an element dynamically, which means the height and width updates on window resize.

We do this with a resize event listener:

JavaScript
import React, { useEffect, useState, useRef } from 'react'; function ExampleComponent() { const [width, setWidth] = useState(0); const [height, setHeight] = useState(0); const elementRef = useRef(null); useEffect(() => { const handleResize = () => { setWidth(elementRef.current.offsetWidth); setHeight(elementRef.current.offsetHeight); }; handleResize(); window.addEventListener('resize', handleResize); return () => { window.removeEventListener('resize', handleResize); }; }, []); return ( <div ref={elementRef} style={{ width: '50%', height: '50%' }}> <p>Getting element width dynamically</p> <p><b>{`Element size: (${width}, ${height})`}</b></p> </div> ); } export default function App() { return ( <div> <ExampleComponent /> </div> ); }

We call addEventListener() in useEffect() to set the resize event listener on the element before it renders on the screen.

The resize event listener is called whenever the user resizes the window. In the listener, we update the state that stores the element’s width and height, and this causes a re-render.

We call removeEventListener() in useEffect‘s clean-up function to stop listening for resize events when the component is unmounted or when the dependencies change to prevent memory leaks and unintended side effects.

Get element height and width before render in React

To get the width and height of an element before render in React, we can combine two React hooks: useRef and useLayoutEffect.

JavaScript
import React, { useRef, useLayoutEffect, useState } from 'react'; function ExampleComponent() { const [width, setWidth] = useState(0); const [height, setHeight] = useState(0); const elementRef = useRef(null); useLayoutEffect(() => { setWidth(elementRef.current.offsetWidth); setHeight(elementRef.current.offsetHeight); }, []); return ( <div style={{ width: '50%', height: '50%' }}> <p>Coding Beauty</p> <div ref={elementRef}> Element size: ({width}, {height}) </div> </div> ); } export default function App() { return ( <div> <ExampleComponent /> </div> ); }

So the difference between “before render” and “after render” is useLayoutEffect() and useEffect().

useLayoutEffect() works just like useEffect(), but the key difference is that it fires before the browser repaints the screen – before React renders the component.

We pass an empty dependencies array to useLayoutEffect() to make sure it only gets called once.

Here we create a ref for the target element with useRef(), and assign it to its ref prop, so we can access the HTMLElement object for this React element.

useRef returns a mutable ref object that doesn’t change its value when a component is updated. Also, modifying the value of this object’s current property does not cause a re-render. This is in contrast to the setState update function returned from useState.

We do use useState() though, to create a state that we update when useLayoutEffect() gets called. So calling setWidth() will cause the component to be re-rendered.

To get the actual width and height, we use the offsetWidth and offsetHeight properties, which include borders, padding, and any scrollbars.

Key takeaways

  1. To get the height or width of an element in React, combine the useRef, useEffect, and useState hooks to get the value of offsetWidth and offsetHeight.
  2. clientWidth and clientHeight are similar to offsetWidth and offsetHeight, but they include padding and exclude borders and scrollbars.
  3. To get the dimensions of the element dynamically, create a window resize event listener to automatically update the size when the user resizes the browser window.
  4. To get the size of the element before render, replace useEffect with useLayoutEffect.

How to easily get the current route in Next.js

Getting the current route in a web application is important for managing user sessions, handling authentication, and dynamically displaying UI elements.

Let’s how see how easy it is to get the current route or pathname in our Next.js app.

In this article

Get current route in Next.js Pages Router component

We can get the current route in a Next.js component with the useRouter hook:

src/pages/blog.tsx
import Head from 'next/head'; import { useRouter } from 'next/router'; export default function Page() { const { pathname } = useRouter(); return ( <> <Head> <title>Next.js - Coding Beauty</title> <meta name="description" content="Next.js Tutorials by Coding Beauty" /> <meta name="viewport" content="width=device-width, initial-scale=1" /> <link rel="icon" href="/favicon.ico" /> </Head> <main> Welcome to Coding Beauty <br /> <br /> Pathname: <b>{pathname}</b> </main> </> ); }

Get current route in Next.js App Router component

To get the current route in a Next.js app router component, use the usePathname hook from next/navigation:

src/app/amazing-url/page.tsx
'use client'; import React from 'react'; import { Metadata } from 'next'; import { usePathname } from 'next/navigation'; export const metadata: Metadata = { title: 'Next.js - Coding Beauty', description: 'Next.js Tutorials by Coding Beauty', }; export default function Page() { const pathname = usePathname(); return ( <main> Welcome to Coding Beauty 😄 <br /> <br /> Route: <b>{pathname}</b> </main> ); }

We need 'use client' in Next.js 13 App Router

Notice the 'use client' statement at the top.

It’s there because all components in the new app directory are server components by default, which means we can’t access client-side specific APIs.

We’ll get an error if we try to do anything interactive with useEffect or other hooks, as it’s a server environment.

Get current route in Next.js getServerSideProps

To get the current route in getServerSideProps, use req.url from the context argument.

src/pages/amazing-url.tsx
import { NextPageContext } from 'next'; import Head from 'next/head'; export function getServerSideProps(context: NextPageContext) { const route = context.req!.url; console.log(`The route is: ${route}`); return { props: { route, }, }; } export default function Page({ route }: { route: string }) { return ( <> <Head> <title>Next.js - Coding Beauty</title> <meta name="description" content="Generated by create next app" /> <meta name="viewport" content="width=device-width, initial-scale=1" /> <link rel="icon" href="/favicon.png" /> </Head> <main> Welcome to Coding Beauty 😃 <br /> Route: <b>{route}</b> </main> </> ); }
The current route printed in the console

How to easily get the current URL in Next.js

We use the current URL in a web app to track user activity, maintain history, or modify displayed elements based on route. So, let’s see how to quickly get the current URL in a Next.js app.

In this article

Get current URL in Next.js Pages Router component

To get the current URL in a Next.js component, use the useUrl hook from the nextjs-current-url package:

With pages directory:

src/pages/index.tsx
import { useUrl } from 'nextjs-current-url'; import Head from 'next/head'; export default function Home() { const { href: currentUrl, pathname } = useUrl() ?? {}; return ( <> <Head> <title>Next.js - Coding Beauty</title> <meta name="description" content="Next.js Tutorials by Coding Beauty" /> <meta name="viewport" content="width=device-width, initial-scale=1" /> <link rel="icon" href="/favicon.png" /> </Head> <main> Welcome to Coding Beauty 😄 <br /> <br /> URL: <b>{currentUrl}</b> <br /> pathname: <b>{pathname}</b> </main> </> ); }
The current URL is displayed on the Next.js page.

useUrl() returns a URL object that gives us more info on the current URL.

Get current URL with useState and window.location.href

We can also get the current URL in a client component using useState and window.location.href.

src/pages/index.tsx
import Head from 'next/head'; import { useRouter } from 'next/router'; import { useEffect } from 'react'; export default function Home() { const [currentUrl, setCurrentUrl] = useState<string | null>(null); const { pathname } = useRouter(); useEffect(() => { setCurrentUrl(window.location.href); }, []); return ( <> <Head> <title>Next.js - Coding Beauty</title> <meta name="description" content="Next.js Tutorials by Coding Beauty" /> <meta name="viewport" content="width=device-width, initial-scale=1" /> <link rel="icon" href="/favicon.ico" /> </Head> <main> Welcome to Coding Beauty 😄 <br /> <br /> URL: <b>{currentUrl}</b> <br /> pathname: <b>{pathname}</b> </main> </> ); }

The window.location.href property returns a string containing the entire page URL, and we use the useState and useEffect hooks to create and set state for storing the current URL.

window.location property

window.location has other properties that tell you more about the URL. Like:

  • pathname: the path of the URL after the domain name and any optional port number. Query and fragment identifier not included.
  • protocol: URL‘s protocol scheme, like https: or mailto:. Doesn’t include the //.
  • hostname: the URL‘s domain name without the port number.

Here’s an example where we use some of these properties:

src/pages/index.tsx
import { getUrl } from '@/lib/utils/get-url'; import { NextPageContext } from 'next'; import Head from 'next/head'; import { useEffect, useState } from 'react'; export function getServerSideProps(context: NextPageContext) { return { props: { currentUrl: getUrl({ req: context.req! })?.href, }, }; } export default function Home() { const [myLocation, setMyLocation] = useState<Location | null>(null); useEffect(() => { setMyLocation(window.location); }); return ( <> <Head> <title>Next.js - Coding Beauty</title> <meta name="description" content="Next.js Tutorials by Coding Beauty" /> <meta name="viewport" content="width=device-width, initial-scale=1" /> <link rel="icon" href="/favicon.png" /> </Head> <main> You are currently accessing <b>{myLocation?.href}</b> 😃 <br /> Pathname: <b>{myLocation?.pathname}</b> <br /> Protocol: <b>{myLocation?.protocol}</b> <br /> Hostname: <b>{myLocation?.hostname}</b> </main> </> ); }
Display various segments of the current URL in a Next.js page.

We need useEffect to get the current URL

Pages render on both the server and client in Next.js, so when the server renders the page, there’s no window object available.

So you’ll get a “window is not defined” error if you try to use window before hydration:

"window is not defined" error in Next.js page

That’s why we use useEffect – to wait till mounting/hydration is done.

What’s hydration?

Hydration is when a server-generated web page gets extra client-side features added by the user’s web browser. Features like event listeners, client-side routing, etc.

Get current URL in Next.js App Router component

To get the current URL in a Next.js app router component, we can also use the useUrl hook from the nextjs-current-url library.

src/app/page.tsx
'use client'; import React from 'react'; import { useUrl } from 'nextjs-current-url'; import { Metadata } from 'next'; export const metadata: Metadata = { title: 'Next.js - Coding Beauty', description: 'Next.js Tutorials by Coding Beauty', }; export default function Page() { const { pathname, href } = useUrl() ?? {}; return ( <main> Welcome to Coding Beauty <br /> <br /> URL: <b>{href}</b> <br /> route: <b>{pathname}</b> </main> ); }
The current URL is displayed on the Next.js app router component

Next.js App Router: We need 'use client'

Notice the 'use client' statement at the top.

It’s there because all components in the new app directory are server components by default, so we can’t use any client-side specific APIS.

We’ll get an error if we try to do anything interactive with useEffect or other hooks like useUrl, because it’s a server environment.

Get current URL in Next.js getServerSideProps

To get the current URL in getServerSideProps of a Next.js page, use the getUrl function from the nextjs-current-url library.

src/pages/amazing-url.tsx
import { NextPageContext } from 'next'; import Head from 'next/head'; import { getUrl } from 'nextjs-current-url/server'; export function getServerSideProps(context: NextPageContext) { const url = getUrl({ req: context.req }); return { props: { url: url.href, }, }; } export default function Home({ url }: { url: string }) { const urlObj = new URL(url); const { pathname } = urlObj; return ( <> <Head> <title>Next.js - Coding Beauty</title> <meta name="description" content="Generated by create next app" /> <meta name="viewport" content="width=device-width, initial-scale=1" /> <link rel="icon" href="/favicon.png" /> </Head> <main> Welcome to Coding Beauty 😃 <br /> <br /> URL: <b>{url}</b> <br /> Route: <b>{pathname}</b> </main> </> ); }
The current URL is displayed on the Next.js page from getServerSideProps()

Let’s check out some more properties of URL:

src/pages/amazing-url.tsx
import { NextPageContext } from 'next'; import Head from 'next/head'; import { getUrl } from 'nextjs-current-url/server'; export function getServerSideProps(context: NextPageContext) { const url = getUrl({ req: context.req }); return { props: { url: url.href, }, }; } export default function Home({ url }: { url: string }) { const urlObj = new URL(url); const { pathname, href, protocol, hostname, search, hash } = urlObj; return ( <> <Head> <title>Next.js - Coding Beauty</title> <meta name="description" content="Generated by create next app" /> <meta name="viewport" content="width=device-width, initial-scale=1" /> <link rel="icon" href="/favicon.png" /> </Head> <main> Welcome to Coding Beauty 😃 <br /> <br /> URL: <b>{href}</b> <br /> Pathname: <b>{pathname}</b> <br /> Protocol: <b>{protocol}</b> <br /> Hostname: <b>{hostname}</b> <br /> Search: <b>{search}</b> <br /> Hash: <b>{hash}</b> </main> </> ); }

Here’s what these properties do:

  • href: the complete URL, including the protocol, hostname, port number, path, query parameters, and fragment identifier.
  • protocol: URL’s protocol scheme, like https: or mailto:. Doesn’t include the //.
  • hostname: the URL’s domain name without the port number.
  • pathname: the URL’s path and filename without the query and fragment identifier.
  • search: the URL’s query parameters. Includes the ?
  • hash: the fragment identifier, the part after the #.
Various properties of the current URL are displayed on the Next.js page.

Note: As you can see it’s not possible to get the hash/fragment in getServerSideProps because the browser never sends the part after the # to the server. That’s why there’s no hash here. We’d have to get the current URL in the client-side to access the fragment identifier.

How to Scroll to the Top of a Div in React

To scroll to the top of a div element in React, create a ref for the div, then call scrollTo() on the ref.

App.jsx
import React, { useRef } from 'react'; function YourComponent() { const divRef = useRef(null); const onClick = () => { divRef.current.scrollTo({ top: 0, behavior: 'smooth' }); }; return ( <div ref={divRef} style={{ height: '200px', width: '400px', overflow: 'auto', border: '1px solid #c0c0c0', }} > {[...Array(100)].map((_, index) => ( <div key={index}>Item {index + 1}</div> ))} <button onClick={onClick}>Go to top</button> </div> ); } export default function App() { return ( <div> <YourComponent /> </div> ); }

Related: How to Scroll to the Bottom of a Div in React

When the button is clicked, the div smoothly scrolls to the top.

When reading long content, scroll-to-top helps users get back to the start easily.

Think of a lengthy blog post or an extensive list of items.

The useRef hook from React plays a key role here.

It holds the reference to our scrollable div in divRef.

The scrollTo function accepts an object specifying the top position and scroll behavior.

This creates the scrollable effect due to the div’s fixed height and width.

The button at the end does the magic.

Clicking it triggers the onClick function, smoothly scrolling the div to the top.

We enabled smooth scrolling by setting behavior to smooth in scrollTo().

In smooth scrolling, the scrolling happens gradually – an animation.

By default behavior is auto.

In auto the scroll happens instantly.

A smooth scroll back to the top adds a slick, professional touch to the user experience.

Let’s dive deeper into a slightly different case in the next section.

How to scroll to the top of a div on item add in React

Imagine you have a list in a div.

This list is overflowing the div.

Each time a new item is added, we want to scroll back to the top.

React makes this quite easy:

App.jsx
import React, { useRef, useEffect } from 'react'; const MyComponent = () => { const divRef = useRef(null); const initialItems = Array.from({ length: 10 }, (_, i) => `Item ${i + 1}`); const [items, setItems] = React.useState(initialItems); const addItem = () => { setItems([...items, `Item ${items.length + 1}`]); }; useEffect(() => { if (divRef.current) { divRef.current.scrollTo({ top: 0, behavior: 'smooth' }); } }, [items]); return ( <div> <button onClick={addItem}>Add Item</button> <div ref={divRef} style={{ height: '200px', width: '400px', overflow: 'auto', border: '1px solid #c0c0c0', }} > {items.map((item, index) => ( <p key={index}>{item}</p> ))} </div> </div> ); }; const App = () => { return ( <div> <MyComponent /> </div> ); }; export default App;
The div scrolls to the top when a new element gets added to it.

We use useRef to create a new ref – divRef.

This ref will be attached to our div.

The addItem function adds new items to items.

The useEffect hook is activated every time items is updated.

It takes care of scrolling the div to the top.

The component includes a button and the div.

Clicking the button adds a new item.

The div is linked to divRef.

We display each item in items as a paragraph.

That’s it.

With each new item added, the div scrolls to the top.

Give it a shot!

Scroll to top of page in React

To scroll to the top of a page in React, call window.scrollTo({ top: 0, left: 0}).

App.jsx
import { useRef } from 'react'; const allCities = [ 'Tokyo', 'New York City', 'Paris', 'London', 'Dubai', 'Sydney', 'Rio de Janeiro', 'Cairo', 'Singapore', 'Mumbai', ]; export default function App() { const ref = useRef(null); const scrollToTop = () => { window.scrollTo({ top: 0, left: 0, behavior: 'smooth' }); }; return ( <div> <h2>Top of the page</h2> <div style={{ height: '100rem' }} /> <div ref={ref}> {allCities.map((fruit) => ( <h2 key={fruit}>{fruit}</h2> ))} </div> <button onClick={scrollToTop}>Scroll to top</button> <div style={{ height: '150rem' }} /> </div> ); }
Clicking the button to scroll to the top of the page in React.

The window.scrollTo() method scrolls to a particular position on a page.

App.jsx
const scrollToTop = () => { window.scrollTo({ top: 0, left: 0, behavior: 'smooth' }); };

We could have called it with two arguments: window.scrollTo(0, 0).

But this overload doesn’t let us set a smooth scroll behavior.

When behavior is smooth, the browser scrolls to the top of the page in a gradual animation.

But when it’s auto, the scroll happens instantly. We immediately jump to the top of the page.

We use the onClick prop of the button to set a click listener.

This listener will get called when the user clicks the button.

Key takeaways

  1. The useRef hook in React is essential for managing scrolling operations. This allows you to create a reference for your scrollable div.
  2. With the scrollTo() function, you can easily scroll within your referenced div.
  3. Adding new items to your list and wish to scroll back to the top of your div? React has got you covered!
  4. React’s useEffect hook comes to the rescue by triggering the scrollTo() function each time your list of items is updated.
  5. You can choose how you want your scrolling to behave – smoothly and gradually, or instantly for quick results.
  6. The onClick prop is perfect for activating your button click listener. A simple click, and you’re back at the top!

So, there you have it. Try implementing these in your upcoming React projects. Happy coding!

How to get the current route/URL in React Router

To get the current route in React Router, we use the useLocation() route.

For example:

JavaScript
import React from 'react'; import { Route, Link, Routes, useLocation } from 'react-router-dom'; function Home() { return <h2>Home</h2>; } function Products() { return <h2>About</h2>; } function Pricing() { return <h2>Pricing</h2>; } function Posts() { return <h2>Posts</h2>; } export default function App() { const location = useLocation(); const { hash, pathname, search } = location; return ( <div> <div> <Routes> <Route path="/products" element={<Products />} /> <Route path="/" element={<Home />} /> <Route path="/posts" element={<Posts />} /> <Route path="/#pricing" element={<Pricing />} /> </Routes> Pathname: <b>{pathname}</b><br /> Search params: <b>{search}</b><br /> Hash: <b>{hash}</b> <nav> <ul> <li> <Link to="/">Home</Link> </li> <li> <Link to="/products">Products</Link> </li> <li> <Link to="/posts?id=5">Posts</Link> </li> <li> <Link to="/#pricing">Pricing</Link> </li> </ul> </nav> </div> </div> ); }

useLocation() returns an object that contains information on the current page URL. Some of these properties are:

  • pathname: the part that comes after the domain name, e.g., /products.
  • search: the query string, e.g., ?id=5.
  • hash: the hash, e.g., #pricing.

Note

To get the full URL, we use location.href instead of useLocation().

JavaScript
const url = window.location.href;

Get current page URL in React

We you want to get the current page URL in React, you can use window.location.href.

For example:

JavaScript
import { useRef } from 'react'; export default function App() { const url = window.location.href; return ( <div> You are currently accessing url</b> </div> ); }
Displaying the current URL in React.

The window.location.href property returns a string that contains the entire page URL.

window.location contains other properties that give more information on the URL. Some of them are:

  • pathname: the path of the URL after the domain name and any optional port number.
  • protocol: the protocol scheme of the URL.
  • hostname: the hostname portion of the URL.

Here are some examples of using these properties to get various URL properties in addition to the full URL.

JavaScript
export default function App() { const url = window.location.href; const pathname = window.location.pathname; const protocol = window.location.protocol; const hostname = window.location.hostname; return ( <div> You are currently accessing <b>{url}</b><br /> Pathname: <b>{pathname}</b><br /> Protocol: <b>{protocol}</b><br /> Hostname: <b>{hostname}</b> </div> ); }
Displaying various URL properties.

Get dynamic route variable in React Router

To access the variables of a dynamic route directly in React Router, we use the useParams() hook.

For example:

JavaScript
import React from 'react'; import { Route, Routes, useParams } from 'react-router-dom'; function Posts() { const { id } = useParams(); return <h2>Settings for post {id} </h2>; } export default function App() { return ( <div> <div> <Routes> <Route path="/posts/:id" element={<Posts />} /> </Routes> </div> </div> ); }
Displaying the dynamic route variable.

The id variable corresponds to its placeholder value in the /posts/:id path. So as you saw in the example, the path /posts/5 will result in the id having a value of 5.

Get current route in Next.js app

To get the current route in a Next.js React app, we use the useRouter() hook:

The object useRouter() returns has an asPath property that is the current route in the Next.js app.

pages/posts.tsx
import Head from 'next/head'; import { useRouter } from 'next/router'; export default function Posts() { const posts = ['Post 1', 'Post 2', 'Post 3']; // 👇 Get route data const { route } = useRouter(); return ( <> <Head> <title>Next.js - Coding Beauty</title> <meta name="description" content="Generated by create next app" /> <meta name="viewport" content="width=device-width, initial-scale=1" /> <link rel="icon" href="/favicon.ico" /> </Head> <main> Route: <b>{router}</b> <br /> {posts.map((post) => ( <p>{post}</p> ))} </main> </> ); }

asPath returns the current route/path that’s rendering.

Including any query parameters or hash.

Displaying the current route in Next.js

We use useRouter() to get data and take actions related to the current app route.

Get current dynamic route data in Next.js

To get data passed to a dynamic route, we use the query property from the useRouter() object:

For instance, we could have a route /posts/5 corresponding to a dynamic route, /posts/:id where 5 is the passed value for id.

Here’s how we’ll access it in the Next.js file that handles requests to the dynamic route:

pages/posts/[id].tsx
import Head from 'next/head'; import { useRouter } from 'next/router'; export default function Posts() { const { query } = useRouter(); // 👇 Get id value from dynamic route const { id } = query; return ( <> <Head> <title>Next.js - Coding Beauty</title> <meta name="description" content="Generated by create next app" /> <meta name="viewport" content="width=device-width, initial-scale=1" /> <link rel="icon" href="/favicon.ico" /> </Head> <main> <h2> Post <b>{id}</b> </h2> </main> </> ); }
Displaying the data passed with the dynamic route in Next.js

For the dynamic route to work, the file structure in the pages folder has to be like this: /pages/[id].tsx. We name the file according to what property we’ll use to access the data from the query, and we wrap the name in square brackets.

We use useRouter() to get data and take actions related to the current app route.

Get query parameter data in Next.js

We can also access URL query parameters (i.e., ?key1=value1) using the query object:

pages/posts/[id].tsx
import Head from 'next/head'; import { useRouter } from 'next/router'; export default function Posts() { const { query } = useRouter(); // 👇 Get source from query params const { id, source } = query; return ( <> <Head> <title>Next.js - Coding Beauty</title> <meta name="description" content="Generated by create next app" /> <meta name="viewport" content="width=device-width, initial-scale=1" /> <link rel="icon" href="/favicon.ico" /> </Head> <main> <h2> Post <b>{id}</b> </h2> <h3>You came from {source}!</h3> </main> </> ); }
Display data passed with URL query parameters in Next.js

Key takeaways

  • In React Router, use the useLocation() hook to get the current route. It returns an object containing properties like pathname, search, and hash.
  • To get the full URL in a React app, use window.location.href.
  • In React Router, use the useParams() hook to access dynamic route variables.
  • In a Next.js app, use the useRouter() hook to get the current route and access dynamic route data.
  • The query property from the useRouter() object in Next.js allows you to access URL query parameters.

How to Scroll to the Top of a Page in React

To scroll to the top of a page in React, call window.scrollTo({ top: 0, left: 0}).

JavaScript
import { useRef } from 'react'; const allCities = [ 'Tokyo', 'New York City', 'Paris', 'London', 'Dubai', 'Sydney', 'Rio de Janeiro', 'Cairo', 'Singapore', 'Mumbai', ]; export default function App() { const ref = useRef(null); const scrollToTop = () => { window.scrollTo({ top: 0, left: 0, behavior: 'smooth' }); }; return ( <div> <h2>Top of the page</h2> <div style={{ height: '100rem' }} /> <div ref={ref}> {allCities.map((fruit) => ( <h2 key={fruit}>{fruit}</h2> ))} </div> <button onClick={scrollToTop}>Scroll to top</button> <div style={{ height: '150rem' }} /> </div> ); }
Clicking the button to scroll to the top of the page in React.

The window.scrollTo() method scrolls to a particular position in a page.

JavaScript
const scrollToTop = () => { window.scrollTo({ top: 0, left: 0, behavior: 'smooth' }); };

We could have called it with two arguments: window.scrollTo(0, 0).

But this overload doesn’t let us set a smooth scroll behavior.

When behavior is smooth, the browser scrolls to the top of the page in a gradual animation.

But when it’s auto, the scroll happens instantly. We immediately jump to the top of the page.

We use the onClick prop of the button to set a click listener.

This listener will get called when the user clicks the button.

Scroll to bottom of page in React

To scroll to the end of the page in React, we use a different approach.

We create an element at the end of the page.

We set a ref on it.

Then we scroll to it by calling scrollIntoView() on the ref.

JavaScript
import { useRef } from 'react'; const allCities = [ 'Tokyo', 'New York City', 'Paris', 'London', 'Dubai', 'Sydney', 'Rio de Janeiro', 'Cairo', 'Singapore', 'Mumbai', ]; export default function App() { const bottomRef = useRef(null); const scrollToBottom = () => { bottomRef.current.scrollIntoView({ behavior: 'smooth' }); }; return ( <div> <h2>Top of the page</h2> <button onClick={scrollToBottom}>Scroll to bottom</button> <div style={{ height: '100rem' }} /> <div> {allCities.map((fruit) => ( <h2 key={fruit}>{fruit}</h2> ))} </div> <div style={{ height: '150rem' }} /> <div ref={bottomRef}></div> <h2>Bottom of the page</h2> </div> ); }
Clicking the button to scroll to the bottom of the page in React.

scrollIntoView() scrolls to a certain element on the page.

By calling it on the bottom element, we scroll to the page end.

Like scrollTo(), scrollIntoView() has a behavior option that controls the scrolling motion.

JavaScript
const scrollToBottom = () => { bottomEl?.current?.scrollIntoView({ behavior: 'smooth' }); };

smooth scrolls to the element in an animation.

auto jumps to the element on the page instantly. It’s the default.

To access the bottom element, we set a React ref on it.

We create a ref object with the useRef hook and set the element’s ref prop to it.

JavaScript
const bottomEl = useRef(null);

Doing this sets the ref object’s current property to the element’s HTMLElement object.

useRef returns a mutable object that maintains its value when a component updates.

Also, modifying the value of this object’s current property doesn’t cause a re-render.

This is unlike the setState update function return from the useState hook.

Key takeaways

  • In React, to scroll to the top of a page, call window.scrollTo() with { top: 0, left: 0, behavior: 'smooth' }.
  • Setting the behavior property to 'smooth' provides a gradual animated scroll to the top, while 'auto' causes an instant jump to the top.
  • To scroll to the bottom of a page in React, call scrollIntoView() on a specific element by creating a ref for it using the useRef hook.
  • By setting the behavior property to 'smooth', the browser will smoothly scroll to the referenced element at the bottom of the page.
  • useRef is used to create a mutable reference to an element, allowing access to its properties without causing a re-render.

How to Scroll to the Bottom of a Div Element in React

To scroll to the bottom of a div element in React:

  1. Create an element at the bottom of the div.
  2. Set a ref on this element.
  3. Call scrollIntoView() on the ref to scroll down to this element.
JavaScript
import { useRef } from 'react'; const allFruits = [ 'Apples', 'Bananas', 'Oranges', 'Grapes', 'Strawberries', 'Blueberries', 'Pineapples', 'Mangoes', 'Kiwis', 'Watermelons', ]; export default function App() { const bottomEl = useRef(null); const scrollToBottom = () => { bottomEl?.current?.scrollIntoView({ behavior: 'smooth' }); }; return ( <div> <div style={{ position: 'fixed', backgroundColor: 'white', bottom: 0, marginBottom: 10, }} > <button onClick={scrollToBottom} style={{ marginLeft: '8px' }}> Scroll to bottom </button> </div> <div style={{ height: '5rem' }} /> <div> {allFruits.map((fruit) => ( <h2 key={fruit}>{fruit}</h2> ))} {/* 👇 Element created at the bottom */} <div ref={bottomEl}></div> </div> <div style={{ height: '150rem' }} /> </div> ); }
Clicking the button to scroll to the bottom of the div in React.

Here we have a list of fruits displayed.

The Scroll to bottom button scrolls to the bottom of the div on click.

It does this by calling scrollIntoView() in a click event listener we set, on the bottom element’s ref.

JavaScript
const scrollToBottom = () => { bottomEl?.current?.scrollIntoView({ behavior: 'smooth' }); };

We set the behavior option to smooth to make the element scroll into view in an animated way, instead of jumping straight to the element in the next frame – auto.

auto is the default.

We create the ref object with the useRef hook and assign it to the ref prop of the target div element.

JavaScript
const bottomEl = useRef(null);

Doing this sets the current property of the ref object to the DOM object that represents the element.

useRef returns a mutable object that maintains its value when a component updates.

Also, modifying the value of this object’s current property doesn’t cause a re-render.

This is unlike the setState update function return from the useState hook.

Scroll to bottom of dynamic list div in React

We can do something similar to scroll to the bottom of a div containing a list of items that change.

JavaScript
import { useRef, useState } from 'react'; const allFruits = [ 'Apples', 'Bananas', 'Oranges', 'Grapes', 'Strawberries', 'Blueberries', 'Pineapples', 'Mangoes', 'Kiwis', 'Watermelons', ]; export default function App() { const ref = useRef(null); const [fruits, setFruits] = useState([...allFruits.slice(0, 3)]); const addFruit = () => { setFruits((prevFruits) => [...prevFruits, allFruits[prevFruits.length]]); }; const scrollToLastFruit = () => { const lastChildElement = ref.current?.lastElementChild; lastChildElement?.scrollIntoView({ behavior: 'smooth' }); }; return ( <div> <div style={{ position: 'fixed', backgroundColor: 'white', bottom: 0, marginBottom: 10, }} > <button onClick={addFruit}>Add fruit</button> <button onClick={scrollToLastFruit} style={{ marginLeft: '8px' }}> Scroll to last </button> </div> <div style={{ height: '5rem' }} /> <div ref={ref}> {fruits.map((fruit) => ( <h2 key={fruit}>{fruit}</h2> ))} </div> <div style={{ height: '150rem' }} /> </div> ); }
Scrolling to a dynamic element in a list div in React.

Like in the previous example, we also have a list of fruits displayed here.

But this time the list isn’t static – when can add an item to it with the Add fruit button.

The Scroll to last button scrolls to the last item in the div – the most recently added item.

Like before, we use the onClick prop to set a click event listener on the button.

We set the ref on the list instead of a list item, since the items are created dynamically, and the last item will not always be the same.

Doing this sets the current property of the ref object to the DOM object that represents the list element.

In this listener, we use the lastElementChild property of the list element to get its last item element. Then we call scrollIntoView() on this last item to scroll down to it.

JavaScript
const scrollToLastFruit = () => { const lastChildElement = ref.current?.lastElementChild; lastChildElement?.scrollIntoView({ behavior: 'smooth' }); };

Scroll to bottom of div after render

Sometimes we want to scroll to the bottom of the div immediately after the page renders.

Like if we want to scroll to the bottom of the list in the previous section,

we’ll just a useEffect() hook and call scrollIntoView() in the hook.

JavaScript
const scrollToLastFruit = () => { const lastChildElement = ref.current?.lastElementChild; lastChildElement?.scrollIntoView({ behavior: 'smooth' }); }; useEffect(() => { scrollToLastFruit(); }, []); // 👈 empty deps array
Scrolling to the bottom of a div list after render in React.

The code in useEffect is run after the component mounts.

And also when any value in the dependency array changes.

We pass an empty dependency array – so there are no dependencies.

So the useEffect will only run when the component mounts.

Here’s the full code for reference:

JavaScript
import { useEffect, useRef } from 'react'; const allFruits = [ 'Apples', 'Bananas', 'Oranges', 'Grapes', 'Strawberries', 'Blueberries', 'Pineapples', 'Mangoes', 'Kiwis', 'Watermelons', ]; export default function App() { const ref = useRef(null); const scrollToLastFruit = () => { const lastChildElement = ref.current?.lastElementChild; lastChildElement?.scrollIntoView({ behavior: 'smooth' }); }; useEffect(() => { scrollToLastFruit(); }, []); // 👈 empty deps array return ( <div> <div style={{ height: '5rem' }} /> <div ref={ref}> {allFruits.map((fruit) => ( <h2 key={fruit}>{fruit}</h2> ))} </div> <div style={{ height: '150rem' }} /> </div> ); }

Key takeaways

  1. To scroll to the bottom of a div element in React, create a ref on the target element and use scrollIntoView().
  2. The useRef hook creates a mutable ref object that can be assigned to the ref prop.
  3. Set the behavior option to smooth for a smooth scrolling animation.
  4. For dynamic lists, set the ref on the container element and scroll to the last child element.
  5. To scroll to the bottom immediately after rendering, use useEffect with an empty dependency array.
  6. The code within useEffect runs after mounting and when dependency values change.

How to Scroll to an Element in React

To scroll to an element in React, set a ref on the target element, then call scrollIntoView() on the target ref.

We can use this approach to scroll to an element when another trigger element is clicked.

We’ll first need to set a click event listener on the trigger element.

Then we’ll call scrollIntoView() in the listener.

JavaScript
import { useRef } from 'react'; export default function App() { const ref = useRef(null); const handleClick = () => { ref.current?.scrollIntoView({ behavior: 'smooth' }); }; return ( <div> <button onClick={handleClick}>Scroll to element</button> <div style={{ height: '150rem' }} /> <div ref={ref} style={{ backgroundColor: 'lightblue' }}> Coding Beauty </div> <div style={{ height: '150rem' }} /> </div> ); }
Scrolling to an element on click in React

Scrolling on click is great for quick navigation.

It improves the user experience.

It’s great for long lists and pages with many sections.

It makes apps more interactive with smooth-scrolling animations.

We create a ref object with the useRef hook and assign it to the ref prop of the target div element.

Doing this sets the current property of the ref object to the DOM object that represents the element.

useRef returns a mutable object that maintains its value when a component updates.

Also, modifying the value of this object’s current property doesn’t cause a re-render.

This is unlike the setState update function return from the useState hook.

We use the onClick on the button to a click listener to it. So, this listener will be called when the user clicks the button.

JavaScript
const handleClick = () => { ref.current?.scrollIntoView({ behavior: 'smooth' }); };

In the handleClick listener, we call the scrollIntoView() method on the ref of the target div element to scroll down to it and display it to the user.

We set the behavior option to smooth to make the element scroll into view in an animated way, instead of jumping straight to the element in the next frame – auto.

auto is the default.

Scroll to dynamic element on click in React

We can do something similar to scroll to a dynamically created element in React:

JavaScript
import { useRef, useState } from 'react'; const allFruits = [ 'Apples', 'Bananas', 'Oranges', 'Grapes', 'Strawberries', 'Blueberries', 'Pineapples', 'Mangoes', 'Kiwis', 'Watermelons', ]; export default function App() { const ref = useRef(null); const [fruits, setFruits] = useState([...allFruits.slice(0, 3)]); const addFruit = () => { setFruits((prevFruits) => [...prevFruits, allFruits[prevFruits.length]]); }; const scrollToLastFruit = () => { const lastChildElement = ref.current?.lastElementChild; lastChildElement?.scrollIntoView({ behavior: 'smooth' }); }; return ( <div> <div style={{ position: 'fixed', backgroundColor: 'white', bottom: 0, marginBottom: 10, }} > <button onClick={addFruit}>Add fruit</button> <button onClick={scrollToLastFruit} style={{ marginLeft: '8px' }}> Scroll to last </button> </div> <div style={{ height: '5rem' }} /> <div ref={ref}> {fruits.map((fruit) => ( <h2 key={fruit}>{fruit}</h2> ))} </div> <div style={{ height: '150rem' }} /> </div> ); }
Scrolling to a dynamic element on click in React.

Here we have a list of fruits displayed.

The Add fruit button dynamically adds an item to the fruit list on click.

Then the Scroll to last button scrolls to this item on click, as it’s the last in the list.

Like before, we use the onClick prop to set a click event listener on the button.

This time we set the ref on the list instead of the items since the items are created dynamically, and the last item will not be constant.

Doing this sets the current property of the ref object to the DOM object that represents the list element.

In this listener, we use the lastElementChild property of the list element to get its last item element. Then we call scrollIntoView() on this last item to scroll down to it.

JavaScript
const scrollToLastFruit = () => { const lastChildElement = ref.current?.lastElementChild; lastChildElement?.scrollIntoView({ behavior: 'smooth' }); };

Scroll to element after render in React

To scroll to an element after render on React:

  1. Set a ref on the element.
  2. Create a useEffect hook to run code just after the component mounts.
  3. Call scrollIntoView() on the ref object in useEffect.
JavaScript
import { useEffect, useRef } from 'react'; export default function App() { const ref = useRef(null); const scrollToElement = () => { ref.current?.scrollIntoView({ behavior: 'smooth' }); }; useEffect(() => { scrollToElement(); }, []); return ( <div> <div style={{ height: '150rem' }} /> <div ref={ref} style={{ backgroundColor: 'blue', color: 'white' }}> Coding Beauty </div> <div style={{ height: '150rem' }} /> </div> ); }
Scrolling to a particular element after render in React.

Scrolling after page loads help users find info.

It also helps fix errors.

It’s great for those who use special software.

It aids web navigation.

Like before, we create a ref object with the useRef hook and assign it to the ref prop of the target div element.

Doing this sets the current property of the ref object to the DOM object that represents the element.

useRef returns a mutable object that maintains its value when a component updates.

Also, modifying the value of this object’s current property doesn’t cause a re-render.

This is unlike the setState update function return from the useState hooks.

The useEffect hook performs an action after the component renders, and when one or more of its dependencies change.

We passed an empty dependencies array ([]) to make sure that action only runs when the component mounts.

In useEffect, we call the scrollIntoView() method on the ref of the target div element to scroll down to it and display it to the user.

We set the behavior option to smooth to make the element scroll into view in an animated way, instead of jumping straight to the element in the next frame (auto).

auto is the default.

Key takeaways

In React, we can use refs to scroll to a specific element on the page.

We can set a click event listener on a trigger element and call scrollIntoView() on the target ref to scroll to the desired element.

useRef() returns a mutable object that maintains its value when a component updates, allowing us to reference DOM elements.

Setting a ref on a list container allows us to dynamically scroll to the last item in the list.

We can use useEffect() to scroll to an element after the component mounts, improving the user experience and aiding web navigation.

Setting the behavior option to smooth in scrollIntoView() produces a smooth scrolling animation instead of an abrupt jump to the element.