By Tari Ibaba
/ Last updated on September 21, 2023
To detect mouse hover in Vue.js, use a hover state variable and the mouseenter & mouseleave events to detect when the mouse enters and leaves the element’s bounds.
The mouseenter event runs when the mouse pointer enters the bounds of an element, while mouseleave runs when it leaves.
We could also listen to the mouseover event to detect hover, this event runs for an element and every single one of its ancestor elements in the DOM tree (i.e. it bubbles) and this could cause serious performance problems in deep hierarchies. mouseenter doesn’t bubble so we can use it without worrying about this.
Change style on hover in Vue.js
To change the style of an element on hover in Vue.js, we can combine the hover state variable and the :class directive:
We could also display another element in the UI when we detect hover. For example: a tooltip to display more info on a particular UI element.
To do this, you can pass the state variable to a v-if state directive you set on the element. This ensures that the element only displays when the hover state is true.
Indeed, they are impressive when done right; a nice way to show off language mastery.
But exactly is a one-liner? Is it really code that takes only one line? If so, then can’t every piece of code qualify as a one-liner, if we just remove all the newline characters? Think about it.
A minified JavaScript file with only one line of code.
It seems like we need a more rigorous definition of what qualifies as a one-liner. And, after a few minutes of thought when writing a previous article on one-liners, I came up with this:
A one-liner is a code solution to a problem, implemented with a single statement in a particular programming language, optionally using only first-party utilities.
Tari Ibaba (😎)
You can clearly see those particular keywords that set this definition apart from others
1. “…single statement…”
Single line or single statement? I go with the later.
Because the thing is, we squeeze every program ever made in a single line of code if we wanted; all the whitespace and file separation is only for us and our fellow developers.
If you’ve used Uglify.js or a similar minifier, you know what it does to all those pitiful lines of code; why it’s called Uglify.
Uglify changes this:
JavaScriptCopied!
/**
  Obviously redudant comments here. Just meant to
  emphasize what Uglify does

  Class Person
*/
class Person {
    /**
        Constructor
    */
    constructor(name, age) {
        this.name = name;
        this.age = age;
    }

    /**
        Print Message
    */
    printMessage() {
        console.log(`Hello! My name is ${this.name} and I am ${this.age} years old.`);
    }
}

/**
    Creating Object
*/
var person = new Person('John Doe', 25);

/**
    Printing Message
*/
person.printMessage();
to this:
JavaScriptCopied!
class Person{constructor(e,n){this.name=e,this.age=n}printMessage(){console.log(`Hello! My name is ${this.name} and I am ${this.age} years old.`)}}var person=new Person("John Doe",25);person.printMessage();
Would you be impressed by someone who actually wrote code like in this minified way? I would say it’s just badly formatted code.
Would you call this a one-liner?
JavaScriptCopied!
const sum = (a, b) => { const s1 = a * a; const s2 = b * b; return s1 + s2; }
Tools like the VS CodePrettier extension will easily split up those 3 statements into multiple lines:
The three statements are separated after VS Code Prettier auto-format on save.
A true one-liner way to get the sum of two squares would be something like this:
JavaScriptCopied!
const sum = (a, b) => a * a + b * b;
One short, succinct statement does the same job with equal clarity.
On the other hand, what about code that spans multiple lines but only uses one statement? Like this:
Wait, this is just another piece of code, right? Well, it is, except that they do exactly the same thing, but in different languages. One in C++, and the other in Assembly.
Now imagine how much more an equivalent machine language program will have. Clearly, we can only our sum() a one-liner function in the context of C++.
“…using only first-party utilities”
Once again, we need this part because of abstraction.
For us to consider a piece of code as a one-liner, it should only use built-in functions and methods that are part of the language’s standard library or core functionality. For example: array methods, the http module in Node.js, the os module in Python, and so on.
Without this, capitalizeWithoutSpaces() below would easily pass as a JavaScript one-liner:
JavaScriptCopied!
// Not a one-liner
const capitalizeWithoutSpaces = (str) =>
  filter(str.split(''), (char) => char.trim())
    .map((char) => char.toUpperCase())
    .join('');

function filter(arr, callback) {
  // Look at all these lines
  const result = [];
  for (const item of arr) {
    if (callback(item)) {
      result.push(item);
    }
  }
  return result;
}
filter could have contained many thousands of lines, yet capitalizeWithoutSpaces would still be given one-liner status.
It’s kind of controversial because a lot of these so-called first-party utilities are abstractions themselves with logic spanning dozens of lines. But just like the “single statement” specifier, it makes it impossible to have an unlimited number of one-liners.
Final thoughts
The essence of a one-liner in programming extends beyond the literal interpretation of its name. It lies not only in the minimalism of physical lines but also in the elegance and sophistication of its execution. It often requires a sound comprehension of the language at hand, an ability to concisely solve a problem, and the art of utilizing the language’s core functionalities with finesse.
A one-liner isn’t merely about squeezing code into a single line; It is where the clarity of thought, the elegance of language mastery, and the succinctness of execution converge. It’s the realm where brevity meets brilliance and the art of coding truly shines.
redirects is an async function that returns an array with items that have source, destination, and permanent properties:
source: A pattern matching the path of the incoming request.
destination: The path you want to redirect to.
permanent: If true, Next sets a 308 status code in the redirection response, which tells clients like search engines to cache the redirect from that point onwards. If false, Next will set a 307 status code (temporary redirect) instead, making sure that redirect doesn’t get cached.
Note: While 301 and 302 are the popular status codes for permanent and temporary redirects, Next.js uses 307 and 308 because many browsers changed the request method to GET for the destination URL, regardless of the method the client set in the original request to the source. So if POST v1/posts returned a 302 with v2/posts, the next request to v2/posts may end up GET v2/posts instead of POST v2/posts. But with 307 and 308, the browsers are guaranteed to preserve the request method.
Redirect statically with path parameter to page URL
You can use a path parameter like :path to match any path in the source URL and pass it on to the destination URL.
Here, /news/:slug/ will match /news/codingbeauty and redirect to /blog/codingbeauty.
Redirect to another page URL dynamically in Next.js App Router server component
To redirect to another page URL dynamically in a Next.js 13 server component, use the redirect() function from the next/navigation module:
JavaScriptCopied!
import React from 'react';
import { Metadata } from 'next';
import { redirect } from 'next/navigation';

export const metadata: Metadata = {
  title: 'Next.js - Coding Beauty',
  description: 'Tutorials by Coding Beauty',
};

export default function Page() {
  if (process.env.NEXT_PUBLIC_HOME) redirect('/home');

  return <main>Welcome to Coding Beauty.</main>;
}
The redirect() function redirects the browser to another URL; /home in this case.
Here this happens conditionally, but if the redirect is guaranteed to happen, it will surely prevent any JSX in the page from rendering, and editors like VS Code are smart enough to detect this:
Redirect to another page URL dynamically in App Router client component
To redirect to another page URL dynamically in a Next.js client component in the Next.js 13 app directory, use the push() method of the object returned by the useRouter hook from the next/navigation module:
Here we’re redirecting from from the /blog path to an external URL:
src/app/blog/page.tsxCopied!
'use client';

import React, { useEffect } from 'react';
import { useRouter } from 'next/navigation';

export default function Page() {
  const router = useRouter();

  useEffect(() => {
    router.push('https://codingbeautydev.com');
  }, []);

  return <main>Welcome to Coding Beauty.</main>;
}
The useRouter hook returns a Router object that we use to programmatically change the route, resulting in a client-side redirect.
Redirect to another page URL dynamically in Pages Router component
It’s like in the App router, but useRouter comes from next/router instead of next/navigation.
To redirect to another page URL dynamically in a Next.js client component in the Pages router, use the push() method of the object returned by the useRouter hook from the next/router module.
src/pages/amazing-url.tsxCopied!
import Head from 'next/head';
import { useEffect } from 'react';
import { useRouter } from 'next/router';

export default function Home() {
  const router = useRouter();

  useEffect(() => {
    router.push('/fantastic-url');
  }, []);

  return (
    <>
      <Head>
        <title>Amazing URL | Coding Beauty</title>
        <meta name="description" content="Generated by create next app" />
        <meta name="viewport" content="width=device-width, initial-scale=1" />
        <link rel="icon" href="/favicon.png" />
      </Head>
      <main>
        <p>Coding Beauty</p>
        <h2>Amazing URL</h2>
      </main>
    </>
  );
}
The useRouter hook returns a Router object that we use to programmatically change the route to perform a redirect on the client side.
Next.js >= 12: Redirect to another page URL in middleware
To redirect to another page URL using middleware in Next.js 12.1 and above, use the NextResponse.redirect method from the next/server module in a middleware.ts file.
src/middleware.tsCopied!
import { NextResponse } from 'next/server';
import type { NextRequest } from 'next/server';

export function middleware(request: NextRequest) {
  const url = request.nextUrl.clone();
  if (url.pathname === '/old-blog') {
    url.pathname = '/new-blog';
    return NextResponse.redirect(url);
  }
}
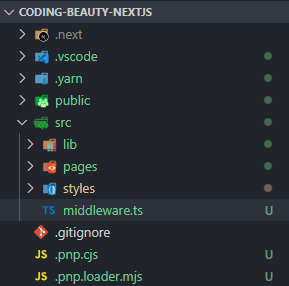
You’ll place middleware.ts file in the same level as your pages directory – which could be the root directory, or src, if enabled.
middleware.ts is at the same level as the pages directory.
The reason why this only works in Next.js 12.1 above is because starting from Next.js 12.1, relative URLs are not allowed in redirects with NextResponse.redirect() or NextResponse.rewrite().
Next.js 12: Redirect to another page URL in middleware
To redirect to another page URL dynamically using middleware in Next.js 12, use the NextResponse.redirect() method from the next/server module in a _middleware.js file inside the pages folder or a subfolder where you want the middleware to work:
pages/_middleware.jsCopied!
import { NextResponse, NextRequest } from 'next/server';
export async function middleware(request, event) {
  const { pathname } = request.nextUrl;
  if (pathname == '/') {
    return NextResponse.redirect('/hello-nextjs');
  }
  return NextResponse.next();
}
Key takeaways
In Next.js, there are several ways to quickly redirect to another page URL.
For static redirects, you can use the redirects key in the next.config.js file. It allows you to define source and destination paths with options for temporary or permanent redirects.
Path parameters (e.g., /blog/:slug) and wildcard paths (e.g., /blog/:slug*) can be used to match and redirect nested routes or query parameters.
In a Next.js App Router server component, you can use the redirect() function from the next/navigation module to dynamically redirect to another URL.
In the Next.js client component, you can use the push() method from the useRouter hook in the next/navigation (Next.js 13) or next/router (Next.js 12 and below) module to programmatically change the route and perform a client-side redirect.
For middleware in Next.js 12.1 and above, you can use the NextResponse.redirect() method from the next/server module in a middleware.ts file.
In Next.js 12 middleware, you can use the NextResponse.redirect() method in a _middleware.js file inside the pages folder or a subfolder.
By Tari Ibaba
/ Last updated on September 30, 2023
What do we know as Yarn 2?
It’s the modern version of Yarn that comes with important upgrades to the package manager including PNMP-style symlinks, and an innovative new Plug ‘n’ Play module installation method for much-reduced project sizes and rapid installations.
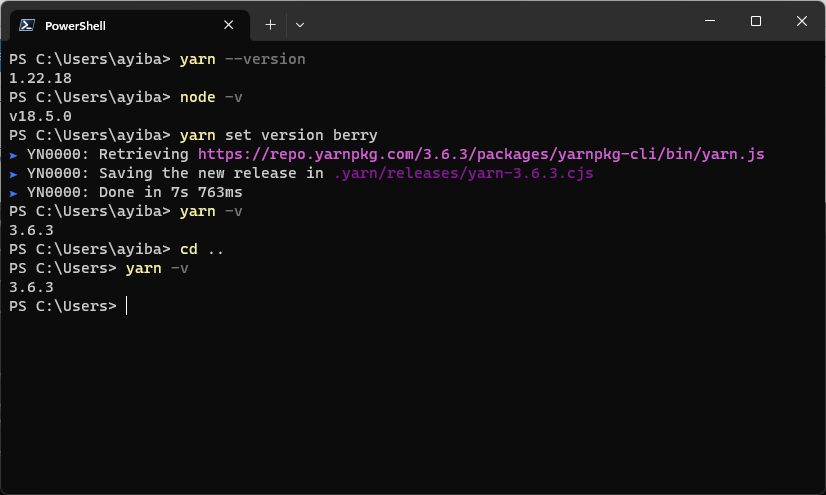
But after migrating from Yarn 1, you’ll find something interesting, as I did – the thing widely known as Yarn 2 is actually… version 3?
Why is “Yarn 2” using version 3?
It’s because Yarn 1 served as the initial codebase which was completely overhauled in the Yarn v2.0 (the actual version 2), enhancing its efficiency and effectiveness, with its launch taking place in January 2020. As time moved on, the introduction of a fresh major, Yarn v3.0, happened, thankfully without the need for another codebase rewrite. The upcoming major update is expected to be Yarn v4.0, and so on.
Despite the historical tendency of releasing few major updates, there was a growing trend among some individuals to label everything that used the new codebase as “Yarn 2”, which includes Yarn 2.x versions and future ones such as 3.x. This, however, was a misinterpretation as “Yarn 2” strictly refers to the 2.x versions. A more accurate way to reference the new codebase would be “Yarn 2+” or “Yarn Berry” – a codename that the team selected for the new codebase when they started developing it.
As once stated by one of the maintainers in a related GitHub discussion:
Some people have started to colloquially call “Yarn 2” everything using this new codebase, so Yarn 2.x and beyond (including 3.x). This is incorrect though (“Yarn 2” is really just 2.x), and a better term to refer to the new codebase would be Yarn 2+, or Yarn Berry (which is the codename I picked for the new codebase when I started working on it).
If you’re still using Yarn version 1 – or worse, NPM – you’re missing out.
The new Yarn is loaded with a sizable number of upgrades that will significantly improve your developer experience when you start using it. These range from notable improvements in stability, flexibility, and extensibility, to brand new features, like Constraints.
You can migrate from Yarn v1 to Yarn Berry in 7 easy steps:
The Yarn versioning saga teaches us an important lesson: terminology matters.
What many of us dub as “Yarn 2” is actually “Yarn 2+” or “Yarn Berry”, the game-changing codebase. This misnomer emphasizes our need to stay current, not just with evolving tools and features, but with their rightful names as well. After all, how we understand and converse about these improvements shapes our effectiveness and fluency as developers.
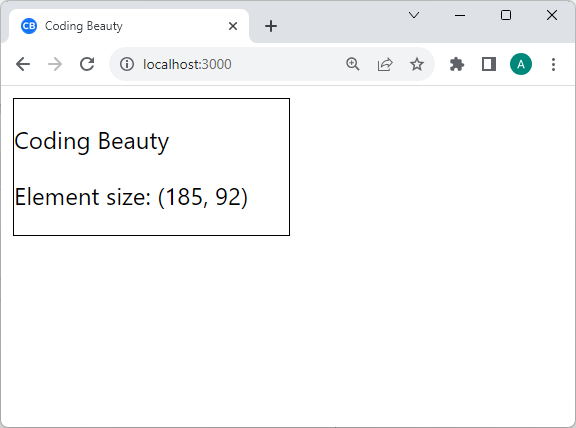
To get the height or width of an element in React, use the useRef, useEffect, and useState hooks to access the element’s offsetWidth or offsetHeight property:
useEffect() runs after the component mounts or re-renders, but useLayoutEffect() runs before. They both have a dependency array that triggers them when any of those dependencies change.
We create a ref for the target element with useRef(), and assign it to its ref prop, so we can access the HTMLElement object for this React element.
useRef returns a mutable ref object that doesn’t change its value when a component is updated. Also, modifying the value of this object’s current property does not cause a re-render. This is in contrast to the setState update function returned from useState.
We use useState() to create a state that we update when useEffect() gets called. This update makes the element’s width and height display on the page.
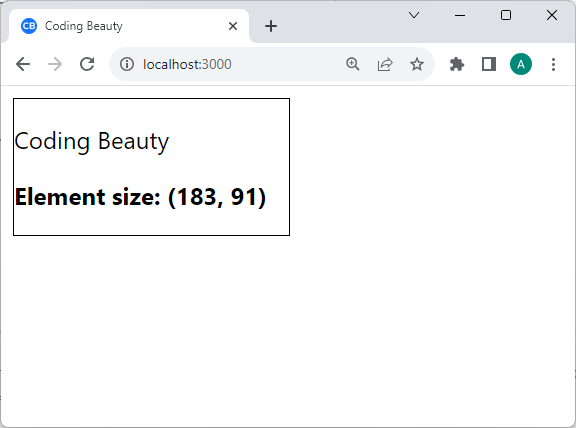
Get height and width of element with clientHeight and clientWidth
You can also get an element’s height and width in React withclientHeight and clientWidth. Unlike offsetWidth, it includes padding but excludes borders and scrollbars.
We call addEventListener() in useEffect() to set the resize event listener on the element before it renders on the screen.
The resize event listener is called whenever the user resizes the window. In the listener, we update the state that stores the element’s width and height, and this causes a re-render.
We call removeEventListener() in useEffect‘s clean-up function to stop listening for resize events when the component is unmounted or when the dependencies change to prevent memory leaks and unintended side effects.
Get element height and width before render in React
So the difference between “before render” and “after render” is useLayoutEffect() and useEffect().
useLayoutEffect() works just like useEffect(), but the key difference is that it fires before the browser repaints the screen – before React renders the component.
We pass an empty dependencies array to useLayoutEffect() to make sure it only gets called once.
Here we create a ref for the target element with useRef(), and assign it to its ref prop, so we can access the HTMLElement object for this React element.
useRef returns a mutable ref object that doesn’t change its value when a component is updated. Also, modifying the value of this object’s current property does not cause a re-render. This is in contrast to the setState update function returned from useState.
We do use useState() though, to create a state that we update when useLayoutEffect() gets called. So calling setWidth() will cause the component to be re-rendered.
To get the actual width and height, we use the offsetWidth and offsetHeight properties, which include borders, padding, and any scrollbars.
Key takeaways
To get the height or width of an element in React, combine the useRef, useEffect, and useState hooks to get the value of offsetWidth and offsetHeight.
clientWidth and clientHeight are similar to offsetWidth and offsetHeight, but they include padding and exclude borders and scrollbars.
To get the dimensions of the element dynamically, create a windowresize event listener to automatically update the size when the user resizes the browser window.
To get the size of the element before render, replace useEffect with useLayoutEffect.
To get the union of two Sets in JavaScript, convert the sets to arrays and merge them, then create a Set from the merged array, i.e., new Set([...set1, ...set2]).
For example:
JavaScriptCopied!
function getUnion(set1, set2) {
  return new Set([...arr1, ...arr2]);
}

const set1 = new Set([1, 2, 3, 4]);
const set2 = new Set([3, 4, 5, 6]);

const union = getUnion(set1, set2);

console.log(union); // Set(6) { 1, 2, 3, 4, 5, 6 }
Set() constructor
The Set() constructor creates a new Set object from an iterable like an array. As a Set can only contain unique values, it removes any possible duplicates that may be in the array it receives.
JavaScriptCopied!
const set = new Set([1, 1, 2, 3, 3, 4]);
console.log(set); // Set(4) [1, 2, 3, 4]
Spread syntax (...)
The array we pass to Set() is a merge of two arrays that represent the two Sets. The spread syntax (...) unpacks the value of each Set into the array.
To get the union of two arrays in JavaScript, merge the arrays, create a new Set object from the merged result to remove the duplicates, then convert it back to an array, i.e., Array.from(new Set([...arr1, ...arr2])).
To get the union of two Sets in JavaScript, convert the Sets to arrays, merge them, and convert the merged array back to a Set object, i.e., new Set([...set1, ...set2]).
To get the union of two arrays in JavaScript, merge the arrays, create a new Set object from the merged result to remove the duplicates, then convert it back to an array, i.e., Array.from(new Set([...arr1, ...arr2])).
The Array from() method converts Sets and other iterable objects to arrays.
JavaScriptCopied!
const set = new Set(['Paul', 'John', 'George', 'Ringo']);
const arr = Array.from(exampleSet);

console.log(arr);  // ['Paul', 'John', 'George', 'Ringo']

const map = new Map();
map.set('Bob', 'Marley');
map.set('Mick', 'Jagger');

let arr2 = Array.from(map);

console.log(exampleArray2);  // [ ['Bob', 'Marley'], ['Mick', 'Jagger'] ]
Set() constructor
We create these sets with the Set constructor, which can only contain unique values, so it removes any possible duplicates that may be in the array it receives.
JavaScriptCopied!
const set = new Set([1, 1, 2, 3, 3, 4]);
console.log(Array.from(set)); // [1, 2, 3, 4]
Spread syntax (...)
To pass this array to the Set() constructor, we use the spread syntax (...) to merge the two arrays together. The spread syntax unpacks the value of each array into another array:
We can use the same principles to easily get the union of two sets in JavaScript.
Get union of two sets in JavaScript
To get the union of two sets in JavaScript, convert the sets to arrays and merge them, then create a Set from the results of the merge.
For example:
JavaScriptCopied!
function getUnion(set1, set2) {
  return new Set([...set1, ...set2]);
}

const set1 = new Set(['a', 'b', 'c', 'd']);
const set2 = new Set(['c', 'd', 'e', 'f']);

const union = getUnion(set1, set2);

console.log(union); // Set(6) { 'a', 'b', 'c', 'd', 'e', 'f' }
Key takeaways
To get the union of two arrays in JavaScript, create a new Set object from the merge of the two arrays, then convert this Set object to an array again, i.e., Array.from(new Set(arr1.concat(arr2))).
We can do a similar thing to get the union of two sets, i.e., new Set([...set1, ...set2]).
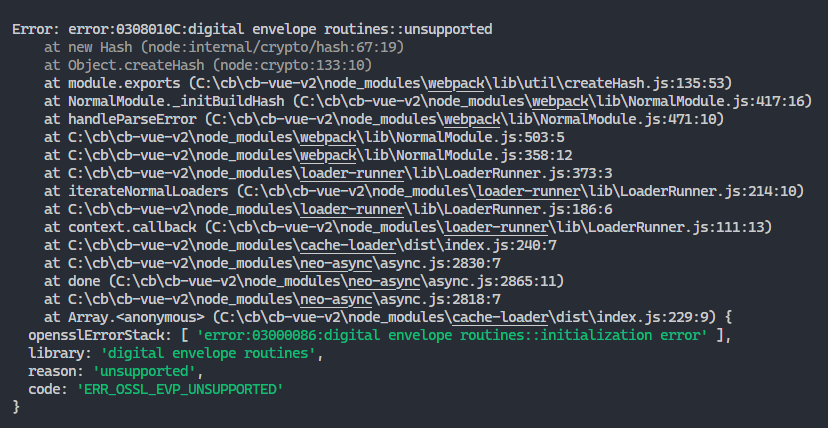
The ERR_OSSL_EVP_UNSUPPORTED error happens in Node.js when a JavaScript module still uses a flawed OpenSSL version that is incompatible with the version Node.js uses.
The ERR_OSSL_EVP_UNSUPPORTED error occurring.
To fix it, downgrade to Node.js v16.13.0, or use the npm audit fix --force command to upgrade your packages to versions that use the updated OpenSSL version.
Why does the ERR_OSSL_EVP_UNSUPPORTED error occur in Node.js?
In Node.js v17, the Node.js team patched an OpenSSL security vulnerability. This fix introduced a breaking change; if you try to use OpenSSL in Node.js v17 or later versions without simultaneously updating those modules that use previous OpenSSL versions, you’ll get this error.
And you’ll get it the next time Node.js updates to use a newer OpenSSL version with breaking changes and you haven’t updated the OpenSSL-dependent libraries.
Fix: upgrade NPM packages
To fix the ERR_OSSL_EVP_UNSUPPORTED error, update the Node.js packages causing the error to the latest version.
Run npm audit fix to fix vulnerabilities
You can run the npm audit fix command to identify those packages using the outdated OpenSSL version and fix them automatically.
ShellCopied!
npm audit fix
npm audit fix reviews the project’s dependency tree to identify packages that have known vulnerabilities, and attempts to upgrade and/or fix the vulnerable dependencies to a safe version.
npm audit fix --force
If you want to install semver major updates to vulnerable packages, you can use the --force option.
ShellCopied!
npm audit fix --force
Be cautious with this option as it could potentially break your project.
yarn-audit-fix
If you’re a Yarn user, you can use the yarn-audit-fix package to do what npm audit fix does.
Upgrade Webpack to v5
If you’re using Webpack directly to bundle your files, you can upgrade it to version v5 – specifically, v5.61.0 – to fix the ERR_OSSL_EVP_UNSUPPORTED error.
ShellCopied!
npm i webpack@latest

# Yarn
yarn add webpack@latest
If instead, you’re using a tool like Create React App and the Vue CLI that use Webpack internally, you’ll upgrade the tool to a version that doesn’t have this error.
Fix for Create React App: Upgrade react-scripts to v5
If you’re using Create React App then you can fix the ERR_OSSL_EVP_UNSUPPORTED error by upgrading react-scripts to version 5, which comes with the newer Webpack version 5.
Install version 5 or later with this command:
ShellCopied!
npm i react-scripts@latest

# Yarn
yarn add react-scripts@latest
Fix for Vue CLI: Upgrade to v5
Similarly for the Vue CLI, you can fix the ERR_OSSL_EVP_UNSUPPORTED error by upgrading the Vue CLI to version 5 which also comes with the newer Webpack version 5.
Install Vue CLI version 5 or later with this command:
ShellCopied!
npm update -g @vue/cli

# OR
yarn global upgrade --latest @vue/cli
They’ll obviously be problematic when collaborating and team members use other operating systems. What do we do? We install the cross-env NPM module and run the script with it.
Now the script runs successfully on every platform.
Fix for Vue CLI
So to fix the ERR_OSSL_EVP_UNSUPPORTED error when using Vue with the Vue CLI, install the cross-env module and set the --openssl-legacy-provider option:
And to fix the ERR_OSSL_EVP_UNSUPPORTED error when using React with Create React App, install the cross-env module and set the --openssl-legacy-provider option.
If you’re using Chocolatey, Node.js is available as the nodejs package, meaning you can easily install it in a terminal using the following command.
ShellCopied!
# Use current LTS version

choco install nodejs --version=18.5.0
Install with nvm
If you’re using nvm or nvm-windows, use these commands to quickly install and switch to Node.js v16.13.0.
ShellCopied!
nvm install 16.13.0

nvm use 16.13.0
Key takeaways
The ERR_OSSL_EVP_UNSUPPORTED error in Node.js occurs when a JavaScript module uses an outdated OpenSSL version that is incompatible with the current Node version. This typically happens when Node.js v17 or later versions are used without updating the modules that use previous OpenSSL versions.
To fix this error, you can:
Downgrade to Node.js v16.13.0.
Use the npm audit fix --force or yarn-audit-fix command to upgrade your packages to versions that use the updated OpenSSL version.
If you’re using Webpack, you can upgrade it to version v5.61.0 to fix the error. For Create React App and Vue CLI, you can upgrade them to v5.
Another way to fix the error is to use the --openssl-legacy-provider option when running the script. However, this solution leaves your app open to security threats and is only available in Node version 17 or later.
Downgrading to Node.js v16.13.0 is another way to fix the error. However, this solution also leaves your app open to security threats. You can install this version from the official website, or use Chocolatey, nvm, or nvm-windows to install and switch to this version.
Animations. A fantastic way to stand out from the crowd and grab the attention of your visitors.
With creative object motion and fluid page transitions, you not only add a unique aesthetic appeal to your website but also enhance user engagement and create a memorable first impression.
And creating animations can’t get any easier with these 10 powerful JavaScript libraries. Scroll animations, handwriting animations, SPA page transitions, typing animations, color animations, SVG animations… they are endlessly capable. They are the best.
With over 43k stars on GitHub, Anime.js is easily one of the most popular animation libraries out there.
It’s a lightweight JavaScript animation library with a simple API that can be used to animate CSS properties, SVG, DOM attributes, and JavaScript objects. With Anime.js, you can play, pause, restart or reverse an animation. The library also provides staggering features for animating multiple elements with follow-through and overlapping actions. There are various animation-related events also included, which we can listen to using callbacks and Promises.
Lottie is a library that parses Adobe After Effects animations exported as JSON with the Bodymovin plugin and renders them natively on mobile and web applications. This eliminates the need to manually recreate the advanced animations created in After Effects by expert designers. The Web version alone has over 27k stars on GitHub.
With Velocity you create color animations, transforms, loops, easings, SVG animations, and more. It uses the same API as the $.animate() method from the jQuery library, and it can integrate with jQuery if it is available. The library provides fade, scroll, and slide effects. Besides being able to control the duration and delay of an animation, you can reverse it sometime after it has been completed, or stop it altogether when it is in progress. It has over 17k stars on GitHub and is a good alternative to Anime.js.
Rough Notation is a JavaScript library for creating and animating colorful annotations on a web page. It uses RoughJS to create a hand-drawn look and feel. You can create several annotation styles, including underline, box, circle, highlight, strike-through, etc., and control the duration and color of each annotation style.
Popmotion is a functional library for creating prominent and attention-grabbing animations. What makes it stand out? – there are zero assumptions about the object properties you intend to animate, but instead provides simple, composable functions that can be used in any JavaScript environment.
The library supports keyframes, spring and inertia animations on numbers, colors, and complex strings. It is well-tested, actively maintained, and has over 19k stars on GitHub.
Vivus is a JavaScript library that allows you to animate SVGs, giving them the appearance of being drawn. It is fast and lightweight with exactly zero dependencies, and provides three different ways to animate SVGs: Delayed, Sync, and OneByOne. You can also use a custom script to draw an SVG in your preferred way.
Vivus also allows you to customize the duration, delay, timing function, and other animation settings. Check out Vivus Instant for live, hands-on examples.
The GreenSock Animation Platform (GSAP) is a library that lets you create wonderful animations that work across all major browsers. You can use it in React, Vue, WebGL, and the HTML canvas to animate colors, strings, motion paths, and more. It also comes with a ScrollTrigger plugin that lets you create impressive scroll-based animations with little code.
Used in over 11 million sites, with over 15k stars on GitHub, it is a versatile and popular indeed. You can use the GSDevTools from GreenSock to easily debug animations created with GSAP.
Three.js is a lightweight library for displaying complex 3D objects and animations. It makes use of WebGL, SVG, and CSS3D renderers to create engaging three-dimensional experiences that work across a wide range of browsers and devices. It is a well-known library in the JavaScript community, with over 85k stars on GitHub.
The ScrollReveal library lets you easily animate a DOM element as it enters or leaves the browser viewport. It provides various types of elegant effects to reveal or hide an element on-scroll in multiple browsers. And quite easy to use too, with with zero dependencies and over 21k stars on GitHub.
One creative way to make your website outstanding is to add lively transitions between the pages as your users navigate between them. This produces a better user experience than simply displaying the new webpage or reloading the browser.
And that’s why Barba.js is so useful; this library lets you create enjoyable page transitions by making the site run like a Single Page Application (SPA). It reduces the delay between pages and minimizes the number of HTTP requests that the browser makes. It’s gotten almost 11k stars on GitHub.
Great library for creating compelling motion graphics.
It provides simple, declarative APIs for effortlessly creating smooth animations and effects that look great on devices of various screen sizes. You can move HTML or SVG DOM elements, or you can create a special Mo.js object, which comes with a set of unique capabilities. It is a reliable and well-tested library, with over 1500 tests written and over 17k stars on GitHub.
It types out a specific string character by character as if someone was typing in real-time, allowing you pause the typing speed, and even pause the typing for a specific amount of time. With smart backspacing, it types out successive strings starting with the same set of characters as the current one without backspacing the entire preceding string – as we saw in the demo above.
Also included is support for bulk typing, which types out a group of characters on the screen at the same time, instead of one after the other. Typed.js has over 12k stars on GitHub and is trusted bySlack and Envato.
The world of web animation is vast and dynamic, constantly evolving with the advent of new technologies and libraries. The animation libraries highlighted in this article offer an array of features to create engaging, interactive, and visually appealing experiences for users. They are a testament to the power and flexibility of JavaScript, and demonstrate how animations greatly enhance the user experience.
As a developer, harnessing these tools will no doubt elevate your projects, making them stand out in an increasingly competitive digital landscape.
We use the .prevent modifier to stop the default action of the event from happening. In this case, that action was a page refresh, so .prevent stopped the page refresh on the form submission.
App.vueCopied!
<form @submit.prevent="handleSubmit">
.prevent is a Vue.js event modifier, which lets us access and modify event-related data.
We use the @submit directive to add a submit event listener to the form; this listener runs when the user clicks the button to submit the form.
In this case we only reset the form; in practical scenarios you’ll likely make an AJAX request to a server with the form data.
With type="submit", the browser also submits the form when the user presses the Enter key in an input field.
Remove type="submit" from the button to prevent page refresh
To prevent page refresh on form submit in Vue.js, you can also remove the type="submit" from the button.
When is this useful? You may want to show an alert message or something before submission. In this case, we wouldn’t want type="submit" since it submits the form on button click.
We used type="button" on the button, but that’s as good as not having a type attribute. It doesn’t do anything on click.
Key takeaways
To prevent page refresh on form submit in Vue.js, use the .prevent modifier in the submit event listener.
Set type="submit" to ensure the form submits on button click or Enter press. Remove it when you don’t want this.
Remove type="submit" when something needs to happen after the button click before submitting the form, e.g., show a dialog, make an initial request, etc.