Tari Ibaba is a software developer with years of experience building websites and apps. He has written extensively on a wide range of programming topics and has created dozens of apps and open-source libraries.
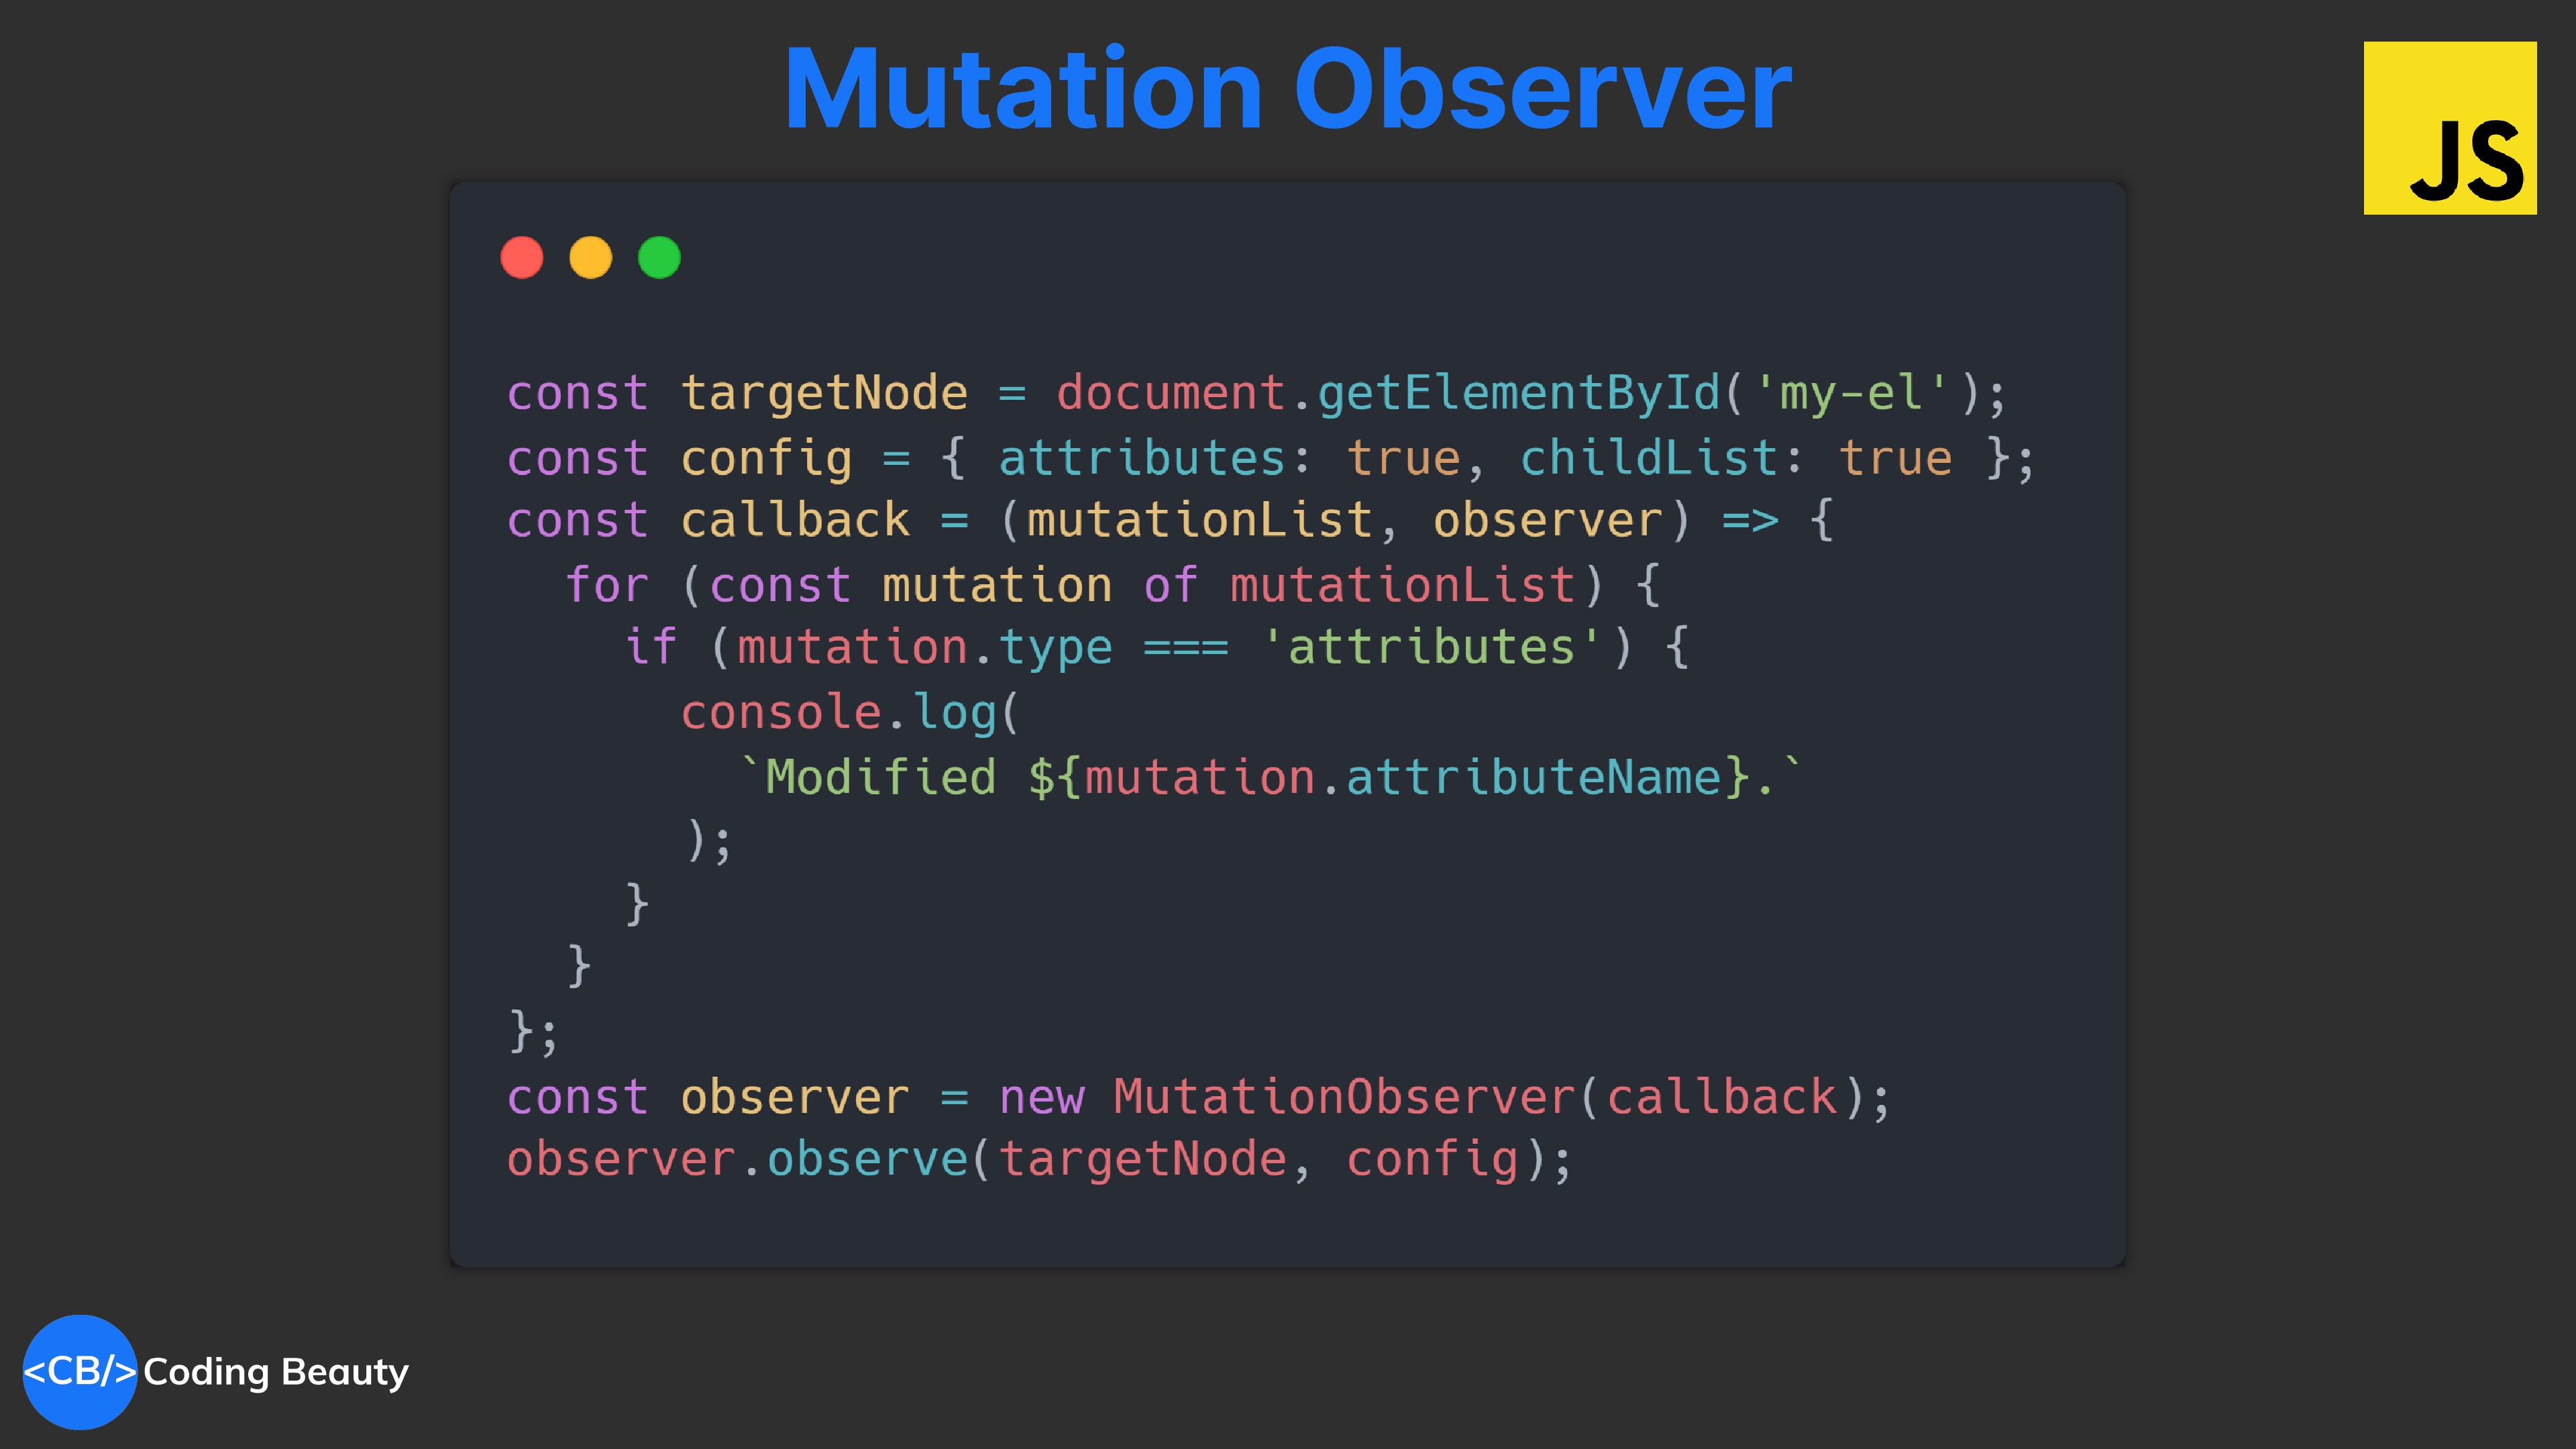
An underrated API for watching for changes in the DOM: “child added”, “attribute changed”, and more.
JavaScriptCopied!
// Node/element to be observed for mutations
const targetNode = document.getElementById('my-el');

// Options for the observer (which mutations to observe)
const config = { attributes: true, childList: true, subtree: true };

// Callback function to execute when mutations are observed
const callback = (mutationList, observer) => {
  for (const mutation of mutationList) {
    if (mutation.type === 'childList') {
      console.log('A child node has been added or removed.');
    } else if (mutation.type === 'attributes') {
      console.log(
        `The ${mutation.attributeName} attribute was modified.`
      );
    }
  }
};

// Create an observer instance linked to the callback function
const observer = new MutationObserver(callback);

// Start observing the target node for configured mutations
observer.observe(targetNode, config);

// Later, you can stop observing
observer.disconnect();
I see a bunch of people online curious to know the point of this API in the real-world.
In this post I’ll show you how I used it to easily shut-up this annoying script carrying out unwanted activities on the page.
And you’ll see how sleek and polish the UI elements became after this.
The 3rd party script
It came from Mailchimp – a service for managing email lists.
Mailchimp provides embedded forms to easily collect sign-ups to your list.
These forms are HTML code embedded in your webpage without any additional configuration.
But being this ready-to-use nature comes at a cost; deeply embedded CSS stubbornly resisting any attempt to customize the form’s look and feel.
I mean I know I definitely spent WAY more than I should have doing this, having to throw CSS !important all over the place and all…
Stubbornly rigid JS
On the JS side I had the remote Mailchimp script showing these pre-defined error/success messages after the request to the Mailchimp API.
Sure this was an decent success message but there was simply no built-in option to customize it. And we couldn’t indicate success in other ways like a color or icon change.
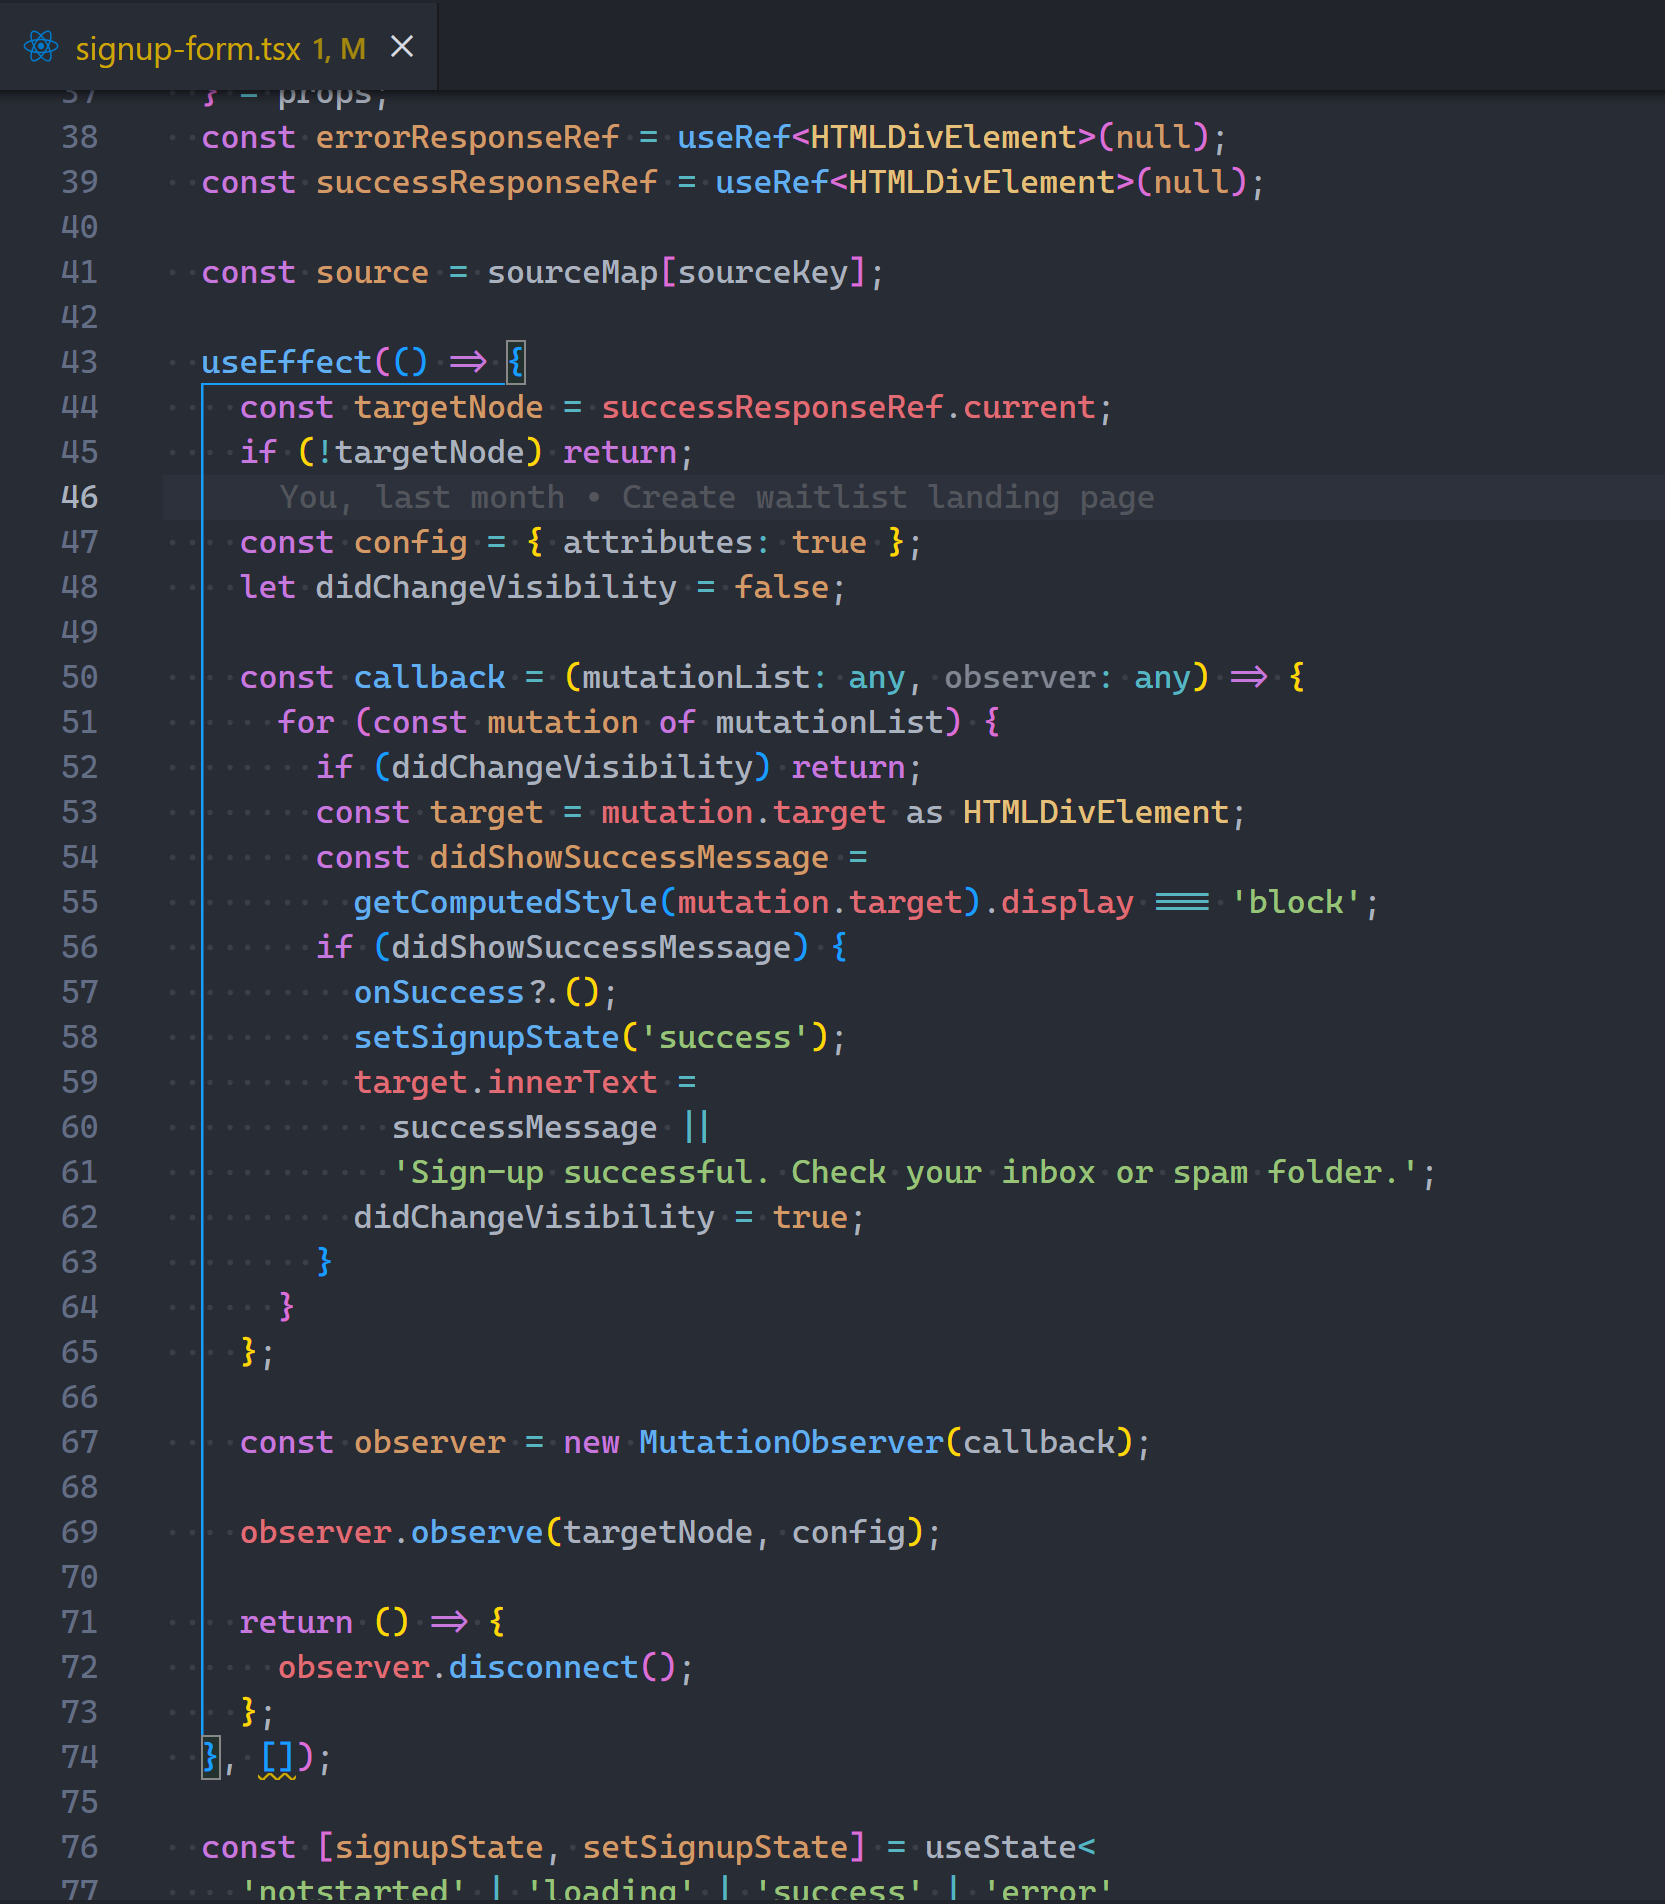
Mutation Observer to the rescue…
Waiting for the precise moment the success text came in and instantly swapping out the copy for whatever I wanted and doing anything else.
And just like that the script was blocked from directly affecting the UI.
We basically turned it into an Event Emitter service; an observable.
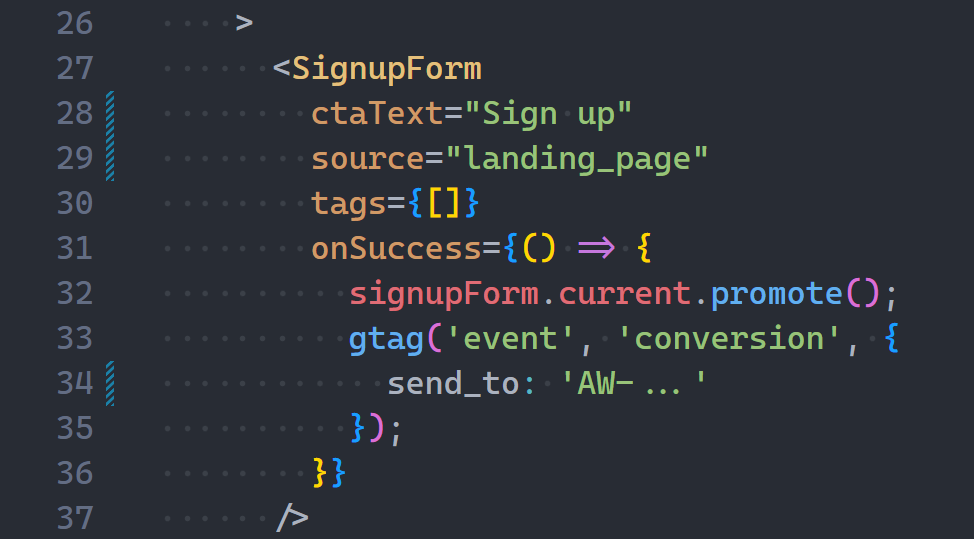
This let us easily abstract everything into a React component and add various event listeners (like onSuccess and onError):
To create the polished form we saw earlier:
This is the power of the JavaScript Mutation Observer API.
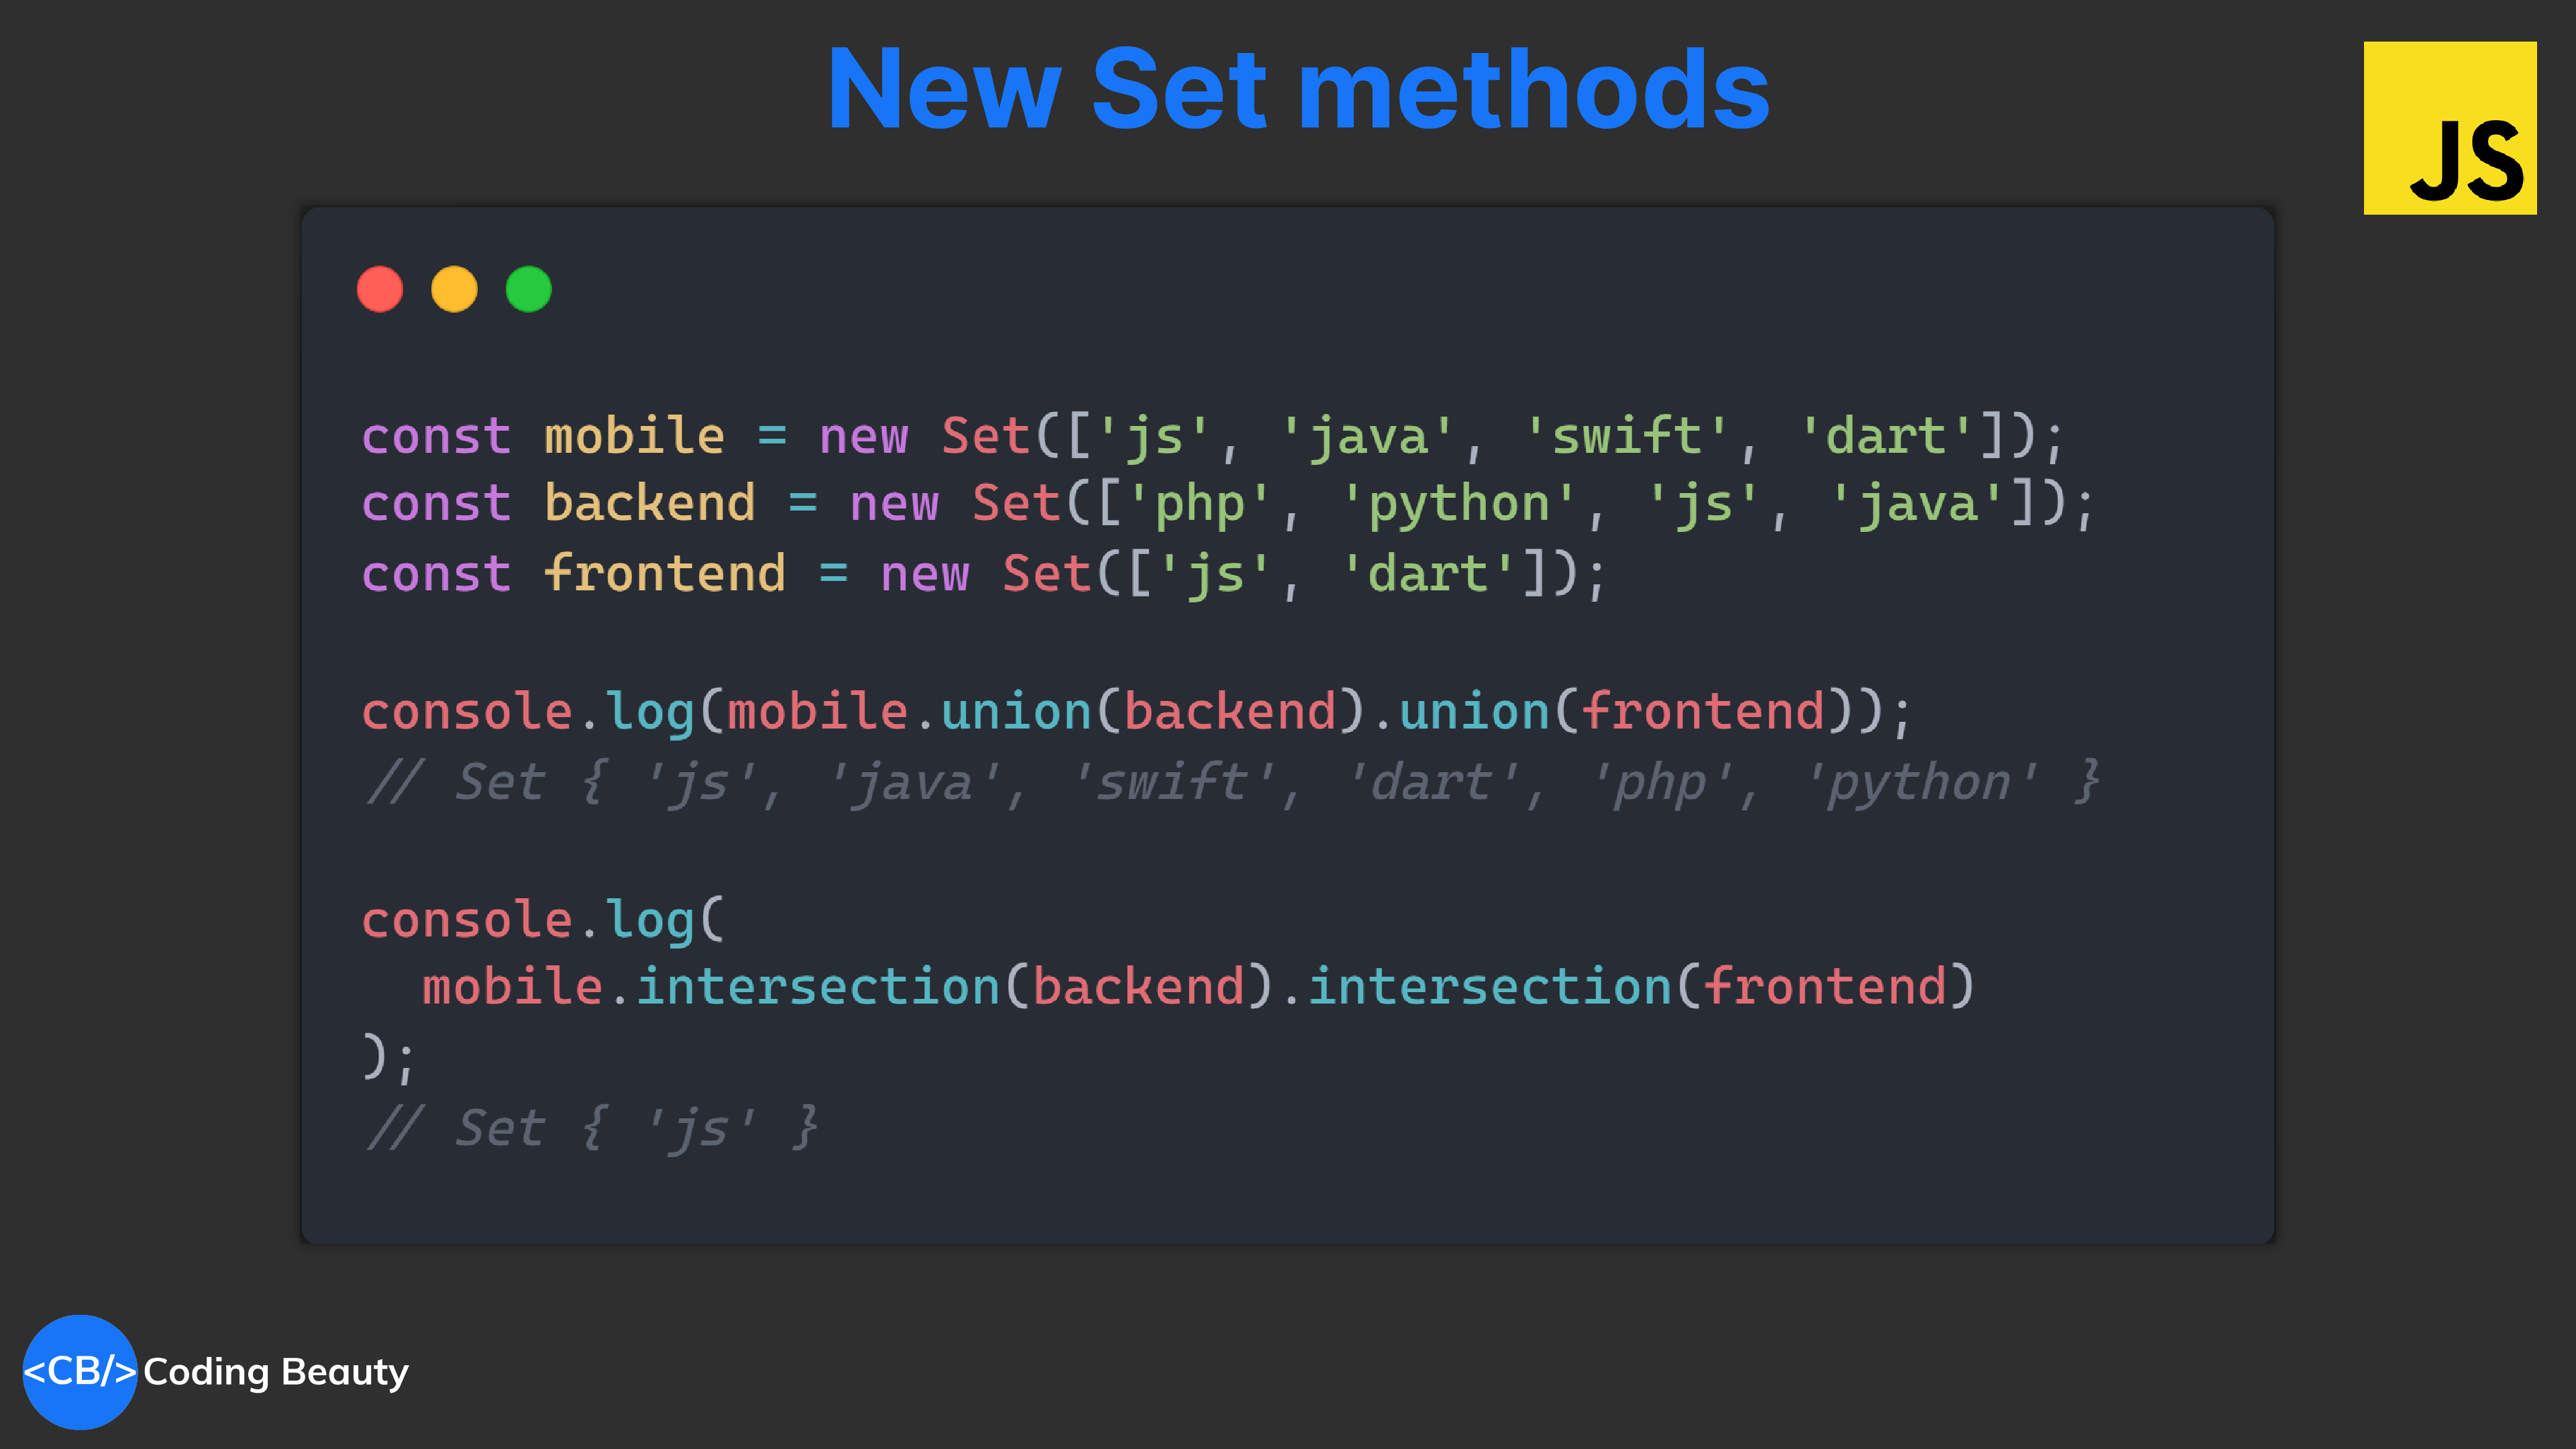
With these 7 upcoming built-in Set methods, we could find ourselves using them a LOT more often.
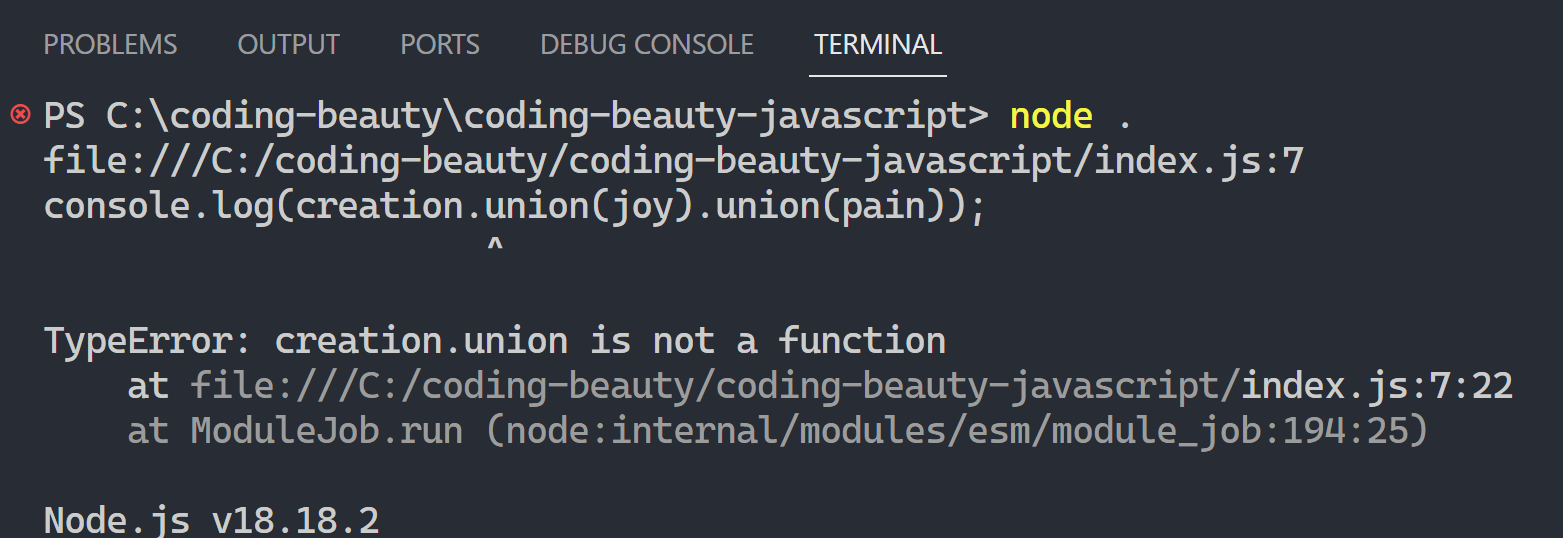
1. union()
The new Set union() method gives us all the unique items in both sets.
JavaScriptCopied!
const creation = new Set(['coding', 'writing', 'painting']);

const joy = new Set(['crying', 'laughing', 'coding']);

console.log(creation.union(joy));
// Set { 'coding', 'crying', 'writing', 'laughing', 'painting' }
And since it’s immutable and returns a copy, you can chain it indefinitely:
JavaScriptCopied!
const odd = new Set([21, 23, 25]);

const even = new Set([20, 22, 24]);

const prime = new Set([23, 29]);

console.log(odd.union(even).union(prime));
// Set(7) { 21, 23, 25, 20, 22, 24, 29 }
2. intersection()
What elements are in both sets?
JavaScriptCopied!
const mobile = new Set(['javascript', 'java', 'swift', 'dart']);

const backend = new Set(['php', 'python', 'javascript', 'java']);

const frontend = new Set(['javascript', 'dart']);

console.log(mobile.intersection(backend));
// Set { javascript, java }

console.log(mobile.intersection(backend).intersection(frontend));
// Set { javascript }
3. difference()
difference() does A – B to return all the elements in A that are not in B:
JavaScriptCopied!
const joy = new Set(['crying', 'laughing', 'coding']);

const pain = new Set(['crying', 'screaming', 'coding']);

console.log(joy.difference(pain));
// Set { 'laughing' }
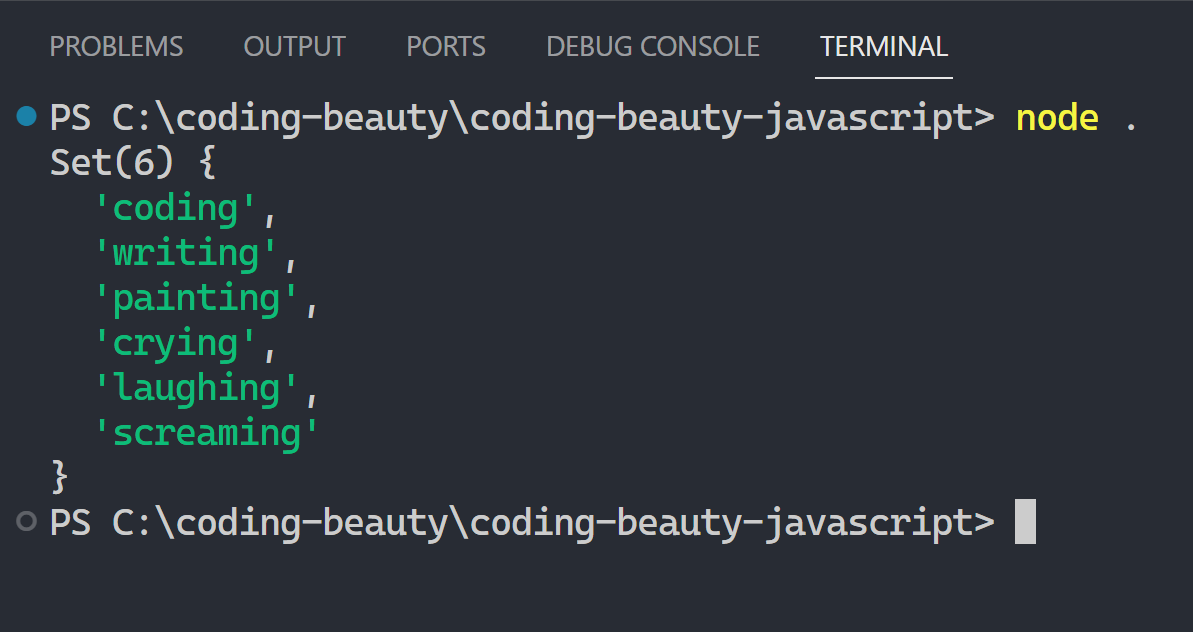
4. symmetricDifference()
As symmetric implies, this method gets the set difference both ways. That’s (A – B) U (B – A).
All the items in 1 and only 1 of the sets:
JavaScriptCopied!
const joy = new Set(['crying', 'laughing', 'coding']);

const pain = new Set(['crying', 'screaming', 'coding']);

console.log(joy.symmetricDifference(pain));
// Set { 'laughing', 'screaming' }
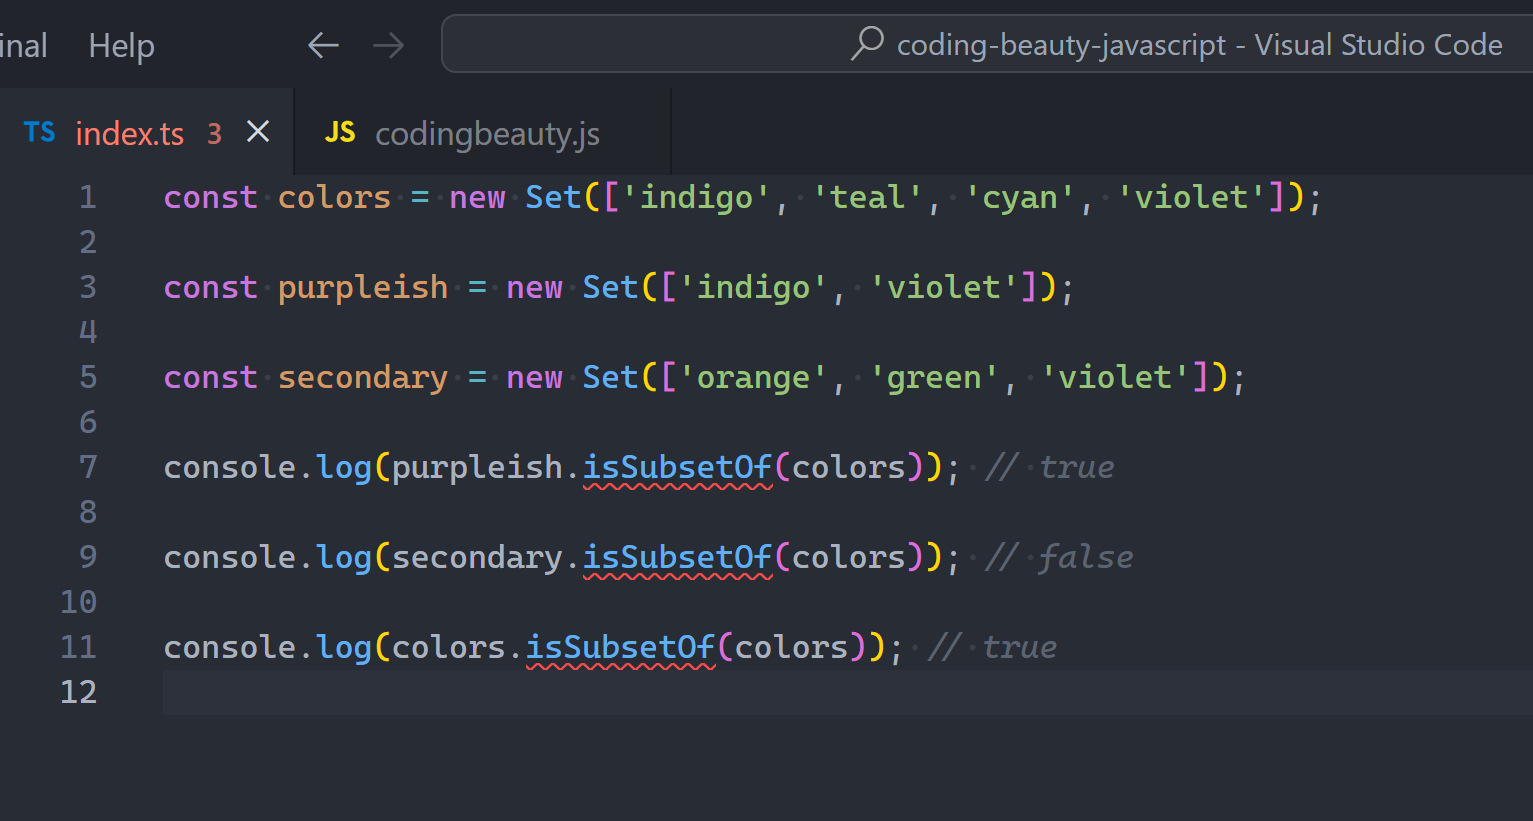
5. isSubsetOf()
Purpose is clear: check if all elements of a set are in another set.
JavaScriptCopied!
const colors = new Set(['indigo', 'teal', 'cyan', 'violet']);

const purpleish = new Set(['indigo', 'violet']);

const secondary = new Set(['orange', 'green', 'violet']);

console.log(purpleish.isSubsetOf(colors)); // true

console.log(secondary.isSubsetOf(colors)); // false

console.log(colors.isSubsetOf(colors)); // true
6. isSupersetOf()
Check if one set contains all the elements in another set: As good as swapping the two sets in isSubsetOf():
JavaScriptCopied!
const colors = new Set(['salmon', 'cyan', 'yellow', 'aqua']);

const blueish = new Set(['cyan', 'aqua']);

const primary = new Set(['red', 'yellow', 'blue']);

console.log(colors.isSupersetOf(blueish)); // true

console.log(colors.isSupersetOf(primary)); // false

console.log(colors.isSupersetOf(colors)); // true
7. isDisjointFrom()
isDisjointFrom: Do these sets share zero common elements?
JavaScriptCopied!
const ai = new Set(['python', 'c++']);

const mobile = new Set(['java', 'js', 'dart', 'kotlin']);

const frontend = new Set(['js', 'dart']);

console.log(ai.isDisjointFrom(mobile)); // true

console.log(mobile.isDisjointFrom(frontend)); // false
Yes it’s ChatGPT, the underrated + overrated chatbot used by self-proclaimed AI experts to promote “advanced skills” like prompt engineering.
But this isn’t a ChatGPT post about AI. It’s about JavaScript and algorithms…
Message editing; a valuable feature you see in every popular chatbot:
Edit our message: No one is perfect and we all make mistakes, or we want to branch off on a different conversation from an earlier point.
Edit AI message: Typically by regeneration to get varying responses, especially useful for creative tasks.
But ChatGPT is currently the only chatbot that saves your earlier conversation branches whenever you edit messages.
Other chatbots avoid doing this, probably due to the added complexity involved, as we’ll see.
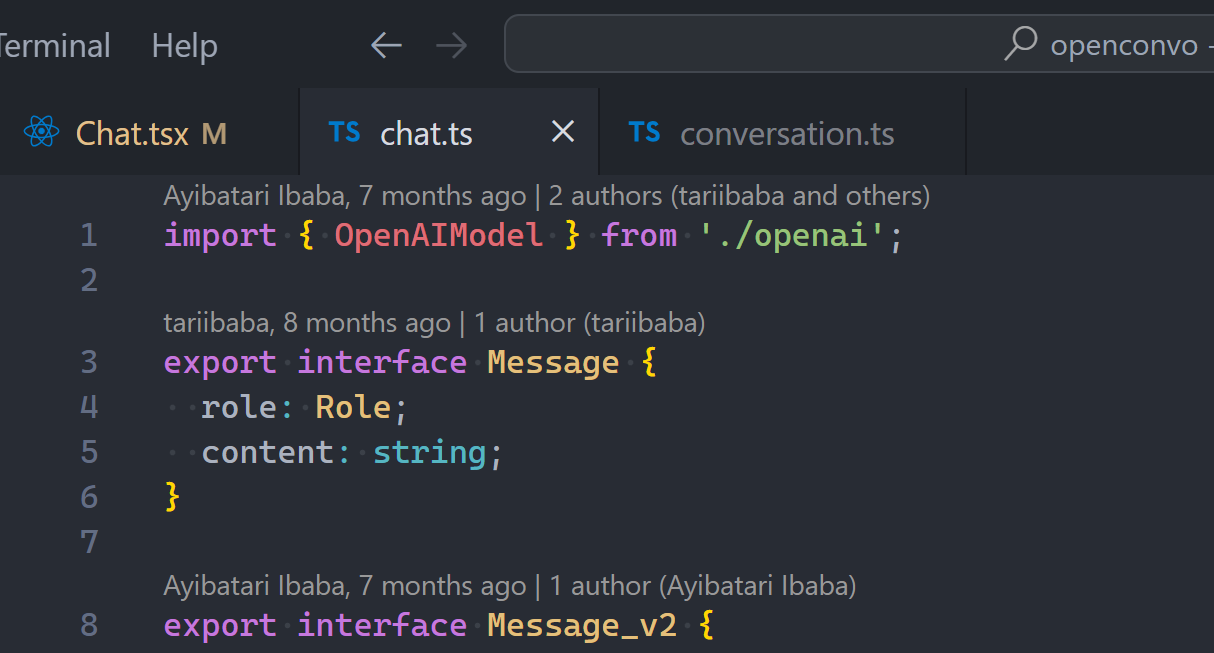
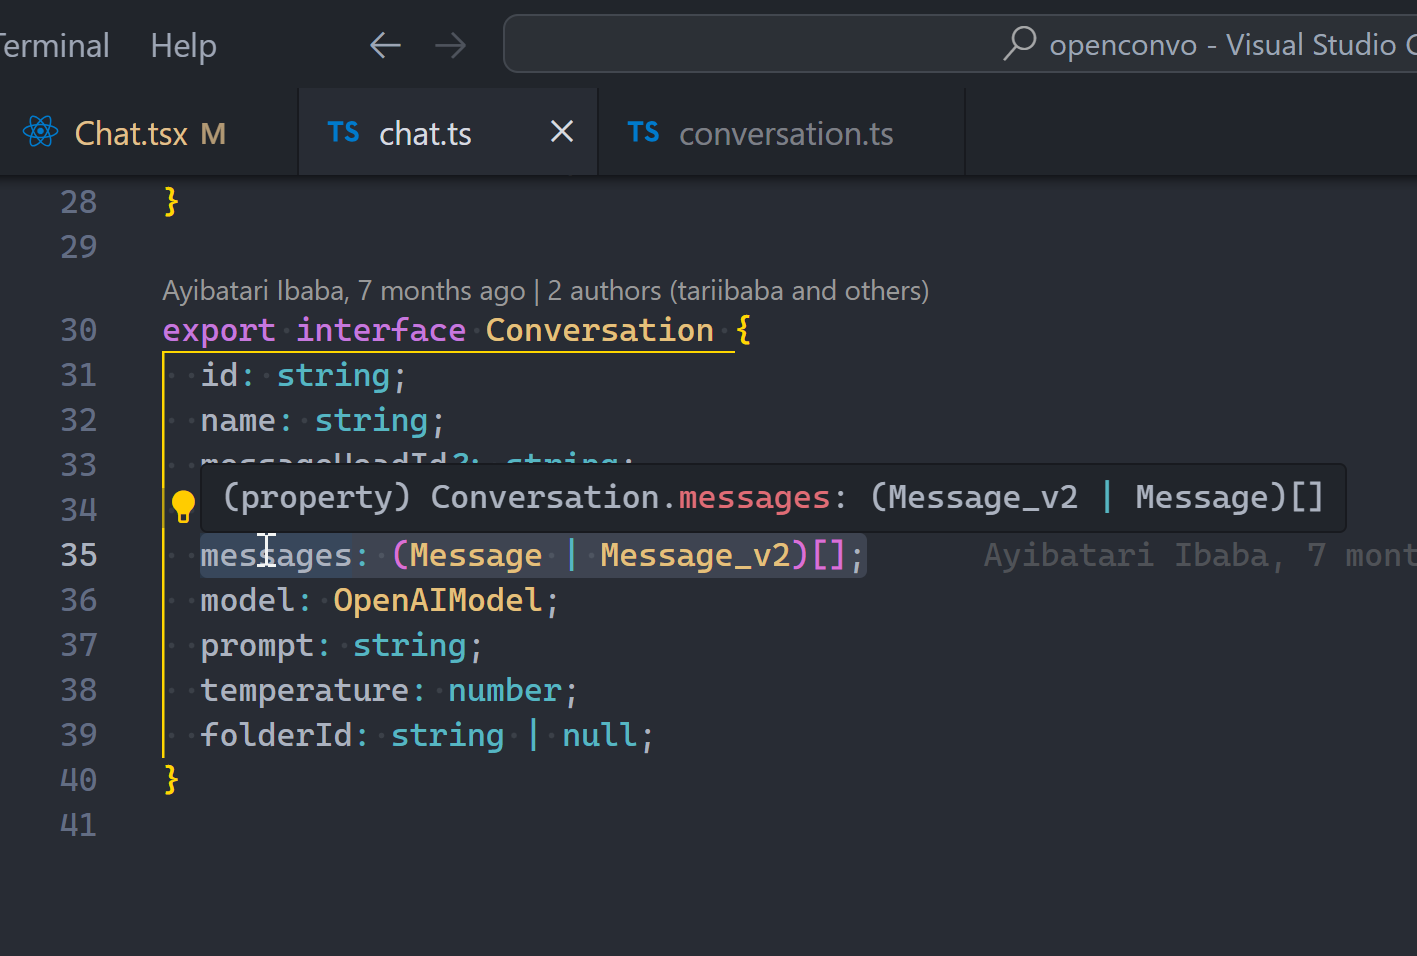
OpenConvo is my fork of Chatbot UI v1, and this conversation branching feature was one of the key things I added to the fork — the only reason I made the fork.
Today, let’s put ourselves in the shoes of the OpenAI developers, and see how to bring this feature into life (ChatGPT’s life).
Modify the chatbot to allow storing previous user and AI messages after editing or regeneration. Users can navigate to any message sent at any time in the chat and view the resulting conversation branch and sub-branches that resulted from that message.
Just before we start this feature we’ll probably have been storing the convo as a simple list of messages👇. It’s just an ever-growing list that keeps increasing.
The 3 main functional requirements we’re concerned with, and what they currently do in a sample React app.
Add new message: add item to list.
Edit message: Delete this and all succeeding messages, then Add new message with edited content.
Display messages: Transform list to JSX array with your usual data -> UI element mapping.
But now with the conversation branching feature, we’re going have some key sub-requirements stopping us from using the same implementation
Every message has sibling messages to left and/or right.
Every message has parent and child message to top and/or bottom.
We can’t use simple lists to store the messages anymore; we want something that easily gives us that branching functionality without us trying to be too smart.
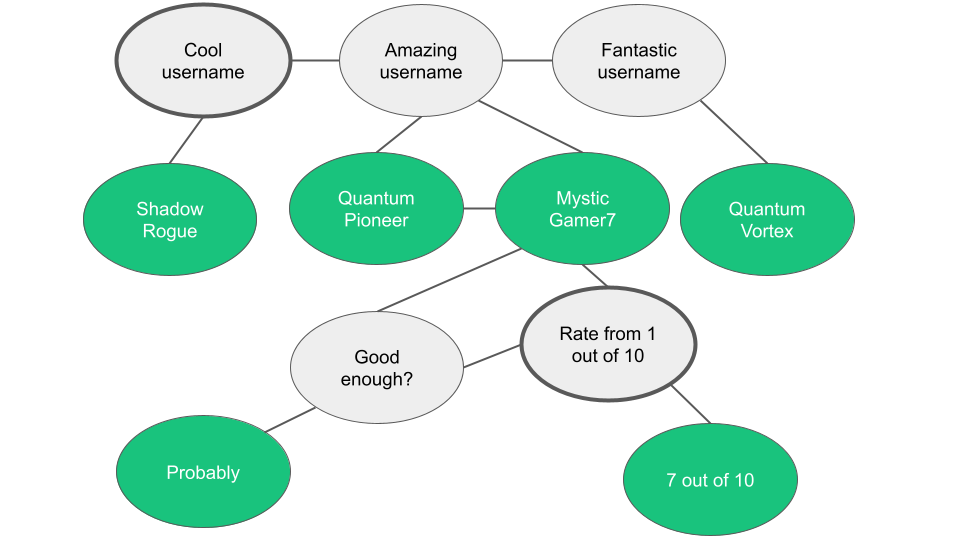
If you’re done a little Algo/DS you’ll instantly see that the messages are in a tree-like structure. And one great way to implement trees is with: Linked Lists.
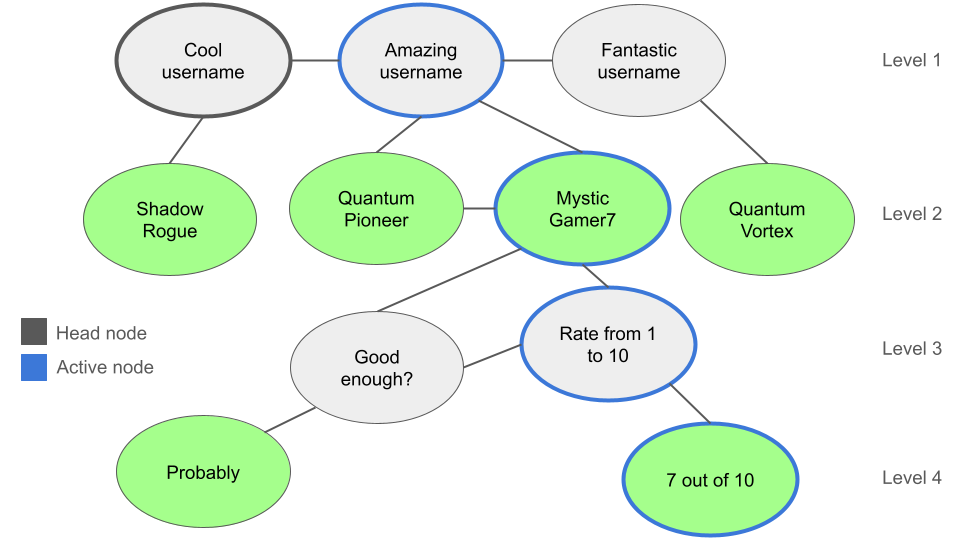
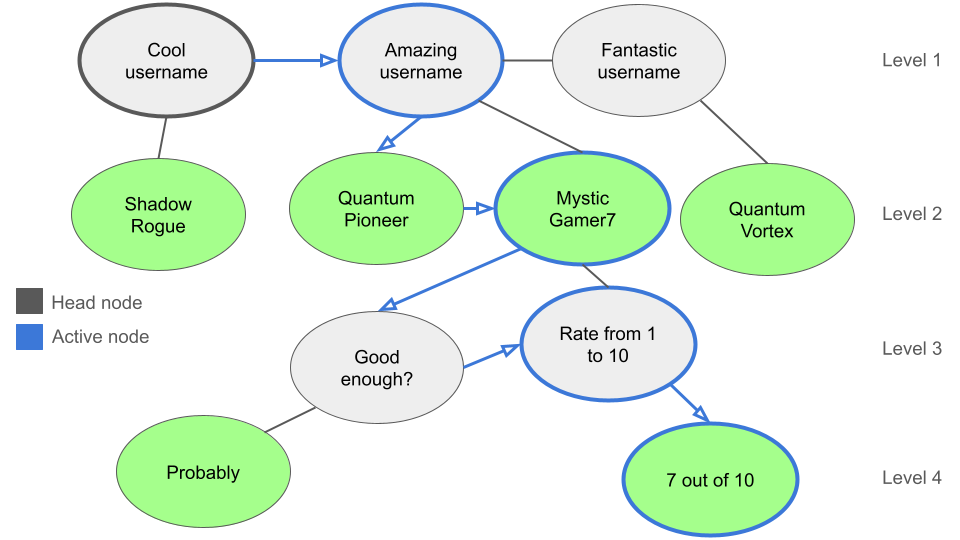
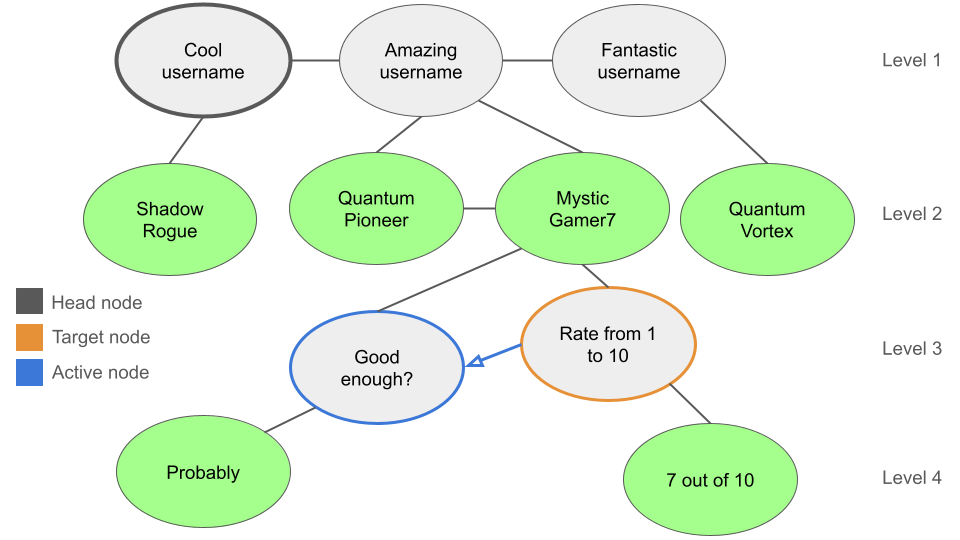
Every conversation message is a node. A single “head” node begins the conversation.
Every node has 4 pointers: prevSibling, nextSibling, parent, and child (←→ ↑ ↓) . Siblings are all on the same tree level.
Every level has an active node, representing the message the user can see at that branch.
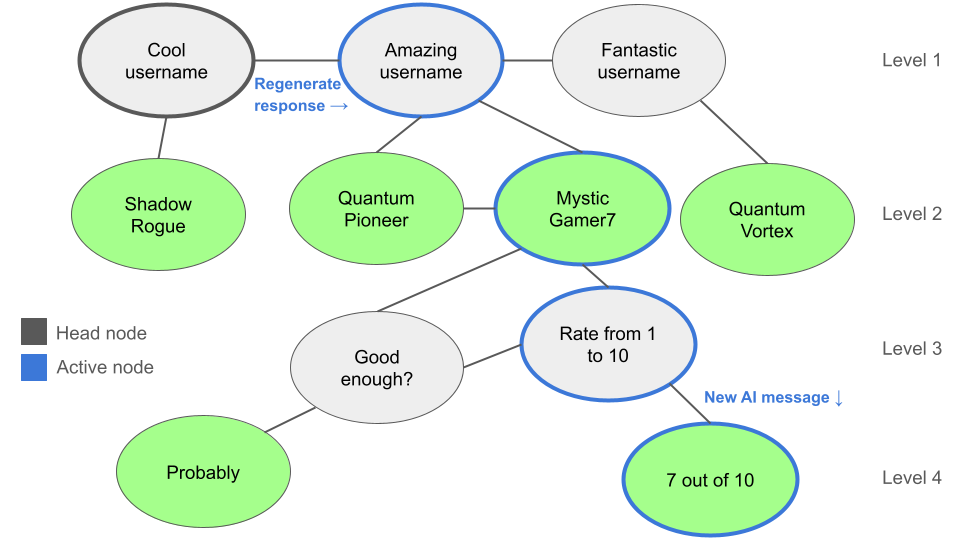
We either branch right by editing/regenerating:
Or we branch down by entering a new message or getting a response:
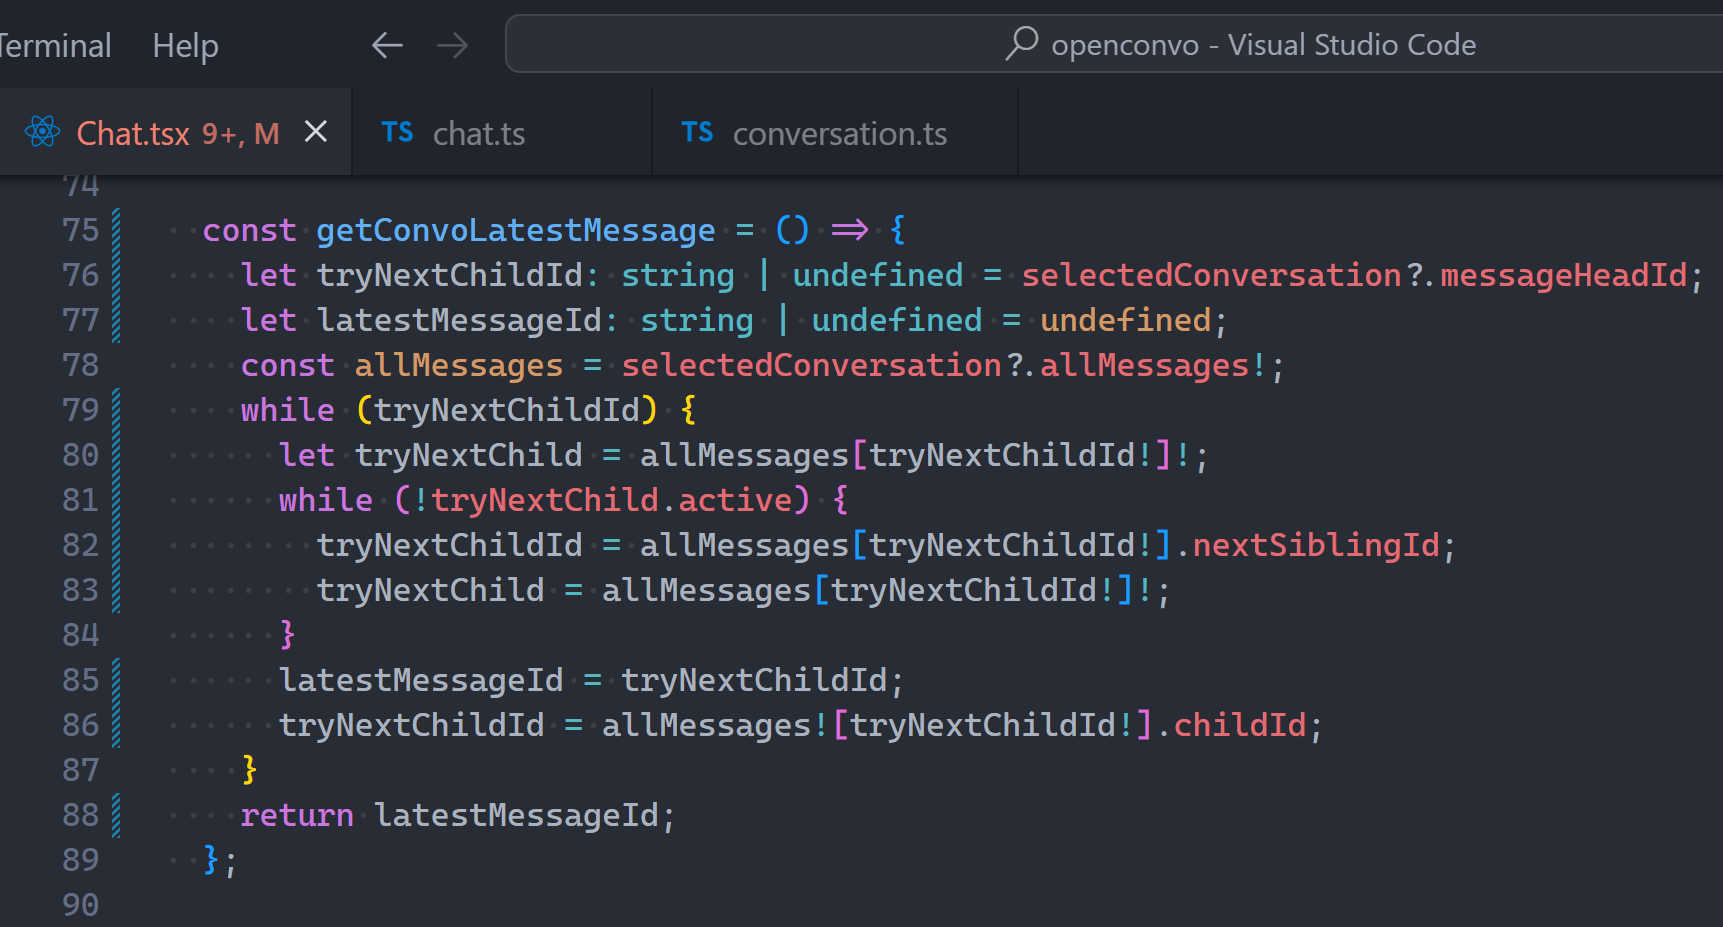
The most important algorithm for this conversation branching feature is the graph transversal. Dearly needed to add and display the messages.
Here’s pseudocode for the full-depth transversal to active conversation branch’s latest message:
Set current node to conversation head (always the same) (level 1 node)
Look for the active node at current node’s level and re-set current node to it. This changes whenever the user navigates with the left/right arrows.
If current node has a child, re-set current node to it. Else return current node.
Rinse and repeat: Go to step 2.
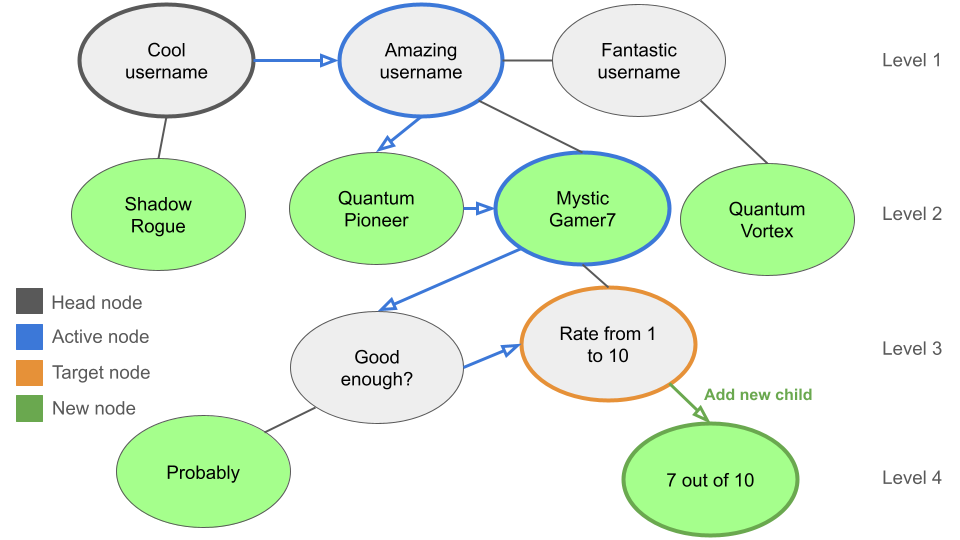
Add new message
So when the user adds a new message we travel to the latest message and add a child to it to extend the current branch.
If it’s a new convo, then we just set the head node to this new message instead.
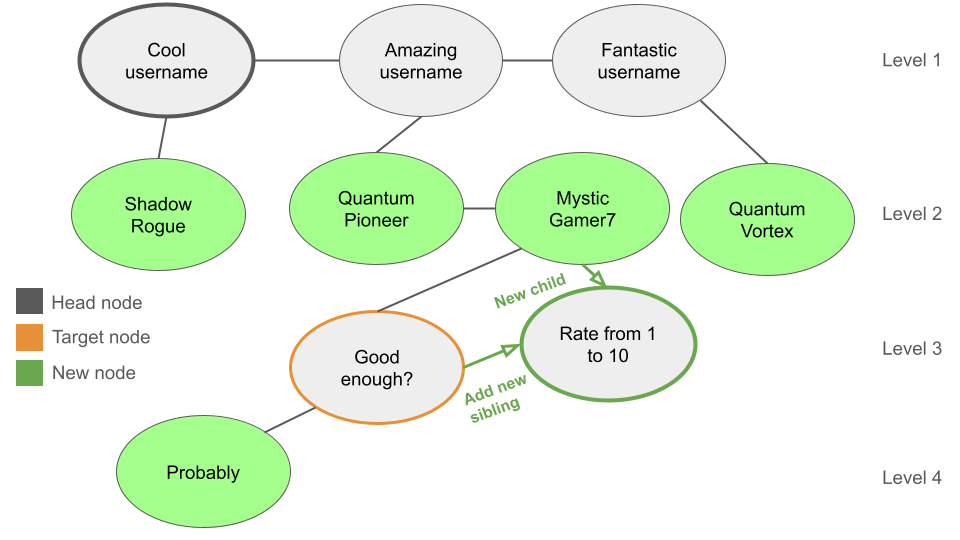
Edit message / regenerate response
There’s no need for transversal because we get the node from the message ID in a “message edited” event listener.
At the node we find its latest/right-most sibling and add another sibling.
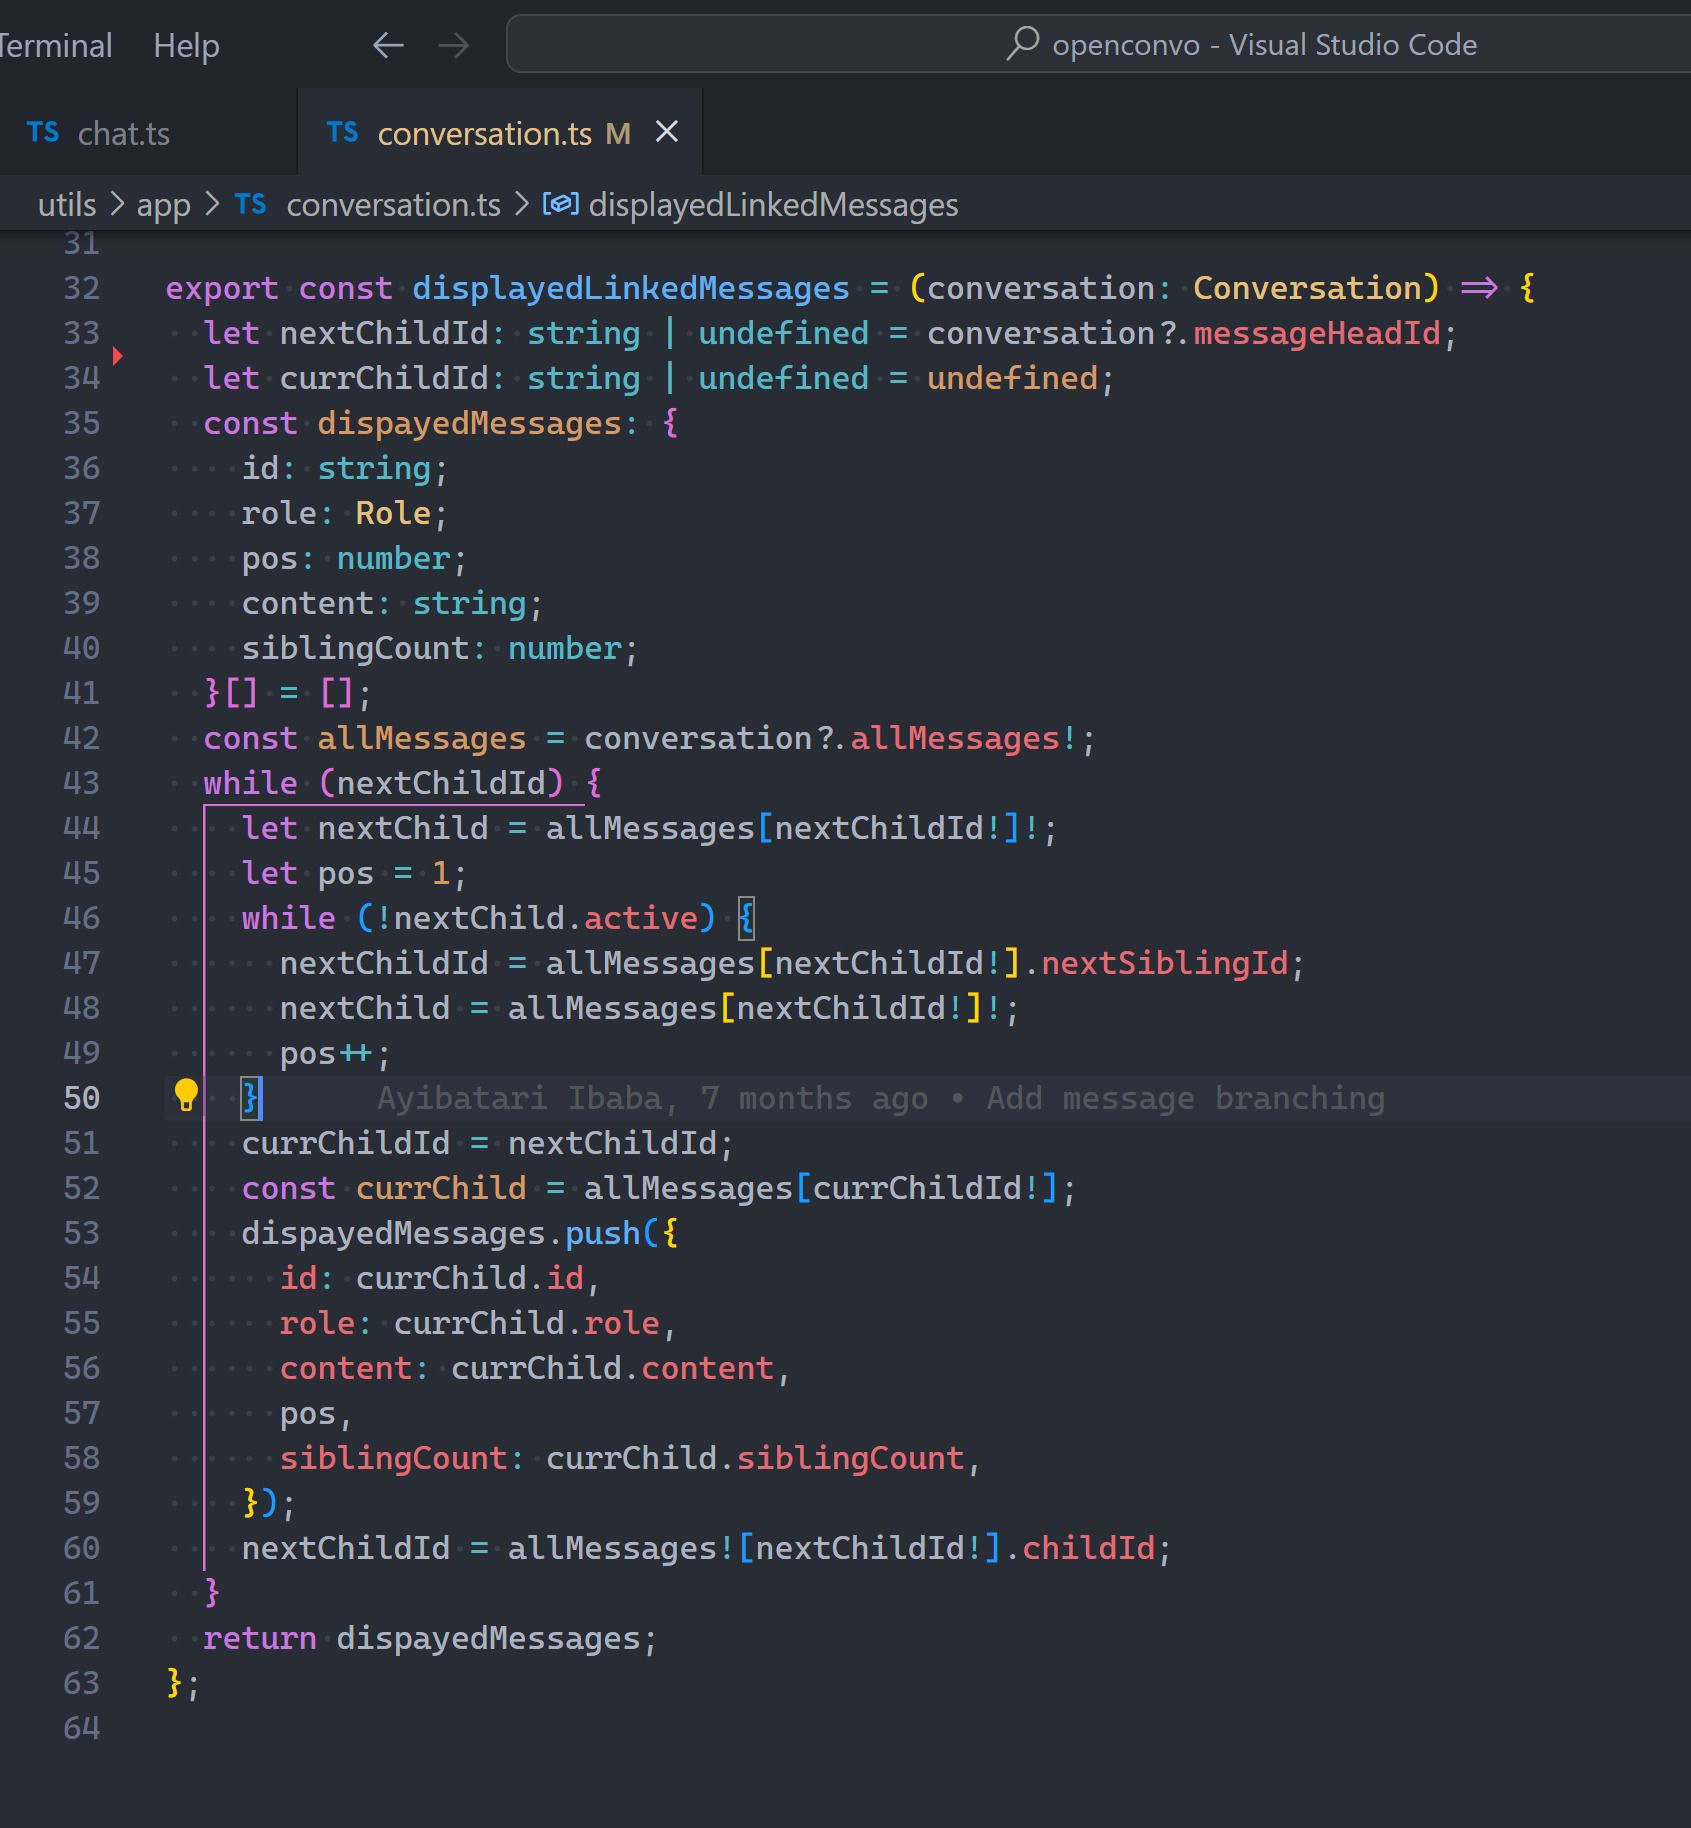
Display messages
Pretty straightforward: travel down all the active nodes in the conversation and read their info for display:
In OpenConvo I added each node to a simple list to transform to JSX for display in the web app:
View previous messages
No point in this branching feature if users can’t see their previous message, is there?
To view the previous messages we simply change the active message to the left or right sibling (we’re just attending to another of our children, but we love them all equally).
With this we’ve successfully added the conversation branching feature.
Another well-known way to to represent graphs/trees is an array of lists; that may have an easier (or harder) way to implement this.
In JavaScript, working with the Document Object Model (DOM) often involves iterating through child elements of a parent element. This technique is essential for tasks such as:
Manipulating elements based on their content or attributes
Dynamically adding or removing elements
Handling events for multiple elements
JavaScript offers several methods to achieve this, each with its own advantages and considerations.
Methods for looping
1. Use children property
Access the children property of the parent element to obtain a live NodeList of its direct child elements.
Iterate through the NodeList using a for loop or other methods:
JavaScriptCopied!
const parent = document.getElementById("myParent");
const children = parent.children;

for (let i = 0; i < children.length; i++) {
  const child = children[i];
  // Perform actions on the child element
  console.log(child.textContent);
}
2. Use for..of loop
Directly iterate over the NodeList using the for...of loop:
JavaScriptCopied!
const parent = document.getElementById("myParent");

for (const child of parent.children) {
  // Perform actions on the child element
  console.log(child.tagName);
}
3. Use Array.from() method
Convert the NodeList into an array using Array.from(), allowing the use of array methods like forEach():
JavaScriptCopied!
const parent = document.getElementById("myParent");
const childrenArray = Array.from(parent.children);

childrenArray.forEach(child => {
  // Perform actions on the child element
  child.style.color = "red";
});
Key considerations
Live NodeList: The children property returns a live NodeList, meaning changes to the DOM are reflected in the NodeList.
Text Nodes: The children property includes text nodes, while childNodes includes all types of nodes (elements, text, comments, etc.). Choose the appropriate property based on your needs.
Performance: For large DOM trees, using Array.from() might have a slight performance overhead due to array creation.
Choosing the right method
For simple iterations, the for...of loop or the children property with a for loop are often sufficient.
If you need to use array methods or want to create a static copy of the child elements, use Array.from().
Consider performance implications if dealing with large DOM structures.
By understanding these methods and their nuances, you’ll be able to effectively loop through child elements in JavaScript for various DOM manipulation tasks.
Used to be a fan but the pains started outweighing the gains and I had to turn it off forever.
1. I actually don’t have unlimited CPU and RAM
You can’t dare call VS Code a “text editor” in 2023; The bloat is real.
Thanks to Electron, we now live in an era where a near-empty app boasts installation sizes of almost 100MB and proudly gobbles as much as 500MB of RAM.
My dozens of extension probably has something to do with this, but many of these extensions only run for specific types of projects and VS Code commands.
My Dart project here uses only 1 of these (the obvious one), and almost none of the ones coming after.
And none of this 1,200 MB RAM and 16.9% CPU came from my running anything in the terminal! I’m sure that there are some background tasks here and there, but I was doing absolutely nothing — no typing, no building, no long-running tasks.
So what do you think will happen when a build watcher like Create React App is also running? Or a massive memory hog like the Android emulator, constantly reloading on every autosave?
2. Where’s our formatting
VS Code doesn’t care about auto-save in its “auto-format on save” feature.
And why should it happen when you’ve just barely finished typing?
Format-on-save only makes sense for real saves; you usually only press Ctrl + S when you’ve reached some sort of checkpoint; like after a bug fix attempt or a UI change and you want to see our changes in action.
If I want auto-formatting I’m still going to be using Ctrl + D, D my personal keyboard shortcut for auto-formatting. So, no thanks — I’ll rather save and format together.
3. Autosave demands perfection
Autosave wants you to be superhuman.
There’s no breathing room to make mistakes with auto-save; any you type gets written to disk within seconds.
Like can’t you even make a single typo? Can’t you have doubts about which direction to take the code in?
Now you’ll say there’s Git and all, but here’s something to think about: within every commit, there are multiple “micro-commits”. Even if you’re blindly committing every single day there’ll be intermediary changes within those 24 hours that you won’t want to compromise or discard.
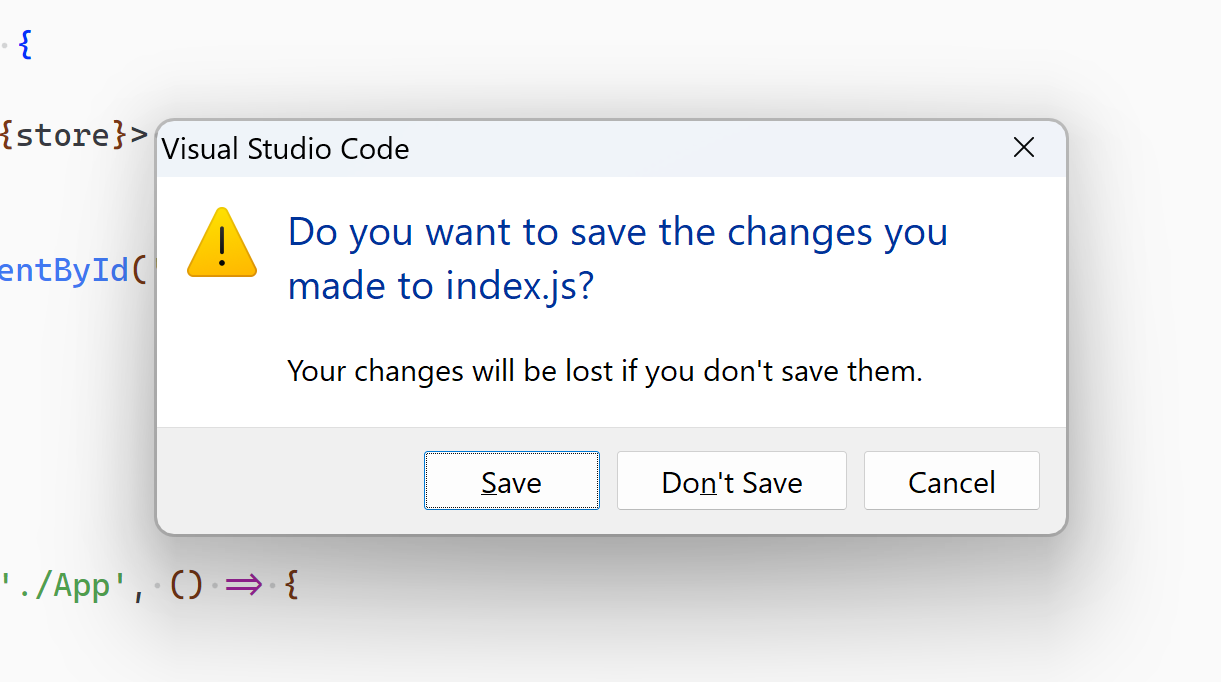
With autosave you’ll never get a warning when you close a file after making an unwanted and buggy change — potentially leading to hours of debugging code you thought was working just a few days back.
4. A save should be a micro-commit
Even if you Ctrl + S all the time you’ll probably wait until the end of the statement. Because subconsciously you see Ctrl + S as a micro-commit, and it would be senseless to make those micro-commits at random.
But build watchers like Create React App don’t see it this way.
These tools couldn’t care less about whether the code that’s been auto-saved is complete or not; they just re-build and re-build and re-build again.
Not cool. And at times this put pressure on me to keep typing until I was ready to see the result of my changes.
That’s distracting and unnatural. And you can’t avoid it — the best you can you is to set an autosave delay to reduce how much this happens or close the terminal. The former comes with its own set of problems (as we’ll see), and the latter is simply unthinkable.
5. The lag tradeoff is annoying
Imagine what would happen if VS Code and others weren’t sensible enough to have a delay before any autosave?
Your CPU usage would go crazy; Even if you’re an extra-terrestrial typing god going at 10000 words per minute, you’re still not going to be fast enough; there’ll be a disk write for every single character you put down.
Even worse when you have a heavy build tool like Create React App watching your files and re-building.
So yes there had to be an autosave delay.
But a delay is a delay and no one likes waiting, even if it’s a 3-second delay. Especially when you can get rid of it.
When I press Ctrl + S, I instantly know my changes are saved. I know my build watcher will run immediately. I have instant feedback and there is zero noticeable delay.
I find small things like these make a non-trivial impact on the development experience.
So I’m no longer autosaving my code. I had it on for some months back after I discovered such a feature even existed in VS Code, and then I went on and off, and then finally — no more! Like many devs, I’m already used to Ctrl + S so it’s no big deal. Let’s see if my mind changes in the future — how about you?
What if we see coding as a delicate act of nurturing, a digital development brought about by our creativity and the intricate logical reasoning of our minds?
There’s a reason we’re called software *developers*. Developers develop; developers build and grow.
If we can get ourselves to view a software project as a unit of its own, with all its capabilities, potential, and goals, we instantly start to observe numerous interesting connections between programming and other nurturing acts like parenting, gardening, and self-improvement.
From the onset: a freshly scaffolded project, a file, or a folder. There is always a beginning, a birth.
With every single line of code added, deleted, and refactored, the software grows into greatness. With every additional library, package, and API fastened into place, low-level combines into high-level; the big picture unfolds; a fully formed digital creation emerges.
Goal in sight: Plan
Similar to nurturing a budding sapling, the coding process begins with the seed of an idea. You envision the type of product you hope your software will become.
You and your team are to carefully plan and design the structure, algorithms, and flow of the code, much like parents are to create a loving and supportive home by providing the necessary resources, values, and guidance to foster their child’s development.
This thoughtful approach lays the foundation for the entire coding project and boosts the chances of a bright future.
From here to there: Grow
Your codebase needs to grow and improve, but growth on its own is a very vague and generic word. It’s just… an increase.
For any type of growth of any entity to be meaningful, it has to be in the direction of *something*. Something valuable and important.
What’s the first thing I get right now when I search for the meaning of “personal” growth on Google?
This definition prefers to remain vague and makes it clear that personal growth isn’t the same for everyone. You choose your values, set goals based on them, and develop yourself and your environment according to those goals.
But this doesn’t mean you can pick just any goal you want for a happy life; Certain goals are way more beneficial for your well-being than others. A target of progressively gobbling up to 10,000 calories of ice cream every day can never be put in the same league as running a marathon or building solid muscle at the gym.
So the same thing applies to coding. Consciously hoping to write 10,000 lines of code or add 1,000 random features to your software is a terrible aspiration, and will never guarantee high-quality software.
Apart from the explicitly defined requirements, here are some important growth metrics to measure your software project by:
On a lower level, all about the code:
Readability: How easy is it for a stranger to understand your code, even if they know nothing about programming?
Efficiency: How many units of a task can your program complete in X amount of time?
Modularity: Is your code organized into separate modules for different responsibilities? Can one module be swapped out without the entire project crashing into ruins?
Testability and test quality & quantity: How easy is it to test these modules? Do you keep side-effects and mutation to a minimum? And yes, how many actual tests have you written? Are these tests even useful and deliberate? Do you apply the 80/20 rule during testing?
On a higher level closer to the user:
Effective, goal-focused communication: with copy, shape, icons, and more.
Perceived performance: Including immediate responses to user actions, loading bars for long-running actions, buffering, etc.
Number of cohesive features: Are the features enough, and relevant to the overall goal of the software?
Sensual pleasure: Lovely aesthetics, stunning animations, sound effects, and more.
Was working on some open-source download manager a few years back.
This delightful growth process is one of the things that transforms coding from a cold logical activity into a creative, empowering, addictive pursuit. You continually strive, with the ultimate desired outcome in sight, line after line, commit after commit, feature after feature; everlasting progress in an energizing purposeful atmosphere.
What man actually needs is not a tensionless state but rather the striving and struggling for some goal worthy of him. What he needs is not the discharge of tension at any cost, but the call of a potential meaning waiting to be fulfilled by him.
Viktor E. Frankl (1966). “Man’s Search for Meaning”
And yes, just like raising a responsible, well-rounded individual, we may never actually reach a definite, final destination. But it gave us a strong sense of direction. We are going *somewhere* and we have the map.
Have you heard the popular estimates of devs spending on average as much as 75% of their time debugging software?
Yes, it would be nothing but a pipe dream to expect this journey to be easy.
Indeed, as a loving parent does all they can to shield their dearest child from harm’s way, programmers must safeguard their code from bugs and vulnerabilities to produce robust and reliable software. We’ve already talked about testing, and these precautions drastically reduce the chances of nasty errors and mistakes.
But just like with building good personal habits and social skills, you are still going to make mistakes along the way.
With any serious complex codebase, there are still going to be loud, frustrating bugs that bring you to the point of despair and hopelessness. But you simply cannot quit. You are responsible; you are the architect of this virtual world, the builder of digital solutions and innovations. You possess the power to overcome obstacles and transform difficulties into opportunities for growth — your growth, your software’s growth.
And what of when the path toward the goal changes dramatically? Close-mindedness won’t take you far.
Parents need to be adaptable and flexible in adjusting to the child’s changing unique needs and development stages: Software requirements are hardly set in stone. You must be able to incorporate new features into your codebase — and destroy them as time goes on.
Pro-active scalability is nice to have in every software system, but this isn’t always feasible; in the real world you have time and cost constraints and you need to move fast. What was a great algorithm at 1 thousand users could quickly become a huge performance bottleneck at 1 million users. You may need to migrate to a whole new database for increasingly complex datasets needing speedy retrieval.
Takeaway: What coding should be
Like tending to a seedling or guiding a child’s development, coding requires careful planning, thoughtful design, and continuous adaptation. It’s an everlasting process of meaningful growth, measured not only by lines of code but by metrics such as readability, efficiency, beauty, and user-focused features. With each line added, bugs debugged, and obstacles overcome, the software and its creator thrive together on a path filled with purpose, determination, and endless possibilities.
These 10 amazing features were all about writing shorter, safer, and more expressive code.
1. Private methods and fields
We need our privacy. There’s no two ways about it.
And so do OOP classes; but in JavaScript it was once impossible to strictly declare private members.
It was once impossible to declare private members in a JavaScript class.
A member was traditionally prefixed with an underscore (_) to indicate that it was meant to be private, but it could still be accessed and modified from outside the class.
JavaScriptCopied!
class Person {
  _firstName = 'Coding';
  _lastName = 'Beauty';

  get name() {
    return `${this._firstName} ${this._lastName}`;
  }
}

const person = new Person();
console.log(person.name); // Coding Beauty

// Members intended to be private can still be accessed
// from outside the class
console.log(person._firstName); // Coding
console.log(person._lastName); // Beauty

// They can also be modified
person._firstName = 'Debugging';
person._lastName = 'Nightmares';

console.log(person.name); // Debugging Nightmares
With ES2022, we can now add private fields and members to a class, by prefixing it with a hashtag (#). Trying to access them from outside the class will cause an error:
JavaScriptCopied!
class Person {
  #firstName = 'Coding';
  #lastName = 'Beauty';

  get name() {
    return `${this.#firstName} ${this.#lastName}`;
  }
}

const person = new Person();
console.log(person.name);

// SyntaxError: Private field '#firstName' must be
// declared in an enclosing class
console.log(person.#firstName);
console.log(person.#lastName);
Note that the error thrown here is a syntax error, which happens at compile time; the code doesn’t run at all; the compiler doesn’t expect you to even try to access private fields from outside a class, so it assumes you’re trying to declare one.
“Ergonomic brand” checks for private fields
With private fields come a new keyword to safely check if a class object contains a particular one — the in keyword:
JavaScriptCopied!
class Car {
  #color;
  hasColor() {
    return #color in this;
  }
}
const car = new Car();
console.log(car.hasColor()); // true;
It correctly distinguishes private fields with the same names from different classes:
JavaScriptCopied!
class Car {
  #color;
  hasColor() {
    return #color in this;
  }
}
class House {
  #color;
  hasColor() {
    return #color in this;
  }
}

const car = new Car();
const house = new House();
console.log(car.hasColor()); // true;
console.log(car.hasColor.call(house)); // false
console.log(house.hasColor()); // true
console.log(house.hasColor.call(car)); // false
And don’t ask me about the name; I also have no idea why they’re called that (do you?).
Ergonomics as far as I’m concerned is all about keeping good sitting posture while using your computer (?) 🤔.
Although I guess you could twist this definition to allow for this new feature — or any new feature for that matter. They’re all about comfort, right? Less pain writing code.
But I guess English isn’t a closed language and you can always add new words and additional definitions (just ask Shakespeare).
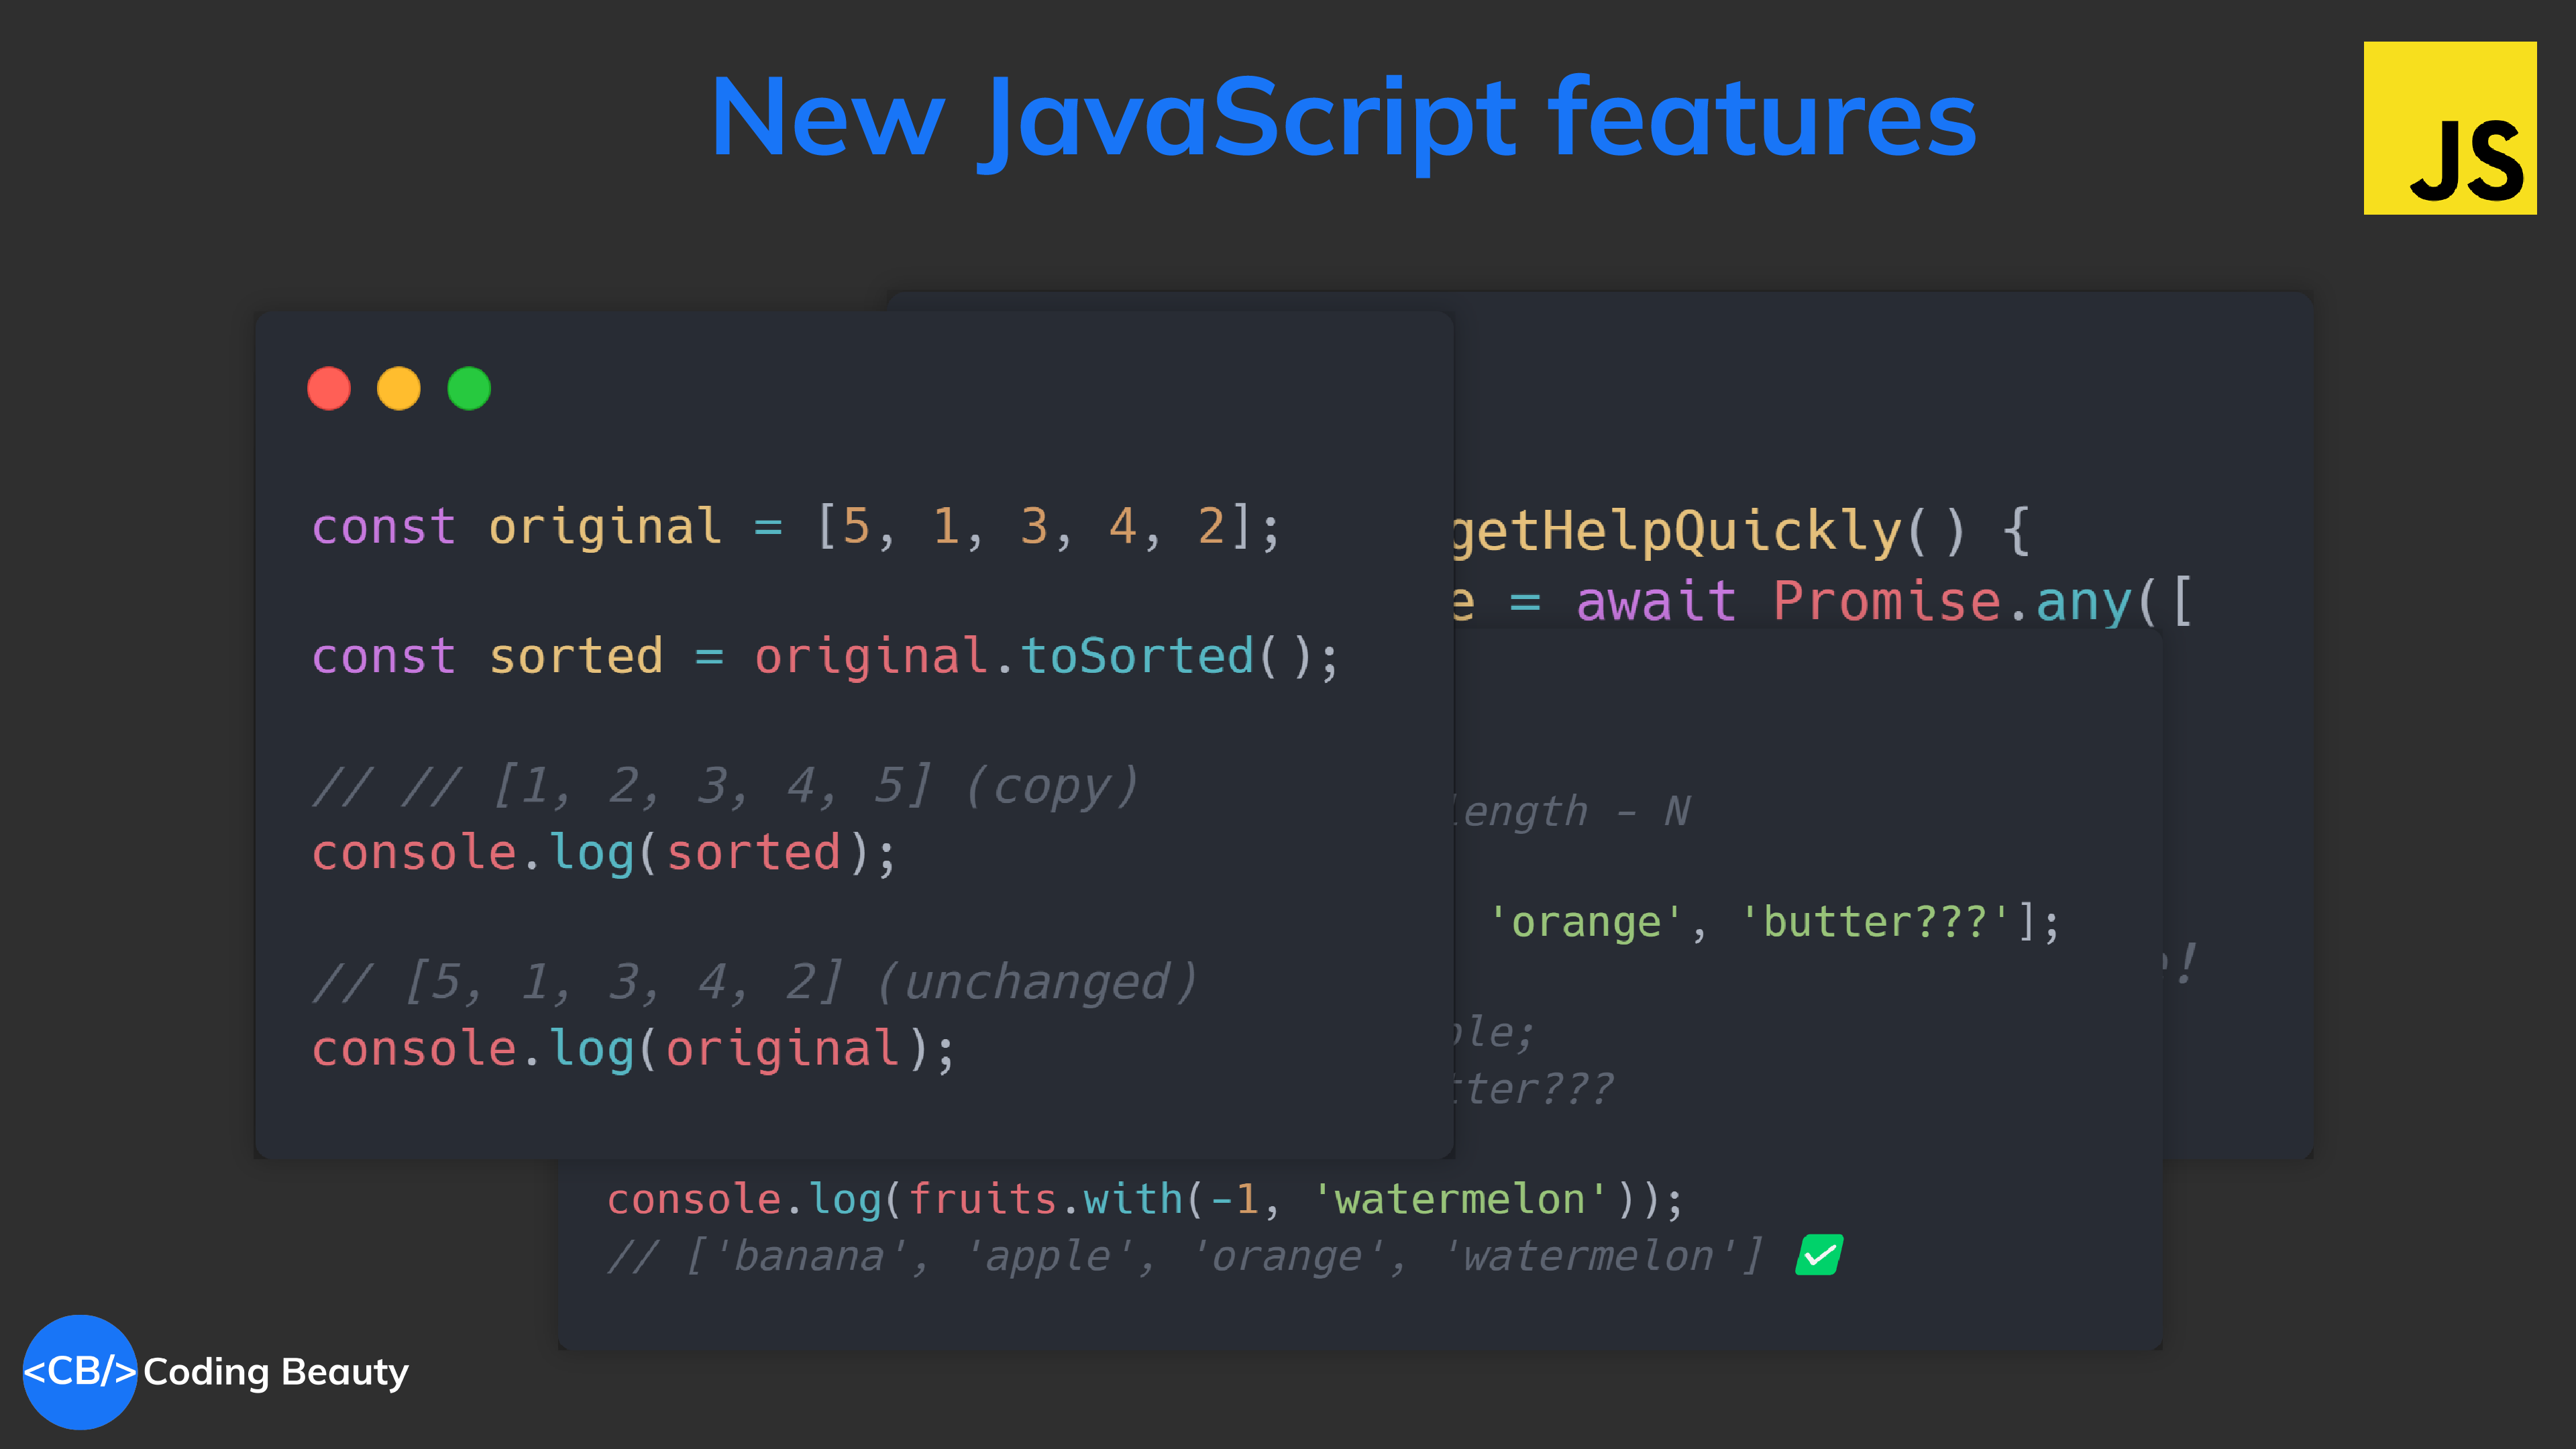
2. Immutable sort(), splice(), and reverse()
ES2023 came fully packed with immutable versions of these 3 heavily used array methods.
Okay maybe splice() isn’t used as much as the others, but they all mutate the array in place.
Did you know: F# was the first language to introduce async/await? As far back as 2007! But it took JavaScript 10 good years to catch up.
await pauses execution in the async context until a Promise resolves.
Previously we could only use this operator in an async function, but it could never work in the global scope.
JavaScriptCopied!
function setTimeoutAsync(timeout) {
  return new Promise((resolve) => {
    setTimeout(() => {
      resolve();
    }, timeout);
  });
}

// SyntaxError: await is only valid in async functions
await setTimeoutAsync(3000);
With ES2022, now we can:
JavaScriptCopied!
function setTimeoutAsync(timeout) {
  return new Promise((resolve) => {
    setTimeout(() => {
      resolve();
    }, timeout);
  });
}

// ✅ Waits for timeout - no error thrown
await setTimeoutAsync(3000);
4. Promise.any()
If you know Promise.all(), then you can easily guess what this does: wait for one Promise to resolve and return the result.
JavaScriptCopied!
async function getHelpQuickly() {
  const response = await Promise.any([
    cautiousHelper(),
    kindHelper(),
    wickedHelper(),
  ]);
  console.log(response); // Of course!
}

async function cautiousHelper() {
  await new Promise((resolve) => {
    setTimeout(() => {
      resolve('Uum, oohkaay?');
    }, 2000);
  });
}

async function kindHelper() {
  return 'Of course!';
}

function wickedHelper() {
  return Promise.reject('Never, ha ha ha!!!');
}
Point to note: Promise.any() still waits for *all* the promises in the current async context to resolve, even though it only returns the result of the first one.
JavaScriptCopied!
await getHelpQuickly(); // outputs "Of course!" immediately
// Still waits for 2 seconds
5. Array find from last
Arrayfind() searches for an array element that passes a specified test condition, and findIndex() gets the index of such an element.
While find() and findIndex() both start searching from the first element of the array, there are instances where it would be preferable to start the search from the last element instead.
There are scenarios where we know that finding from the last element might achieve better performance. For example, here we’re trying to get the item in the array with the value prop equal to y. With find() and findIndex():
This works, but as the target object is closer to the tail of the array, we might be able to make this program run faster if we use the new ES2022 findLast() and findLastIndex() methods to search the array from the end.
We could call the reverse() method on the array to reverse the order of the elements before calling find() and findIndex(). But this approach would cause unnecessary mutation of the array; reverse() reverses the elements of an array in place.
The only way to avoid this mutation would be to make a new copy of the entire array, which could cause performance problems for large arrays.
Also findIndex() still wouldn’t on the reversed array, as reversing the elements would also mean changing the indexes they had in the original array. To get the original index, we would need to perform an additional calculation, which means writing more code.
JavaScriptCopied!
const nums = [7, 14, 3, 8, 10, 9];

// Copying the entire array with the spread syntax before
// calling reverse()
const reversed = [...nums].reverse();

// correctly gives 10
const lastEven = reversed.find((value) => value % 2 === 0);

// gives 1, instead of 4
const reversedIndex = reversed.findIndex((value) => value % 2 === 0);

// Need to re-calculate to get original index
const lastEvenIndex = reversed.length - 1 - reversedIndex;

console.log(lastEven); // 10
console.log(reversedIndex); // 1
console.log(lastEvenIndex); // 4
It’s cases like where the findLast() and findLastIndex() methods come in handy.
This code is shorter and more readable. Most importantly, it produces the correct result.
6. StringreplaceAll()
We already had replace() for quickly replace a substring within a string.
JavaScriptCopied!
const str =
  'JavaScript is so terrible, it is unbelievably terrible!!';

const result = str.replace('terrible', 'wonderful');

console.log(result);
// JavaScript is so wonderful, it is unbelievably terrible!!
// Huh?
But it only does so for the first occurrence of the substring unless you use a regex; now we have replaceAll() to replace every single instance of that substring.
JavaScriptCopied!
const str =
  'JavaScript is so terrible, it is unbelievably terrible.';

const result = str.replaceAll('terrible', 'wonderful');

console.log(result);

// JavaScript is wonderful, it is unbelievably wonderful.
// Now you're making sense!
7. Arraywith() and at()
at() came first and with() came a year after that in 2023.
They are the functional and immutable versions of single-element array modification and access.
The cool thing about these new methods is how they let you get and change element values with negative indexing.
JavaScriptCopied!
// index -N is same as index arr.length - N

const fruits = ['banana', 'apple', 'orange', 'butter???'];

console.log(fruits.at(-3)); // apple
console.log(fruits.at(-1)); // butter???

console.log(fruits.with(-1, 'watermelon'));
// ['banana', 'apple', 'orange', 'watermelon'] ✅
8. static static static
Static class fields, static private methods (2022).
Static methods access other private/public static members in the class using the this keyword; instance methods with this.constructor:
JavaScriptCopied!
class Person {
  static #count = 0;
  static getCount() {
    return this.#count;
  }
  // Instance method
  constructor() {
    this.constructor.#incrementCount();
  }
  static #incrementCount() {
    this.#count++;
  }
}
const person1 = new Person();
const person2 = new Person();
console.log(Person.getCount()); // 2
Static blocks.
Executed only once when the *class* is created. It’s like static constructors in other OOP languages like C# and Java.
When they’re multiple static blocks, they’re executed in the order they’re declared, along with any static fields in between. The super property in a static block to access properties of the superclass.
9. Logical assignment operators
They let a variable perform a logical operation with another variable and re-assign the result to itself.
We use them like this:
JavaScriptCopied!
left ??= right;
left ||= right;
left &&= right;
They’re as good as:
JavaScriptCopied!
// More like exactly the same as
left = (left ?? right);
left = (left || right);
left = (left && right);
??=. Quickly assign a value to a variable *if* it is null or undefined (“nullish”).
JavaScriptCopied!
user.preferredName ??= generateDumbUserName();
||=. Like ??=, but assigns the value for any falsy value (0, undefined, null, '', NaN, or false).
JavaScriptCopied!
user.profilePicture ||= "/angry-stranger.png";
And then &&=. Something like the reverse; only assigns when the value is truthy (not falsy).
Tiny new addition to make big number literals more readable and human-friendly.
JavaScriptCopied!
const isItPi = 3.1_415_926_535;

const isItAvagadro = 602_214_076_000_000_000_000_000;

const isItPlanck = 6.626_070_15e-34;

const isItG = 6.674_30e-11;

// Works for other number bases too...
The compiler completely ignores those pesky underscores — they’re all for you, the human!
Final thoughts
These are the juicy new JavaScript features that arrived in the last 3 years. Use them to boost your productivity as a developer and write cleaner code with greater conciseness, expressiveness and clarity.
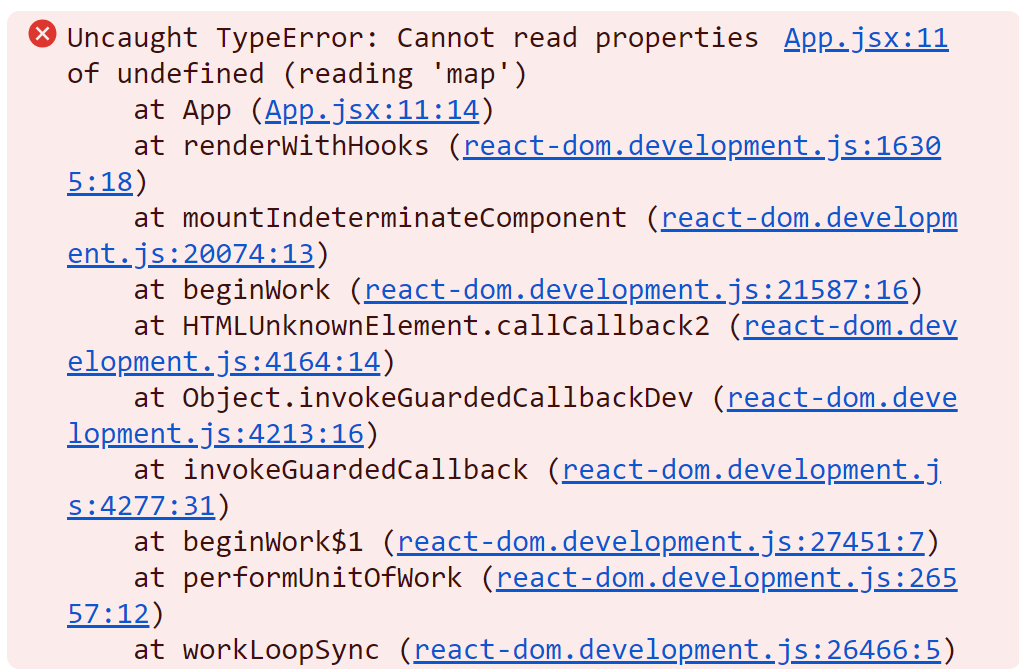
Are you currently experiencing the “Cannot read property ‘map’ of undefined” error in your React app?
The “Cannot read properties of undefined (reading ‘map’)” error in the browser console.
This error happens when you call the map() method on a variable that was meant to be an array, but is actually undefined. The variable could be a property or state variable.
The optional chaining operator lets us safely access a property on a value that may be undefined or null. If it is, the operator will return undefined immediately and prevent the property access or method call.
Here’s what a chain of && does: it returns the right-most variable if all the variables are truthy. Otherwise, it returns the left-most falsy variable:
Note: These are the falsy values in JavaScript: undefined, null, 0, false, '' (empty string), and NaN. Every other value is truthy.
Fix: Initialize state variable to empty array
The applies when the array value is a state variable like in our example.
We set the state to an empty array ([]) at the point where it’s created, so it never becomes undefined, preventing the “Cannot read property ‘map’ of undefined” error.
JavaScriptCopied!
import { useState, useEffect } from 'react';
import { fetchBooks } from './books';

function App() {
  // ✅ `books` starts out as an array, not `undefined`
  const [books, setBooks] = useState([]);

  useEffect(() => {
    (async () => {
      setBooks(await fetchBooks());
    })();
  }, []);

  return (
    <div>
      {books.map((book) => (
        <div key={book.id}>
          <h2>Title: {book.title}</h2>
          <p>Author: {book.author}</p>
        </div>
      ))}
    </div>
  );
}

export default App;
Fix: Create a loading state when fetching data
Apart from initializing the state to an empty array you can also display a loading indicator when performing network request, or some other time-consuming operation:
Maybe you initialized the array properly and did everything else right, but you set it to undefined at some point in the code.
If the array is to be filled with API data, are you sure you’re making the network request properly.
For example, if our fetchBooks() function was defined like below, it will cause a “Cannot read property ‘map’ of undefined” error when there’s a network error on the user’s device.
JavaScriptCopied!
export async function fetchBooks() {
  const res = fetch('https://api.example/books', {
    headers: {
      'Content-Type': 'application/json',
      Accept: 'application/json',
    },
  });
  // ❌ Will return `undefined` if status code is not 200
  return res.status === 200 ? (await res).json() : undefined;
}
Make sure you handle all the edge cases in your app.
Fix: Check your variable names
Sometimes the error happens due to a error in your variable names.
Here we mistakenly create a books variable in the map() callback but we use book identifier in the JSX, which is what we actually intended. The causes the unfortunate error, aside from the fact that it shadows the outer books state variable.
You will be an expert on JavaScript generators by the time you’re done reading this.
JavaScript generators are way more than just a fancy feature and we are going to discover many powerful use cases for them, including creating engaging animations, and streaming videos over the internet.
If you’ve never heard of them you may be missing out.
Generators are simply functions that you can pause and resume whenever you want — they don’t execute continuously.
The asterisk * marks the function as a generator, and yield generates values on demand from a .next() call, until the generator is done.
It’s just like how a physical generator produces electricity not all at once, but as time goes on.
Instead of calling next() you can use the for..of loop, which is great for when the generator generates a lot of data.
JavaScriptCopied!
function* countTo100() {
  for (let i = 0; i < 100; i++) {
    yield i;
  }
}

for (const item of countTo100()) {
  console.log(item);
}
// 1, 2, ... 100
Lazy evaluation
“Calculate only when necessary.”
Much unlike regular functions in JavaScript that execute entirely and return the result.
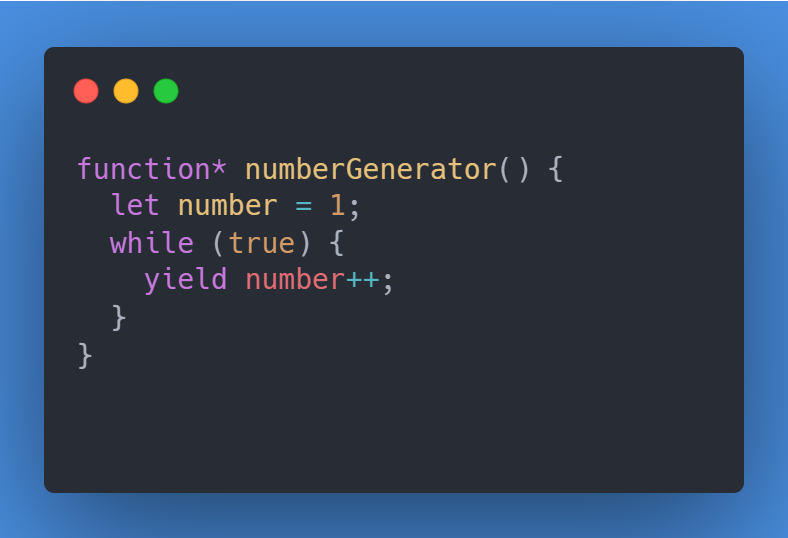
Let’s say you want a sequence of numbers, but you’re not sure how many. Here’s how a generator helps:
JavaScriptCopied!
function* numberGenerator() {
  let number = 1;
  // infinite loop won't cause freeze in generator
  // -- execution pauses after `yield`
  while (true) {
    yield number++;
  }
}

const numbers = numberGenerator();

console.log(numbers.next().value); // 1
console.log(numbers.next().value); // 2
// you can continue this as long as you need
With generators, you get the next number only when you ask for it.
Better memory utilization
Generators don’t hold all the results in memory, they generate them on the fly.
Imagine you need a sequence of a million numbers. With a regular function, you’d need to store all these numbers in an array, using up significant memory.
A generator is much more efficient:
JavaScriptCopied!
function* bigNumberGenerator() {
  let number = 1;
  while (number <= 100000000) {
    yield number++;
  }
}

const bigNumbers = bigNumberGenerator();

const chunk = 10;
for (let i = 0; i < chunk; i++) {
  const value = bigNumbers.next().value;
  // Use next 10 values...
}
Handling asynchronous tasks
Did you know that Babel transpiles async/await to generators for JavaScript versions that don’t support it natively?
Babel tranforms this:
JavaScriptCopied!
this.it('is a test', async function () {
    const name = await 'coding beauty'
    const num = await new Promise(resolve => resolve(10));
    console.log(`Name: ${name}, Num: ${num}`);
});
To this:
JavaScriptCopied!
function _asyncToGenerator(fn) {
  return function () {
    var gen = fn.apply(this, arguments);
    return new Promise(function (resolve, reject) {
      function step(key, arg) {
        try {
          var info = gen[key](arg);
          var value = info.value;
        } catch (error) {
          reject(error);
          return;
        }
        if (info.done) {
          resolve(value);
        } else {
          return Promise.resolve(value).then(
            function (value) {
              return step('next', value);
            },
            function (err) {
              return step('throw', err);
            }
          );
        }
      }

      return step('next');
    });
  };
}

myFunc(
  'generator async/await example',
  _asyncToGenerator(function* () {
    const name = yield 'coding beauty'; // yield, not await
    const num = yield new Promise((resolve) => resolve(10));
    console.log(`Name: ${name}, Num: ${num}`);
  })
);
Typing animations
Typing animations grab the attention of users and make your website more visually appealing.
They add personality and character to a website by mimicking the typing behavior of a human to create a more human-like experience and establish a unique brand identity.
So with all these benefits you’re feeling excited about infusing your webpages with these energetic visual effects.
Here would be a decent way to go about it, using recursion and setTimeout():
JavaScriptCopied!
function typeAnimation(text, index = 0) {
  if (index < text.length) {
    document.body.innerHTML += text.charAt(index);
    index++;
    setTimeout(typeAnimation, 500);
  }
}
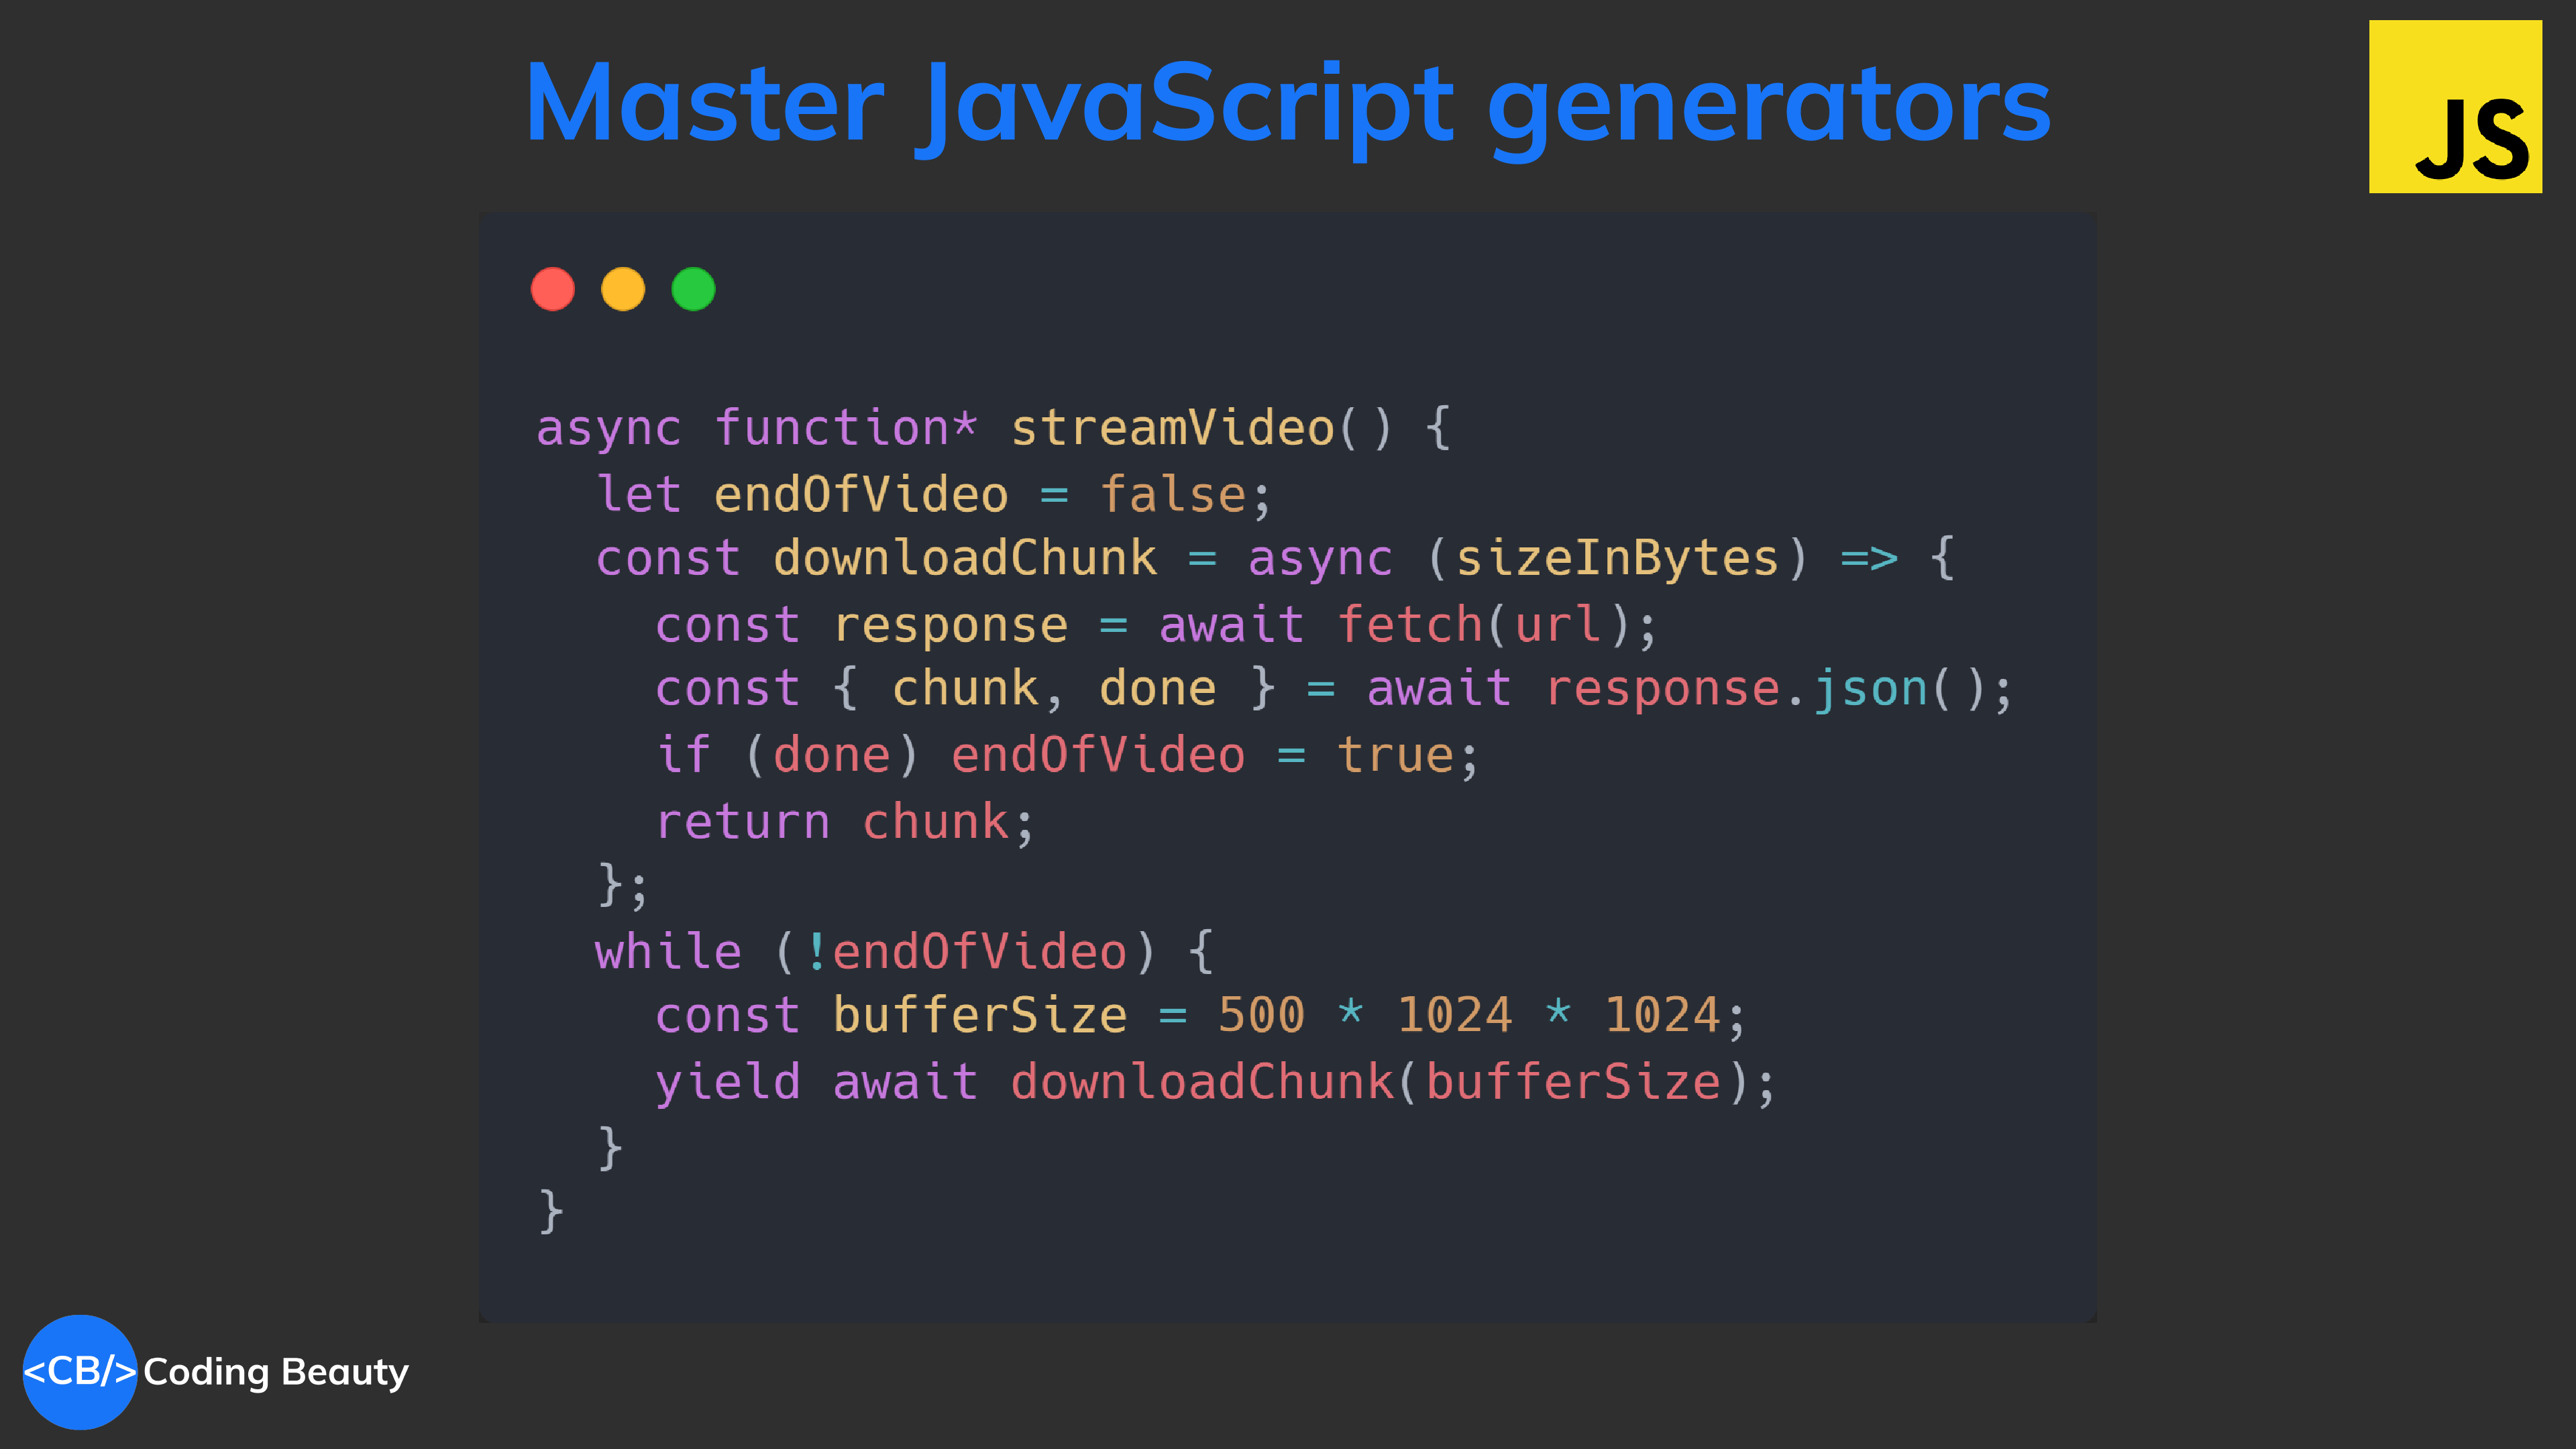
This is such a powerful tool for streaming data in web app in a structured, readable manner — just look at this function that buffers and streams data for a video-sharing app like YouTube:
import createSagaMiddleware from 'redux-saga';
import { createStore, applyMiddleware } from 'redux';
import mySaga from './sagas';

const sagaMiddleware = createSagaMiddleware();
const store = createStore(
  reducer,
  applyMiddleware(sagaMiddleware)
);
sagaMiddleware.run(mySaga)
Whenever the USER_FETCH_REQUESTED action is dispatched, redux-saga runs the generator which in turn calls fetchData() to perform the asynchronous network request.
A note on return
What happens when you return a value in a generator function? Let’s see:
JavaScriptCopied!
function* soccerPlayers() {
  yield 'Ronaldo';
  yield 'Messi';
  return 'Neymar';
}

for (const player of soccerPlayers()) {
  console.log(player);
}

// Ronaldo
// Messi
Why isn’t Neymar part of the generated values?
Let’s use .next() to find out if the done property has something to do with it:
You can see that generators only produce values until, but not including when done is true.
So return completes the generator and terminates the function (like any other).
JavaScriptCopied!
function* myGenerator() {
    yield 'Hello';
    return 'End';
    yield 'This will not be executed';
}
Final thoughts
JavaScript generators offer powerful solutions for control flow, memory efficiency, and asynchronous handling. They enhance web development with dynamic animations, streaming data, and managing side effects.
Let’s embrace the versatility of generators for elegant and efficient JavaScript programming.
Are you currently experiencing the “Cannot use import statement outside a module” error in JavaScript?
The “Cannot use import statement outside a module” error in a browser console.
This is a well-known error that happens when you use the import keyword to load a file or package that is not a module.
Let’s learn how to easily fix this error in Node.js or the browser.
Fix “Cannot use import statement outside a module” in browser
Fix: Set type="module" in <script> tag
The “Cannot use import statement outside a module” error happens in a browser when you import a file that is a module without indicating this in the <script> tag.
index.htmlCopied!
<!DOCTYPE html>
<html>
  <head>
    <title>Coding Beauty</title>
    <link rel="icon" href="favicon.ico" />
  </head>
  <body>
    A site to make you enjoy coding
    <!-- ❌ SyntaxError: Cannot use import statement outside a module -->
    <script src="index.js"></script>
  </body>
</html>
To fix it, add type="module" to the <script> tag.
index.htmlCopied!
<!DOCTYPE html>
<html>
  <head>
    <title>Coding Beauty</title>
    <link rel="icon" href="favicon.ico" />
  </head>
  <body>
    A site to make you enjoy coding
    <!-- ✅ Loads script successfully -->
    <script type="module" src="index.js"></script>
  </body>
</html>
Fix “Cannot use import statement outside a module” in Node.js
The “Cannot use import statement outside a module” error happens when you use the import keyword in a Node.js project that doesn’t use the ES module import format.
index.jsCopied!
// ❌ SyntaxError: Cannot use import statement outside a module
import axios from 'axios';

const { data } = (
  await axios.post('https://api.example.com/hi', {
    hello: 'world',
  })
).data;

console.log(data);
Fix: Set type: "module" in package.json
To fix the error in Node.js, set the package.jsontype field to “module”.
package.jsonCopied!
{
  // ...
  "type": "module",
  // ...
}
Now you can use the import statement with no errors:
If there’s no package.json in your project, you can initialize one with the npm init -y command.
ShellCopied!
npm init -y
The -y flags creates the package.json with all the default options – no user prompts for the fields.
Fix: Use require instead of import
Alternatively, you can fix the “Cannot use import statement outside a module” error in JavaScript by using the require() function in place of the import syntax:
index.jsCopied!
// ✅ Works - require instead of import
const axios = require('axios');

const { data } = (
  await axios.post('https://api.example.com/hi', {
    hello: 'world',
  })
).data;

console.log(data);
But require() only works on the older, Node-specific CommonJS module system, and these days more and more modules are dropping support for CommonJS in favor of ES6+ modules.
Or, you can downgrade to an earlier version of the package that supported CommonJS and require().
ShellCopied!
npm install chalk@4
# Yarn
yarn add got@4
Here are the versions you should install for various well-known NPM packages to avoid this ERR_REQUIRE_ESM error:
Fix “Cannot use import statement outside a module” in TypeScript
If the module field in tsconfig.json is set to commonjs, any import statement in the TypeScript source will change to require() calls after the compilation and potentially cause this error.
tsconfig.jsonCopied!
{
  //...
  "type": "module"
}
Prevent this by setting module to esnext or nodenext
tsconfig.jsonCopied!
{
  "type": "module"
}
nodenext indicates to the TypeScript compiler that the project can emit files in either ESM or CommonJS format.