5 overlooked ways to make $5000/m online as a programmer
Developers are turning code into cash on the internet every day.
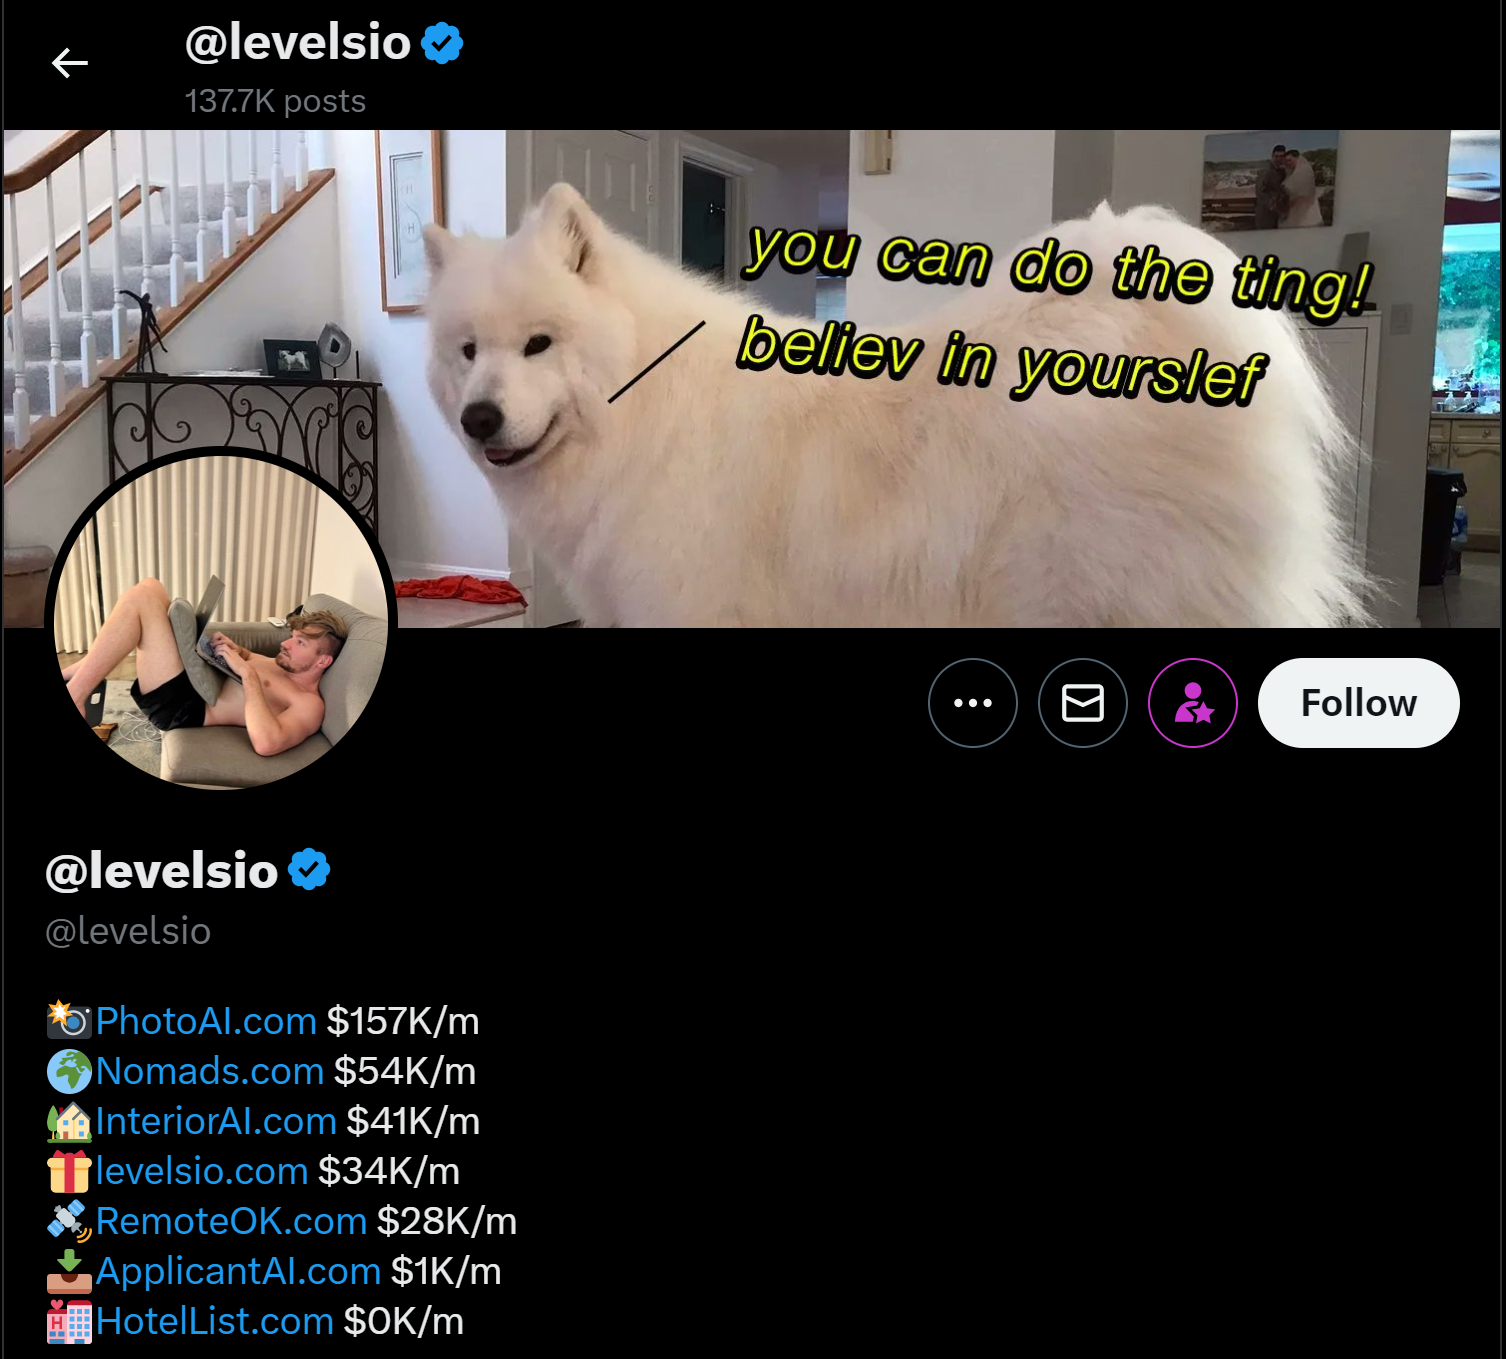
Just look at Pieter Levels, a developer making over $300,000 per month from his laptop.
He’s just one of many who combined ingenuity and skill to create tremendous value through the internet.
If you’ve been coding for a while, you can also provide value with your knowledge in several ways.
1. SaaS: Build it once, sell it forever
This is how Pieter makes most of his money.
It’s the holy grail of online income.
Build it once and sell it forever. It’s as passive as it gets.
The hard part is, what are you building? What problem are you solving?
Ideas are not a dime a dozen. Good ideas are rare.
And how do you find good SAAS ideas?
Look into your life.
What are some problems you face regularly online or offline, and can software solve them?
Uber started because the founders found themselves stuck in Paris with no way to find a taxi.
React, Polymer JS, and many other dev tools came about because the existing alternatives just weren’t good enough.
2. Freelancing the right way

I love freelancing.
It’s packed with new and exciting opportunities with unlimited earning potential.
One minute you’re building a sleek landing page for a startup; the next, you’re diving into an AI project for a company on the other side of the world.
But please don’t make the same mistake I did.
I used to spend hours cold-emailing strangers and applying to random low-quality job listings.
I thought it was all a numbers game.
But it was a complete and utter waste of time.
I stopped cold applying and focused on building your network instead. Warm.
I meet new people from people already in my network on WhatsApp and my email contacts.
These people ended up either becoming clients or referring me to clients.
An even faster way was by joining exclusive freelance networks.
In the networks I’m in I get offered at least 3 new freelancing opportunities every single day.
I could have saved all the time and energy spent on the above — but less control and hard to find and get into legit ones.
3. Create “content”
Every line of code you write has a story behind it. Let’s hear it.
Let’s hear how — tools and techniques.
Let’s hear why — your motivations, thought processes, and breakthroughs.
Don’t just throw your knowledge out there; it’s about storytelling.
Share your discoveries, ideas, and opinions; share what you’re passionate about.
And content doesn’t only mean posting on social media or blogging.
“Content” also includes your portfolio — on GitHub and more.
So it also means creating significant projects in your niche and talking about them.
The point of all this is to broaden your reach.
You either end up earning directly on the platform (like YouTube), or you greatly boost your visibility and attract great opportunities.
4. Coaching: Teach what you know
Nothing beats interactive and personalized learning from another human.
Someone who’s been there done that. They’ve seen it all, they know all the tips and tricks and pitfalls.
If you’ve been coding for more than a few years, this is you. You are the one.
Turn your knowledge into an income stream by teaching others.
And it doesn’t even have to be online. Look into your life.
When I was in uni there were tons of my coursemates who needed someone to guide them on learning coding and the other CS topics.
That was a serious opportunity.
Especially as I was one of the few who had already been coding for quite some time.
5. Patreon and GitHub Sponsors: Rally a community
Donations? Lol
How can anyone make any real money from donations?!
Until you hear of how Caleb Porzio makes over $100K/year from nothing but those same donations🤯

That’s the magic of Patreon and GitHub Sponsors.
By offering exclusive perks—like priority issue responses, educational guides on the project, or early access to your latest builds—you can turn your most devoted fans into your sponsors.
You can even sell advertising space, just like Vuetify does:
It’s not just about code anymore—it’s about building a community around your work, a tribe that’s willing to keep you going.
Final thoughts
Making money online as a programmer is about turning your skills into something bigger than yourself.
Whether you’re a freelancer battling through client projects or a creator gathering an audience, the key is the same: know your value, share it, and let the internet do the rest.