Google’s new AI image generator just changed everything
Wow this is huge.
Google just released a massive upgrade to their image generation model — and this thing is on a whole different level.
Nano Banana 2 pushes AI image generation way beyond novelty and closer to something we can actually use in production, use as a daily driver in everyday life.

It’s not just about spitting out unbelievable or ultra-realistic images this time.
It’s about cost-effective speed, consistency, accuracy, and flexibility — the traits that make an image generation model usable in the real-world of software development, the traits creative teams actually need.
1. Pro-level quality at Flash speed
Nano Banana 2 gives you high-fidelity images in seconds (typically 10–15s) while improving overall visual quality.

What’s improved:
- More vibrant, dynamic lighting
- Richer textures and sharper detail
- Cleaner handling of complex scenes
- Faster iteration without major quality loss
Why it matters:
You no longer have to choose between speed and polish. The model is built for rapid concepting, quick revisions, and high-quality drafts that are often close to final output.
2. 🌐 Google Search grounding

One of the biggest upgrades is Google Search grounding.
Nano Banana 2 can:
- Pull real-time visual references from Google Search
- Verify landmarks, people, and products
- Use up-to-date visual information before generating
Why this is significant:
- Reduces guesswork in recognizable subjects
- Improves factual accuracy
- Makes the model more viable for commercial and educational use
Instead of approximating a famous building or product from memory, the model can check current references — a major step toward reliable AI visuals.
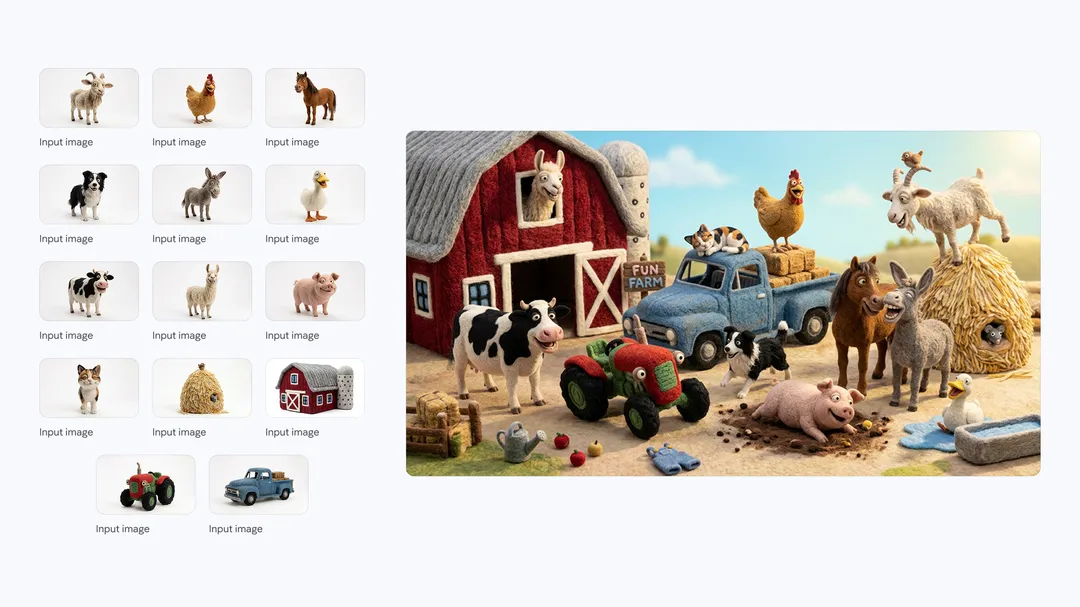
3. 🎭 Subject consistency

Consistency has long been a weak point in image generation. Nano Banana 2 addresses that directly.
It can maintain:
- Up to 5 characters
- Up to 14 objects
- Across multiple images in a sequence

What this enables:
- Storyboarding
- Comic strip creation
- Branded character campaigns
- Multi-frame marketing concepts
Characters keep their appearance. Objects stay recognizable. Visual identity becomes more stable across iterations.
4. 📝 Precision text rendering

Text inside AI images used to be notoriously unreliable a few years back.
The first Nano Banana made serious improvements here, and v2 takes it even further.
It can handle:
- Complex labels and signage
- Clean typographic layouts
- Infographics and diagrams
- Structured text blocks
It also supports:
- In-image translation
- Instant localization of text within graphics
Practical benefit:
You can generate posters, packaging mockups, charts, menus, and educational graphics without rebuilding all text manually in a separate design tool.
5. 📐 Flexible specs
Nano Banana 2 supports a wide range of resolutions and aspect ratios.
Resolution range:
- 512px
- 1K
- 2K
- 4K
Native aspect ratios:
- 16:9 (widescreen)
- 9:16 (vertical/social)
- 21:9 (cinematic)
- 8:1 (panoramic)
Why this matters:
Modern content lives everywhere — social feeds, websites, presentations, digital signage. This flexibility means assets can be generated in the correct format from the start.
Bottom line
Nano Banana 2 isn’t just about stunning or realistic images. It combines:
- ⚡ Fast generation
- 🎨 Higher visual fidelity
- 🌍 Real-time search grounding
- 🔁 Stronger multi-image consistency
- 📝 Accurate in-image text
- 📏 Flexible output specs
The result is a model designed not just to wow and amaze — but to integrate into real creative workflows.
If these capabilities hold up at scale, Nano Banana 2 could become one of Google’s most practically useful AI image tools to date.