How to Get the Current Page URL in React
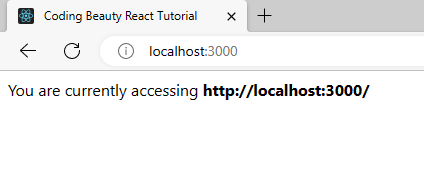
We use the window.location.href property to get the current page URL in React.
For example:
import { useRef } from 'react';

export default function App() {
  const url = window.location.href;

  return (
    <div>
      You are currently accessing <b>{url}</b>
    </div>
  );
}
We can use this same approach to get the current URL in Next.js
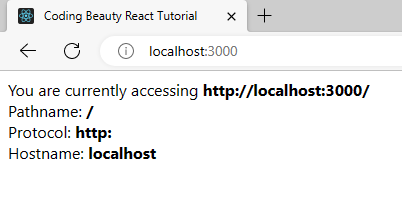
The window.location.href property returns a string that contains the entire page URL.
window.location contains other properties that give more information on the URL. Some of them are:
pathname: the path of the URL after the domain name and any optional port number.protocol: the protocol scheme of the URL.hostname: the hostname portion of the URL.
Here are some examples of using these properties to get various URL properties in addition to the full URL.
export default function App() {
  const url = window.location.href;
  const pathname = window.location.pathname;
  const protocol = window.location.protocol;
  const hostname = window.location.hostname;

  return (
    <div>
      You are currently accessing <b>{url}</b><br />
      Pathname: <b>{pathname}</b><br />
      Protocol: <b>{protocol}</b><br />
      Hostname: <b>{hostname}</b>
    </div>
  );
}
Get current route in React Router
To get the current route in React Router, we use the useLocation() route.
For example:
import React from 'react';
import { Route, Link, Routes, useLocation } from 'react-router-dom';

function Home() {
  return <h2>Home</h2>;
}

function Products() {
  return <h2>About</h2>;
}

function Pricing() {
  return <h2>Pricing</h2>;
}

function Posts() {
  return <h2>Posts</h2>;
}

export default function App() {
  const location = useLocation();

  const { hash, pathname, search } = location;

  return (
    <div>
      <div>
        <Routes>
          <Route path="/products" element={<Products />} />
          <Route path="/" element={<Home />} />
          <Route path="/posts" element={<Posts />} />
          <Route path="/#pricing" element={<Pricing />} />
        </Routes>
        Pathname: <b>{pathname}</b><br />
        Search params: <b>{search}</b><br />
        Hash: <b>{hash}</b>
        <nav>
          <ul>
            <li>
              <Link to="/">Home</Link>
            </li>
            <li>
              <Link to="/products">Products</Link>
            </li>
            <li>
              <Link to="/posts?id=5">Posts</Link>
            </li>
            <li>
              <Link to="/#pricing">Pricing</Link>
            </li>
          </ul>
        </nav>
      </div>
    </div>
  );
}
useLocation() returns an object that contains information on the current page URL. Some of these properties are:
pathname: the part that comes after the domain name, e.g.,/products.search: the query string, e.g.,?id=5.hash: the hash, e.g.,#pricing.
Note
To get the full URL, we use location.href instead of useLocation().
const url = window.location.href;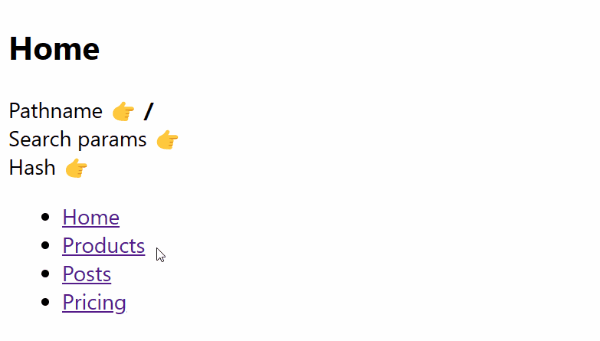
Get dynamic route variable in React Router
To access the variables of a dynamic route directly in React Router, we use the useParams() hook.
For example:
import React from 'react';
import { Route, Routes, useParams } from 'react-router-dom';

function Posts() {
  const { id } = useParams();
  return <h2>Settings for post {id} </h2>;
}

export default function App() {

  return (
    <div>
      <div>
        <Routes>
          <Route path="/posts/:id" element={<Posts />} />
        </Routes>
      </div>
    </div>
  );
}
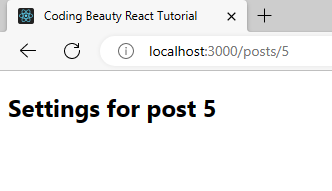
The id variable corresponds to its placeholder value in the /posts/:id path. So as you saw in the example, the path /posts/5 will result in the id having a value of 5.
Get current route in Next.js app
To get the current route in a Next.js React app, we use the useRouter() hook:
The object useRouter() returns has a route property that is the current route in the Next.js app.
import Head from 'next/head';
import { useRouter } from 'next/router';

export default function Posts() {
  const posts = ['Post 1', 'Post 2', 'Post 3'];

  // 👇 Get route data
  const { route } = useRouter();

  return (
    <>
      <Head>
        <title>Next.js - Coding Beauty</title>
        <meta name="description" content="Generated by create next app" />
        <meta name="viewport" content="width=device-width, initial-scale=1" />
        <link rel="icon" href="/favicon.ico" />
      </Head>
      <main>
        Route: <b>{router}</b>
        <br />
        {posts.map((post) => (
          <p>{post}</p>
        ))}
      </main>
    </>
  );
}
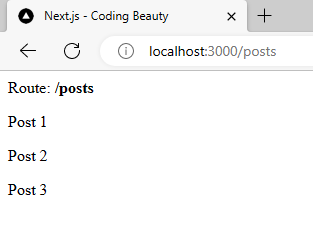
We use useRouter() to get data and take actions related to the current app route.
Get current dynamic route data in Next.js
To get data passed to a dynamic route, we use the query property from the useRouter() object:
For instance, we could have a route /posts/5 corresponding to a dynamic route, /posts/:id where 5 is the passed value for id.
Here’s how we’ll access it in the Next.js file that handles requests to the dynamic route:
import Head from 'next/head';
import { useRouter } from 'next/router';

export default function Posts() {
  const { query } = useRouter();

  // 👇 Get id value from dynamic route
  const { id } = query;

  return (
    <>
      <Head>
        <title>Next.js - Coding Beauty</title>
        <meta name="description" content="Generated by create next app" />
        <meta name="viewport" content="width=device-width, initial-scale=1" />
        <link rel="icon" href="/favicon.ico" />
      </Head>
      <main>
        <h2>
          Post <b>{id}</b>
        </h2>
      </main>
    </>
  );
}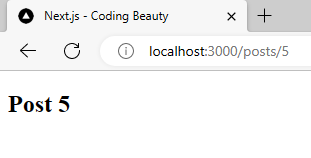
For the dynamic route to work, the file structure in the pages folder has to be like this: /pages/[id].tsx. We name the file according to what property we’ll use to access the data from the query, and we wrap the name in square brackets.
We use useRouter() to get data and take actions related to the current app route.
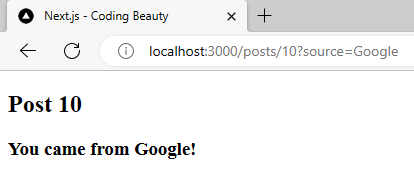
Get query parameter data in Next.js
We can also access URL query parameters (i.e., ?key1=value1) using the query object:
import Head from 'next/head';
import { useRouter } from 'next/router';

export default function Posts() {
  const { query } = useRouter();

  // 👇 Get source from query params
  const { id, source } = query;

  return (
    <>
      <Head>
        <title>Next.js - Coding Beauty</title>
        <meta name="description" content="Generated by create next app" />
        <meta name="viewport" content="width=device-width, initial-scale=1" />
        <link rel="icon" href="/favicon.ico" />
      </Head>
      <main>
        <h2>
          Post <b>{id}</b>
        </h2>
        <h3>You came from {source}!</h3>
      </main>
    </>
  );
}
Key takeaways
In React, we can use window.location.href to get the current page URL, and useLocation() to get information on the current route in React Router. For dynamic routes, useParams() accesses the values of a dynamic route directly.
For Next.js, we use the useRouter() hook to get info on the current route. From the object, it returns, route has the current route, and query gives us info on data passed to the app with the URL, like dynamic route and query parameter data.