Blog

Essential VS Code tips & extensions for power zooming

As expected VS Code has the basic zoom in & out in every text editor.

But they’re some hidden gems to quickly level up your zoom game once found.

Dig into the command palette and you’ll find Font zooming – zooming just the code without the rest of the editor UI.

Pretty cool – did you know about this?

Zoom with scroll

Easily adjust zoom with Ctrl + mouse scroll:

After turning on the Editor: Mouse Wheel Zoom setting:

Powerful zoom extensions

The VS marketplace is packed full with powerful, capable extensions that boost various aspects of your workflow.

For zooming, there’s none better to start with than Zoom Bar:

The first thing you notice right away after install: the exact zoom level now shows up in the status bar:

+ and - buttons are obviously to zoom in and out.

Select the zoom percentage and this dialog appears:

Tons of pre-defined zoom options to choose from.

Just as you can see your exact zoom, you can also set it precisely with Input zoom:

Why not? 😏

And what about zooming just the terminal font?

There’s an extension for that too:

At the bottom-right you can clearly see the displayed terminal font.

My status bar has gotten semi-painfully humongous now, but it’s clear how useful these upgrades are… They were always great for taking screenshots when I used a 768p PC.

An of course: laser-precise focus on specific lines, syntax, and details without straining your eyes. Or whatever other reason you need to zoom for.

Never use magic numbers in your code: Do this instead

You can never guess what this does 👇

JavaScript
function c(a) { return a / 13490190; } const b = c(40075); console.log(p); // 0.002970677210624906

All we see is a calculation. We have no idea what those numbers and variables mean in the bigger picture of the codebase.

It’s a mystery. It’s magic to everyone apart from the developer who wrote the code.

We can’t possibly make any contributions to this code; we’re stuck.

But what if our dev had looked beyond code that merely works and also focused on communicating the full story of the code?

At the very least they would have given those variables far more descriptive names to explain the context:

JavaScript
function calculateSpeedstersTime(distance) { return distance / 13490190; } const time = calculateSpeedstersTime(40075); console.log(time); // 0.002970677210624906

This small change vastly improves the code’s readability. Now you have a general idea of what’s going on.

But there are still mysteries we must solve.

It’ll still take us a little bit to realize 13490190 is speed — but how much speed?. And we know 40075 is a distance, but why 40075 of all the numbers?

For maximum readability we replace these magic numbers with variables with explanatory names

JavaScript
const speedstersSpeedKmPerHr = 13490190; const earthCircumferenceKm = 40075; function calculateSpeedstersTime(distance) { return distance / speedstersSpeedKmPerHr; } const time = calculateSpeedstersTime(earthCircumferenceKm); console.log(time); // 0.002970677210624906 ~ 11s

Now you understand every single thing this code does at a glance.

Understanding at a glance is always the goal.

Even with readable code…

Anyone can understand this TS code here; but there’s a serious issue that could easily lead us to hours-long bug hunting.

Can you spot it?

JavaScript
class Person { state: string; name: string; greet() { console.log(`Hey I'm ${this.name}`); } eatFood() { if (this.state === 'tired') { this.state = 'fresh'; } } exercise() { if (this.state === 'fresh') { this.state = 'tired'; } } }

Problem: We’re lousily checking the state for equality and assigning with magic strings again and again.

Repeating ourselves, and allow a mere typo to break this code in the future. And the bug won’t always be easy to spot like it would be in this tiny code.

That’s why we have union types; similar to enums in TypeScript and other languages.

JavaScript
class Person { name: string; // ✅ Only 3 values, not infinite state: 'tired' | 'fresh' | 'sleepy'; greet() { console.log(`Hey I'm ${this.name}`); } eatFood() { if (this.state === 'tired') { this.state = 'fresh'; } } exercise() { // ✅ Typo: Error thrown if (this.state === 'fres') { this.state = 'tired'; } } }

Now 'tired' and 'fresh' are no longer random string literals. They’re now registered values of a pre-defined type.

And this is one of the powerful advantages TypeScript has over regular JS.

We even have this exact type of issue in a Dart codebase I’m part of. We’ve used the same magic strings like 10 times each.

But Dart only has enums and it’s not so easy to convert from magic strings to enums like we did here with union types. So we better refactor before it comes back to bite us!

The only thing that remains constant…

Keep using magic values and they keep spreading throughout the codebase across more and more files.

Replacing them is a chore.

JavaScript
// email.js export function sendEmail({ username }) { emailApi.send({ title: `Hi ${username ?? 'User'}`, role: 'user' // Union type value }); } // user-info.jsx export function UserInfo({ user }) { return ( <div> <div>Name: {user.name ?? 'User'}</div> <div>Email: {user.email}</div> </div> ); }

What happens when you want to change the default user name to something else but you’ve got the 'User' magic string in over 15 files?

Even Find and Replace will be tricky because they could be other strings with the same value but no relation.

We can fix this issue by creating a separate global config file containing app-wide values like this:

JavaScript
// app-values.js export const DEFAULT_USERNAME = 'User'; // ✅ Only one place to change // email.js import { DEFAULT_USERNAME } from './app-values'; export function sendEmail({ username, role }) { emailApi.send({ message: `Hi ${username ?? DEFAULT_USERNAME}`, // ✅ role: role ?? 'user', }); } // user-info.jsx import { DEFAULT_USERNAME } from './app-values'; export default function UserInfo({ user }) { return ( <div> <div>Name: {user.name ?? DEFAULT_USERNAME}</div> // ✅ <div>Email: {user.email}</div> </div> ); }

Final thoughts

Banish magic numbers and strings from your JavaScript code for clarity, maintainability, and efficiency.

By adopting these practices you pave the way for code that is not only functional but also self-documenting, collaborative, and resilient in the face of change.

3 ways to show line breaks in HTML without ever using br

Of course <br/> is what we all grew up with from our HTML beginnings, but there’s more.

Like… CSS white-space: pre-wrap:

HTML
<div id="box"> Coding is cognitively demanding, mentally stimulating, emotionally rewarding, beauty, unity power </div>
CSS
#box { background-color: #e0e0e0; width: 250px; font-family: Arial; white-space: pre-wrap; }

Without pre-wrap:

pre-wrap preserves line breaks and sequences of whitespace in the element’s text.

So the 4 spaces between the words in the first line are shown in the output along with the line break.

Even the space used for text indentation is also shown in the output, adding extra left padding to the container.

JS too

pre-wrap also acknowledges the \n character when set from JavaScript; with innerText or innerHTML:

JavaScript
const box = document.getElementById('box'); box.innerText = 'Coding is \n logic, art, growth, \n creation';

Without pre-wrap:

pre

pre works a lot like pre-wrap but no more auto wrapping:

For example:

HTML
<div id="box"> JavaScript at Coding Beauty HTML at Coding Beauty CSS at Coding Beauty </div>
CSS
#box { white-space: pre; background-color: #e0e0e0; width: 250px; font-family: Arial; }

If pre was pre-wrap in this example:

The behavior with pre is the same when you set the innerHTML or innerText property of the element to a string using JavaScript.

Newlines only

white-space:pre-line: Ignore extra spaces but show line breaks:

HTML
<div id="box"> Coding is growth unity power beauty </div>
CSS
#box { background-color: #e0e0e0; width: 250px; font-family: Arial; white-space: pre-line }

pre-line -> pre-wrap:

Like the previous two possible white-space values, pre-line works in the same way when you set the innerHTML or innerText property of the element to a string using JavaScript.

7 little-known but powerful array methods in JavaScript

There’s more to arrays than map(), filter(), find(), and push()

Check these out:

1. copyWithin()

Array copyWithin() copies a part of an array to another position in the same array and returns it without increasing its length.

JavaScript
const array = [1, 2, 3, 4, 5]; // copyWithin(target, start, end) // replace arr with start..end at target // a. target -> 3 (index) // b. start -> 1 (index) // c. end -> 3 (index) // start..end -> 2, 3 const result = array.copyWithin(3, 1, 3); console.log(result); // [1, 2, 3, 2, 3]

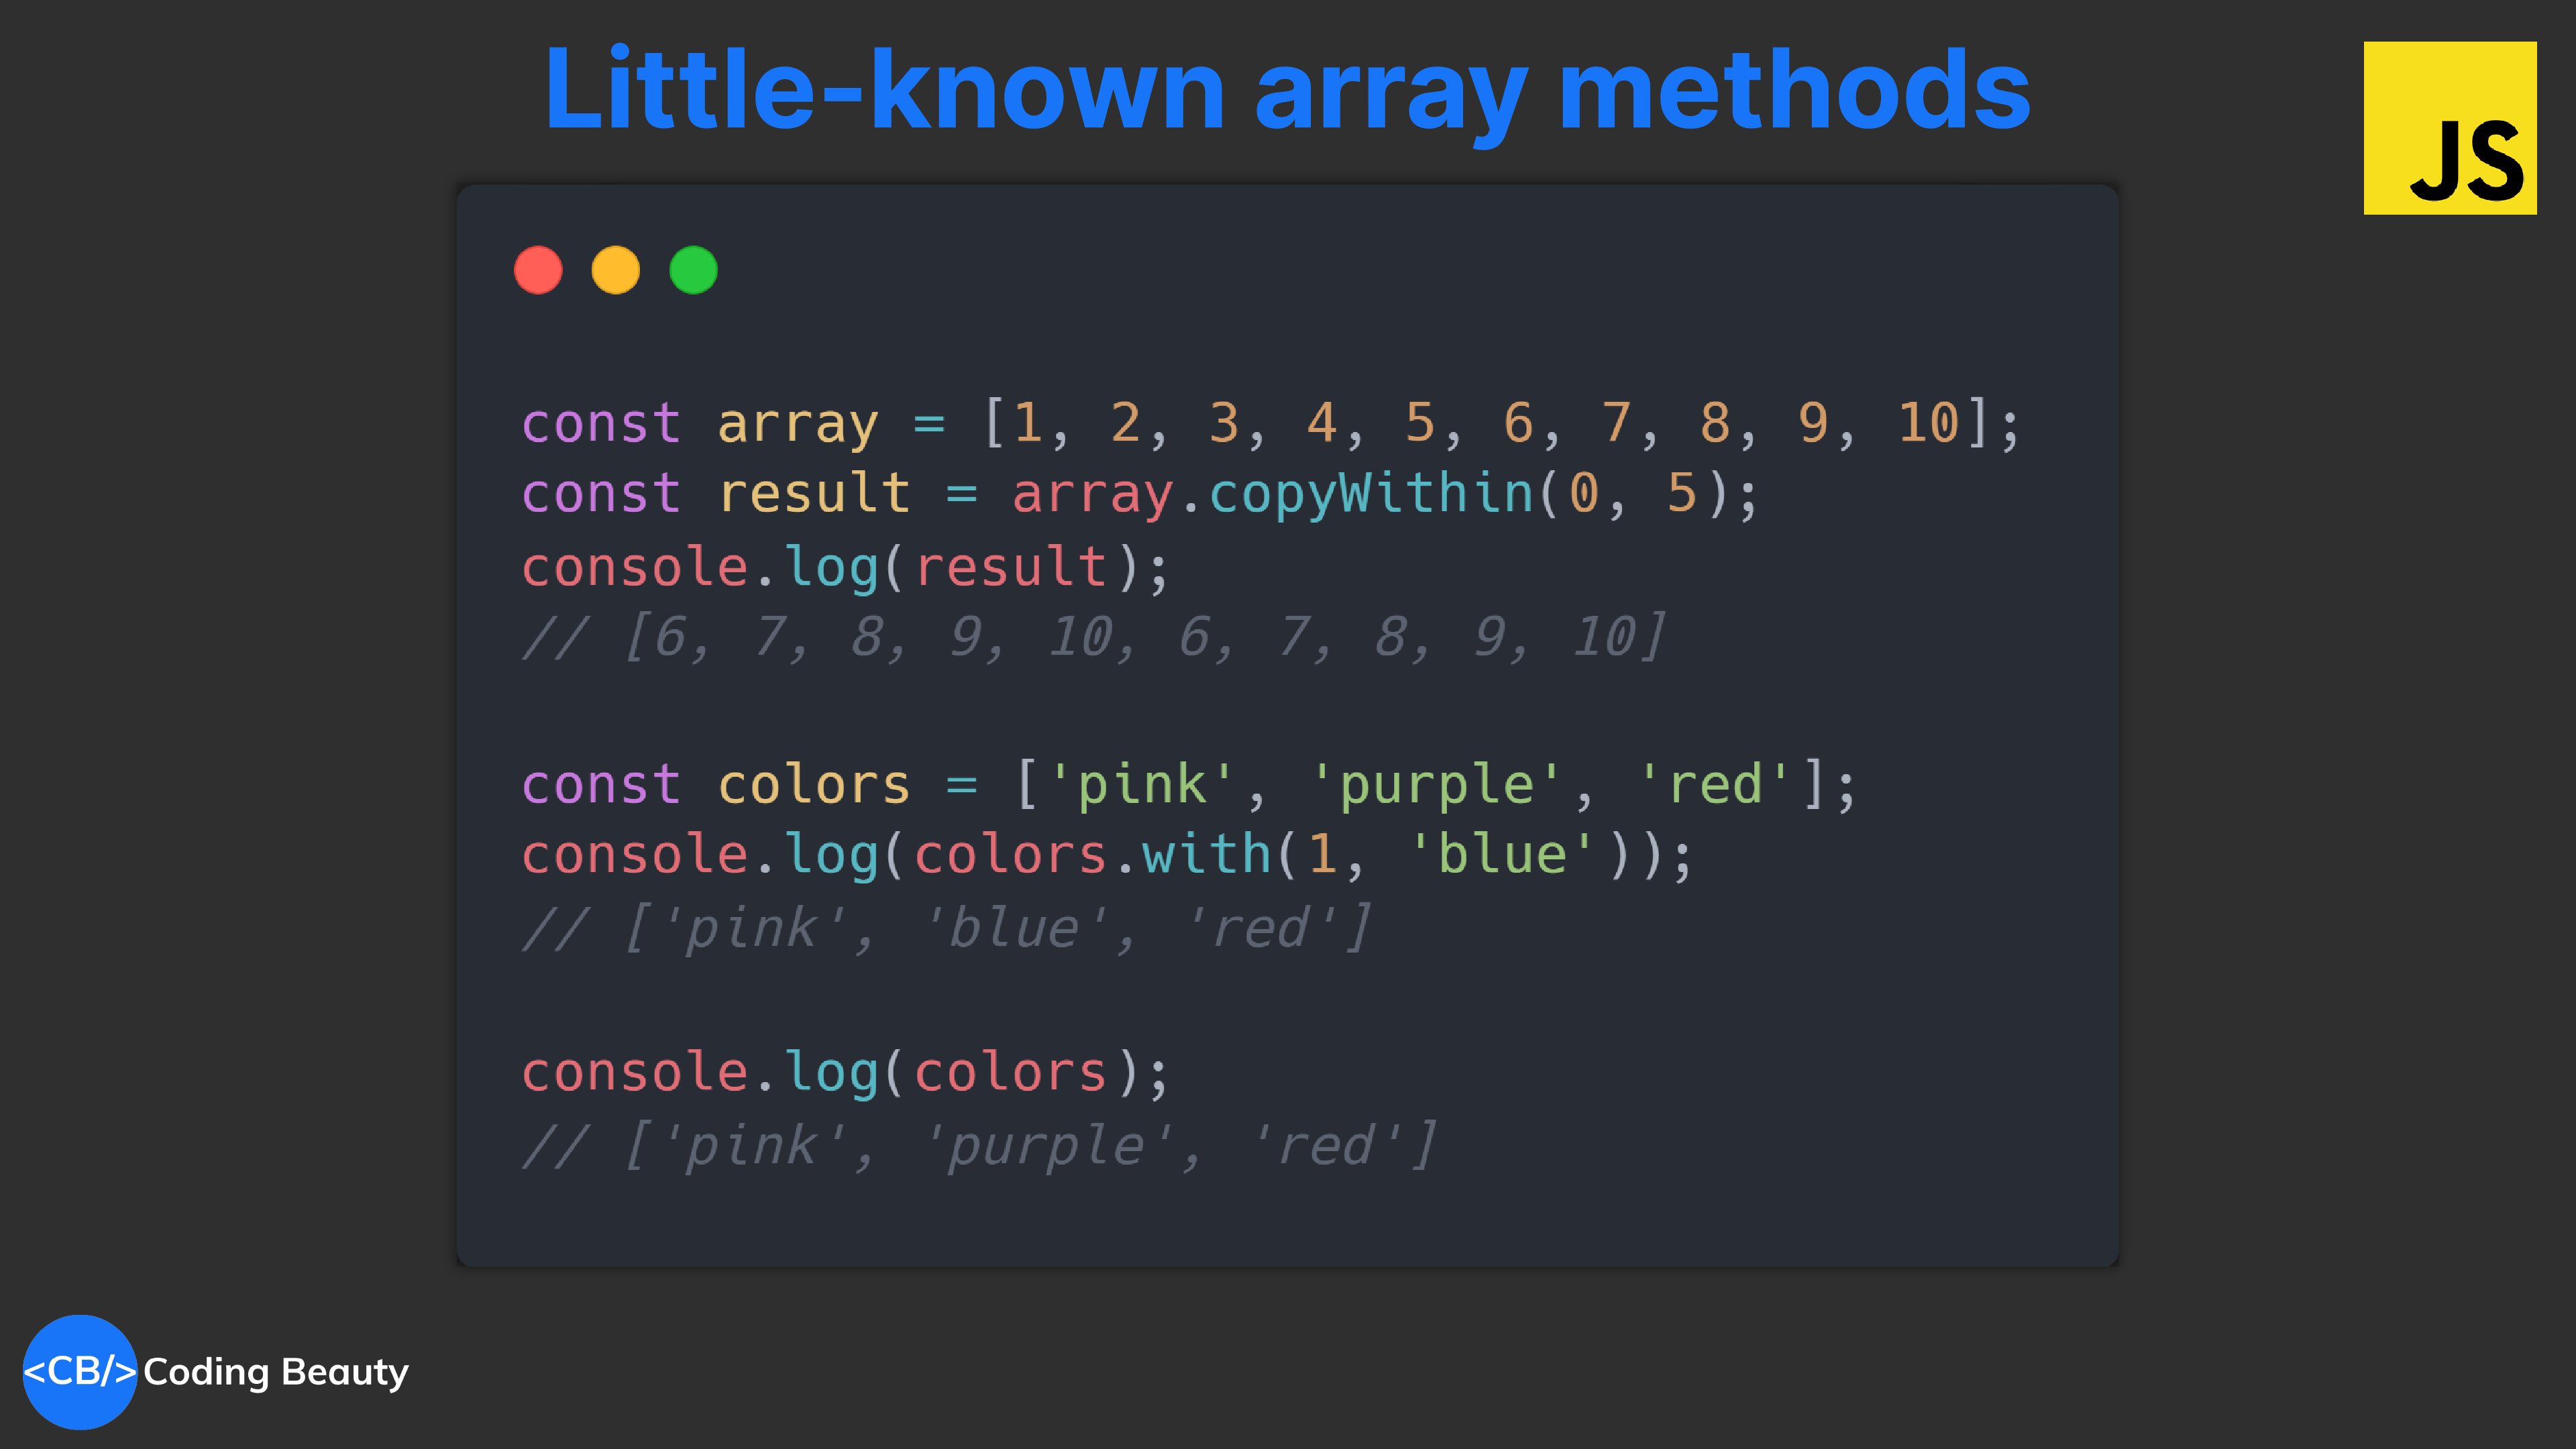
end parameter is optional:

JavaScript
const array = [1, 2, 3, 4, 5, 6, 7, 8, 9, 10]; // "end" not specified so last array index used // target -> 0 (index) // start..end -> 6, 7, 8, 9, 10 const result = array.copyWithin(0, 5); // [6, 7, 8, 9, 10, 6, 7, 8, 9, 10] console.log(result);
JavaScript
const array = [1, 2, 3, 4, 5]; // Copy numbers 2, 3, 4, and 5 (cut off at index 4) const result = array.copyWithin(3, 1, 6); console.log(result); // [1, 2, 3, 2, 3]

2. at() and with()

at() came first and with() came a year after that in 2023.

They are the functional and immutable versions of single-element array modification and access.

JavaScript
const colors = ['pink', 'purple', 'red', 'yellow']; console.log(colors.at(1)); // purple console.log(colors.with(1, 'blue')); // ['pink', 'blue', 'red', 'yellow'] // Original not modified console.log(colors); // ['pink', 'purple', 'red', 'yellow']

The cool thing about these new methods is how they let you get and change element values with negative indexing.

3. Array reduceRight() method

Works like reduce() but the callback goes from right to left instead of left to right:

JavaScript
const letters = ['b', 'e', 'a', 'u', 't', 'y']; const word = letters.reduce((word, letter) => word + letter, ''); console.log(word); // beauty // Reducer iterations // 1. ('', 'y') => '' + 'y' = 'y' // 2. ('y', 't') => 'y' + 't' = 'yt'; // 3. ('yt', 'u') => 'ytu'; // ... // n. ('ytuae', 'b') => 'ytuaeb'; const wordReversed = letters.reduceRight((word, letter) => word + letter, ''); console.log(wordReversed); // ytuaeb

Here’s another great scenario for reduceRight():

JavaScript
const thresholds = [ { color: 'blue', threshold: 0.7 }, { color: 'orange', threshold: 0.5 }, { color: 'red', threshold: 0.2 }, ]; const value = 0.9; const threshold = thresholds.reduceRight((color, threshold) => threshold.threshold > value ? threshold.color : color ); console.log(threshold.color); // red

4. Array findLast() method

New in ES13: find array item starting from last element.

Great for cases where where searching from end position produces better performance than with find()

Example:

JavaScript
const memories = [ // 10 years of memories... { date: '2020-02-05', description: 'My first love' }, // ... { date: '2022-03-09', description: 'Our first baby' }, // ... { date: '2024-01-25', description: 'Our new house' }, ]; const currentYear = new Date().getFullYear(); const query = 'unique'; const milestonesThisYear = events.find( (event) => new Date(event.date).getFullYear() === currentYear && event.description.includes(query) );

This works but as our target object is closer to the tail of the array, findLast() should run faster:

JavaScript
const memories = [ // 10 years of memories... { date: '2020-02-05', description: 'My first love' }, // ... { date: '2022-03-09', description: 'Our first baby' }, // ... { date: '2024-01-25', description: 'Our new house' }, ]; const currentYear = new Date().getFullYear(); const query = 'unique'; const milestonesThisYear = events.findLast( (event) => new Date(event.date).getFullYear() === currentYear && event.description.includes(query) );

Another use case for findLast() is when we have to specifically search the array from the end to get the correct element.

For example, if we want to find the last even number in a list of numbers, find() would produce a totally wrong result:

JavaScript
const nums = [7, 14, 3, 8, 10, 9]; // gives 14, instead of 10 const lastEven = nums.find((value) => value % 2 === 0); console.log(lastEven); // 14

But findLast() will start the search from the end and give us the correct item:

JavaScript
const nums = [7, 14, 3, 8, 10, 9]; const lastEven = nums.findLast((num) => num % 2 === 0); console.log(lastEven); // 10

5. toSorted(), toReversed(), toSpliced()

ES2023 came fully packed with immutable versions of sort(), reverse(), and splice().

Okay maybe splice() isn’t used as much as the others, but they all mutate the array in place.

JavaScript
const original = [5, 1, 3, 4, 2]; const reversed = original.reverse(); console.log(reversed); // [2, 4, 3, 1, 5] (same array) console.log(original); // [2, 4, 3, 1, 5] (mutated) const sorted = original.sort(); console.log(sorted); // [1, 2, 3, 4, 5] (same array) console.log(original); // [1, 2, 3, 4, 5] (mutated) const deleted = original.splice(1, 2, 7, 10); console.log(deleted); // [2, 3] (deleted elements) console.log(original); // [1, 7, 10, 4, 5] (mutated)

Immutability gives us predictable and safer code; debugging is much easier as we’re certain variables never change their value.

Arguments are exactly the same, with splice() and toSpliced() having to differ in their return value.

JavaScript
const original = [5, 1, 3, 4, 2]; const reversed = original.toReversed(); console.log(reversed); // [2, 4, 3, 1, 5] (copy) console.log(original); // [5, 1, 3, 4, 2] (unchanged) const sorted = original.toSorted(); console.log(sorted); // [1, 2, 3, 4, 5] (copy) console.log(original); // [5, 1, 3, 4, 2] (unchanged) const spliced = original.toSpliced(1, 2, 7, 10); console.log(spliced); // [1, 7, 10, 4, 5] (copy) console.log(original); // [5, 1, 3, 4, 2] (unchanged)

6. Array lastIndexOf() method

The lastIndexOf() method returns the last index where a particular element can be found in an array.

JavaScript
const colors = ['a', 'e', 'a', 'f', 'a', 'b']; const index = colors.lastIndexOf('a'); console.log(index); // 4

We can pass a second argument to lastIndexOf() to specify an index in the array where it should stop searching for the string after that index:

JavaScript
const colors = ['a', 'e', 'a', 'f', 'a', 'b']; // Get last index of 'a' before index 3 const index1 = colors.lastIndexOf('a', 3); console.log(index1); // 2 const index2 = colors.lastIndexOf('a', 0); console.log(index2); // 0 const index3 = colors.lastIndexOf('f', 2); console.log(index3); // -1

7. Array flatMap() method

The flatMap() method transforms an array using a given callback function and then flattens the transformed result by one level:

JavaScript
const arr = [1, 2, 3, 4]; const withDoubles = arr.flatMap((num) => [num, num * 2]); console.log(withDoubles); // [1, 2, 2, 4, 3, 6, 4, 8]

Calling flatMap() on the array does the same thing as calling map() followed by a flat() of depth 1, but it`s a bit more efficient than calling these two methods separately.

JavaScript
const arr = [1, 2, 3, 4]; // flat() uses a depth of 1 by default const withDoubles = arr.map((num) => [num, num * 2]).flat(); console.log(withDoubles); // [1, 2, 2, 4, 3, 6, 4, 8]

Final thoughts

They are not that well-known (yet) but they have their unique uses and quite powerful.

Coding as a logical unity of beauty and elegance

We often associate coding with logic, problem-solving, and cold, hard facts.

But what if we shifted our perspective and viewed code through the lens of unity, seeing it as a beautiful ecosystem woven from diverse threads of interconnected elements?

This shift can unlock new ways of understanding, crafting, and appreciating the art of programming.

Imagine a game of chess.

Each piece, while powerful in its own right, finds its true potential when working in harmony with the others. Knights flank, pawns push, and rooks guard, united in their pursuit of checkmate.

Yeah I never thought of that — maybe cause my rating is ~1200 🫠

There’s something grand majestic I’ve always found in seeing various components of a complex system working together towards a shared end.

Whether it’s a soccer team making a beautiful teamwork goal, or thousands of people in a business collaborating to launch a product to millions or billions of users.

It must be a echo of our aching desire to part of something bigger than ourselves; of something grand and greater.

In the same way code exists not as a collection of isolated lines, but as a symphony of components, each playing its part in the grand composition of the program.

Object-Oriented Programming (OOP) embodies this principle of unity; by encapsulating data and functionality within objects, OOP creates self-contained units that interact and collaborate.

It’s like dividing a song into sections for different instruments and audio layers, each contributing its unique voice while adhering to the overall flow and rhythm.

The rhythm, the vocals, the tune…

I love how this song’s chorus goes; there’s one audio layer at first, then gradually they all come together to form the complete song flow (which sounds nice btw).

Imagine a program built with OOP; each object, whether a player character in a game or a customer object in a shopping cart application, becomes a mini-world unto itself, yet seamlessly integrates with the larger system.

But unity extends beyond individual objects. Imagine breaking down a complex program into modular systems, each with its own well-defined purpose.

Every single file plays it’s unique, important role towards the common purpose.

Similar to the departments in a company each module focuses on a specific task like user authentication or data processing. These modules then communicate through APIs (Application Programming Interfaces), standardized languages that facilitate seamless collaboration.

Picture the API as a translator ensuring smooth communication between modules just like diplomats ensure cooperation between nations.

This modular approach not only fosters code organization but also promotes reusability and independent development, allowing different teams to contribute to the unified whole.

The concept of unity even shines through in the ever-evolving world of microservices. Imagine a monolithic application as a centralized factory, a single, atomic unit humming with activity.

As powerful as that may be it’ll be pretty tough to update or repair specific functionalities since they’re all tightly couple to one another. But for microservices we break the system into smaller + independent services like specialized stations in the factory.

Each service operates autonomously, yet communicates through standardized protocols, ensuring collaboration. This distributed architecture promotes agility, scalability, and resilience, fostering a unified system that easily adapts to our changing needs.

Seeing coding as unity doesn’t diminish the rigor of logic or the importance of problem-solving. Instead, it adds a layer of appreciation for the elegance and beauty that emerges when disparate elements become a cohesive whole.

Like a composer finding the perfect harmony between instruments, we strive for unity in algorithms, searching for the most efficient and unified approach to solve a problem. We craft elegant frameworks and reusable libraries promoting consistency and collaboration across projects.

This shift in perspective isn’t just about aesthetics; it has practical implications.

By understanding the connections between components, coders can debug more effectively, anticipate unintended consequences, and write code that is easier to maintain and adapt. It fosters a collaborative spirit, where individual contributions become building blocks for a unified system.

Remember, unity doesn’t imply uniformity. Just like a diverse ecosystem thrives on interconnectedness while celebrating individual species, code benefits from variety within unity.

Different programming paradigms, languages, and libraries enrich the landscape, offering solutions tailored to specific problems. The key lies in understanding the underlying principles of unity and applying them creatively to bring the best out of each unique element.

So, the next time you open your code editor, remember the power of unity. See your code not as a jumble of lines, but as a symphony waiting to be composed.

By appreciating the connections and collaborations within your program, you’ll not only write better code, but also unlock a deeper understanding and appreciation for the art of programming.

Master JavaScript Mutation Observer: amazing real-world use cases

JavaScript Mutation Observer.

An underrated API for watching for changes in the DOM: “child added”, “attribute changed”, and more.

JavaScript
// Node/element to be observed for mutations const targetNode = document.getElementById('my-el'); // Options for the observer (which mutations to observe) const config = { attributes: true, childList: true, subtree: true }; // Callback function to execute when mutations are observed const callback = (mutationList, observer) => { for (const mutation of mutationList) { if (mutation.type === 'childList') { console.log('A child node has been added or removed.'); } else if (mutation.type === 'attributes') { console.log( `The ${mutation.attributeName} attribute was modified.` ); } } }; // Create an observer instance linked to the callback function const observer = new MutationObserver(callback); // Start observing the target node for configured mutations observer.observe(targetNode, config); // Later, you can stop observing observer.disconnect();

I see a bunch of people online curious to know the point of this API in the real-world.

In this post I’ll show you how I used it to easily shut-up this annoying script carrying out unwanted activities on the page.

And you’ll see how sleek and polish the UI elements became after this.

The 3rd party script

It came from Mailchimp – a service for managing email lists.

Mailchimp provides embedded forms to easily collect sign-ups to your list.

These forms are HTML code embedded in your webpage without any additional configuration.

But being this ready-to-use nature comes at a cost; deeply embedded CSS stubbornly resisting any attempt to customize the form’s look and feel.

I mean I know I definitely spent WAY more than I should have doing this, having to throw CSS !important all over the place and all…

Stubbornly rigid JS

On the JS side I had the remote Mailchimp script showing these pre-defined error/success messages after the request to the Mailchimp API.

Sure this was an decent success message but there was simply no built-in option to customize it. And we couldn’t indicate success in other ways like a color or icon change.

Mutation Observer to the rescue…

Waiting for the precise moment the success text came in and instantly swapping out the copy for whatever I wanted and doing anything else.

And just like that the script was blocked from directly affecting the UI.

We basically turned it into an Event Emitter service; an observable.

This let us easily abstract everything into a React component and add various event listeners (like onSuccess and onError):

To create the polished form we saw earlier:

This is the power of the JavaScript Mutation Observer API.

7 new JavaScript Set methods: union(), intersection() + 5 more

Let’s be honest: you probably don’t care about Sets! At least until now…

They’ve been here since ES6 but they’re usually relegated to making sure a list has no duplicates.

JavaScript
const array = [1, 4, 3, 2, 3, 1]; const noDuplicates = [...new Set(array)]; console.log(noDuplicates); // [1, 4, 3, 2]

With these 7 upcoming built-in Set methods, we could find ourselves using them a LOT more often.

1. union()

The new Set union() method gives us all the unique items in both sets.

JavaScript
const creation = new Set(['coding', 'writing', 'painting']); const joy = new Set(['crying', 'laughing', 'coding']); console.log(creation.union(joy)); // Set { 'coding', 'crying', 'writing', 'laughing', 'painting' }

And since it’s immutable and returns a copy, you can chain it indefinitely:

JavaScript
const odd = new Set([21, 23, 25]); const even = new Set([20, 22, 24]); const prime = new Set([23, 29]); console.log(odd.union(even).union(prime)); // Set(7) { 21, 23, 25, 20, 22, 24, 29 }

2. intersection()

What elements are in both sets?

JavaScript
const mobile = new Set(['javascript', 'java', 'swift', 'dart']); const backend = new Set(['php', 'python', 'javascript', 'java']); const frontend = new Set(['javascript', 'dart']); console.log(mobile.intersection(backend)); // Set { javascript, java } console.log(mobile.intersection(backend).intersection(frontend)); // Set { javascript }

3. difference()

difference() does A – B to return all the elements in A that are not in B:

JavaScript
const joy = new Set(['crying', 'laughing', 'coding']); const pain = new Set(['crying', 'screaming', 'coding']); console.log(joy.difference(pain)); // Set { 'laughing' }

4. symmetricDifference()

As symmetric implies, this method gets the set difference both ways. That’s (A – B) U (B – A).

All the items in 1 and only 1 of the sets:

JavaScript
const joy = new Set(['crying', 'laughing', 'coding']); const pain = new Set(['crying', 'screaming', 'coding']); console.log(joy.symmetricDifference(pain)); // Set { 'laughing', 'screaming' }

5. isSubsetOf()

Purpose is clear: check if all elements of a set are in another set.

JavaScript
const colors = new Set(['indigo', 'teal', 'cyan', 'violet']); const purpleish = new Set(['indigo', 'violet']); const secondary = new Set(['orange', 'green', 'violet']); console.log(purpleish.isSubsetOf(colors)); // true console.log(secondary.isSubsetOf(colors)); // false console.log(colors.isSubsetOf(colors)); // true

6. isSupersetOf()

Check if one set contains all the elements in another set: As good as swapping the two sets in isSubsetOf():

JavaScript
const colors = new Set(['salmon', 'cyan', 'yellow', 'aqua']); const blueish = new Set(['cyan', 'aqua']); const primary = new Set(['red', 'yellow', 'blue']); console.log(colors.isSupersetOf(blueish)); // true console.log(colors.isSupersetOf(primary)); // false console.log(colors.isSupersetOf(colors)); // true

7. isDisjointFrom()

isDisjointFrom: Do these sets share zero common elements?

JavaScript
const ai = new Set(['python', 'c++']); const mobile = new Set(['java', 'js', 'dart', 'kotlin']); const frontend = new Set(['js', 'dart']); console.log(ai.isDisjointFrom(mobile)); // true console.log(mobile.isDisjointFrom(frontend)); // false

Use them now

With core-js polyfills:

Otherwise you get blasted with errors from TypeScript & Node.js — they’re not yet in the official JavaScript standard.

Wrap up

So these are our 7 new Set methods — no more need for 3rd parties like _.intersection() (Lodash!)

JavaScript
const unique = new Set(['salmon', 'cyan', 'cherry', 'aqua']); const blueish = new Set(['cyan', 'aqua', 'blue']); const primary = new Set(['red', 'green', 'blue']); console.log(unique.union(blueish)); // Set { 'salmon', 'cyan', 'cherry', 'aqua', 'blue' } console.log(unique.intersection(blueish)); // Set { 'cyan', 'aqua' } console.log(unique.difference(blueish)); // Set { 'salmon', 'cherry' } console.log(unique.symmetricDifference(blueish)); // Set { 'salmon', 'cherry', 'blue' } console.log(primary.isSubsetOf(unique)); // false console.log(new Set(['red', 'green']).isSubsetOf(primary)); // true console.log(unique.isSupersetOf(new Set(['salmon', 'aqua']))); // true console.log(unique.isSupersetOf(blueish)); // false console.log(unique.isDisjointFrom(primary)); // true console.log(unique.isDisjointFrom(blueish)); // false

The genius algorithm behind ChatGPT’s most powerful UI feature

Yes it’s ChatGPT, the underrated + overrated chatbot used by self-proclaimed AI experts to promote “advanced skills” like prompt engineering.

But this isn’t a ChatGPT post about AI. It’s about JavaScript and algorithms…

Message editing; a valuable feature you see in every popular chatbot:

  • Edit our message: No one is perfect and we all make mistakes, or we want to branch off on a different conversation from an earlier point.
  • Edit AI message: Typically by regeneration to get varying responses, especially useful for creative tasks.

But ChatGPT is currently the only chatbot that saves your earlier conversation branches whenever you edit messages.

Other chatbots avoid doing this, probably due to the added complexity involved, as we’ll see.

OpenConvo is my fork of Chatbot UI v1, and this conversation branching feature was one of the key things I added to the fork — the only reason I made the fork.

Today, let’s put ourselves in the shoes of the OpenAI developers, and see how to bring this feature into life (ChatGPT’s life).

Modify the chatbot to allow storing previous user and AI messages after editing or regeneration. Users can navigate to any message sent at any time in the chat and view the resulting conversation branch and sub-branches that resulted from that message.

Just before we start this feature we’ll probably have been storing the convo as a simple list of messages👇. It’s just an ever-growing list that keeps increasing.

The 3 main functional requirements we’re concerned with, and what they currently do in a sample React app.

  • Add new message: add item to list.
  • Edit message: Delete this and all succeeding messages, then Add new message with edited content.
  • Display messages: Transform list to JSX array with your usual data -> UI element mapping.

But now with the conversation branching feature, we’re going have some key sub-requirements stopping us from using the same implementation

  • Every message has sibling messages to left and/or right.
  • Every message has parent and child message to top and/or bottom.

We can’t use simple lists to store the messages anymore; we want something that easily gives us that branching functionality without us trying to be too smart.

If you’re done a little Algo/DS you’ll instantly see that the messages are in a tree-like structure. And one great way to implement trees is with: Linked Lists.

  • Every conversation message is a node. A single “head” node begins the conversation.
  • Every node has 4 pointers: prevSibling, nextSibling, parent, and child (←→ ↑ ↓) . Siblings are all on the same tree level.
  • Every level has an active node, representing the message the user can see at that branch.

We either branch right by editing/regenerating:

Or we branch down by entering a new message or getting a response:

The most important algorithm for this conversation branching feature is the graph transversal. Dearly needed to add and display the messages.

Here’s pseudocode for the full-depth transversal to active conversation branch’s latest message:

  1. Set current node to conversation head (always the same) (level 1 node)
  2. Look for the active node at current node’s level and re-set current node to it. This changes whenever the user navigates with the left/right arrows.
  3. If current node has a child, re-set current node to it. Else return current node.
  4. Rinse and repeat: Go to step 2.

Add new message

So when the user adds a new message we travel to the latest message and add a child to it to extend the current branch.

If it’s a new convo, then we just set the head node to this new message instead.

Edit message / regenerate response

There’s no need for transversal because we get the node from the message ID in a “message edited” event listener.

At the node we find its latest/right-most sibling and add another sibling.

Display messages

Pretty straightforward: travel down all the active nodes in the conversation and read their info for display:

In OpenConvo I added each node to a simple list to transform to JSX for display in the web app:

View previous messages

No point in this branching feature if users can’t see their previous message, is there?

To view the previous messages we simply change the active message to the left or right sibling (we’re just attending to another of our children, but we love them all equally).

With this we’ve successfully added the conversation branching feature.

Another well-known way to to represent graphs/trees is an array of lists; that may have an easier (or harder) way to implement this.

Loop through HTML child elements/nodes in JavaScript

In JavaScript, working with the Document Object Model (DOM) often involves iterating through child elements of a parent element. This technique is essential for tasks such as:

  • Manipulating elements based on their content or attributes
  • Dynamically adding or removing elements
  • Handling events for multiple elements

JavaScript offers several methods to achieve this, each with its own advantages and considerations.

Methods for looping

1. Use children property

  • Access the children property of the parent element to obtain a live NodeList of its direct child elements.
  • Iterate through the NodeList using a for loop or other methods:
JavaScript
const parent = document.getElementById("myParent"); const children = parent.children; for (let i = 0; i < children.length; i++) { const child = children[i]; // Perform actions on the child element console.log(child.textContent); }

2. Use for..of loop

Directly iterate over the NodeList using the for...of loop:

JavaScript
const parent = document.getElementById("myParent"); for (const child of parent.children) { // Perform actions on the child element console.log(child.tagName); }

3. Use Array.from() method

Convert the NodeList into an array using Array.from(), allowing the use of array methods like forEach():

JavaScript
const parent = document.getElementById("myParent"); const childrenArray = Array.from(parent.children); childrenArray.forEach(child => { // Perform actions on the child element child.style.color = "red"; });

Key considerations

  • Live NodeList: The children property returns a live NodeList, meaning changes to the DOM are reflected in the NodeList.
  • Text Nodes: The children property includes text nodes, while childNodes includes all types of nodes (elements, text, comments, etc.). Choose the appropriate property based on your needs.
  • Performance: For large DOM trees, using Array.from() might have a slight performance overhead due to array creation.

Choosing the right method

  • For simple iterations, the for...of loop or the children property with a for loop are often sufficient.
  • If you need to use array methods or want to create a static copy of the child elements, use Array.from().
  • Consider performance implications if dealing with large DOM structures.

By understanding these methods and their nuances, you’ll be able to effectively loop through child elements in JavaScript for various DOM manipulation tasks.

10 essential VS Code tips & tricks for greater productivity: Part 2

I’m back with 10 more powerful VS Code tricks to greatly enhance your productivity.

From rapid navigation to speedy code editing, these tips will help you achieve your coding goals faster than ever with a top-notch development experience.

1. Publish repo to GitHub in literal seconds

Do you remember this?

Or maybe you still do this?

It’s the old-school way of publishing your code to GitHub. Create a repo, enter name and details, create remotes…

With VS Code you don’t need to do this anymore. From the Source Control panel you can now quickly publish any local repo to GitHub in just 2 clicks.

And forget git init: creating the repo is even easier with a single click:

You can safely forget about git init

Quickly commit with Ctrl + Enter:

Now easily publish your repo in seconds:

Okay this is definitely more than “seconds” — but that’s because I was somewhere with snail Internet! Ideally it should be like this:

Now we can enjoy our Sigma English rant directly on GitHub:

2. Workspaces for multi-codebase coding

There was a point when I couldn’t do without this feature.

And you won’t when your project is sprawling with numerous inter-connected codebases stored in different folders that all make an important part of the system.

In one of our projects, we had at least 3 folders.

  1. One folder for Firebase-y stuff: Functions, DB security rules, and more.
  2. One folder for the Next.js website/app.
  3. One folder for the cross-platform app codebase.

Imagine the pain of having to switch back and forth between these in 3 open VS Code windows; opening terminals here and there, searching for the wrong file in the wrong codebase, mixing up your Alt + Tab sequence with other open apps, along with the mental confusion and delay it causes anytime you switch apps.

And don’t forget this 👇. This is a pain.

The pain of clicking twice and having to select the correct window based on their titles.

This is why we need workspaces — one window with all the files and subfolders you need.

Sidenote: And if you’re a Windows user struggling to manage your File Explorer you probably want to try this tiny utility (WinENFET).

Every folder is a workspace to VS Code, so you can easily add more folders with File > Add Folder to Workspace…

When everything is done you’ll have all the folders you need and their files easily accessible on the File Explorer pane.

And when you search for files with Ctrl + P or Ctrl + Shift + F, it’ll apply to every file in all the folders:

You can also rapidly create new terminals with any of the folders as the working directory.

With this and Win 11 22H2 Tabs we’ve easily cut our open windows in half.

3. Power editing with side-by-side view

And when you need to work with multiple of those workspace files at once? Split mode has you covered.

I once ported a Flutter Dart class to its JavaScript equivalent and this feature made things much easier and faster.

You can also do this with one of the View: Split Editor... commands.

Split them down or split them right:

Master coder at work.

VS Code also uses this split view to show changes between different file versions saved in the Timeline view or source control.

4. Rapidly copy any line

In most text editors you would drag your mouse over the line and Ctrl + C.

But VS Code is not like most text editors; it’s a clean productivity beast! If not for the name I wouldn’t even have believed this came from Microsoft at first glance.

To copy a line just move the cursor to it and press Ctrl + C.

Whenever you do need to highlight the line you can always use Ctrl + L:

Press it again to highlight more lines below.

And when you just want part of the line you can use Shift + Left / Right to highlight one way or the other.

You can also use Ctrl + X to quickly cut the line where the cursor is without any highlighting.

5. Move line up and down

But if you’re cutting just to paste somewhere else in the same file, then there’s no need to pollute the clipboard.

Simply use the Alt + Up/Down to move the line to wherever you want:

You can even move large selections of multiple lines up and down.

Including code folds:

6. Code folding for monstrous files

I found this invaluable for those gigantic files with tons of functions and methods. Or a huge Flutter or JSX component with unbelievable amounts of deep nesting.

Why some people hate Flutter/Dart

By clicking those down-facing arrows you can easily collapse various segments of the code you’re not currently working with.

Better still the Ctrl + Shift + [ has us covered.

And Ctrl + Shift + [ has us uncovered.

7. Bird’s eye with Outline view

The Outline View is another brilliant way to keep track of large code files.

This feature gives a broad overview of all the symbols and nested symbols in the file: variables, classes, functions… you name it.

You can sort the top-level symbols shown by their position, name, or type.

And when you’re moving around a lot you probably want to keep the Follow Cursor option turned on, to make the selected symbol in the outline match the selected symbol in the file:

Normally you’ll find this view in the File Explorer pane along with Open Editors and Timeline, but as I started using them more often for my own monstrous files I moved it to a separate pane:

8. Go to symbol quickly

And when we stubbornly refuse to split up the file and it gets HUGE; so huge that navigating through the *outline* is becoming a chore, then it’s time to: Go To Symbol.

With the Ctrl + P, @ shortcuts.

And when we finally do the sensible thing and break up the file, we can still search across all those files and more, with Ctrl + T:

9. Go to definition

And once you get to a symbol, you can easily view the definition with Alt + Click or F12:

Double-click the definition popup to fully open the file:

10. Undo cursor quickly

After going to a symbol or viewing its definition we’ll probably want to return to where we were just a few moments prior.

Instead of wasting time relying on short-term memory, you can rest assured that the Ctrl + U keyboard will take you to exactly where you were before.

This is also essential when you go to a line by Ctrl + G.

These 10 powerful tips will elevate your efficiency and make day-to-day coding life easier and more enjoyable.

Key takeaways

  1. Create and publish a GitHub repo in seconds from the Source Control Panel (open with Ctrl + Shift + G G).
  2. Manage multiple folders in a workspace with File> Add Folder to Workspace....
  3. Code with multiple files at once with the View > Split Editor....
  4. Quickly copy a line with Ctrl + C.
  5. Move a line or up or down with Alt + Up / Down.
  6. Collapse code blocks and nested JSX with Ctrl + Shift [.
  7. View all symbols in a file at once with Outline View
  8. Search all symbols in the file with Ctrl + P, @, search in workspace with Ctrl + T
  9. Go to where a symbol was definite with Ctrl + Click or F12.
  10. Revert cursor to previous location with Ctrl + U.