Why [‘1’, ‘5, ’11’].map(parseInt) returns [1, NaN, 3] in JavaScript
Alex, the self-proclaimed coding whiz, prided himself on quick hacks and short code.
Despite being very new to the industry, he always saw himself as superior to the rest of the team, stubbornly doing whatever he felt like; all their well-meant advice falling on deaf ears.
But Alex was soon to meet his catastrophic downfall. A painful, humbling experience he would never forget.
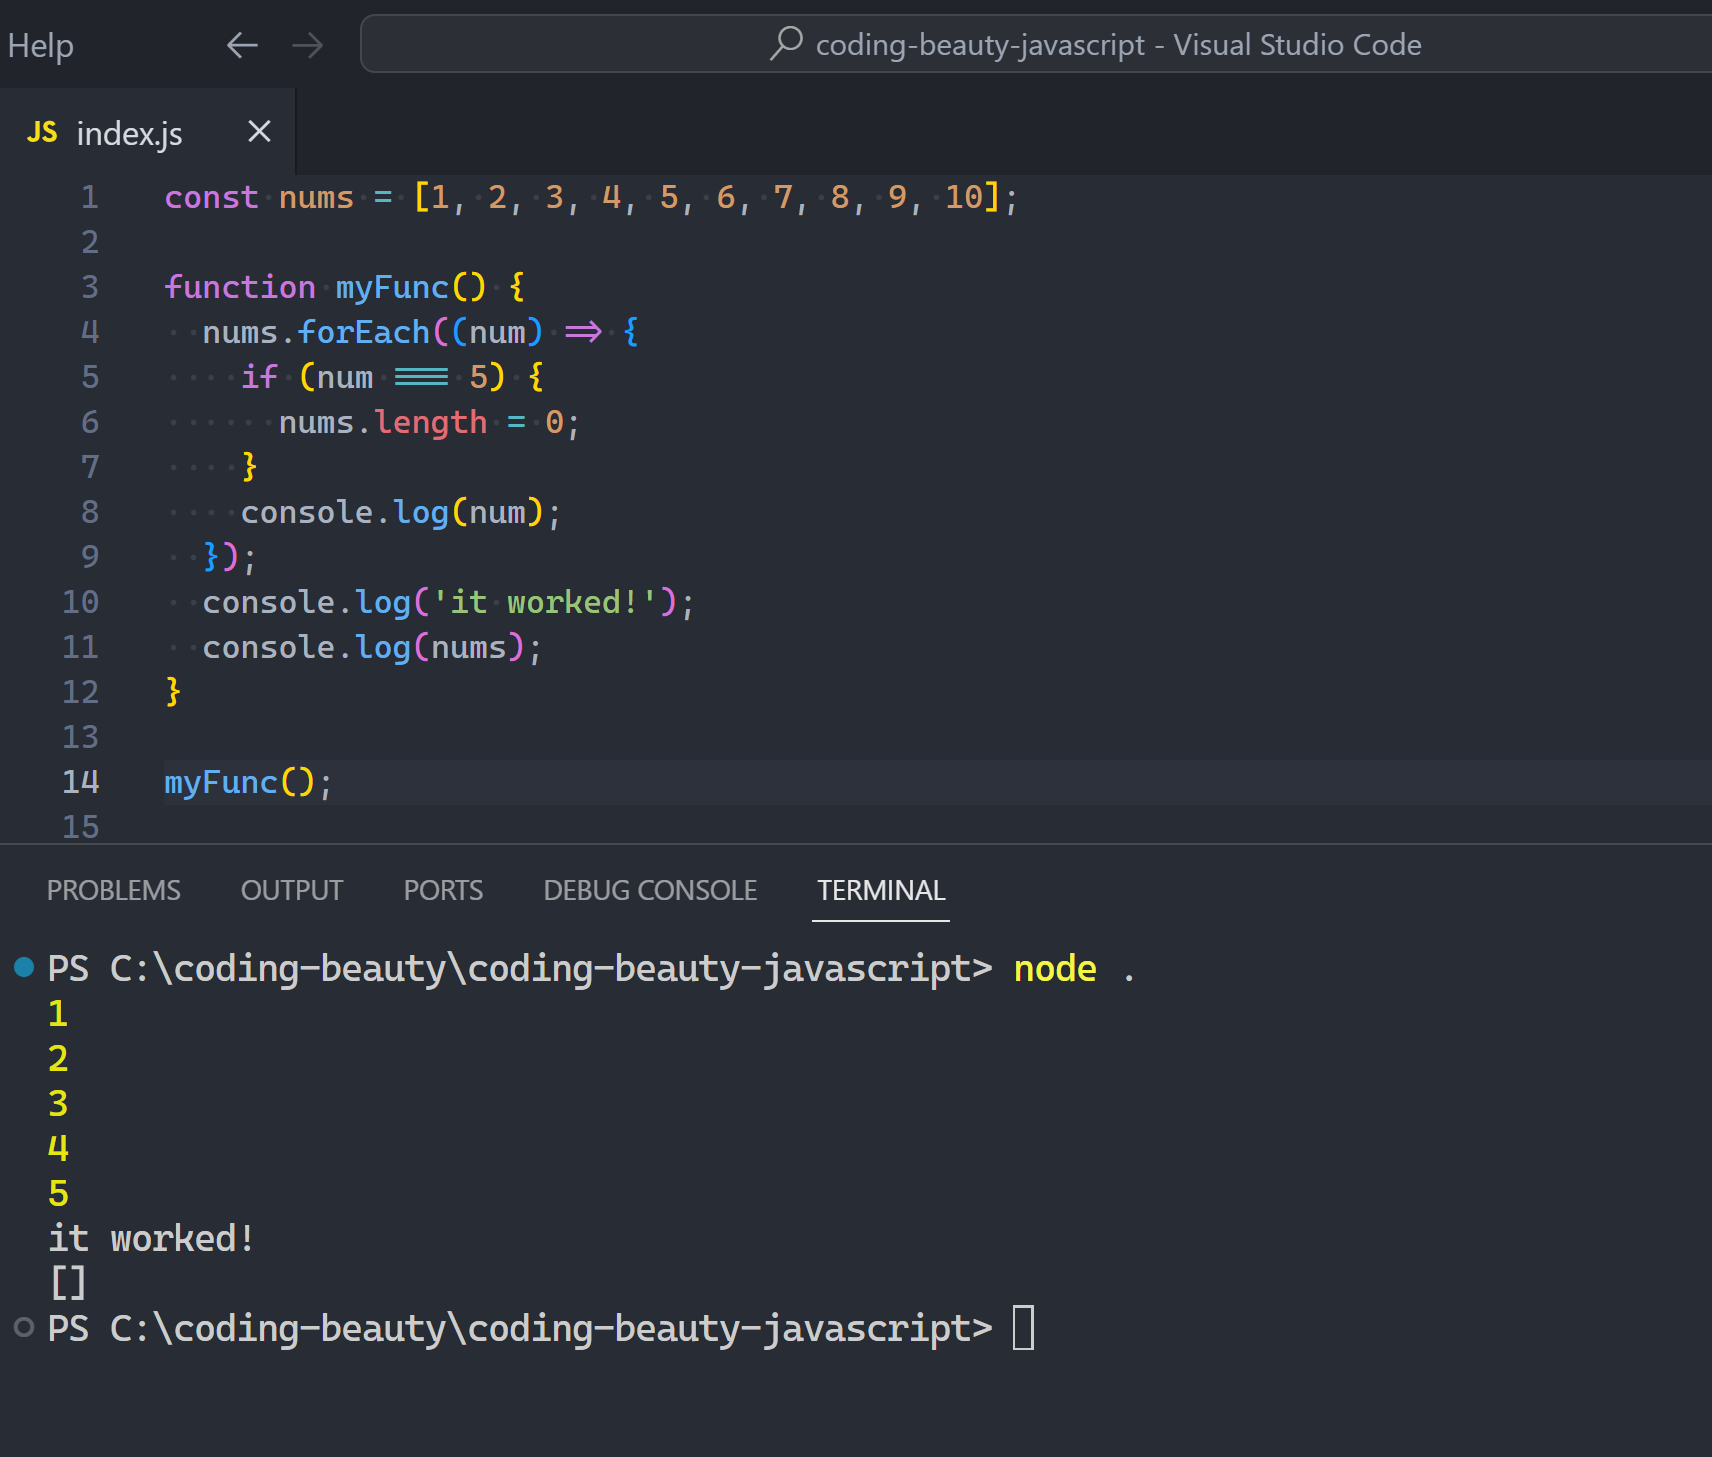
It all started when Alex and Cody were assigned a project task. To let users view the products for the ongoing eCommerce website the team had been working on.
They were still in startup phase so all the data was stored and updated in a CSV file.
The product name, price, quantity… all the usual stuff you’d see on sites like Amazon.
Alex arrogantly scoffed when he learned of the planned collaboration.
“I don’t need to work with ANYONE okay?” He smirked at Jake, the good-natured head of engineering, as he typed on his PC. “It’s literally just to fetch from the DB and show in the JSX”.
“Alex you need to learn how to work with others, I keep telling you this.”, Jake responded with a patient, forced smile. He was used to this man’s self-obsessed antics.
“I don’t need to work with anyone, I can do this alone. Cody will only slow me down with all his nonsense talk about readable code”.
“Cody is one of our best and takes his time for a reason. I keep telling you it’s not all about writing code quickly or concisely…”.
“You always keep telling me things but you NEVER listen to me. I just want to work on my own this time, okay?”. “Please?”, Alex quickly added to avoid sounding too rude — keeping that snobbish smirk on his face of course.
Jake sighed.
“Alright, I’ll let you work you alone if you can convert this string array”, as he wrote on a nearby sheet of paper, “to the same array of numbers”.
Alex couldn’t believe it. On the paper was a simple array.
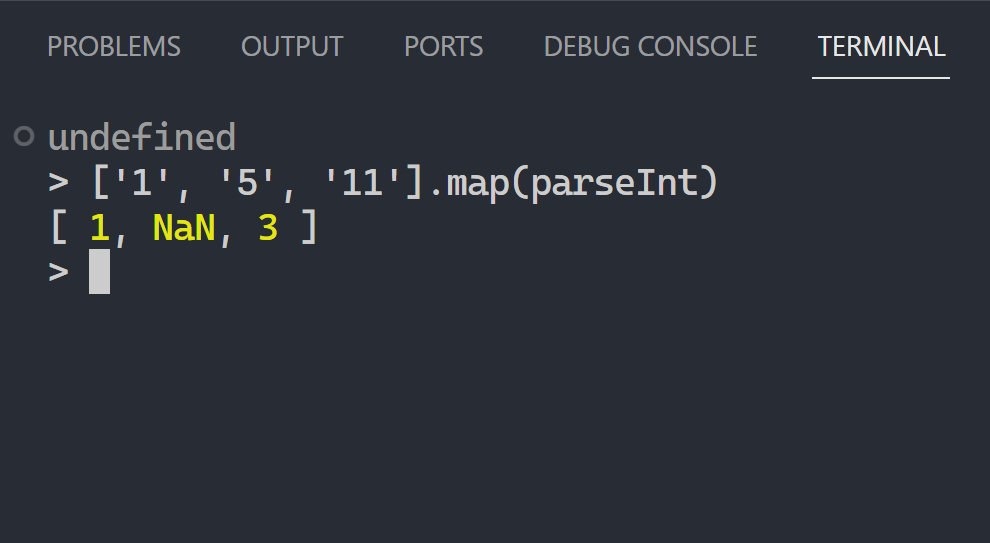
['1', '5', '11']This had to be a trick question. He looked up at Jake suspiciously.
“Seriously? How dumb do you think I am that I can’t parse this?”
“Do it, you only get one chance”. Jake deserved a self-control medal for his astounding patience with this youngster.
With a smug look on his face, Alex opened up a new VS Code terminal and smugly typed out the seemingly obvious solution in Node:
['1', '5', '11'].map(parseInt)He smirked triumphantly, only to turn and see a knowing smile on Jake’s face — he was thrown off balance instantly.
“You sure about that Alex? Why don’t you press Enter and let’s see what the resulting array actually is”.
A little unsure of himself, he scanned through the short CLI code to ensure absolute certainty, before the final moment.
What he saw next shook him to his very core.

How on earth was this possible? Was parseInt broken? Was there a bug in map()?
He looked up frantically, eliciting a sharp, unnerving laughter from Jake.
“Alex, you’re fired”.
“WHAT?!”, Alex screamed.
“Pack your things and get out of here before I close and open my eyes, you arrogant buffoon!”
…
You see, Alex’s downfall was NOT his failure to understand map and parseInt — though that could have helped.
It was his obsession with making code as short as possible, at the expense of readability and clarity…
The fact is in 99% of cases this is how we use map and parseInt
const doubles = ['1', '5', '11'].map((num) => num * 2);

console.log(doubles); // [2, 10, 22]

const num = parseInt('5');

console.log(num); // 👍 5 -- not NaN!
But you may be shocked at what happens when you use map with console.log:
const doubles = ['1', '2', '3'].map(console.log);It logs 3 pairs of numbers for each item!

That’s because the map() callback actually takes 3 arguments:
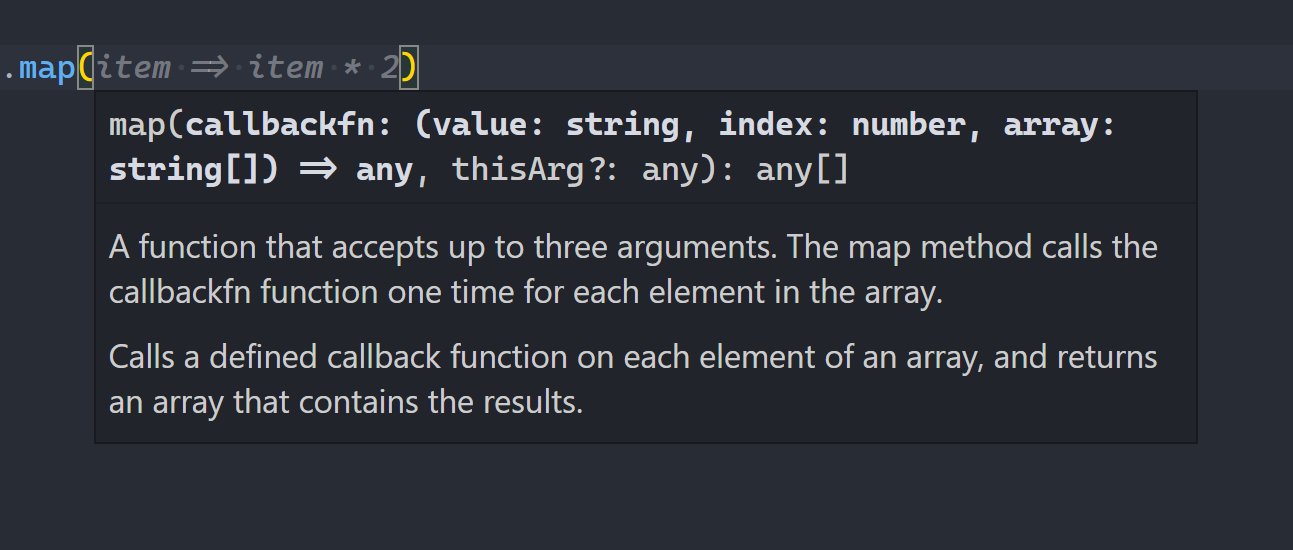
So you’re actually calling parseInt with 3 args:
// parseInt take 2 args max but JS compiler doesn't complain
['1', '5', '11'].map(parseInt)

// parseInt('1', '0', ['1', '5', '11'])
// parseInt('5', '1', ['1', '5', '11'])
// parseInt('11' '2', ['1', '5', '11'])
Alex never knew that parseInt takes either 1 or 2 arguments and behaves differently for each:
When there’s a 2nd arg it becomes a base for the 1st number arg:
// 👇 invalid positive number, ignore
parseInt('1', '0'); // 1 ✅

parseInt('3', 'blah blah'); // 3

// 👇 invalid base (1)
parseInt('2', '1'); // NaN

parseInt('5', '1'); // NaN ✅

// 👇 '10' is 2 in base 2 (remember?)
parseInt('10', '2'); // 2

parseInt('11', '2'); // 3 ✅
Despite his average knowledge of map and parseInt, he could have avoided all of these by simply being explicit:
['1', '5', '11'].map((num) => parseInt(num));Shortening code can be great for reducing clutter but we should always prioritize clear and readable code:
Especially when the added length is not that big of a deal, you know?
async function setTimeout() {
  // ❌
  await new Promise((resolve) => setTimeout(resolve, 1000));
  console.log('Coding Beauty');
}


async function setTimeout() {
  // // ✅
  await new Promise((resolve) => setTimeout(() => resolve(), 1000));
  console.log('Coding Beauty');
}