Tari Ibaba is a software developer with years of experience building websites and apps. He has written extensively on a wide range of programming topics and has created dozens of apps and open-source libraries.
Unsound null safety was a special Dart/Flutter feature where there are no static checks to ensure that we don’t access nullable variables – variables that may be null.
It allowed developers to migrate their codebase to the default null safety gradually without breaking existing code that depended on null-unsafe libraries.
But from version 3.0 upwards, Dart only supports code using sound null safety.
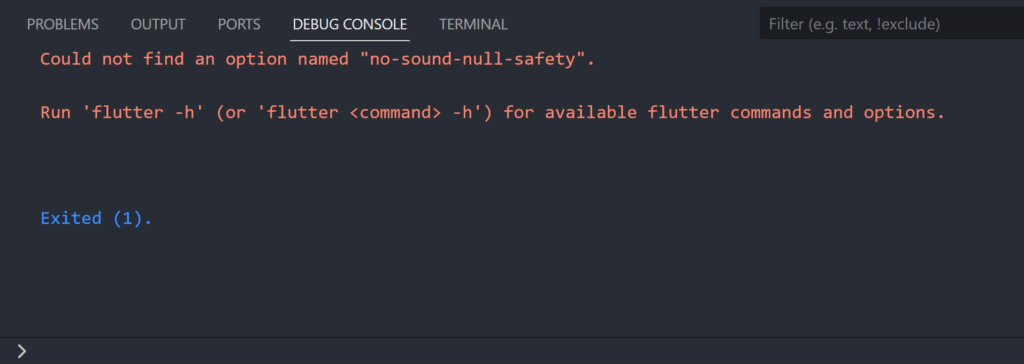
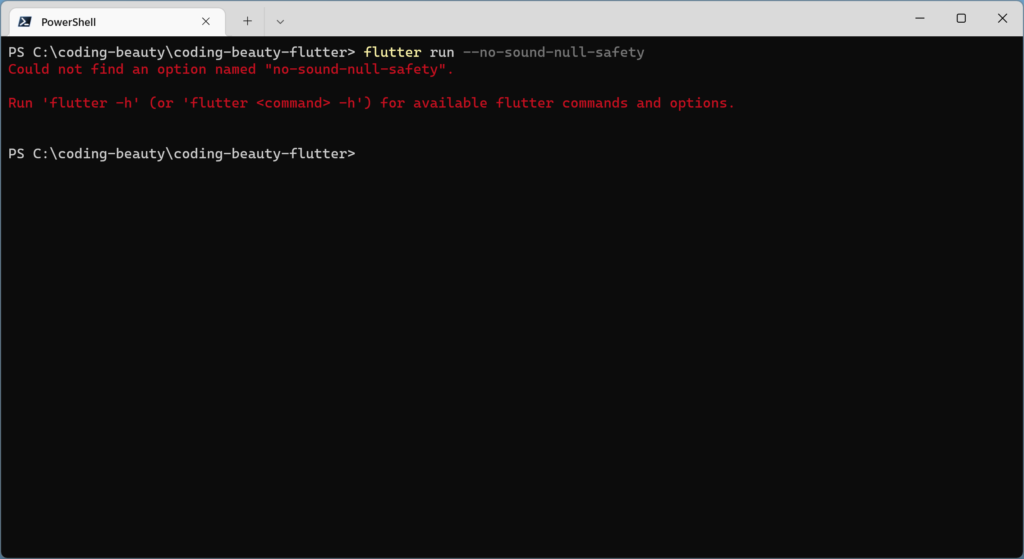
Fix “Could not find an option named no-sound-null-safety” (general)
To fix the “Could not find an option no-sound-null-safety” Flutter error, remove the --no-sound-null-safety option in your flutter run command.
Fix “Could not find an option named no-sound-null-safety” in VS Code
To fix the error in Visual Studio Code remove the --no-sound-null-safety option in the Dart: Flutter Additional Args setting.
You can use the Ctrl + , keyboard shortcut to quickly open the Settings page.
You can also install the package as a development dependency, which indicates that the package is only used for development, and won’t be needed by the app itself. Packages like nodemon and ts-node fit this category:
If it’s a third-party module, installing the type definitions from NPM should help. For example:
JavaScriptCopied!
npm i @types/express
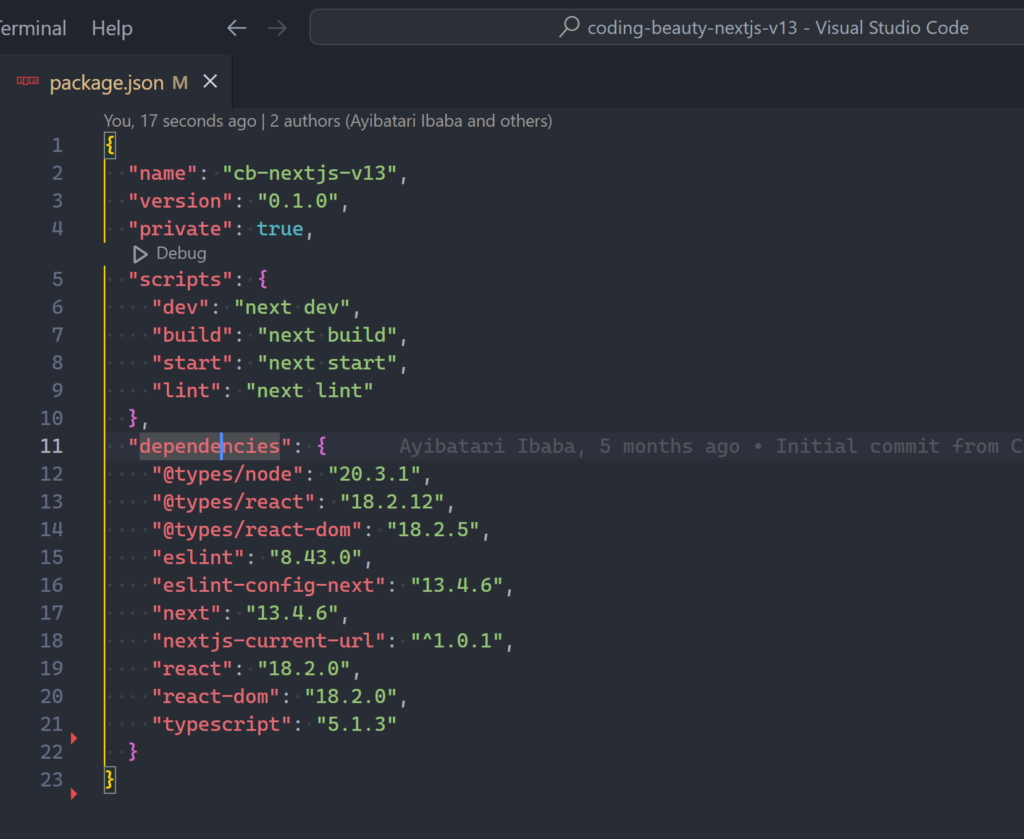
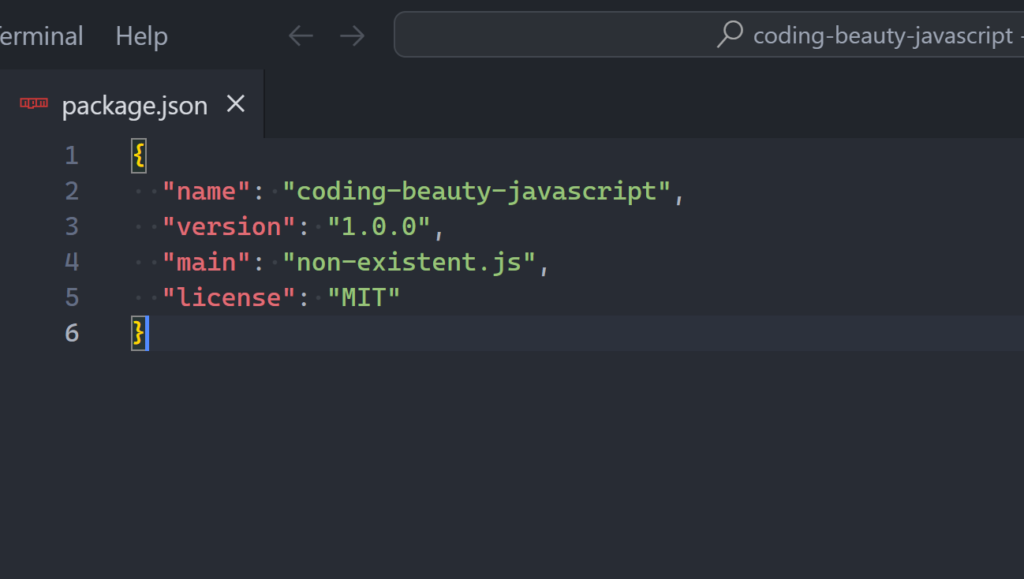
5. Ensure package.jsonmain file exists
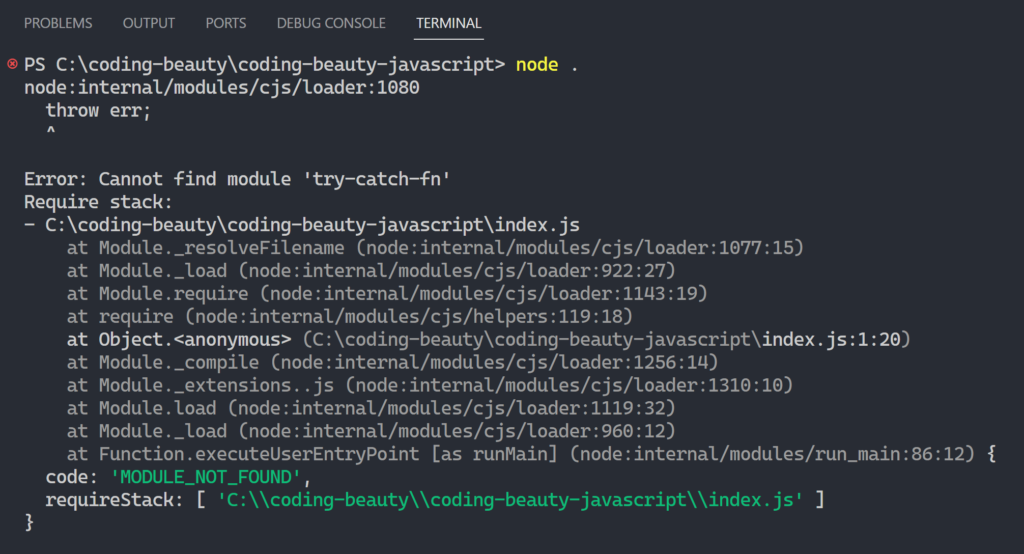
You may encounter the “Cannot find module” error in Node.js if the main field of your package.json file doesn’t exist.
6. npm link package
You can also try the npm link command on the package to fix the MODULE_NOT_FOUND error, for example:
ShellCopied!
npm link create-react-app

npm link webpack
npm link is a command that connects a globally installed package with a local project using a symbolic link.
It enables working on a package locally without publishing it to the npm registry or reinstalling it for every change. Executing npm link in the package directory establishes a symbolic link in the global node_modules directory, directing to the local package.
Afterwards, npm link <package-name> can be used in the project to link the global package with your local project.
7. Ensure correct NODE_PATH
In older Node.js versions, you may be able to fix the “Cannot find module” error by setting the NODE_PATH environment variable to correct node_modules installation folder.
NODE_PATH is a string of absolute paths separated by colons used by Node.js to locate modules when they can’t be found elsewhere.
It was initially created to enable the loading of modules from different paths when there was no defined module resolution algorithm.
And it’s still supported, but it’s not as important anymore since the we’ve established a convention for finding dependent modules in Node.js community.
To fix the “Command not found” error in a VS Code extension, make sure your extension registers the command under the contributed field in your package.json file:
2. Register command in package.jsonactivationEvents
To fix the “Command not found” error in a VS Code extension, make sure you’re added the command to the activationEvents array in your package.json file:
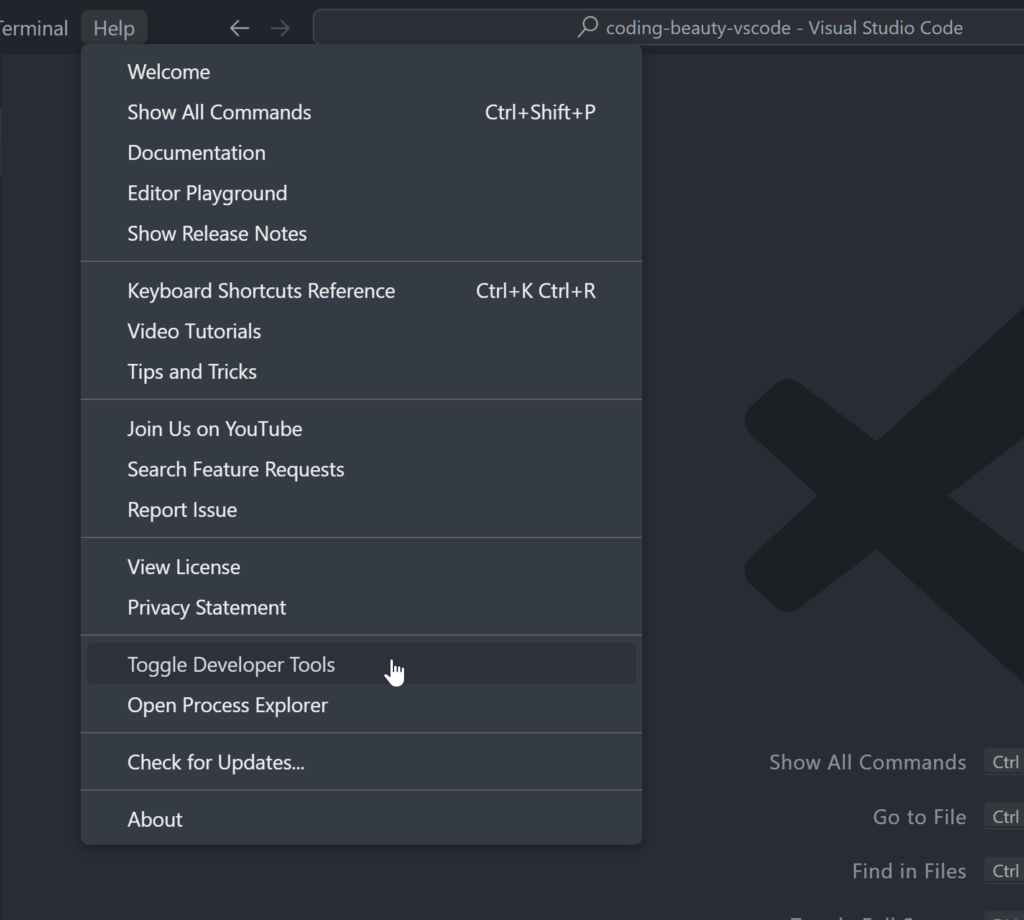
One common cause of “Command not found” error in a VS Code extension is an undetected JavaScript error. You may find such errors when you examine the VS Code console logs.
Head to the Help menu and select Toggle Developer Tools and inspect the console for potential errors.
4. Register command in extension.tsregisterCommand()
To fix the “Command not found” error in a VS Code extension, make sure you’re registered the command in extension.ts using vscode.commands.registerCommand():
JavaScriptCopied!
// ...

export async function activate(context: vscode.ExtensionContext) {
  // ...

  // commandAction is a callback function
  context.subscriptions.push(
    vscode.commands.registerCommand('command_name', commandAction)
  );

  // ...
}
5. Compile TypeScript source manually
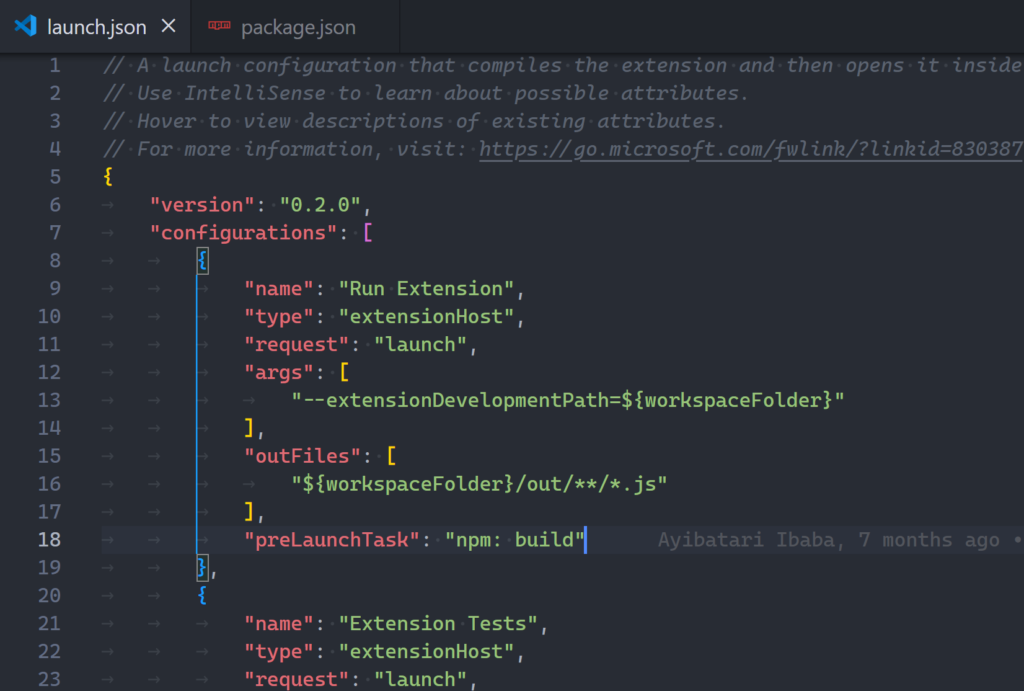
The “Command not found” error happens in a VS Code extension if the TypeScript source wasn’t compiled to the out folder before launch or build.
This typically indicates a problem with your VS Code debug configuration, for example, preLaunchTask may be missing from launch.json:
launch.json should have a preLaunchTask which builds the TypeScript files automatically.
Or there may be a problem with the build script in package.json.
To fix the “Command not found” error in an extension, update VS Code to a version higher that what is specified in the engines.vscode field of your package.json file.
Or, downgrade engines.vscode to a version equal to or lower than the VS Code version you’re using to run the extension.
The thing is many programmers simply don’t see how coding can be creative or intrinsically interesting.
And you know it’s not so easy to stay excited if your days revolve mostly around building apps that do little more than fetch data from a database and display it to the users for them to change.
That can become so repetitive after a while, even worse when you’re using the same tech stack over and over.
Not any better when you find yourself constantly copying and pasting from StackOverflow — programming becomes a little more than a routine chore, rather than an intensive exercise promoting genuine problem-solving and creativity.
And maybe your job demands that you act this way – with all the dry business requirements and the tight deadlines.
But this won’t help you reap the great joys that abound in programming or experience the satisfaction and empowerment that come from solving complex problems and creating something from nothing.
To gain the maximum emotional benefits, you must focus on the process as much as the goal and realize that coding is more than just a means to an end.
“Personal” creativity and mental engagement
What if we see coding as a creative art form that allows abstract thoughts and concepts to materialize into tangible and functional systems?
Making a mark on the broad canvas of our code editor with the paintbrushes of our programming languages and frameworks.
It may be hard to see a connection between coding and creativity when there are now well-established algorithms for just about every logical/mathematical problem that could crop up during development. It seems like there’s nothing new under the programming sun.
Yet I don’t see why this should matter. From the perspective of personal enjoyment, the only creativity that matters is personal creativity. The knowledge brought forth from your mind, compared to what’s already in there. Relative novelty: The difference what you’re subjectively aware of and what you’re not.
Just think of movies. Right now, Fast X is like the only Fast and Furious movie I’m yet to see.
And when I finally do get to see it, would it matter how many other thousands and millions of people have seen the movie? That they’ve had those new experiences doesn’t rob *me* of them – as long they don’t cough up spoilers.
What if you’re tackling a math proof or proving a complex theorem and you come up with some astoundingly brilliant solution? Even if the theorem was already well-known in the math community and proven solutions have existed since time immemorial, the fact is *you* never knew it. You will still experience mental engagement and positive challenges as you immerse yourself in the task.
That fiery spark of mental engagement igniting the depth of your intellect, kindling a boundless flow, carrying you for hours, transcending the realms of time — sleep becomes a distant memory. It’s a mesmerizing force holding you at the edge of your seat, empowering passion and unwavering dedication to your craft.
Contrary to what we usually believe, moments like these, the best moments in our lives, are not the passive, receptive, relaxing times—although such experiences can also be enjoyable, if we have worked hard to attain them. The best moments usually occur when a person’s body or mind is stretched to its limits in a voluntary effort to accomplish something difficult and worthwhile. Optimal experience is thus something that we make happen.
Mihaly Csikszentmihalyi, Flow: The Psychology of Optimal Experience
How to enjoy programming
To truly appreciate coding as more than just a mere job, but instead an exciting and fulfilling pursuit, it is important for us to find genuine pleasure and motivation in it, beyond the external rewards of monetary gain and fame.
1. Implement new algorithms
Yes you know quick sort and depth-first search but what about the thousands of other algorithms you’ve probably never heard of?
Read up on the high-level details of a particular named algorithm and try writing it yourself — and don’t use StackOverflow or any code completion tool for this one, because now the process matters as much as the goal.
Challenging yourself to learn and implement new algorithms keeps your brain active and promotes intellectual growth. It enhances your programming proficiency, providing you with a deep understanding of various languages and constructs.
By diving into the intricacies of algorithms, you’re peeling back the layers of abstraction present in many coding libraries, promoting a profound grasp of these underlying tools’ architectures and mechanisms.
This understanding and skill set encourage innovative thinking, enabling you to formulate new combinations or adaptations of these algorithms. Most importantly, the excitement and satisfaction derived from the successful execution of these complex codes can be quite exhilarating, adding pleasure to your programming pursuits.
2. Solve interesting word problems
It doesn’t matter whether it’s Math, Physics, or Programming.
Word problems are always an incredible way to challenge your cognitive functions especially as they test your ability to process all the information and convert it into software requirements and then into code.
You have to carefully break down various tasks into smaller, manageable components, and then identify the appropriate data structures, control structures, and operations needed to achieve all of them. Successfully going through all of these not only gives you a deep sense of accomplishment (which could vary depending on the complexity of the problem), but it also drastically improves your logic, abstraction, and critical thinking skills.
Where to find these types of problems?
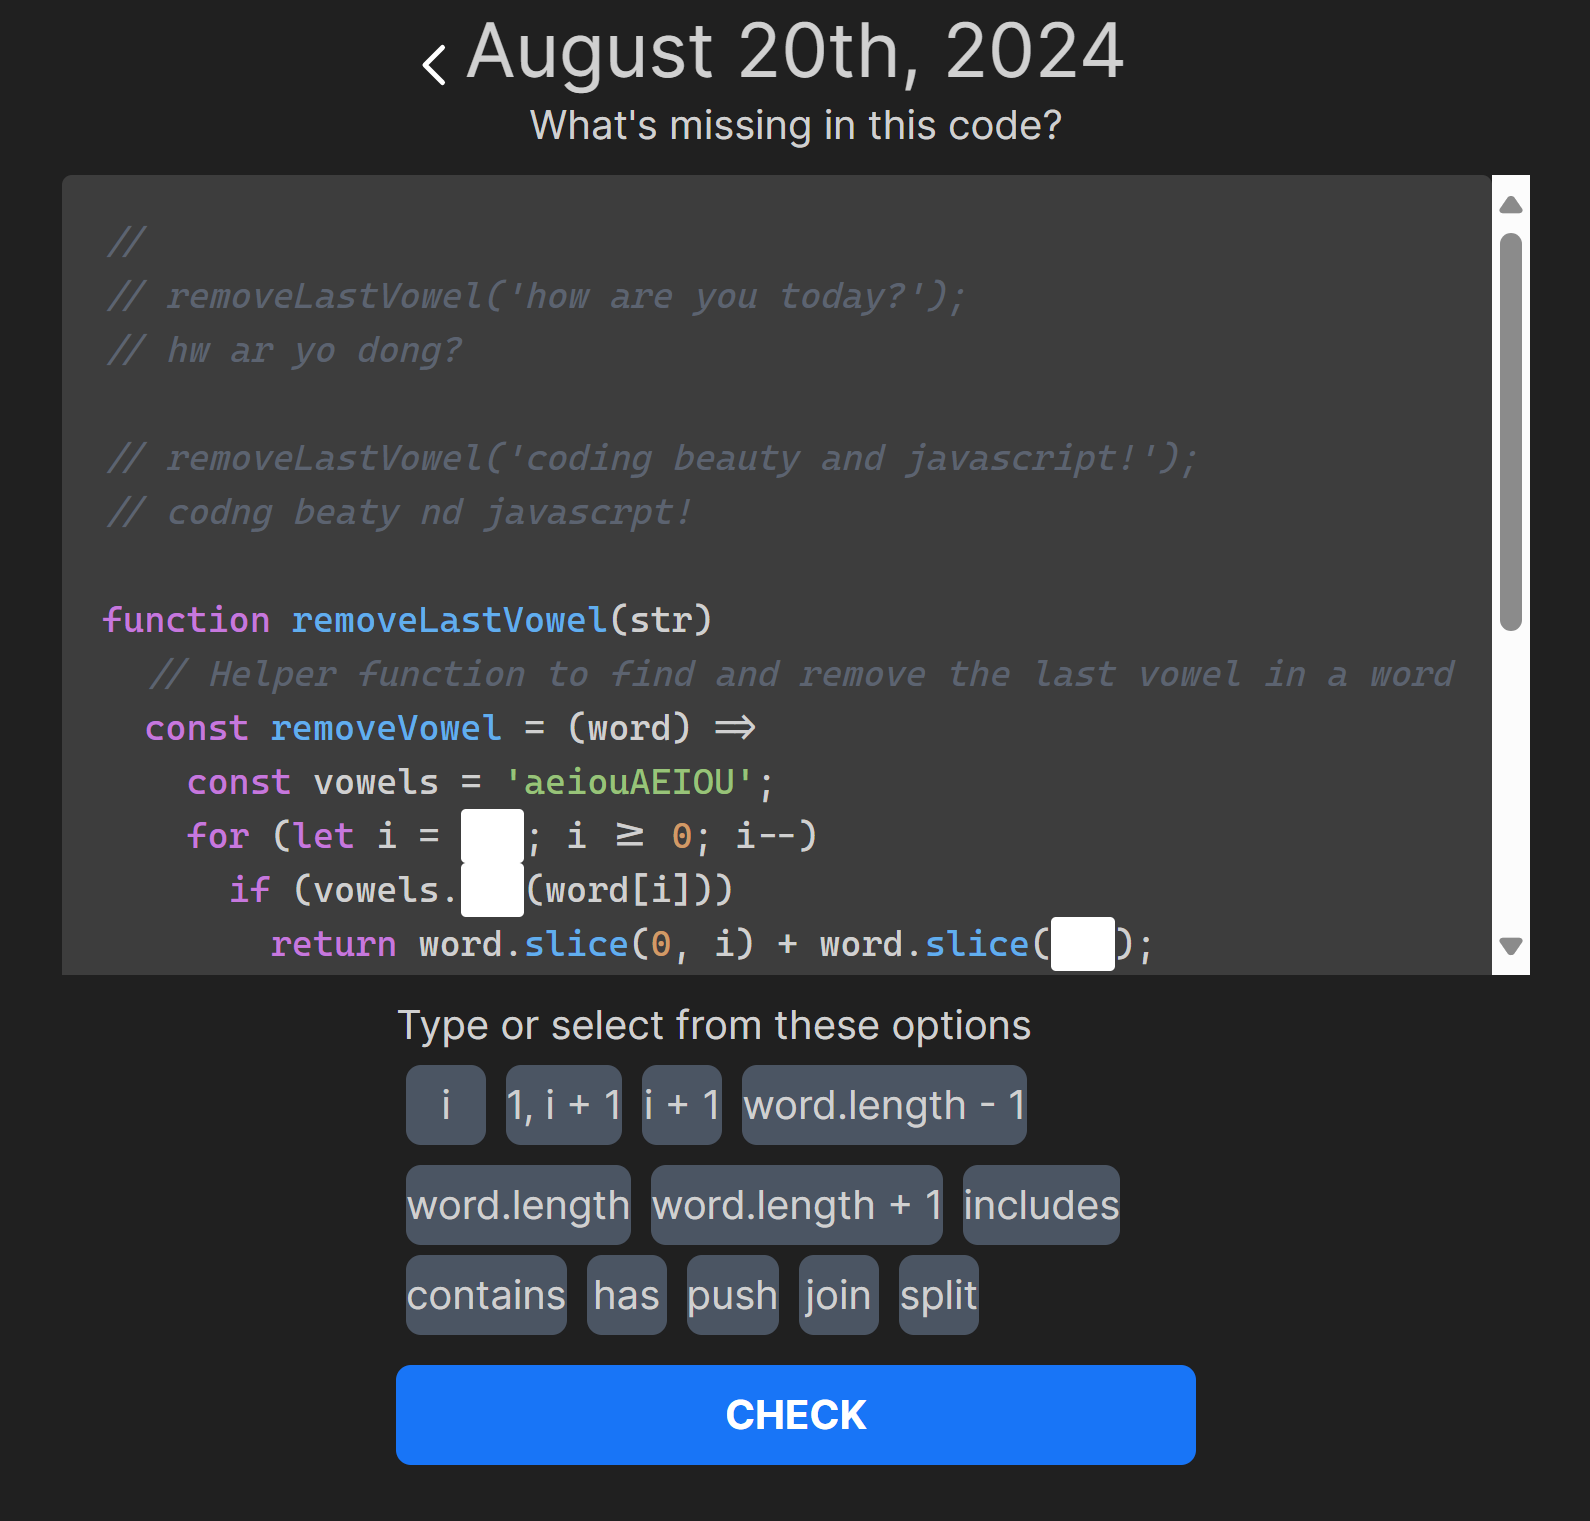
Coding Beauty Play is one — you’ll discover engaging puzzles that boost your coding skills, train your brain, and keep you mentally sharp.
Regularly updated with at least one new puzzle a week.
3. Create your own game
There’s no denying how cool they can be. Even addictive for some.
It’s not uncommon to hear stories of how the beauty and splendor of games were what inspired people to go into programming in the first place. Some of us even had albeit unrealistic but passionately ambitious game development goals – like I remember how I wanted to create my own 3D football game by myself at age 9 with pure C++.
Whether it’s a sci-fi movie or a hardcore game, there can be this magnificent technological blend of the most heartfelt art and the most sophisticated science, that intensely inspires you to absorb as much as you can about this marvelous world and be the most competent you can possibly be to create the most extraordinary creation you can ever imagine.
Apart from the beautiful virtual world that stands to emerge from your own mind with code, game dev is packed with a vast array of mathematical concepts, ranging from basic arithmetic to complex calculations in 3D space.
Game development demands unparalleled logical reasoning due to its complex system of interactions. We create comprehensive rules, anticipate design loopholes, safeguard player balance and progression, and sometimes much more. This rigorous logical exercise stimulates the mind and significantly enhances decision-making skills and logical competence.
Final thoughts
The summary of it all is challenge, novelty, and creativity.
Embrace programming as a journey of continuous learning and intellectual discovery, rather than a predictable routine task. Find joy in the art of coding, make room for personal creativity, and imbue your craft with your unique touch. Implement new algorithms, solve word problems, create your own games and ensure the process matters as much as the result. Stay passionately curious, break the routine, and enjoy the thrill of innovation.
The EAI_AGAIN error happens during an NPM, Yarn, or PNPM installation when the target server or DNS server doesn’t respond within a set time limit. This could happen due to network congestion, DNS server failures, or other connection issues.
Let’s explore some effective methods for quickly fixing the EAI_AGAIN error.
One simple and effective method can be to switch to a faster internet connection. Steer clear of activities that could consume additional data and leave less bandwidth for the package manager. This includes closing all unnecessary browser tabs and other data-consuming applications.
3. Retry command
Quite frequently, the EAI_AGAIN error can be temporary due to brief DNS server issues or network instability. Simply retrying the NPM/Yarn/PNPM command may solve the problem.
4. Clear package manager cache
In NPM and Yarn cache may also be a cause of the EAI_AGAIN error. Try retrying your command after clearing the cache with this command:
As with many other technical issues, sometimes a simple reboot of your computer or server can fix minor problems that may contribute to the error.
7. Disable VPN or proxy
Sometimes, using a VPN or proxy at the OS level makes your package manager have connection issues. In this case, try disabling your VPN or proxy and run the NPM/Yarn/PNPM command again.
8. Connect to another network
If you’re still facing the EAI_AGAIN error, switch to a completely different network. This can help bypass potential network-specific issues causing the error.
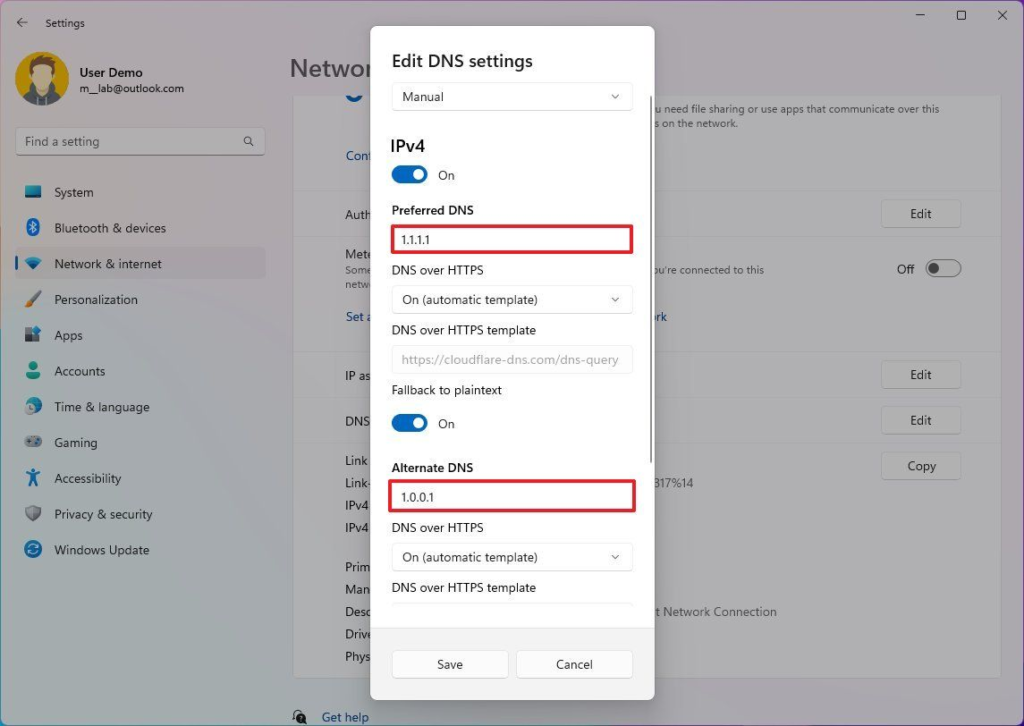
9. Flush DNS cache
Clearing your computer’s DNS cache can also help resolve DNS-related issues that may be causing the EAI_AGAIN error. On Windows, you can do this with ipconfig /flushdns. 4 Ways to Flush the DNS Cache to Fix Web Browsing Errors.
10. Release and renew IP address
Another plausible solution to the EAI_AGAIN error can be releasing and renewing your IP address. Your IP address is what connects your computer to your network, and sometimes a bad IP configuration could possibly cause network errors.
If the issue persists, try switching to a different NPM registry. For example, you can switch to the official NPM registry by running:
ShellCopied!
# NPM
npm config set registry https://registry.npmjs.org/

# Yarn Classic (v1)
yarn config set registry https://registry.npmjs.org/

# Yarn Berry (v2+)
yarn config set npmRegistryServer https://registry.npmjs.org/

# PNPM
pnpm config set registry https://registry.npmjs.org/
12. Temporarily disable antivirus or firewall
In some cases, security software like antivirus or firewall programs can interfere with network requests to NPM and cause the EAI_AGAIN error. Temporarily disable them and see if it resolves the issue.
13. Update package manager and Node.js
Make sure you are using the latest versions of Node.js and NPM, Yarn, or PNPM. You can update npm by running:
ShellCopied!
# NPM
npm i -g npm@latest

# Yarn
npm i -g yarn@latest

# PNPM
npm i -g pnpm@latest
14. Try again later
Finally, if none of the above works, it may be a temporary problem with the registry server – the only thing you can do in this case is to wait for a while and then retry. Patience can sometimes be the most effective solution.
Great news – OpenAI just released GPT-4 Turbo, an upgraded version of the GPT-4 model with a context window up to 128K tokens – more than 300 pages of text, and a fourfold increase in regular GPT-4’s most powerful 32K context model.
The company made this known at its first-ever developer conference, touting a preview version of the model and promising a production-grade GPT-4 Turbo in the next few weeks.
Users will be able to have longer, more complex conversations with GPT-4 Turbo as there’ll be more room to remember more of what was said earlier in the chat.
DALLE-3 prompt: “A beautiful city with buildings made of different, bright, colorful candies and looks like a wondrous candy land”
Also exciting to hear, GPT-4 Turbo is now trained on real-world knowledge and events up to April 2023, allowing us to build greater apps utilizing up-to-date data, without needing to manually keep it in the loop with custom data from embeddings and few-shot prompting.
Even better, the greater speed and efficiency of this new turbocharged model have made input tokens 3 times cheaper and slashed the cost of output tokens in half.
So, upgraded in capability, upgraded in knowledge, upgraded in speed, all with a fraction of the previous cost. That’s GPT-4 Turbo.
An innovative feature currently in preview, you can now pass image inputs to the GPT-4 model for processing, making it possible to perform tasks like generating captions, analyzing and classifying real-world images, and automated image moderation.
Then there’s the new DALL-E 3 API for automatically generating high-quality images and designs, and an advanced Text-to-speech (TTS) API capable of generating human-level speech with a variety of voices to choose from.
DALLE-3 outclasses Midjourney! Especially when it comes to creating complex images from highly detailed and creative prompts.
DALLE-3 (top) vs Midjourney (bottom). Prompt: “A vast landscape made entirely of various meats spreads out before the viewer. tender, succulent hills of roast beef, chicken drumstick trees, bacon rivers, and ham boulders create a surreal, yet appetizing scene. the sky is adorned with pepperoni sun and salami clouds”. Source: DALL-E 3 vs. Midjourney: A Side by Side Quality Comparison
And we can’t forget the ambitious new Assistants API, aimed at helping devs build heavily customized AI agents with specific instructions that leverage extra knowledge and call models and tools to perform highly specialized tasks.
It’s always awesome to see these ground-breaking improvements in the world of AI, surely we can expect developers to take full advantage of these and produce even more intelligent and world-changing apps that improve the quality of life for everyone.
The spread syntax (...) converts the set to an array for filter() to work.
The Set() constructor converts the result of filter() back to an Set.
Get symmetric difference between two sets
The method above only gives the elements in the second set that aren’t in the first.
JavaScriptCopied!
function getDifference(setA, setB) {
  return new Set(
    [...setA].filter((element) => !setB.has(element))
  );
}

const set1 = new Set([2, 4]);
const set2 = new Set([1, 2, 3, 4]);

// Every item in set1 is also in set2, but the sets are different
console.log(getDifference(set1, set2)); // {}
Sometimes you want this, especially if set2 is supposed to be a set1‘s subset.
But other times you may want to find the symmetric difference between the sets, regardless of which one comes first.
To do that, we simply merge the results of two getDifference() calls, each with the order of the Sets reversed.
JavaScriptCopied!
function getDifference(setA, setB) {
  return new Set(
    [...setA].filter((element) => !setB.has(element))
  );
}

function getSymmetricDifference(setA, setB) {
  return new Set([
    ...getDifference(setA, setB),
    ...getDifference(setB, setA),
  ]);
}

const set1 = new Set([2, 4]);
const set2 = new Set([1, 2, 3, 4]);

console.log(getSymmetricDifference(set1, set2)); // {1, 3}
console.log(getSymmetricDifference(set2, set1)); // {1, 3}
Yes, it’s no longer the recommended tool for starting React apps. Some of us were surprised, but many of us knew it was a long time coming.
There are much faster and leaner alternatives available today.
Why shouldn’t you use Create React App anymore?
Create React App was great.
Setting up React apps become as easy as ever without any need to bother with tedious Webpack and Babel configs. But despite the convenience, it had notable issues we just couldn’t ignore:
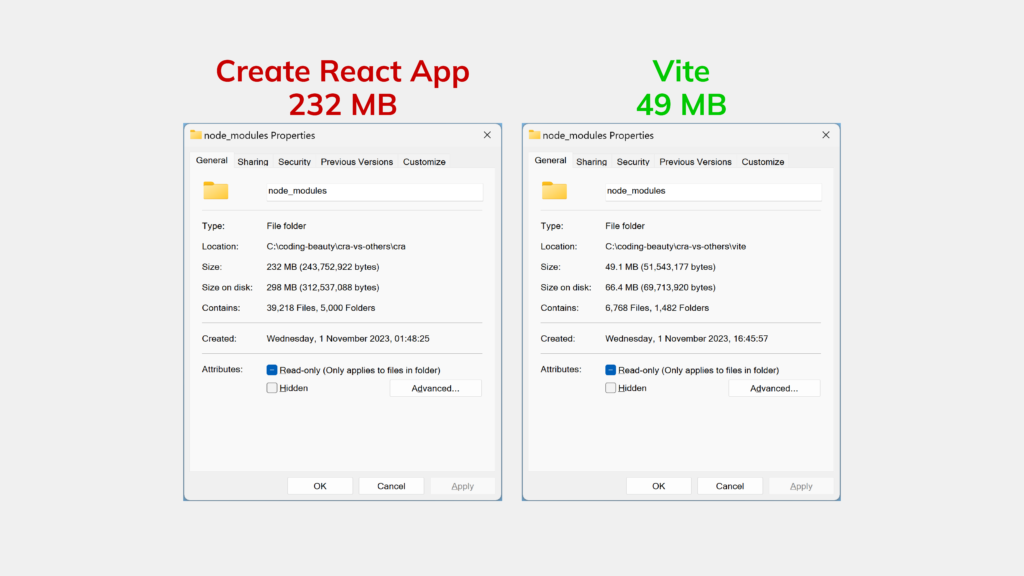
1. Bulky and slow
Create React App is a bloated tool.
It installs an unbelievable number of packages and takes forever to finish. If you’re a long-time CRA user like me, you’ve probably gotten used to this process, but it’s far from normal.
Once you enter the command to start a new project, you will quickly realize the insane number of packages CRA needs to set up.
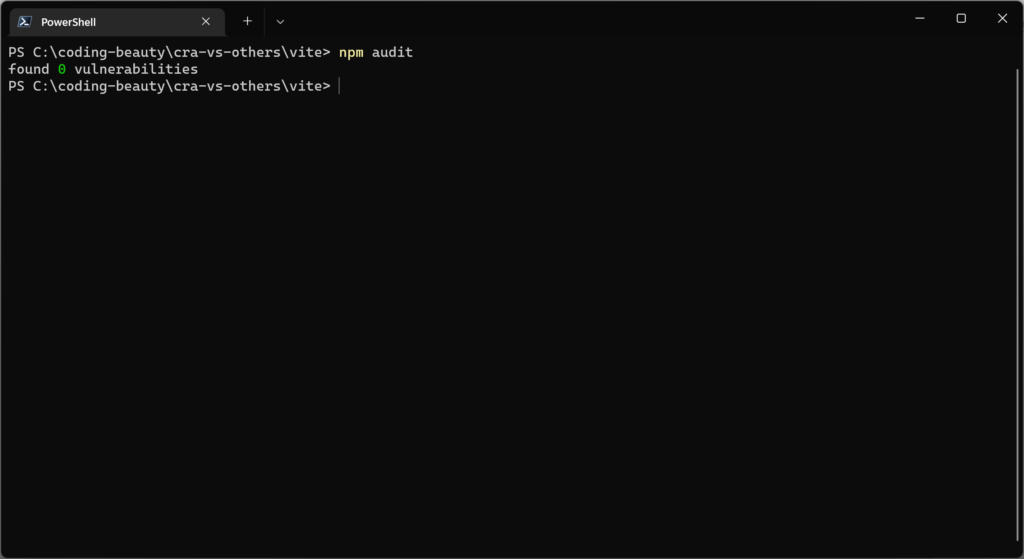
Look at how large the node_modules folder is for CRA compared to Vite, a superior alternative. And both folders were just newly set up.
Many packages mean longer install times, even if you’re using PNPM or Yarn 2.
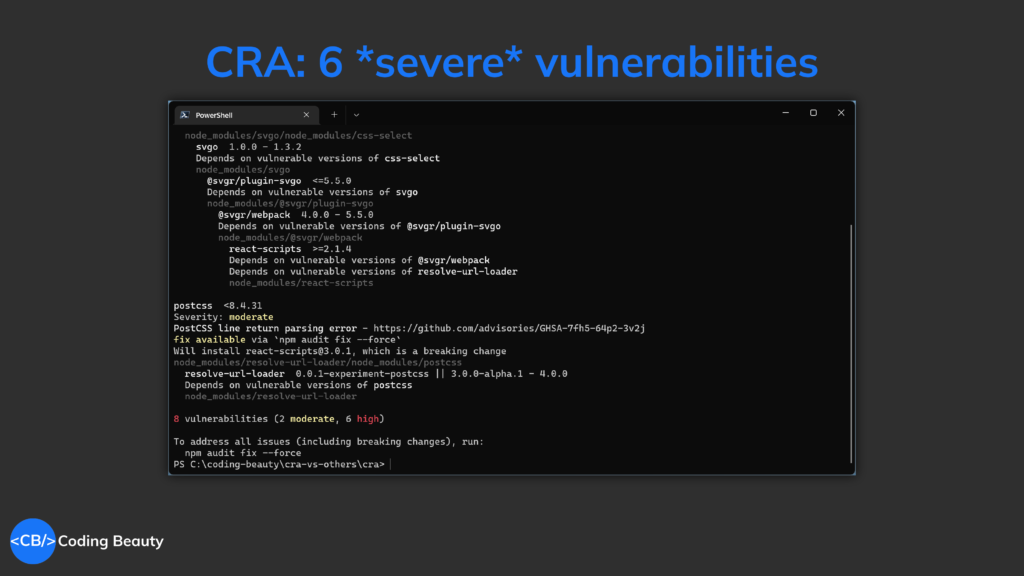
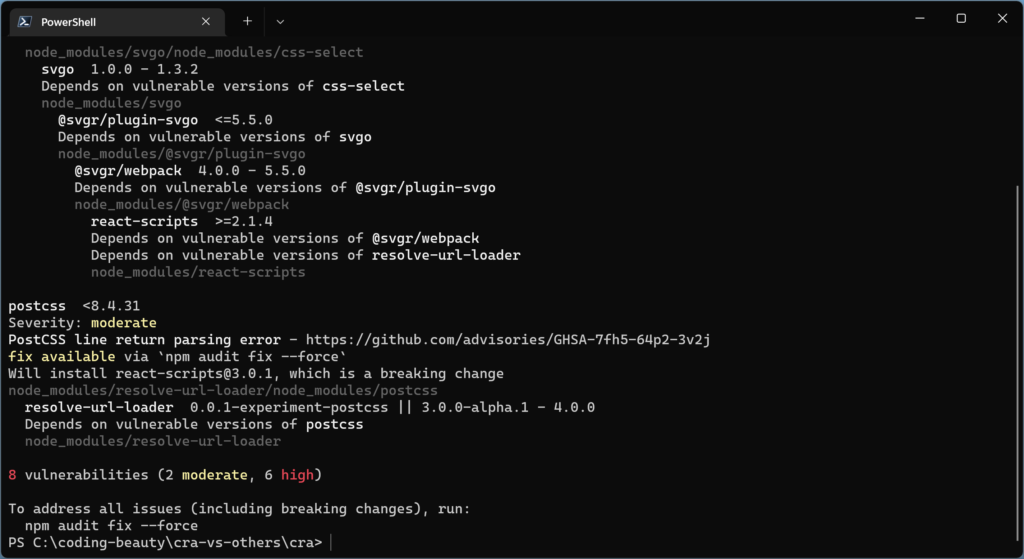
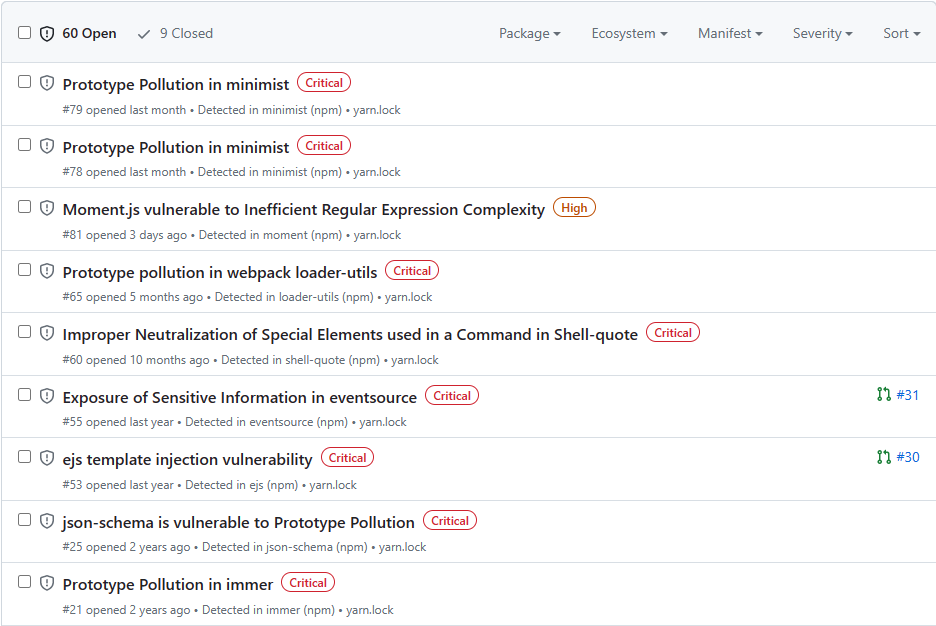
2. Insecure and outdated packages
Bundling so many packages makes it harder to keep track of them all, and many become abandoned and insecure later.
Things improved but any insecure package is something to worry about, and there are still quite a few.
8 high security vulnerabilities! And that’s even better than what it used to be.
In my GitHub repos using CRA, I get several Dependabot alerts at every turn – even from one of my first GitHub projects.
And they’re almost always about security flaws in packages CRA installed.
3. Limited customization options
Create React App is a black box.
To add new libraries and customize it you usually have to depend on libraries like Craco – heck, before CRA version 5, Craco was pretty much our only way to get Tailwind CSS support.
I remember my earlier days of creating various Electron + React desktop apps, where I had to install react-app-rewired just to set the target to 'electron-renderer' to access Node modules in the React part of the app.
For total control, you can always do npm eject, but of course, then you become responsible for all the dependencies installed by CRA, which has trade-offs that may not be worth it for you.
What to use instead of Create React App
Old habits die hard, sure.
If you’ve been hesitating to switch to a superior tool, hopefully, the React team dumping CRA should finally do it for you. There are far more modern and better-maintained alternatives out there; let’s check out some of the most popular ones:
It’s a zero-config bundler with no setup required, yet it’s still more flexible than Create React App.
Parcel supports all the latest web technologies, including React, Vue, and TypeScript, and it can bundle any type of asset, from images and CSS to HTML and JavaScript.
Plus, it has excellent performance, thanks to its use of worker threads, which allows it to parallelize tasks and speed up builds.
Parcel also has HMR support and is updated often with the latest features and optimizations like Vite. You can trust the team to keep up with the latest web technologies and best practices.
And what’s the result: your projects are built with the best tools available.
Webpack is still king if you know what you’re doing.
The level of control of flexibility it gives you is unmatched as there are a massive number of options you can set, far more than just path and filename.
Another benefit to note: Webpack can generate a development build without a local server, unlike Parcel and others.
This particular feature saved me when I was debugging React in a VSCode extension. Loading data from localhost didn’t work properly for a Webview; I had to build to a local file and read the contents.
With source maps enabled and dev mode turned on, I could easily see the exact line where the error occurred in the TS code. Unlike with Parcel, where all I got was a minified build.
Of course, setting up a Webpack config can be complex and more involved – which is why CRA came around in the first place. You must configure various options to get everything working perfectly.
But once you’re set-up, you’ll have a heavily personalized build process for your project. It’s a trade-off that may or may not be worth it for you.
Frameworks to replace Create React App
Need React’s state and UI capabilities without extras? The tools we’ve seen are great.
Want high-performance apps with advanced features like SSR? Then consider frameworks with built-in routing, data fetching, etc.
Another SSR-enable framework with powerful data features like:
Intelligent network error handling
Parallel fetching of CSS, JavaScript, and other assets to save time
Automatically ensuring the UI data is in sync with the server data after a user action.
One stand-out Remix feature is nested routes, which makes it possible to associate a specific section of a page with a particular route segment so that only that section updates when the route segment changes. This accelerates page transitions as no time is wasted re-rendering the entire page.
Gatsby is another awesome one – for scalable & fast-loading static sites.
There are a variety of starter kits and plugins to easily extend your site’s functionality and build a blog, e-commerce site, or portfolio site in no time at all.
With Gatsby, it’s effortless to power up your app with data from a CMS, especially with the GraphQL data layer for rapid integration with various APIs and services.
Final thoughts
CRA was a popular tool.
But it had its issues. It was bulky, outdated, and had limited customization.
Adaptation is crucial in the dynamic landscape of web development. By embracing modern tools, such as Vite, and Parcel, and in-depth frameworks like Next.js, Remix, and Gatsby, we can build faster and more efficient React apps.