New JavaScript pipeline operator: transform anything into a one-liner
With the pipeline operator you’ll stop writing code like this:
const names = ['USA', 'Australia', 'CodingBeauty'];
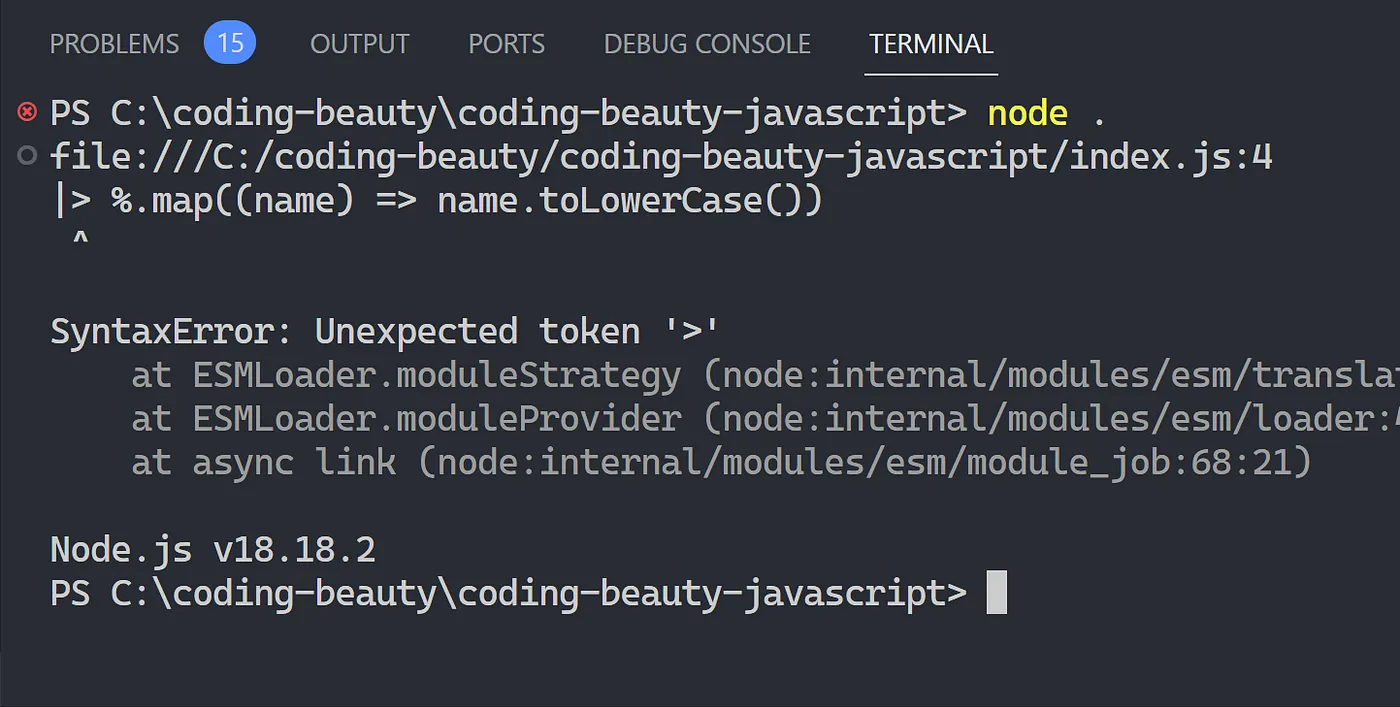
const lowerCasedNames = names.map((name) =>
name.toLowerCase()
);
const hyphenJoinedNames = lowerCasedNames.join('-');
const hyphenJoinedNamesCapitalized = capitalize(
hyphenJoinedNames
);
const prefixedNames = `Names: ${hyphenJoinedNamesCapitalized}`;
console.log(prefixedNames);
// Names: Usa-australia-codingbeautyand start writing code like this:
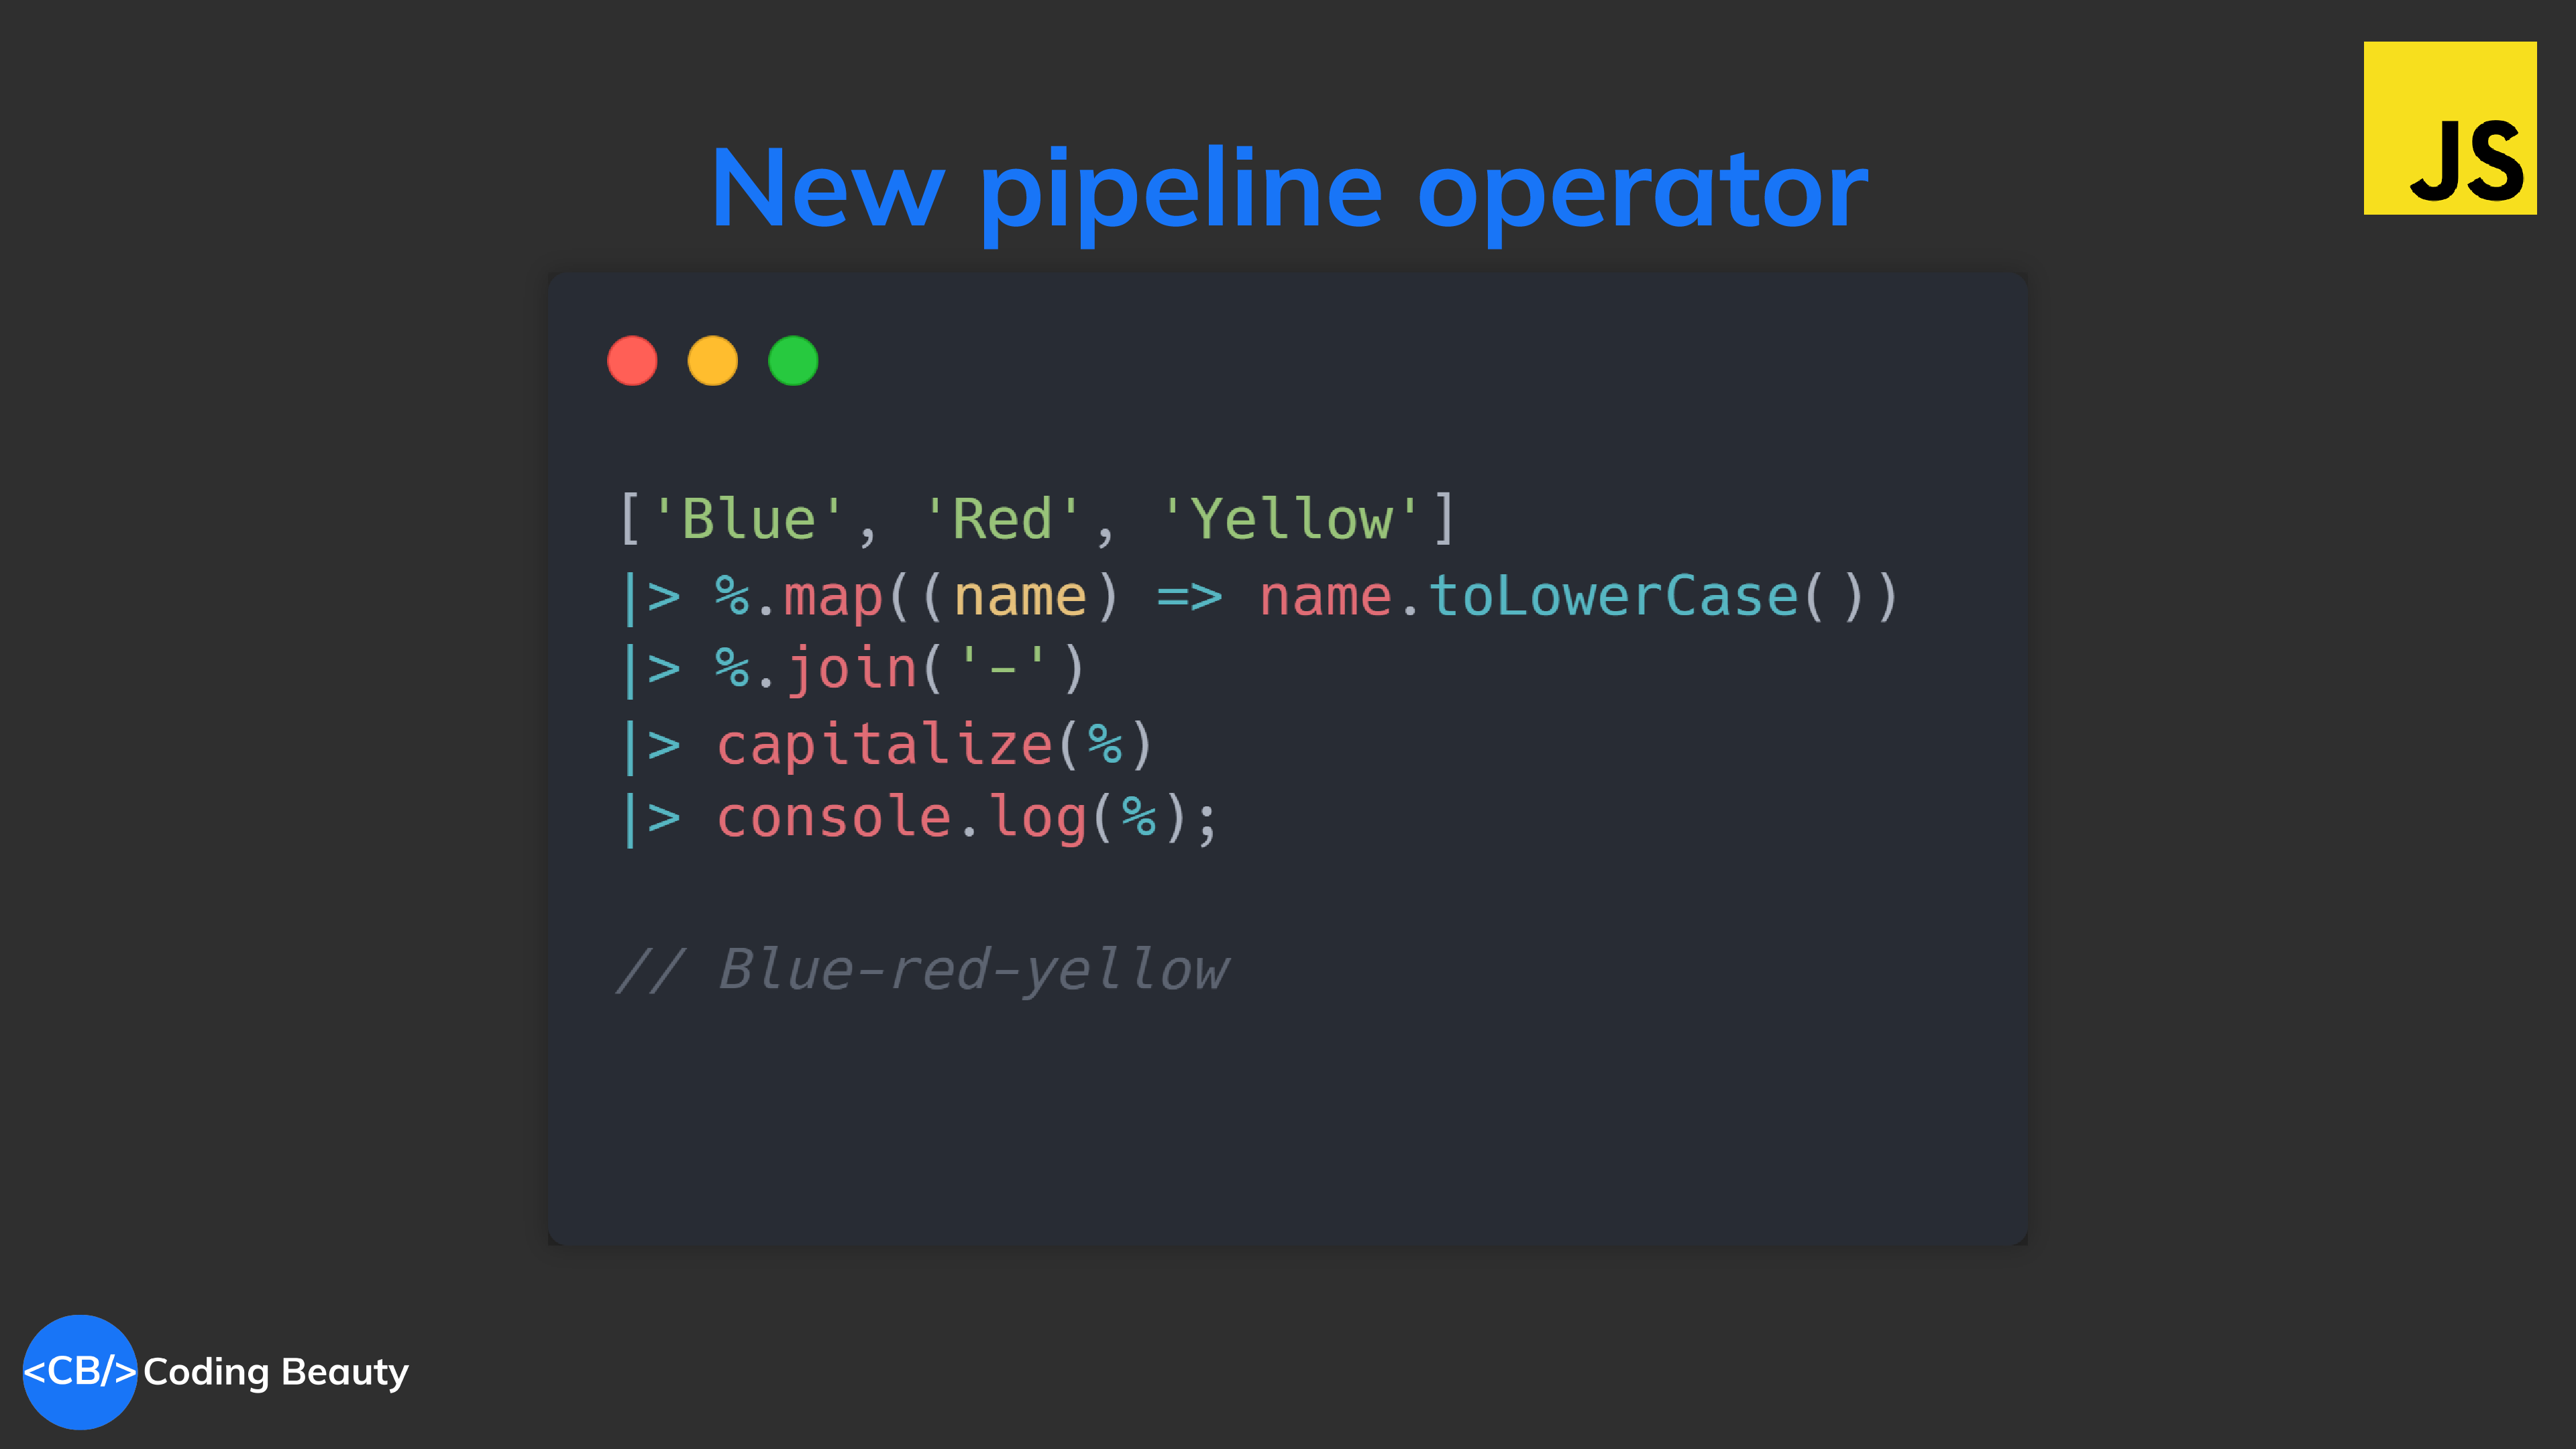
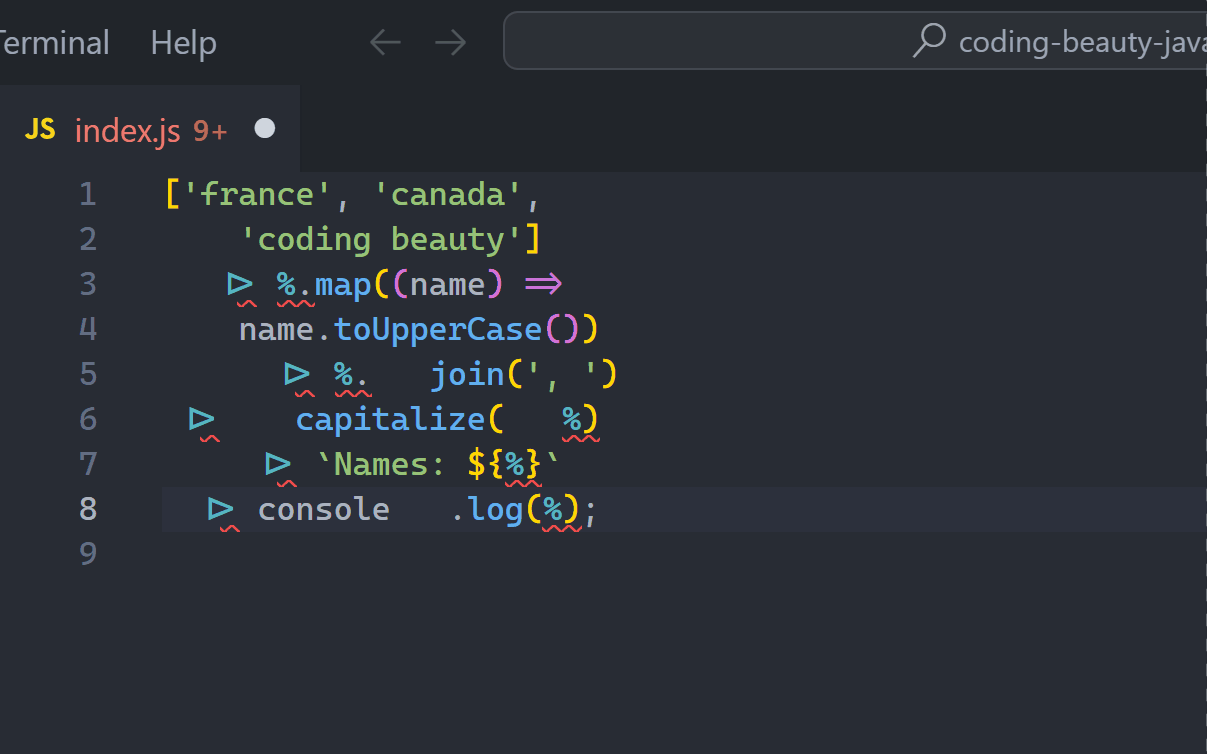
// Hack pipes: | and >

['USA', 'Australia', 'CodingBeauty']
  |> %.map((name) => name.toLowerCase())
  |> %.join('-')
  |> capitalize(%)
  |> `Names: ${%}`
  |> console.log(%);

// Names: Usa-australia-codingbeauty
So refreshingly clean — and elegant! All those temporary variables are gone — not to mention the time it took to come up with those names *and* type them (not everyone types like The Flash, unfortunately).
You may have heard this partially true quote attributed to Phil Karlton: “There are only two hard things in computer science: cache invalidation and naming things“.
Using the JavaScript pipeline operator clears out the clutter to boost readability and write data transforming code (basically all code) in a more intuitive manner.
Verbosity should be avoided as much as possible, and this works so much better to compact code than reusing short-named variables:
let buffer = await sharp('coding-beauty-v1.jpg').toBuffer();
let image = await jimp.read(buffer);

image.grayscale();
buffer = await image.getBufferAsync('image/png');

buffer = await sharp(buffer).resize(250, 250).toBuffer();
image = await jimp.read(buffer);

image.sepia();
buffer = await image.getBufferAsync('image/png');

await sharp(buffer).toFile('coding-beauty-v1.png');
Hopefully, almost no one codes like this on a regular basis. It’s a pretty horrible technique when done in a large scale; a perfect example showing why we embrace immutability and type systems.
Unlike the pipeline operator, there’s no certainty that the variable always contains the value you set at any given point; you’ll need to climb up the scope to look for re-assignments. We can have used the _ at an earlier point in the code; the value it has at various points in the code is simply not guaranteed.
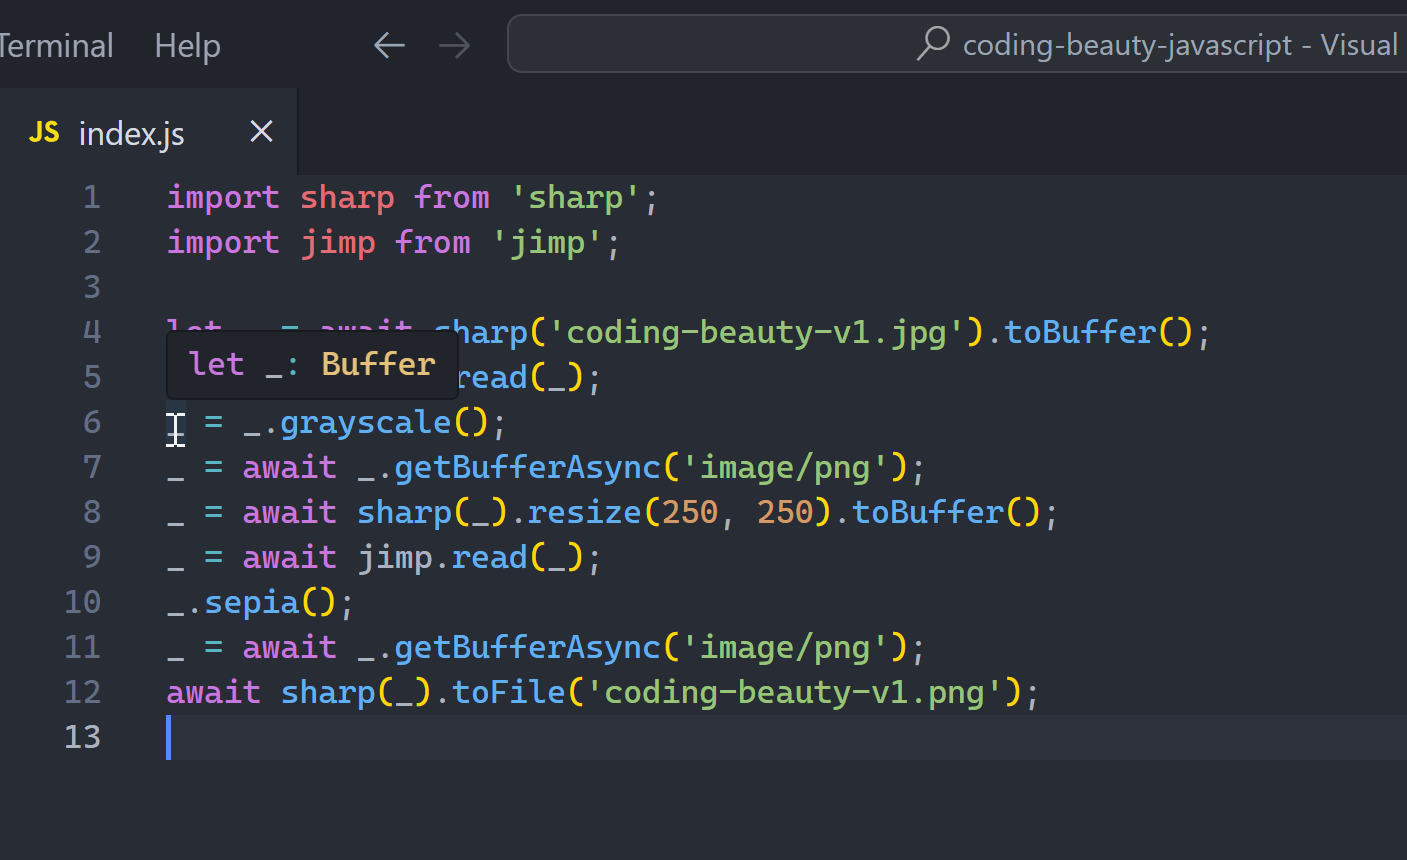
Now we’re just using an underscore, so without checking out the right-hand side of those re-assignments you can’t quickly know what the type of the variable is, unless you have a smart editor like VS Code (although I guess you could say that doesn’t matter since they’re supposed to be “temporary” — at least until they’re not!).
All in all, poor readability. Fragile and Unstable. 5 times harder for someone new to understand. Also, some would say underscores are “ugly”, especially in languages like JavaScript where they hardly show up.
// setup
function one() { return 1; }
function double(x) { return x * 2; }

let _;
_ = one(); // is now 1.
_ = double(_); // is now 2.

Promise.resolve().then(() => {
  // This does *not* print 2!
  // It prints 1, because '_' is reassigned downstream.
  console.log(_);
});

// _ becomes 1 before the promise callback.
_ = one(_);
Okay, so why don’t we just avoid this infestation of temporary underscores, and nest them into one gigantic one-liner?
await sharp(
  jimp
    .read(
      await sharp(
        await jimp
          .read(
            await sharp('coding-beauty-v1.jpg').toBuffer()
          )
          .grayscale()
          .getBufferAsync('image/png')
      )
      .resize(250, 250)
      .toBuffer()
    )
    .sepia()
    .getBufferAsync('image/png')
).toFile('coding-beauty-v2.png');
It’s a mess. The underscore is gone, but who in the world can understand this at a glance? How easy is it to tell how the data flows throughout this code, and make any necessary adjustments.
Understanding, at a glance — this is what we should strive for with every line of code we write.
The pipeline operator greatly outshines every other method, giving us both freedom from temporary variables and readability. It was designed for this.
// We don't need to wrap 'await' anymore

await sharp('coding-beauty-v1.jpg').toBuffer()
  |> jimp.read(%)
  |> %.grayscale()
  |> await %.getBufferAsync('image/png')
  |> await sharp(%).resize(250, 250).toBuffer()
  |> await jimp.read(%)
  |> %.sepia()
  |> await %.getBufferAsync('image/png')
  |> await sharp(%).toFile('coding-beauty-v2.png');
Here the % only exists within this particular pipeline.
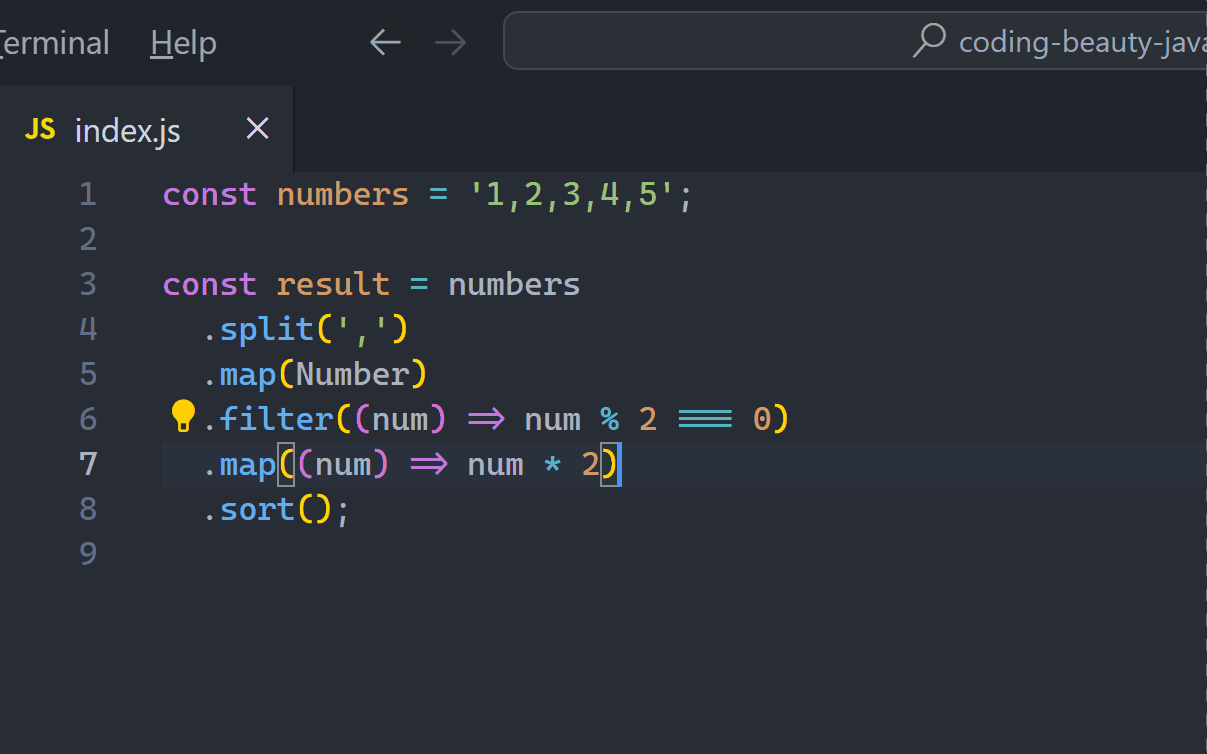
Method chaining?
Who hasn’t used and combined heavily popular array methods like map, filter, and sort? Very hard to avoid in applications involving any form of list manipulation.
const numbers = '4,2,1,3,5';
const result = numbers
  .split(',')
  .map(Number)
  .filter((num) => num % 2 === 0)
  .map((num) => num * 2)
  .sort();
// [4, 8]
This is actually great. There aren’t any temporary variables or unreadable nesting here either and we can easily follow the chain from start to finish.
The formatting lets us easily add more methods at any point in the chain; feature-packed editor like VS Code can easily swap the processing order of two methods, with the Ctrl + Up and Ctrl + Down shortcuts.
There’s a reason why libraries like core http and jQuery are designed like this:
const http = require('http');

http
  .createServer((req, res) => {
    console.log('Welcome to Coding Beauty');
  })
  .on('error', () => {
    console.log('Oh no!');
  })
  .on('close', () => {
    console.log('Uuhhm... bye!');
  })
  .listen(3000, () => {
    console.log('Find me on port 3000');
  });
The problem with method chaining is that we can’t use it everywhere. If the class wasn’t designed like that we’re stuck and out in the cold.
It doesn’t work very well with generator methods, async/await and function/method calls outside the object, like we saw here:
await sharp(
    // 3-method chain, but not good enough!
    jimp
    .read(
        await sharp(
            // Same here
            await jimp
            .read(
                await sharp('coding-beauty-v1.jpg').toBuffer()
            )
            .grayscale()
            .getBufferAsync('image/png')
        )
        .resize(250, 250)
        .toBuffer()
    )
    .sepia()
    .getBufferAsync('image/png')
).toFile('coding-beauty-v2.png');
But all this and more work with the pipeline operator; even object literals and async import function.
await sharp('coding-beauty-v1.jpg').toBuffer()
  |> jimp.read(%)
  |> %.grayscale()
  |> await %.getBufferAsync('image/png')
  |> await sharp(%).resize(250, 250).toBuffer()
  |> await jimp.read(%)
  |> %.sepia()
  |> await %.getBufferAsync('image/png')
  |> await sharp(%).toFile('coding-beauty-v2.png');
Could have been F# pipes
We would have been using the pipeline operator very similarly to F# pipes, with the above turning out like this instead:
(await sharp('coding-beauty-v1.jpg').toBuffer())
  |> (x) => jimp.read(x)
  |> (x) => x.grayscale()
  |> (x) => x.getBufferAsync('image/png')
  |> await
  |> (x) => sharp(x).resize(250, 250).toBuffer()
  |> await
  |> (x) => jimp.read(x)
  |> await
  |> (x) => x.sepia()
  |> (x) => x.getBufferAsync('image/png')
  |> await
  |> (x) => sharp(x).toFile('coding-beauty-v2.png');
  |> await
There was an alternative design. But you can already see how this makes for an inferior alternative: Only single-function arguments are allowed and the operation is more verbose. Unless the operation is already a single-argument function call.
It’s weird handling of async/await was also a key reason why it got rejected — along with memory usage concerns. So, forget about F# pipes in JS!
Use the pipeline operator right now
Yes you can — with Babel.
Babel has a nice habit of implementing features before they’re officially integrated in the language; it did this for top-level await, optional chaining, and many others. The pipeline operator couldn’t be an exception.
Just use the @babel/plugin-proposal-pipeline-operator plugin and you’re good to.
It’s optional of course — but not for long.
Prettier the code formatter is already prepared.
Even though we can’t say the same about VS Code or Node.js.
Right now there’s even speculation that % won’t be the final symbol pass around in the pipeline; let’s watch and see how it all plays out.
Final thoughts
It’s always great to see new and exciting features come to the language. With the JavaScript pipeline operator, you’ll cleanse your code of temporary variables and cryptic nesting, greatly boost code readability, efficiency, and quality.