This beast just got upgraded to the M4 chip and it’s more dangerous than ever.
This is the greatest value for money you’ll ever get in a Macbook Pro.
Especially as Apple finally caved to give us 16 GB RAM in base models for the same price.
The unbelievable performance of the M4 chip makes it every bit as deadly as the new M4 Mac Mini and iMac — yet ultraportable and lightweight.
Starting with a 10-core CPU and 10-core GPU.
Image source: theverge.com
Can’t compare with the Macbook Air on portability tho — lightest PC I’ve ever felt.
Apple says M4 is up to 3 times faster than M1 — but M1 is still very good so don’t go rushing to throw your money at Tim Cook.
In practice you’ll probably only notice a real difference for long tasks in heavy apps — like the Premier Pro 4K export in the benchmarks we just saw.
M4 is also an unbelievable 27 times faster than Intel Core i7 in tasks like video processing:
Core i7 used to be a big deal back then!
So imagine how much faster M4 Pro Max would be than the Intel Core i7?
Yeah their M4 processor comes in 3 tiers: M4, M4 Pro, and M4 Max.
The base model also comes with much as 3 Thunderbolt ports — unlike the 2 in previous base models.
Thunderbolt ports looks just like USB-C but with much faster data transfer speeds — and obviously light years ahead of USB-A.
With Thunderbolt 5 you get incredible speeds of up to 120Gb/s — available in Pro models with M4 Pro and M4 Max.
Along with a standard MagSafe 3 charging port and an SXDC card slot to easily import images from digital cameras.
Plus a headphone jack and a HDMI port.
Definitely geared for the pros, and pretty packed compared to the ultraminimalist MacBook Air:
Btw every wondered why Apple still puts headphone jacks in Macs?
It’s because wired headphones give maximum audio quality and have zero lag — something that’s essential for the Pros. Perfect audio.
And perfect video too — with a sophisticated 12 mega-pixel Center Stage camera.
Center Stage makes sure you’re always at the center of the recording even as you move around.
Crystal clear Liquid Retina display in two great sizes
14 inch — 3024 x 1964
16 inch — 3456 x 2234
imo Take 14 over 16 — It’s more than enough screen space.
You know I thought the 13 inch MacBook Air would be small but it turned out perfect and I was happy not to go with the 15.
My previous 15.6″ PC now seems humongous and too much for a laptop. 16″ seems insane.
Better you get a huge external monitor:
But on it’s own, it’s a monstrously good laptop for coding and other heavy tasks:
The base plan starts at $1599 for 16 GB RAM and 512 GB SSD with M4 chip with many lethal upgrade options:
M4 16 GB RAM and 1 TB SSD — $1799
M4 24 GB RAM and 1 TB SSD — $1999
M4 Pro 24 GB and 512 GB SSD — $1999
M4 Pro 24 GB and 1 TB SSD — $2399
M4 Max 36 GB RAM and 1 TB SSD — $3199 🤯
Overall the M4 MacBook Pro strikes the perfect balance of power, sleek design, and value, making it an excellent choice for professionals seeking the ideal portable workstation.
So refreshingly clean — and elegant! All those temporary variables are gone — not to mention the time it took to come up with those names *and* type them (not everyone types like The Flash, unfortunately).
You may have heard this partially true quote attributed to Phil Karlton: “There are only two hard things in computer science: cache invalidation and naming things“.
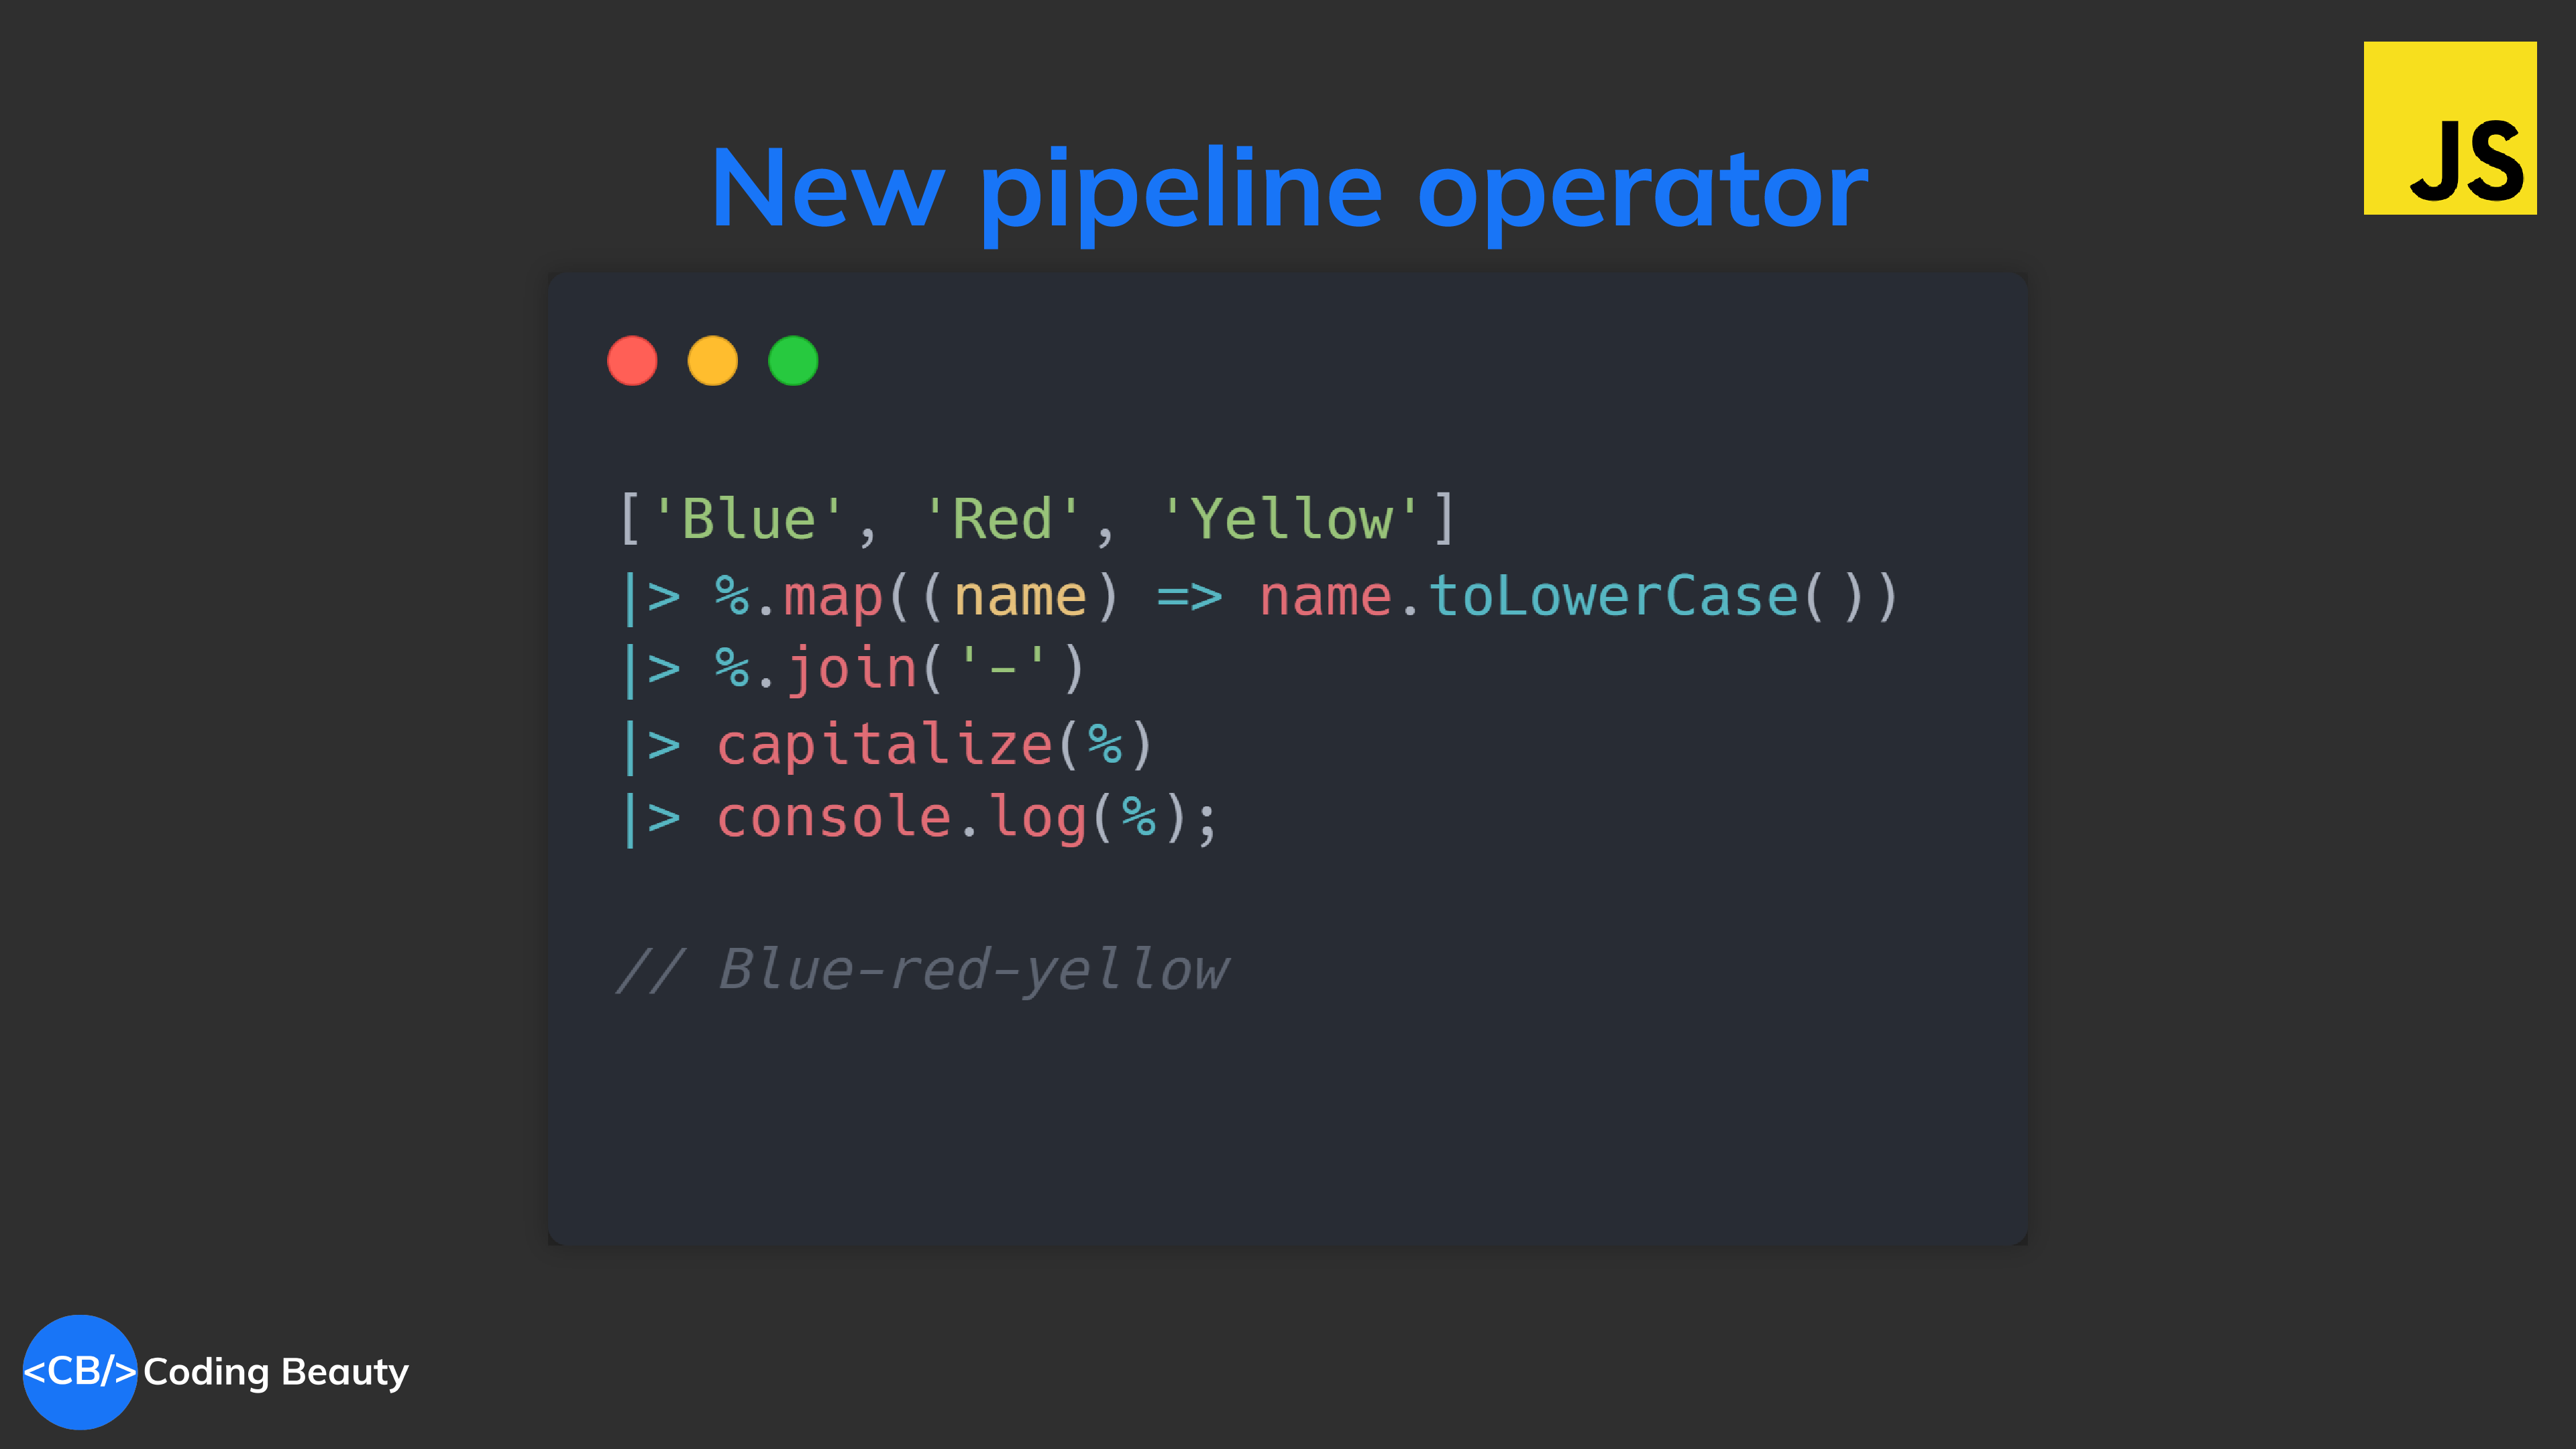
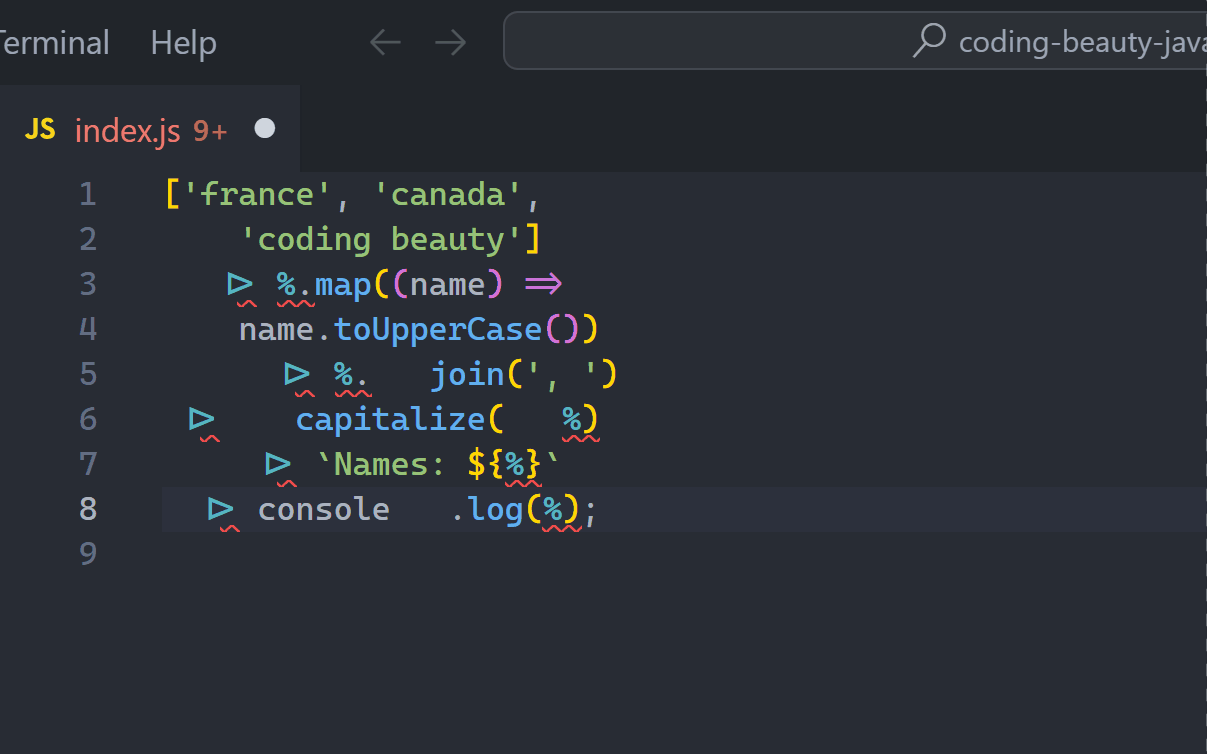
Using the JavaScript pipeline operator clears out the clutter to boost readability and write data transforming code (basically all code) in a more intuitive manner.
Verbosity should be avoided as much as possible, and this works so much better to compact code than reusing short-named variables:
Hopefully, almost no one codes like this on a regular basis. It’s a pretty horrible technique when done in a large scale; a perfect example showing why we embrace immutability and type systems.
Unlike the pipeline operator, there’s no certainty that the variable always contains the value you set at any given point; you’ll need to climb up the scope to look for re-assignments. We can have used the _ at an earlier point in the code; the value it has at various points in the code is simply not guaranteed.
Now we’re just using an underscore, so without checking out the right-hand side of those re-assignments you can’t quickly know what the type of the variable is, unless you have a smart editor like VS Code (although I guess you could say that doesn’t matter since they’re supposed to be “temporary” — at least until they’re not!).
All in all, poor readability. Fragile and Unstable. 5 times harder for someone new to understand. Also, some would say underscores are “ugly”, especially in languages like JavaScript where they hardly show up.
JavaScriptCopied!
// setup
function one() { return 1; }
function double(x) { return x * 2; }

let _;
_ = one(); // is now 1.
_ = double(_); // is now 2.

Promise.resolve().then(() => {
  // This does *not* print 2!
  // It prints 1, because '_' is reassigned downstream.
  console.log(_);
});

// _ becomes 1 before the promise callback.
_ = one(_);
Okay, so why don’t we just avoid this infestation of temporary underscores, and nest them into one gigantic one-liner?
It’s a mess. The underscore is gone, but who in the world can understand this at a glance? How easy is it to tell how the data flows throughout this code, and make any necessary adjustments.
Understanding, at a glance — this is what we should strive for with every line of code we write.
The pipeline operator greatly outshines every other method, giving us both freedom from temporary variables and readability. It was designed for this.
Here the % only exists within this particular pipeline.
Method chaining?
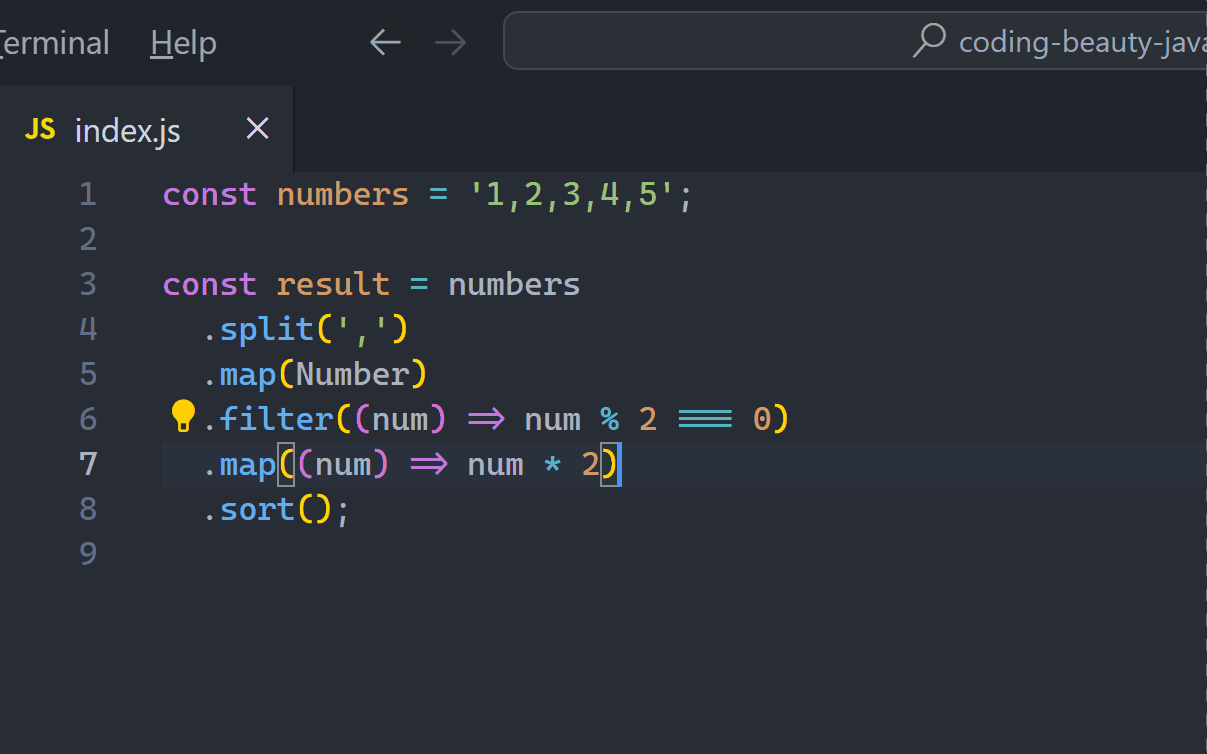
Who hasn’t used and combined heavily popular array methods like map, filter, and sort? Very hard to avoid in applications involving any form of list manipulation.
JavaScriptCopied!
const numbers = '4,2,1,3,5';
const result = numbers
  .split(',')
  .map(Number)
  .filter((num) => num % 2 === 0)
  .map((num) => num * 2)
  .sort();
// [4, 8]
This is actually great. There aren’t any temporary variables or unreadable nesting here either and we can easily follow the chain from start to finish.
The formatting lets us easily add more methods at any point in the chain; feature-packed editor like VS Code can easily swap the processing order of two methods, with the Ctrl + Up and Ctrl + Down shortcuts.
There’s a reason why libraries like core http and jQuery are designed like this:
JavaScriptCopied!
const http = require('http');

http
  .createServer((req, res) => {
    console.log('Welcome to Coding Beauty');
  })
  .on('error', () => {
    console.log('Oh no!');
  })
  .on('close', () => {
    console.log('Uuhhm... bye!');
  })
  .listen(3000, () => {
    console.log('Find me on port 3000');
  });
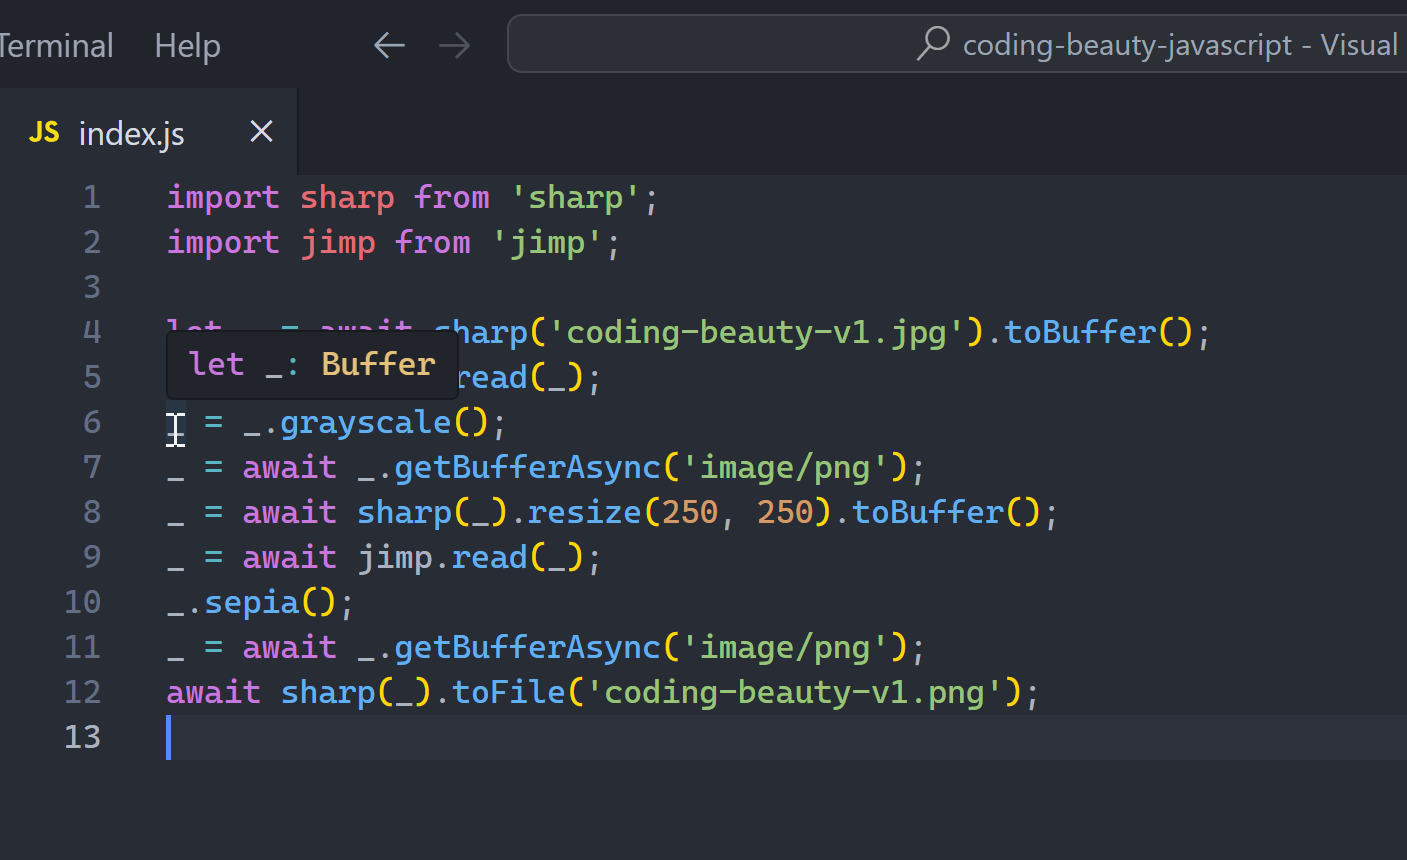
The problem with method chaining is that we can’t use it everywhere. If the class wasn’t designed like that we’re stuck and out in the cold.
It doesn’t work very well with generator methods, async/await and function/method calls outside the object, like we saw here:
JavaScriptCopied!
await sharp(
    // 3-method chain, but not good enough!
    jimp
    .read(
        await sharp(
            // Same here
            await jimp
            .read(
                await sharp('coding-beauty-v1.jpg').toBuffer()
            )
            .grayscale()
            .getBufferAsync('image/png')
        )
        .resize(250, 250)
        .toBuffer()
    )
    .sepia()
    .getBufferAsync('image/png')
).toFile('coding-beauty-v2.png');
But all this and more work with the pipeline operator; even object literals and asyncimport function.
There was an alternative design. But you can already see how this makes for an inferior alternative: Only single-function arguments are allowed and the operation is more verbose. Unless the operation is already a single-argument function call.
It’s weird handling of async/await was also a key reason why it got rejected — along with memory usage concerns. So, forget about F# pipes in JS!
Use the pipeline operator right now
Yes you can — with Babel.
Babel has a nice habit of implementing features before they’re officially integrated in the language; it did this for top-level await, optional chaining, and many others. The pipeline operator couldn’t be an exception.
Just use the @babel/plugin-proposal-pipeline-operatorplugin and you’re good to.
It’s optional of course — but not for long.
Prettier the code formatter is already prepared.
Even though we can’t say the same about VS Code or Node.js.
Right now there’s even speculation that % won’t be the final symbol pass around in the pipeline; let’s watch and see how it all plays out.
Final thoughts
It’s always great to see new and exciting features come to the language. With the JavaScript pipeline operator, you’ll cleanse your code of temporary variables and cryptic nesting, greatly boost code readability, efficiency, and quality.
They call it mini but what it can do is far from mini.
Only 5 x 5 x 2 inches and 1.5 pounds That’s mega-light.
Yet the M4 chip makes it as dangerous as the new MacBook Pro — even though it costs much less.
Image source: verge.com
And just look at the ports:
Image source: apple.com
And you know I saw this pic on their website and was like, What the hell is this?
Then I saw this:
Image source: apple.com
Ohhh… it’s a CPU — no a system unit…
It’s a “pure” computer with zero peripherals — not even a battery. You’re buying everything yourself.
Definitely dramatically superior to the gigantic system unit I used when I was younger.
But I didn’t think this was still a huge thing. Especially with integrated screens like the iMac.
Mac Mini is like the complete opposite of the iMac — a gigantic beast that comes with everything…
Image source: apple.com
iMac gives you predictability — no analysis paralysis in getting all your parts (although you can just buy apple anyways)
Image source: apple.com
Mac Mini is jam-packed with ports:
On the front we’ve got two 10 Gbps USB-C ports and a headphone jack:
Image source: apple.com
Back ports:
Lovely crisp icons indicate what they’re each for…
Image source: apple.com
But they put the power button at the bottom — dumb move!
You’ll have to raise it up any time you want to on it.
Wouldn’t it have been cool if instead they made the power huge to cover the bottom completely — so you’d just have to push it down like those red buttons in game shows?
But once it’s all powered up the possibilities are endless:
From basic typing to heavyweight gaming — like Apple Arcade stuff:
Image source: apple.com
And coding of course:
Image source: apple.com
And with an improved thermal system, Mac Mini can handle all these demanding tasks quietly:
Image source: apple.com
The base plan starts at $599 for 16GB RAM and 256 GB SSD with M4 Pro, you can pay for higher configs like other Mac devices allow:
16 GB RAM and 256 GB SSD – $799
24 GB RAM and 512 GB SSD – $999
And then there’s the M4 Pro — 24 GB RAM and 512 GB SSD for $1399.
Overall the M4 Mac Mini is a perfect blend of power, compact design, and value, great for professionals looking for the ideal desktop workstation.
Shadow PC saves you from wasting thousands of dollars on a new PC.
A fully customizable computer in the cloud with amazing capabilities.
Built to handle heavyweight work: from hardcore gaming to video editing to game dev.
A Windows you can take anywhere you go. Install whenever you want — if it runs on Windows, it runs on Shadow.
❌ Before:
You spend hours searching for the perfect PC to buy with specs that meet your needs and also stays within budget.
You empty your wallet and waste more time ordering it online or checking out your nearby stores.
Then you waste more money on data to download everything you need to finally get started.
✅ Now:
Join Shadow and get cloud PC instantly.
Install everything with lightning-fast Internet speeds of over 1 Gbps:
Done.
And this Internet has nothing to do with your data plan — You only need data to stream the screen to yours — all the uploads and downloads are done on the remote PC with zero cost to you.
Lightweight and straightforward — open the Shadow app and you get to the desktop in less than a minute.
Turn it off and come back whenever to pick right where you left off.
Play hardcore CPU-intensive games without making a dent in your system resources or storage space. Your PC fan will be super silent and your CPU will be positively bored out of its mind with idleness.
Make it full-screen and enjoy a seamless, immersive experience.
When I was using it on a Windows PC there were times when I didn’t even know which was which. Cause it’s literally just Windows — no curated interface like in some gaming services.
It’s also got apps for Mac, Android, iOS, and Linux.
Including a convenient browser-based mode for quick and easy access:
Cost?
So there are two pricing tiers — Shadow Gaming for gaming and Shadow Pro for professional work like video editing.
For just $10 a month get a powerful 3.1GHz processor with 6 GB of RAM and a generous 5 TB of HDD storage, AND 256 GB SSD storage!
Easily capable of Fortnite, Minecraft, and many other popular games.
You also get the 1 Gb/s download bandwidth guaranteed.
Upgrading to the Boost plan will get you an additional 6 GB RAM and a 256 GB SSD for $30 a month.
And then there’s the most powerful Power plan for even more… POWER.
Shadow Pro’s pricing is a bit different.
The plan names are typical and boring, the starting plan is cheaper. I went with Standard and it was great.
This is amazing! How do I get started?
Just head over to shadow.tech and create an account:
After subscribing to a plan they’ll start setting up your cloud PC right away. Looks like they do it manually so it’ll take anywhere from 30-60 minutes to complete.
The email they sent me:
Install the app and sign in.
START NOW and start enjoying your personal computer in the cloud.
So Google has finally decided to show OpenAI who the real king of AI is.
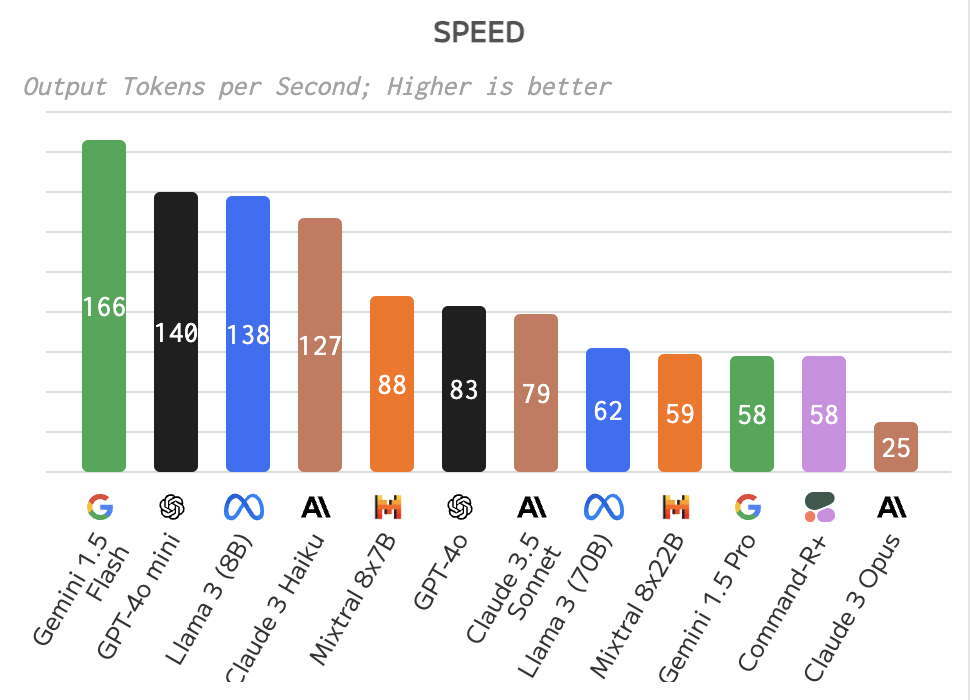
Their new Gemini 1.5 Flash model blows GPT-4o out of the water and the capabilities are hard to believe.
Lightning fast.
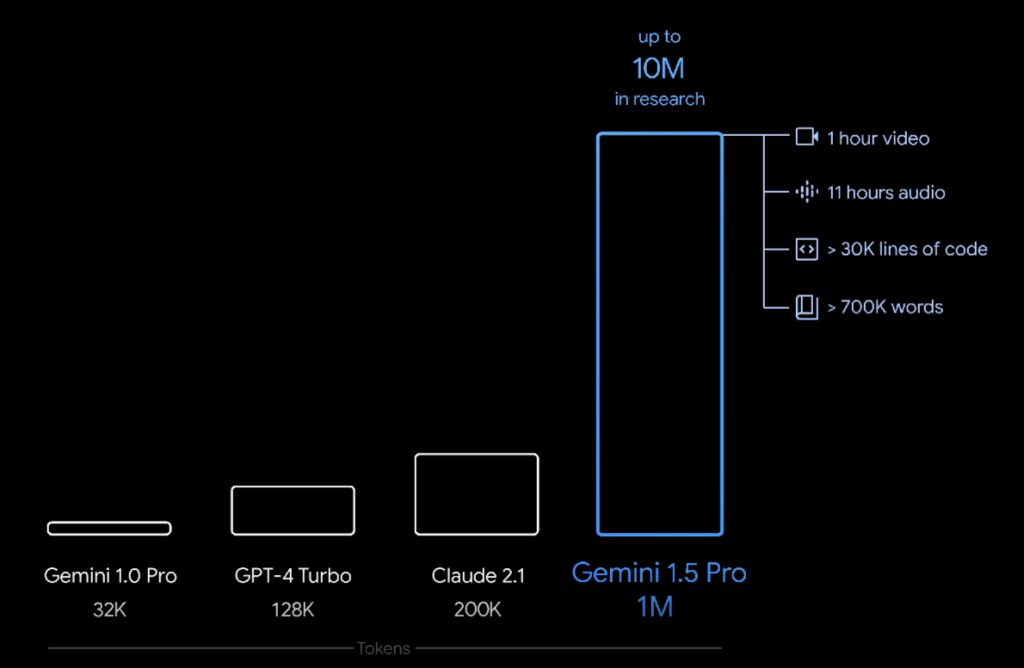
33 times cheaper than GPT-4o but has a 700% greater context — 1 million tokens.
What is 1 million tokens in the real-world? Approximately:
Over an 1 hour of video
Over 30,000 lines of code
Over 700,000 words
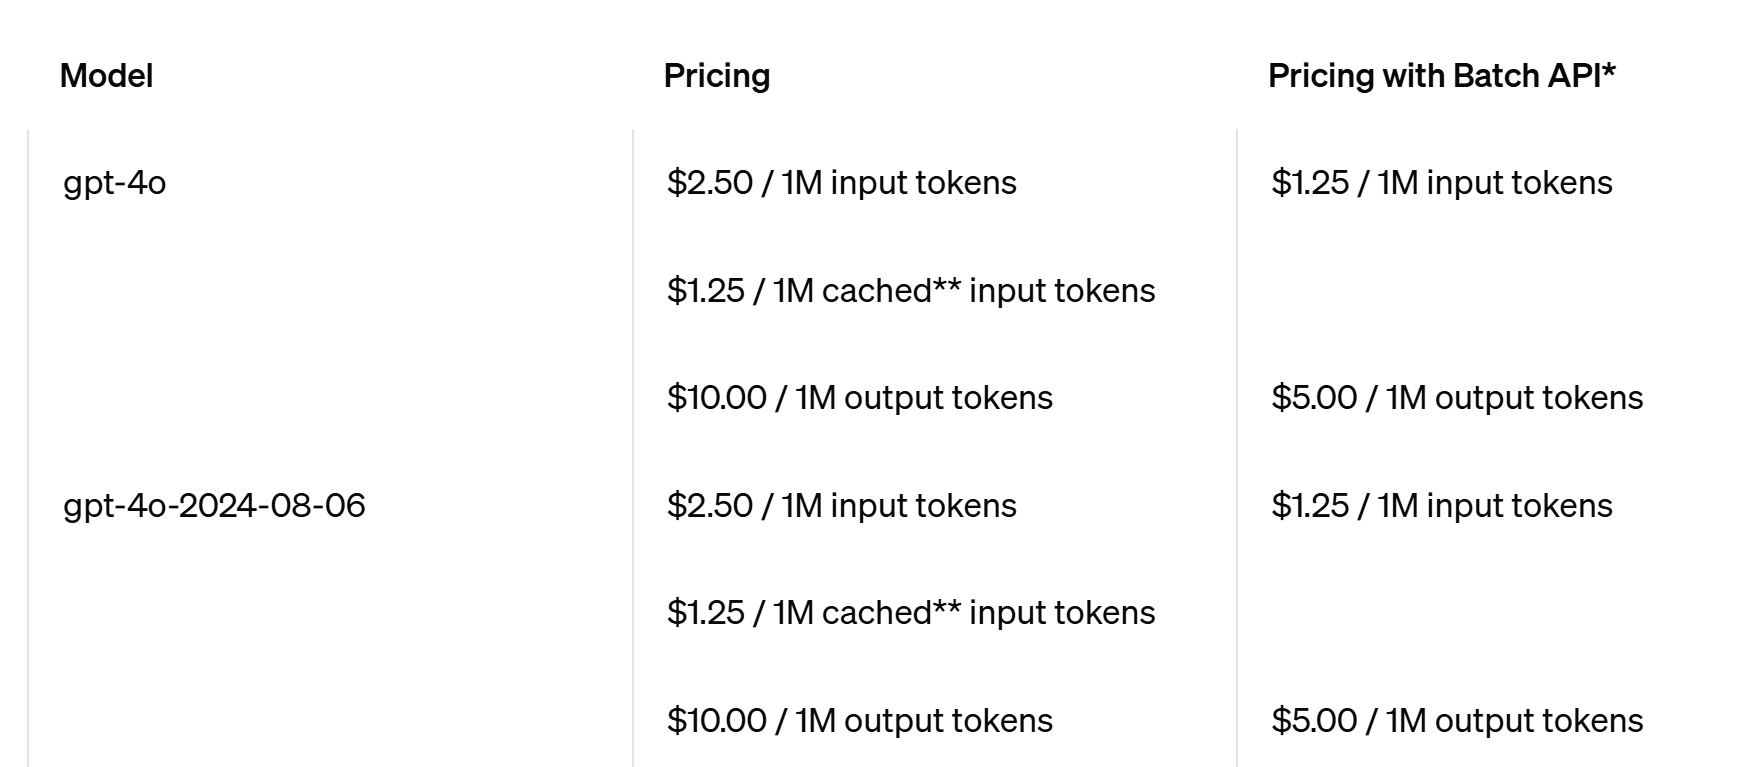
❌GPT-4o cost:
Input: $2.50 per million tokens
Output: $10 per million tokens
Cached input: $1.25 per million tokens
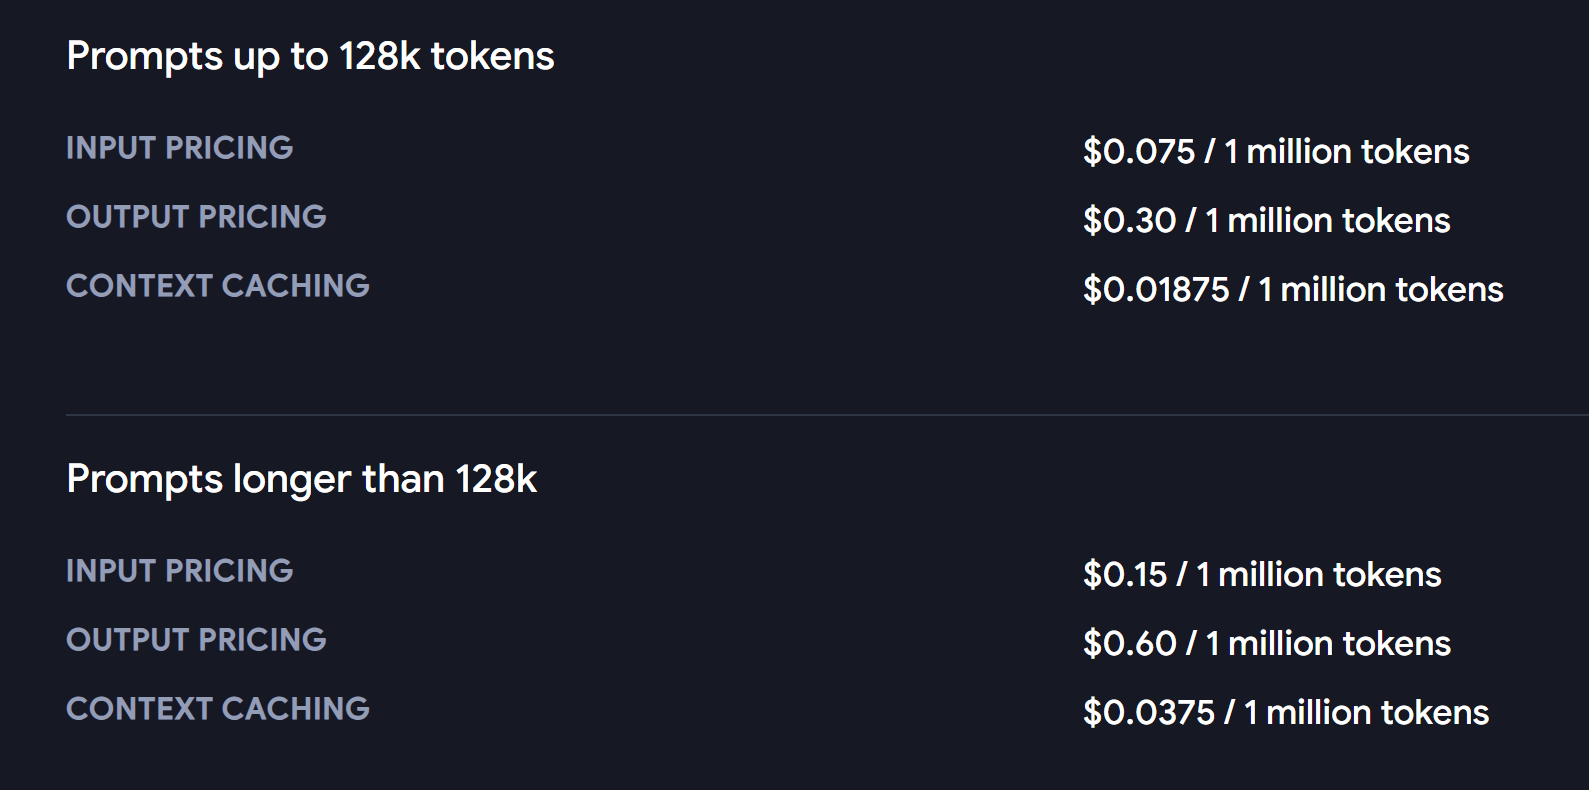
✅ Gemini 1.5 Flash cost:
Input: $0.075 per million tokens
Output: $0.30 per million tokens
Cached input: $0.01875 per million tokens
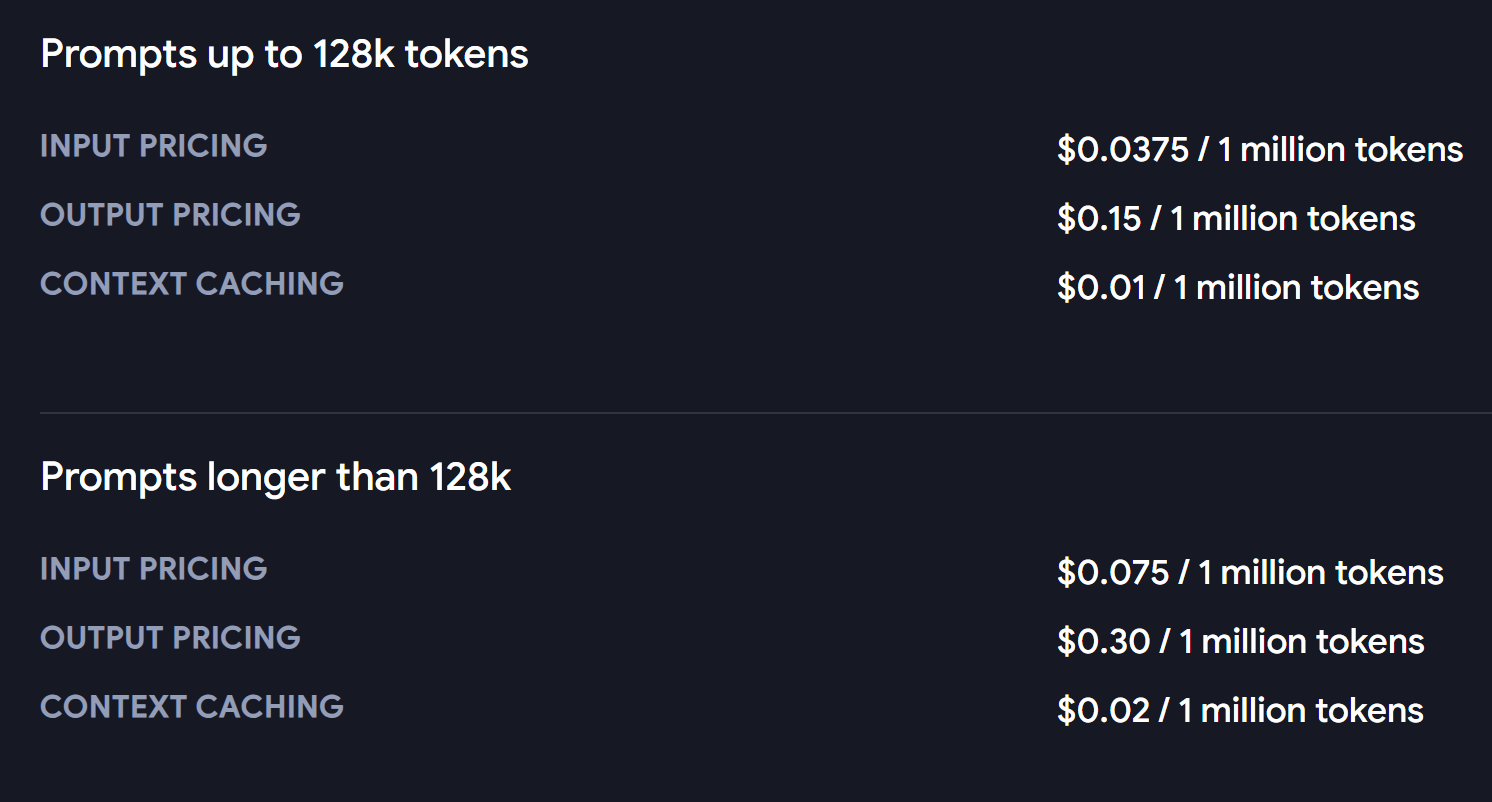
And then there’s the mini Flash-8B version for cost-efficient tasks — 66 times cheaper:
And the best part is the multi-modality — it can reason with text, files, images and audio in complex integrated ways.
And 1.5 Flash has almost all the capabilities of Pro but much faster. And as a dev you can start using them now.
Gemini 1.5 Pro was tested with a 44-minute silent movie and astonishingly, it easily analyzed the movie into various plot points and events. Even pointing out tiny details that most of us would miss on first watch.
Meanwhile the GPT-4o API only lets you work with text and images.
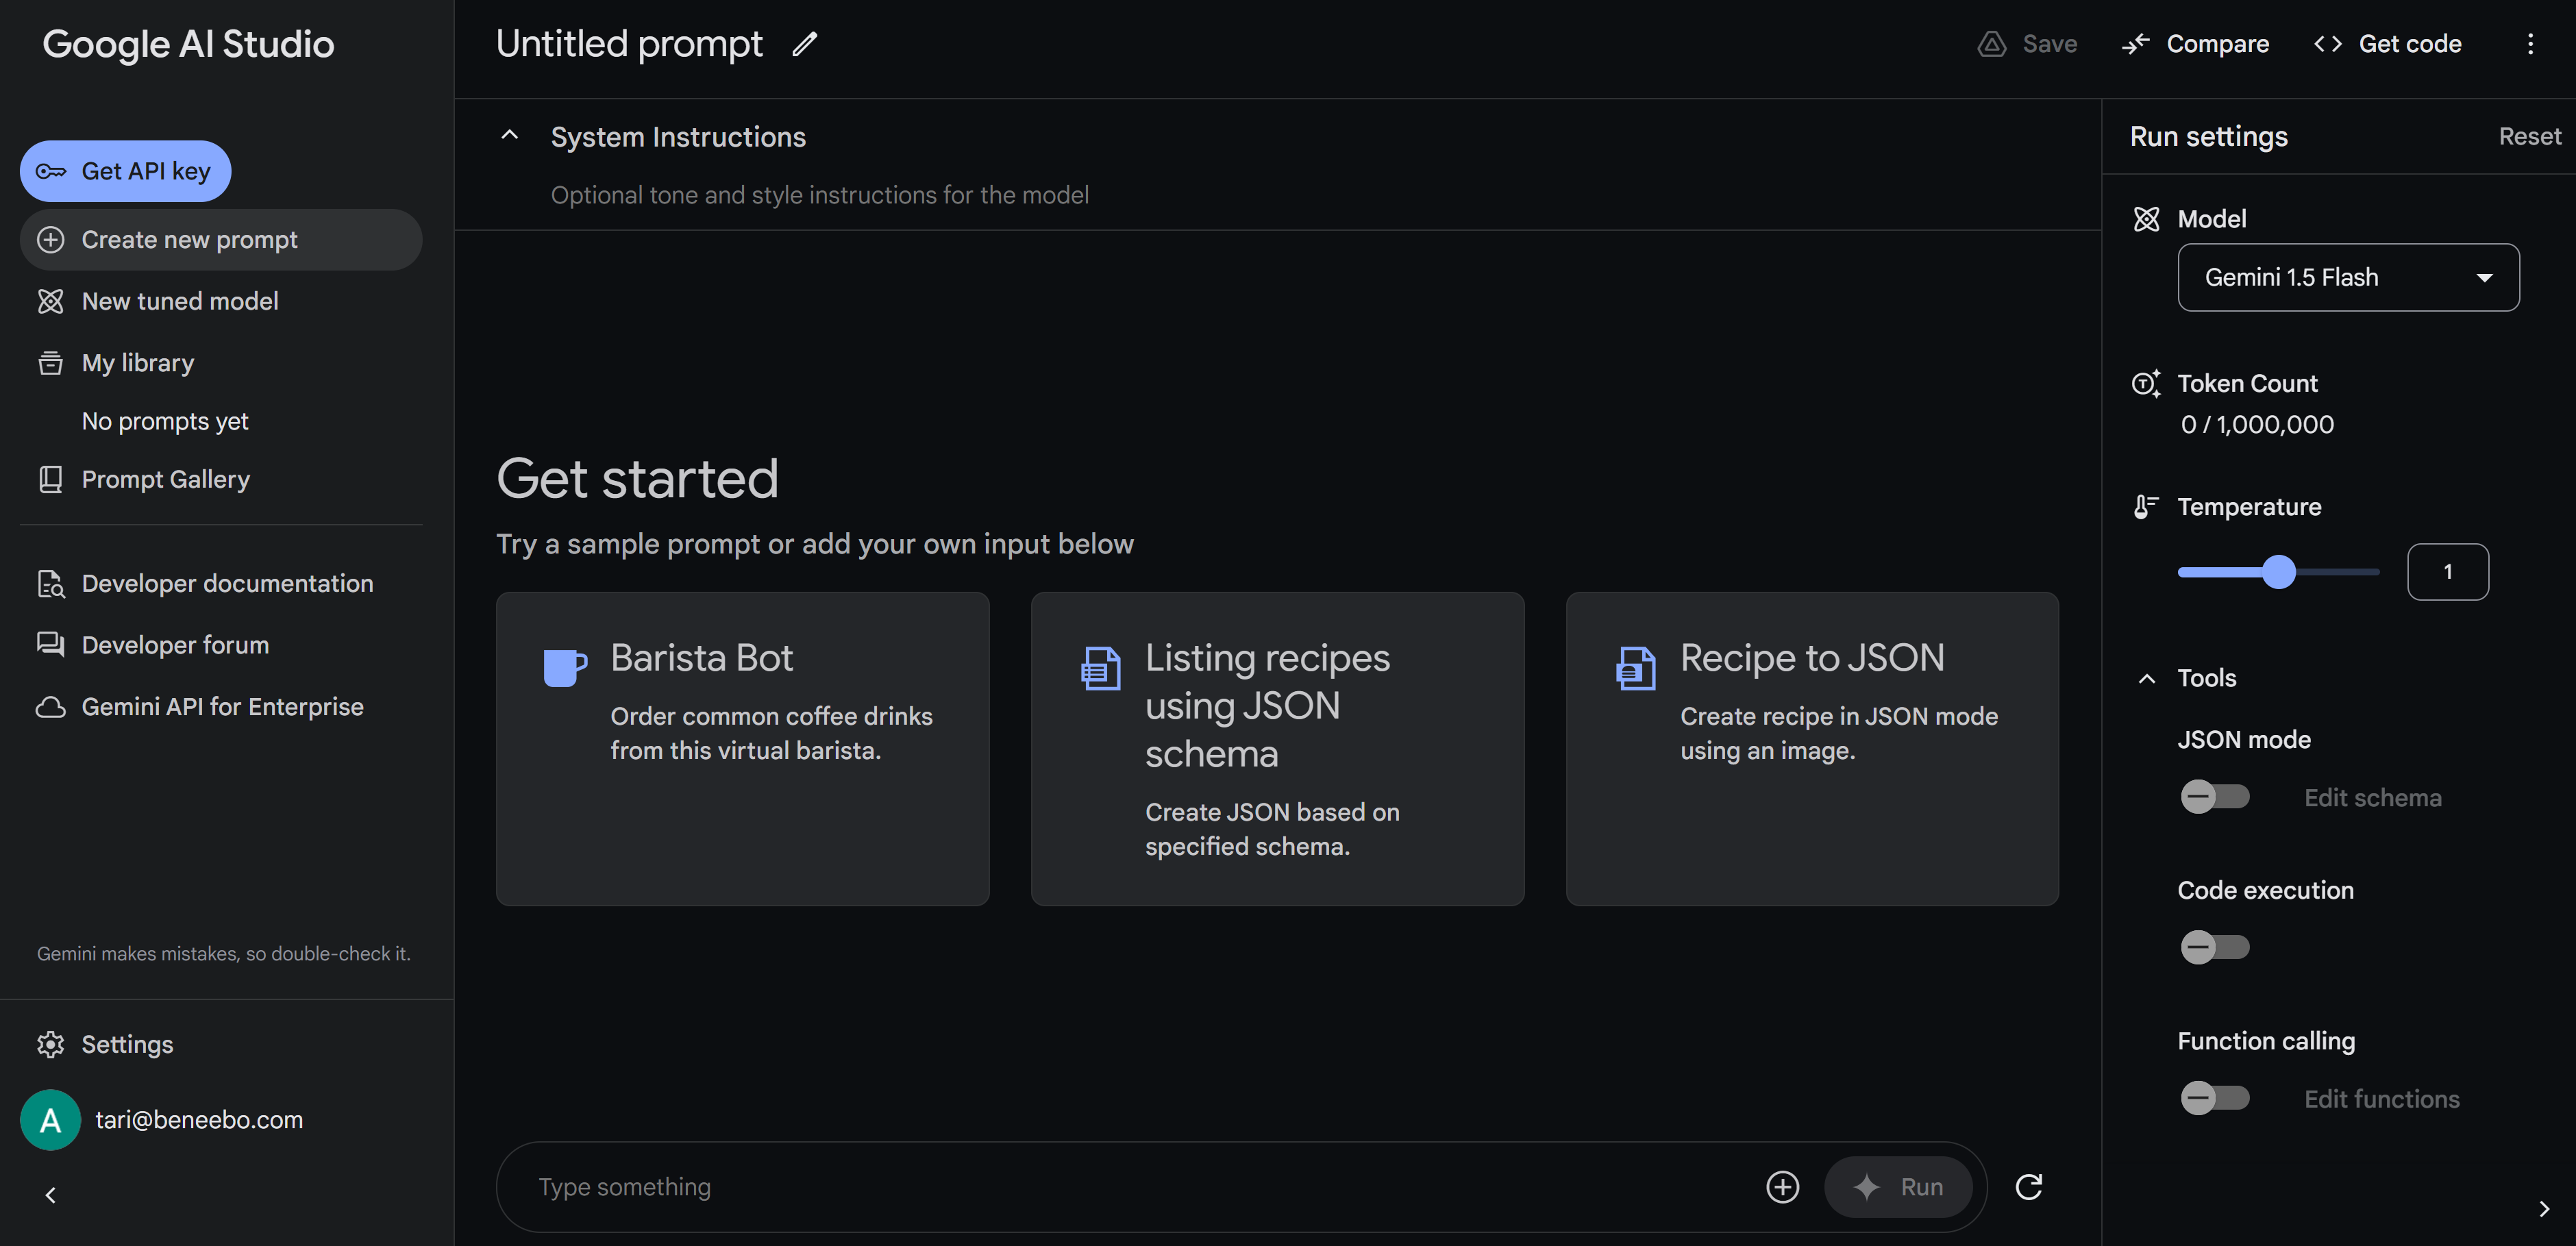
You can easily create, test and refine prompts in Google’s AI Studio — completely free.
It doesn’t count in your billing like in OpenAI playground.
Just look at the power of Google AI Studio — creating a food recipe based on an image:
I uploaded this delicious bread from gettyimages:
Now:
What if I want the response to be a specialized format for my API or something?
Then you can just turn on JSON mode and specify the response schema:
OpenAI playground has this too, but it’s not as intuitive to work with.
Another upgrade Gemini has over OpenAI is how creativity it can be.
In Gemini you can increase the temperature from 0 to 200% to control how random and creative the responses are:
Meanwhile in OpenAI if you try going far beyond 100%, you’ll most likely get a whole literal load of nonsense.
And here’s the best part — when you’re done creating your prompt you can just use Get code — easily copy and paste the boilerplate API code and move lightning-fast in your development.
Works in several languages including Kotlin, Swift and Dart — efficient AI workflow in mobile dev.
In OpenAI playground you can get the code for Python and JavaScript.
Final thoughts
Gemini 1.5 Flash is a game-changer offering unparalleled capabilities at a fraction of the cost.
With its advanced multi-modality ease of use, generous free pricing, and creative potential it sets a new standard for AI leaving GPT-4o in the dust.
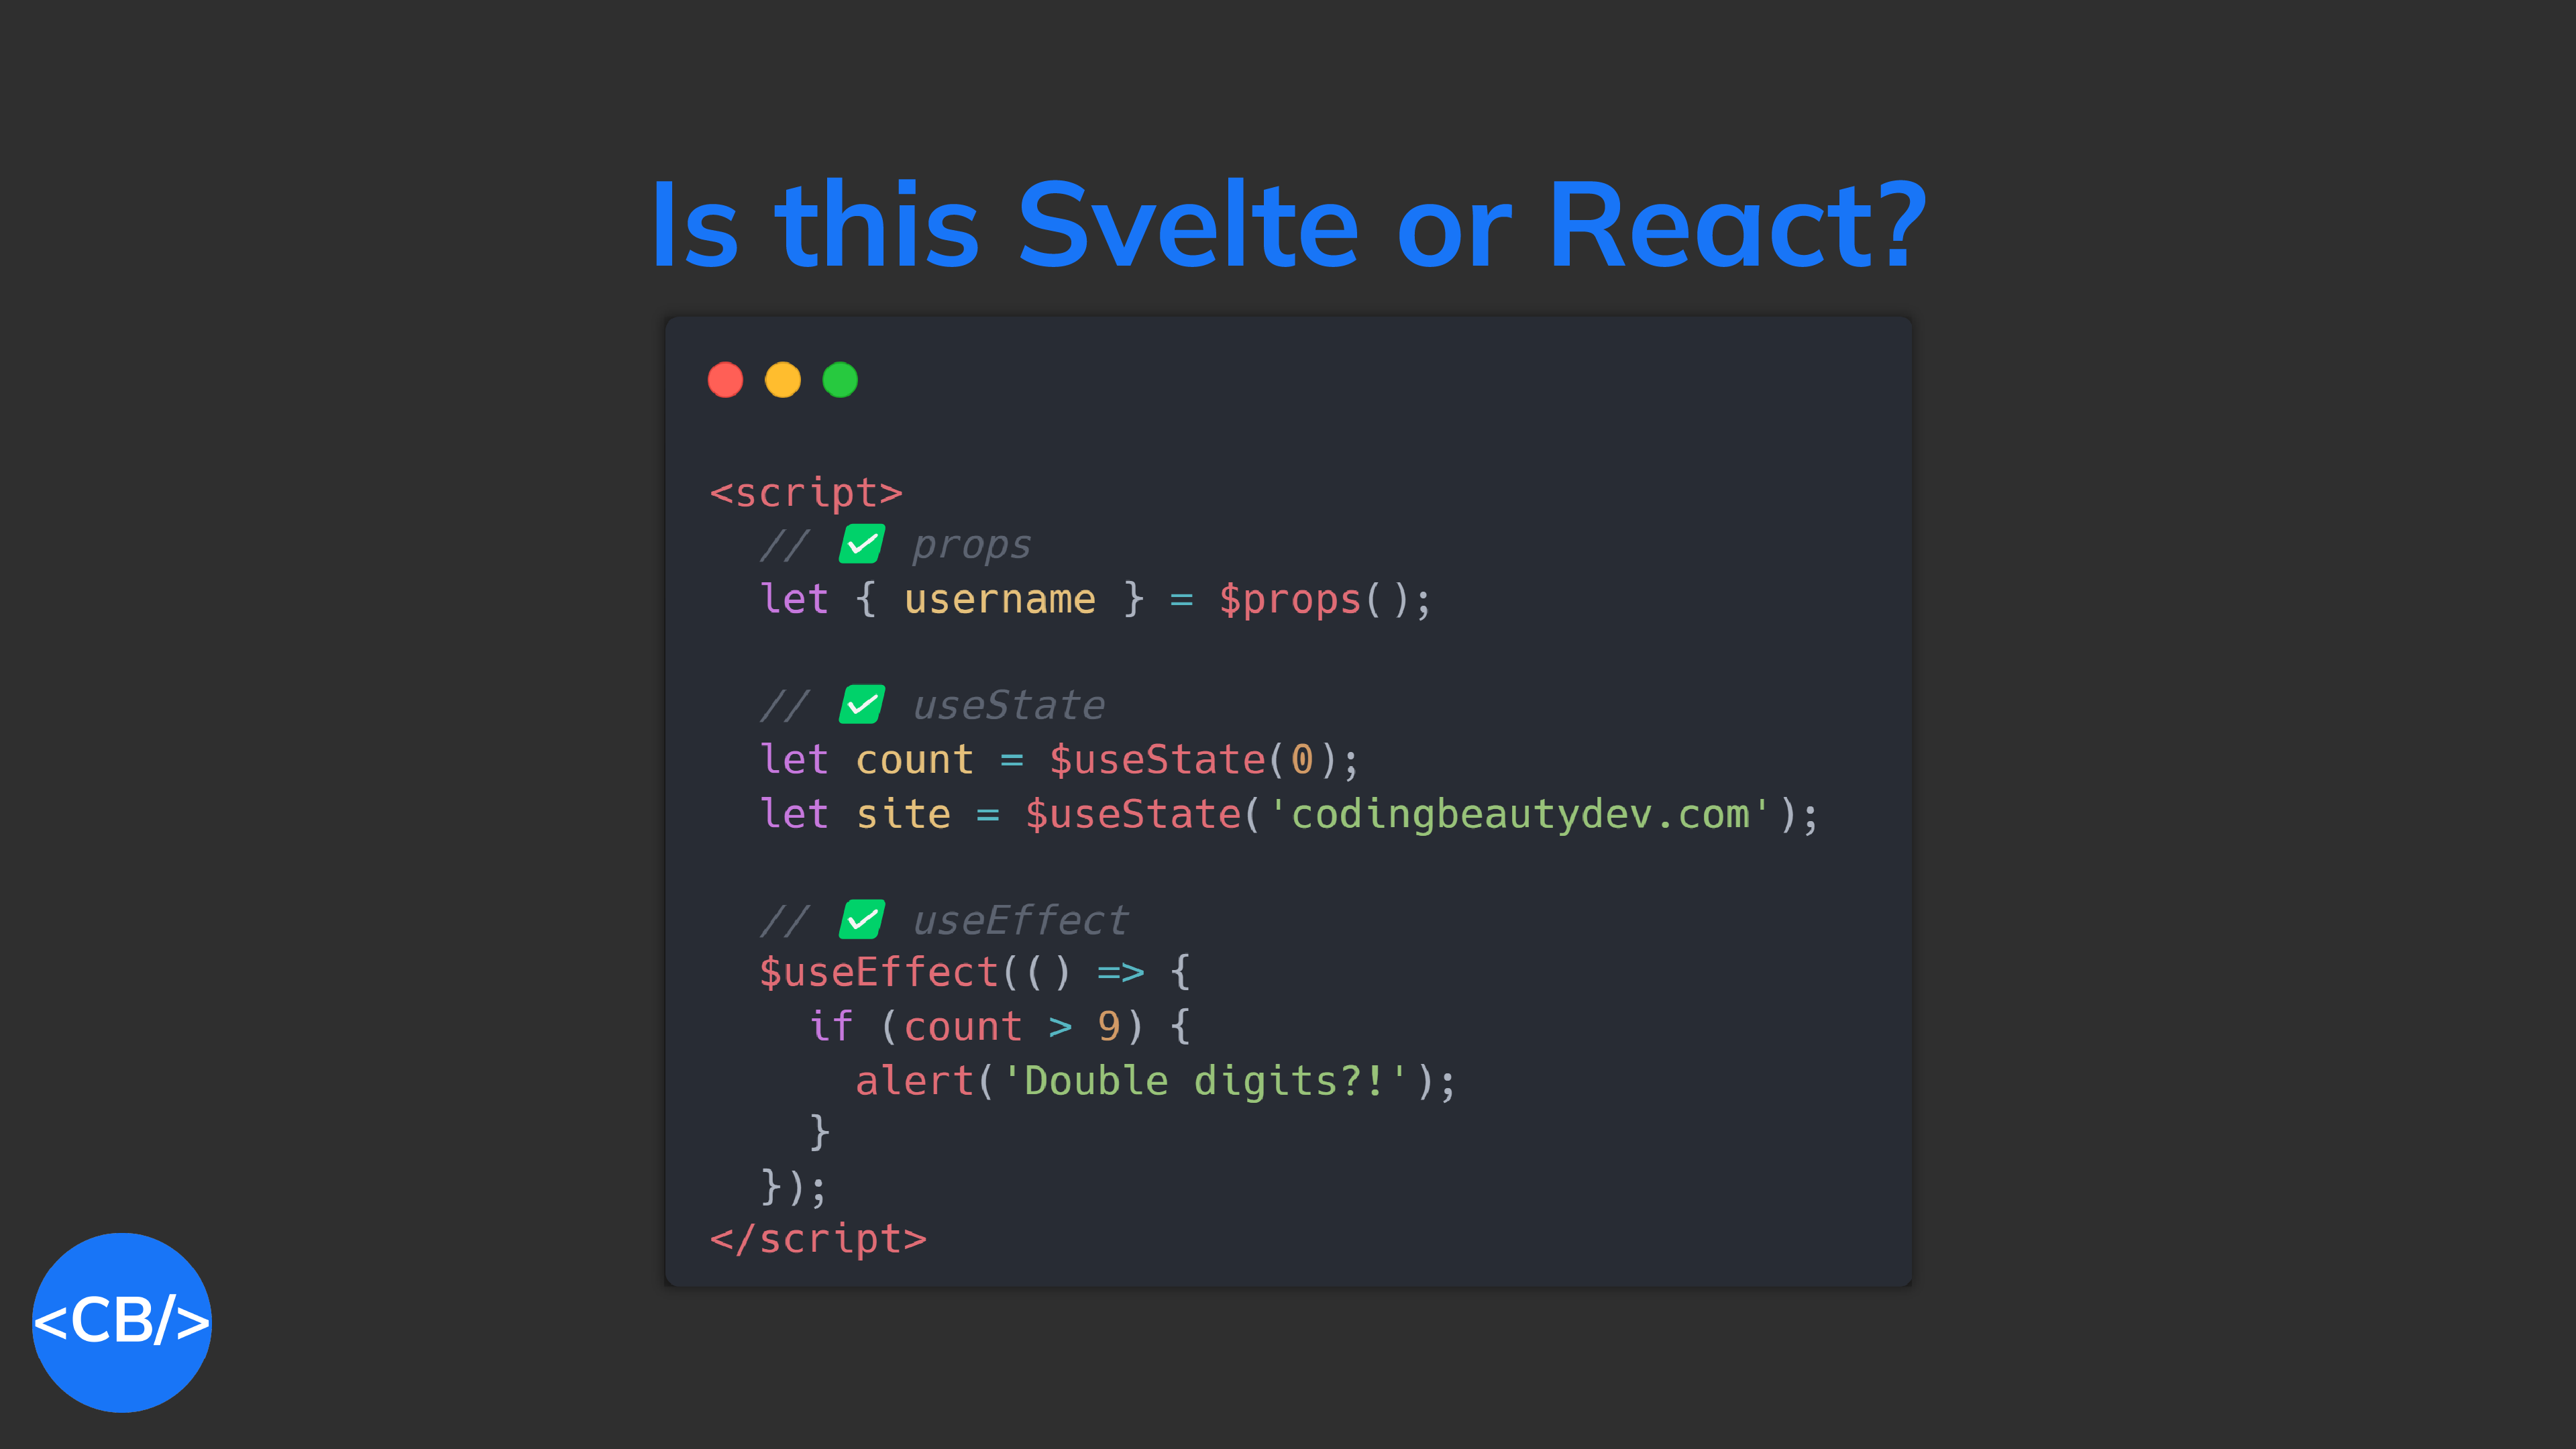
Svelte intelligently figures out dependencies to watch for, unlike React.
And what about handling events and updating the state?
In React:
JavaScriptCopied!
export function Component() {
  // 👇 `setState` function from `useState`
  const [count, setCount] = useState(0);

  return (
    // event handlers are good old JS functions
    <button
      onClick={() => setCount((prev) => prev + 1)}>
      Increase
    </button>
  );
}
❌ Before:
Svelte used to treat events specially and differently from props.
HTMLCopied!
<script>
  let count = $state(0);
</script>

Count: {count}
<br />
<!-- 👇 special on: directive for events -->
<button on:click={() => count++}>
  Increase
</button>
✅ Now:
Svelte is now following React’s style of treating events just like properties.
HTMLCopied!
<script>
  let count = $state(0);
</script>

Count: {count}
<br />
<!-- 👇onclick is just a regular JS function now -->
<button onclick={() => count++}>
  Increase
</button>
Custom component props
In React:
Props are a regular JS object the component receives:
And then hooks came along to let us have much simpler function components?
Svelte has now done something similar, by making components classes instead of functions by default.
In practice this won’t change much of how you write Svelte code — we never created the classes directly anyway — but it does tweak the app mounting code a little:
JavaScriptCopied!
import { mount } from 'svelte';
import App from './App.svelte'

// ❌ Before
const app = new App({ target: document.getElementById("app") });

// ✅ After
const app = mount(App, { target: document.getElementById("app") });

export default app;
Final thoughts
It’s great to see Svelte improve with inspiration from other frameworks.
Gaining the intuitiveness of the React-style design while staying lean and fast.
Next.js 15 gives you a clean way to separate essential from non-essential tasks from every server request:
Essential: Auth checks, DB updates, etc.
Non-essential: Logging, analytics, etc.
JavaScriptCopied!
import { unstable_after as after } from 'next/server';
import { log } from '@/app/utils';

export default function Layout({ children }) {
  // Secondary task
  after(() => {
    log();
  });

  // Primary tasks
  // fetch() from DB
  return <>{children}</>;
}
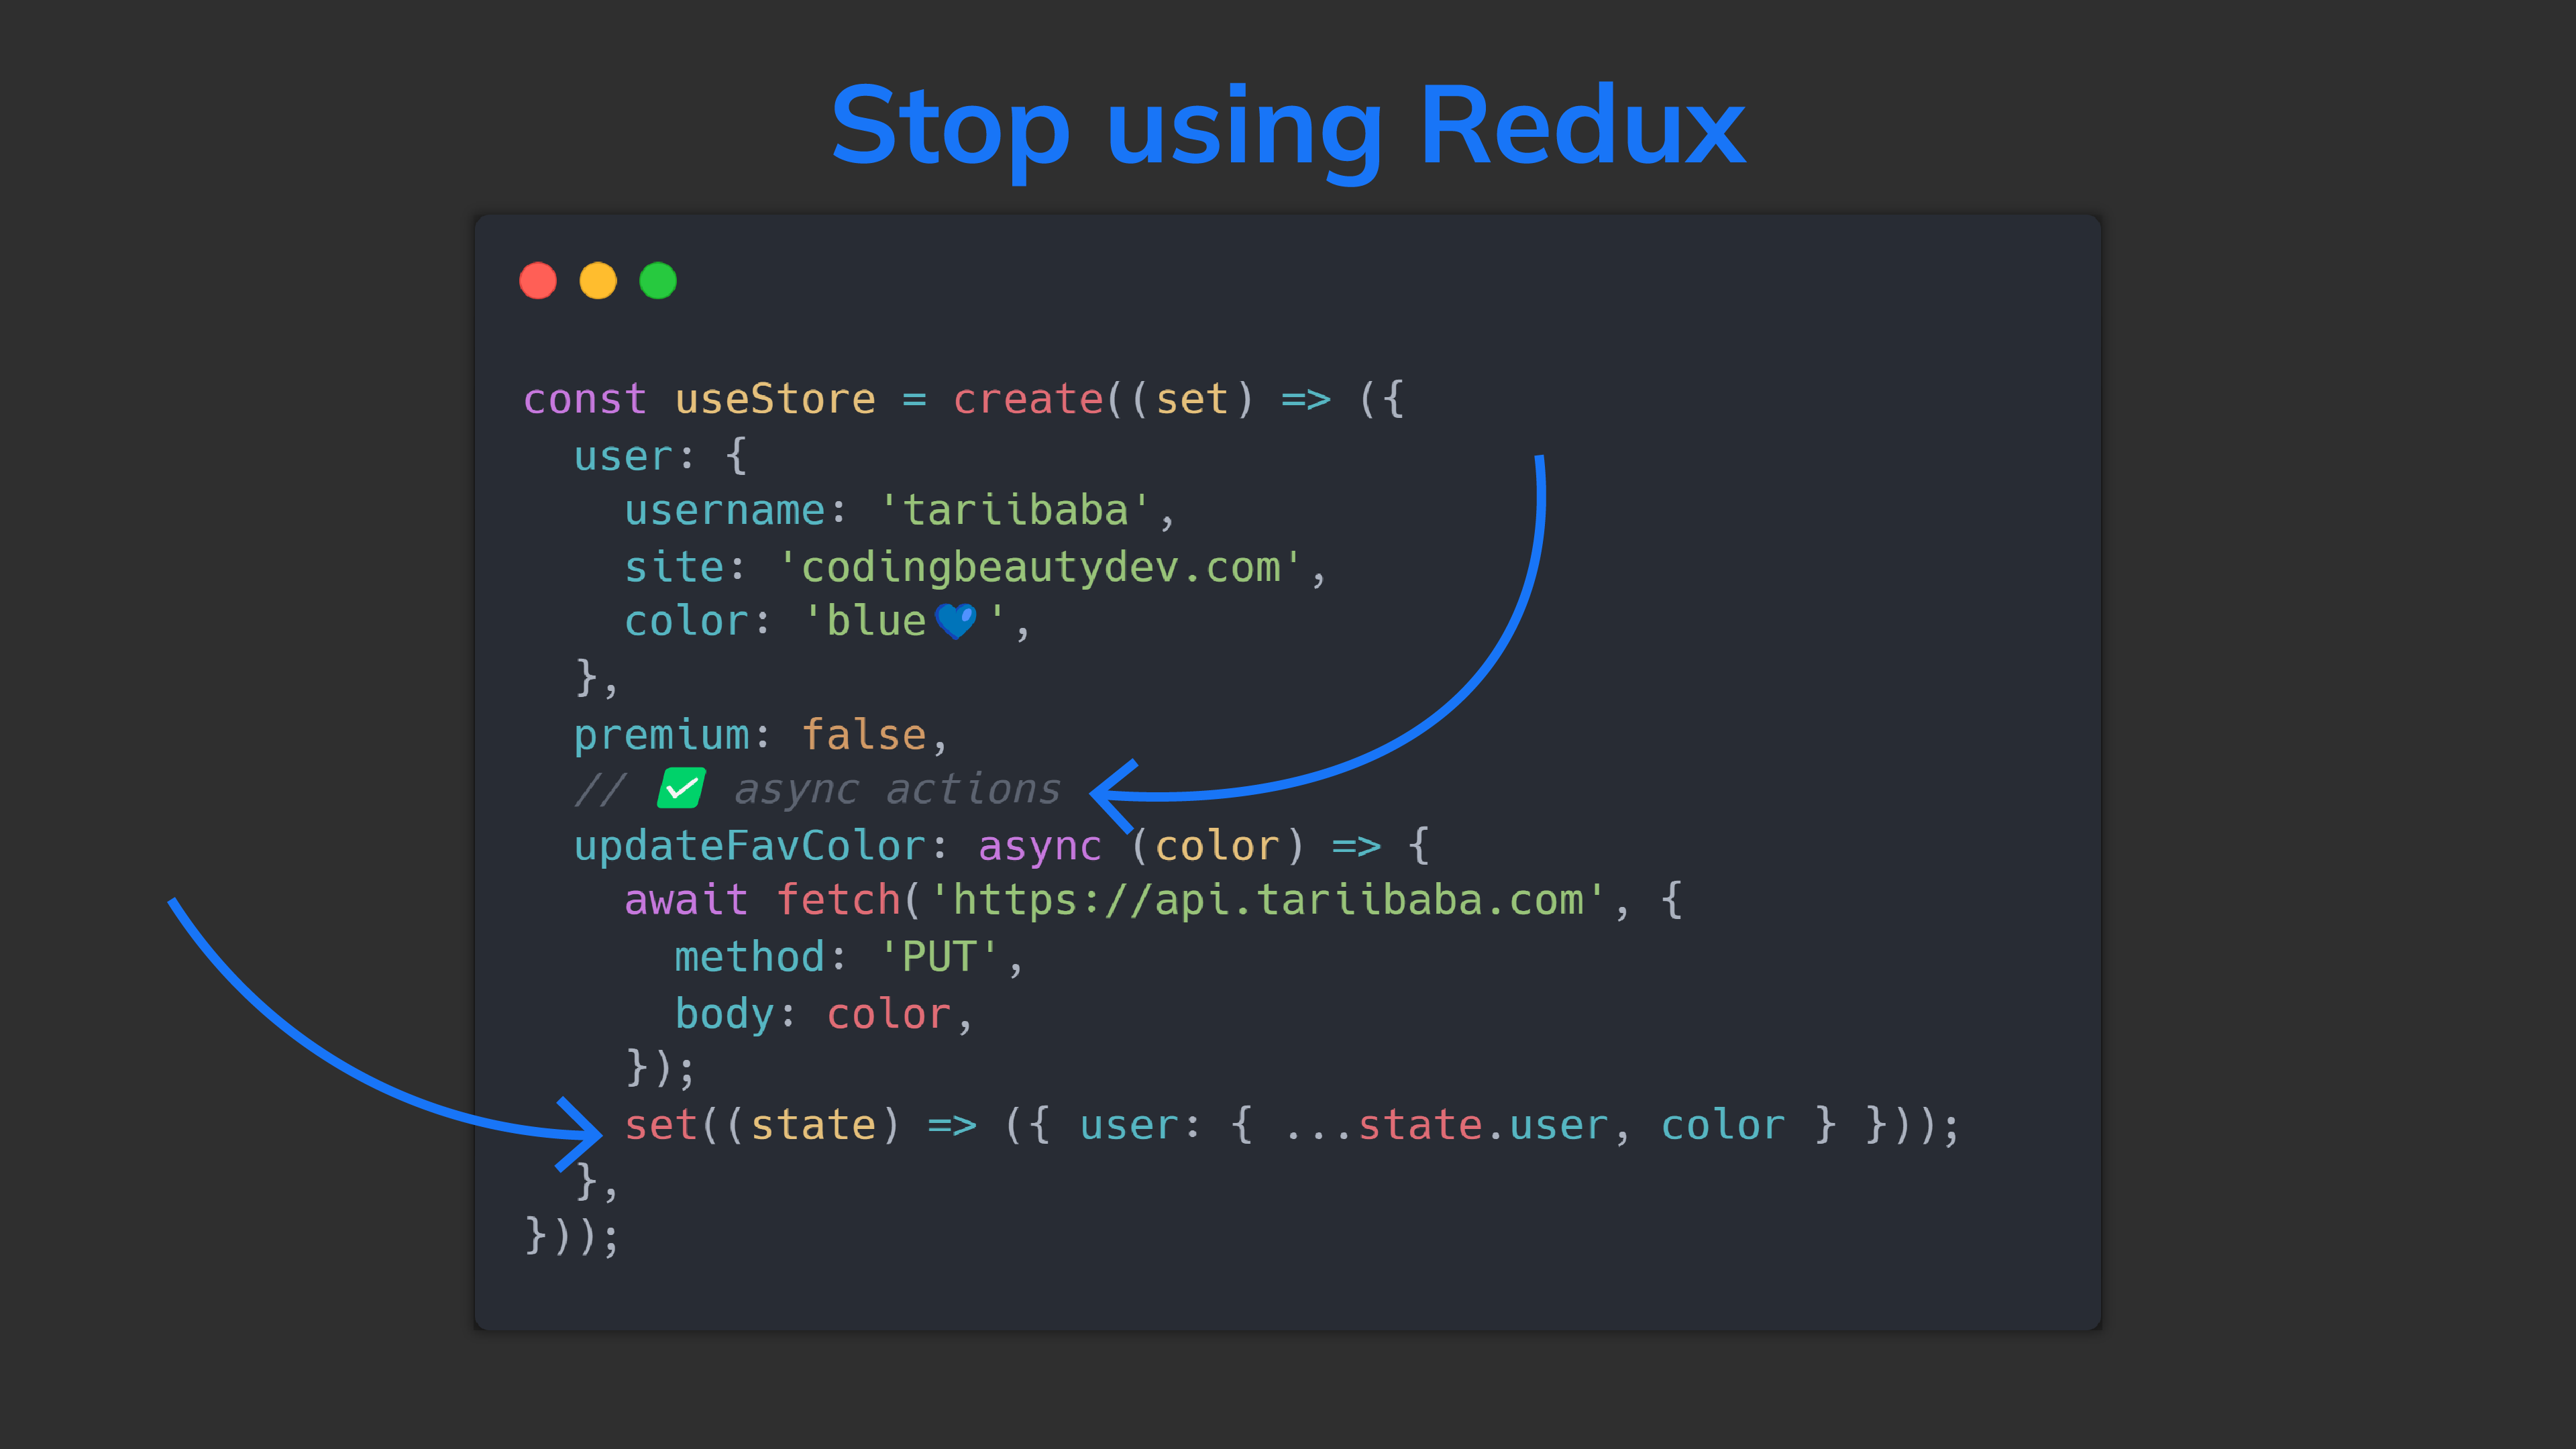
It’s also easy to get state within actions, thanks to get — the 2nd param in create()‘s callback:
JavaScriptCopied!
// ✅ `get` lets us use state directly in actions
const useStore = create((set, get) => ({
  user: {
    username: 'tariibaba',
    site: 'codingbeautydev.com',
    color: 'blue💙',
  },
  messages: [],
  sendMessage: ({ message, to }) => {
    const newMessage = {
      message,
      to,
      // ✅ `get` gives us `user` object
      from: get().user.username,
    };
    set((state) => ({
      messages: [...state.messages, newMessage],
    }));
  },
}));
It’s all about hooks in Zustand, but if you want you can read and subscribe to values in state directly.
JavaScriptCopied!
// Get a non-observed state with getState()
const count = useStore.getState().count;

useStore.subscribe((state) => {
  console.log(`new value: ${state.count}`);
});
This makes it great for cases where the property changes a lot but you only need the latest value for intermediate logic, not direct UI:
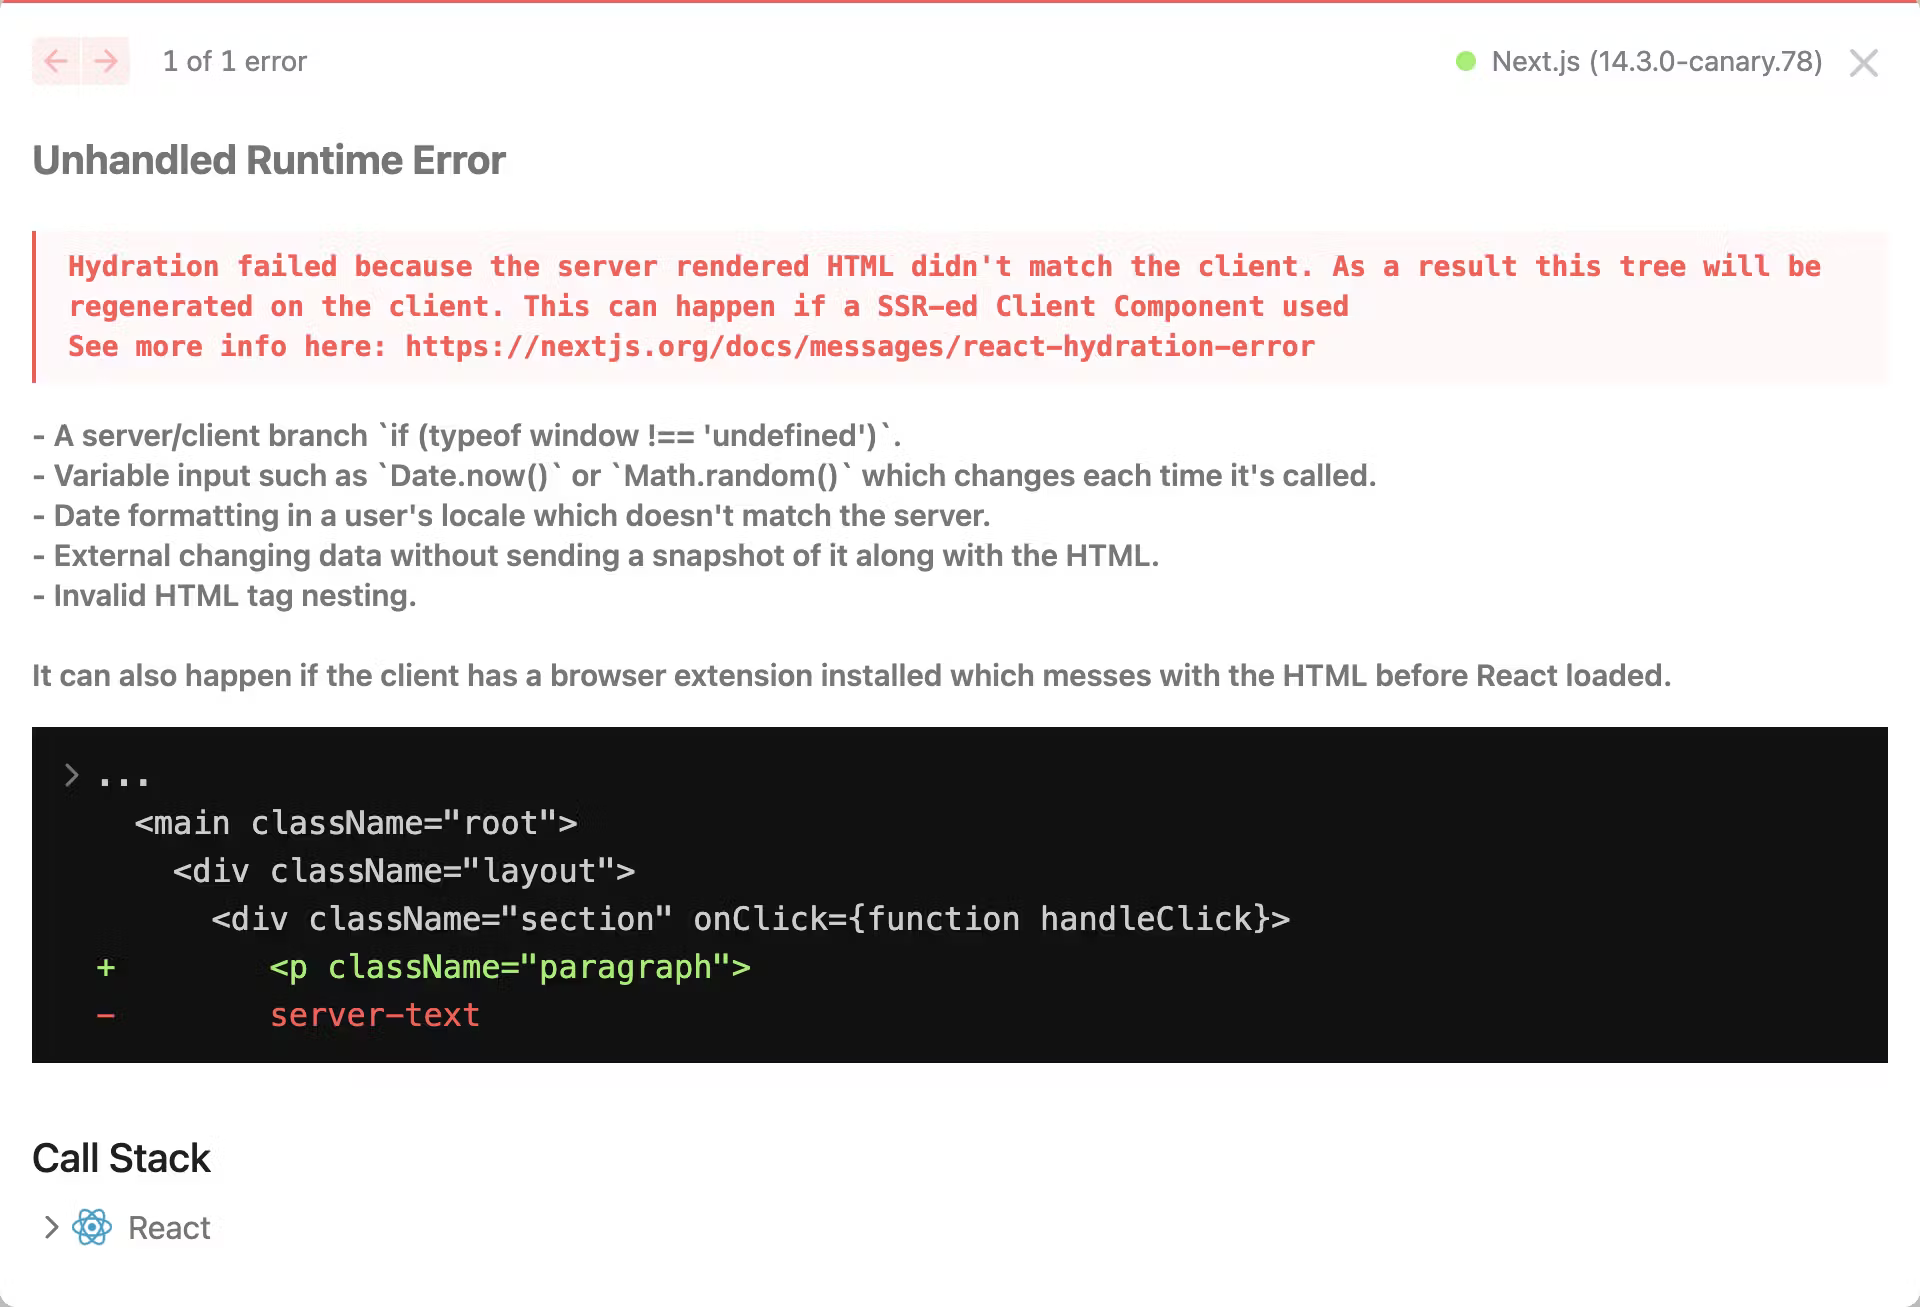
I was coding the other day and stumbled upon something atrocious.
Do you see it?
Let’s zoom in a bit more:
This line:
Please don’t do this in any language.
Don’t await properties.
You’re destroying your code readability and ruining the whole concept of OOP.
Properties are features not actions.
They don’t do like methods. They are.
They are data holders representing states of an object.
Simple states:
JavaScriptCopied!
class Person {
  firstName = 'Tari';
  lastName = 'Ibaba';
  site = 'codingbeautydev.com';
}
Derived states — what getters are meant for:
JavaScriptCopied!
class Person {
  firstName = 'Tari';
  lastName = 'Ibaba';
  site = 'codingbeautydev.com';

  get fullName() {
    return `${this.firstName} ${this.lastName}`;
  }
}

const person = new Person();

console.log(person.fullName); // Tari Ibaba
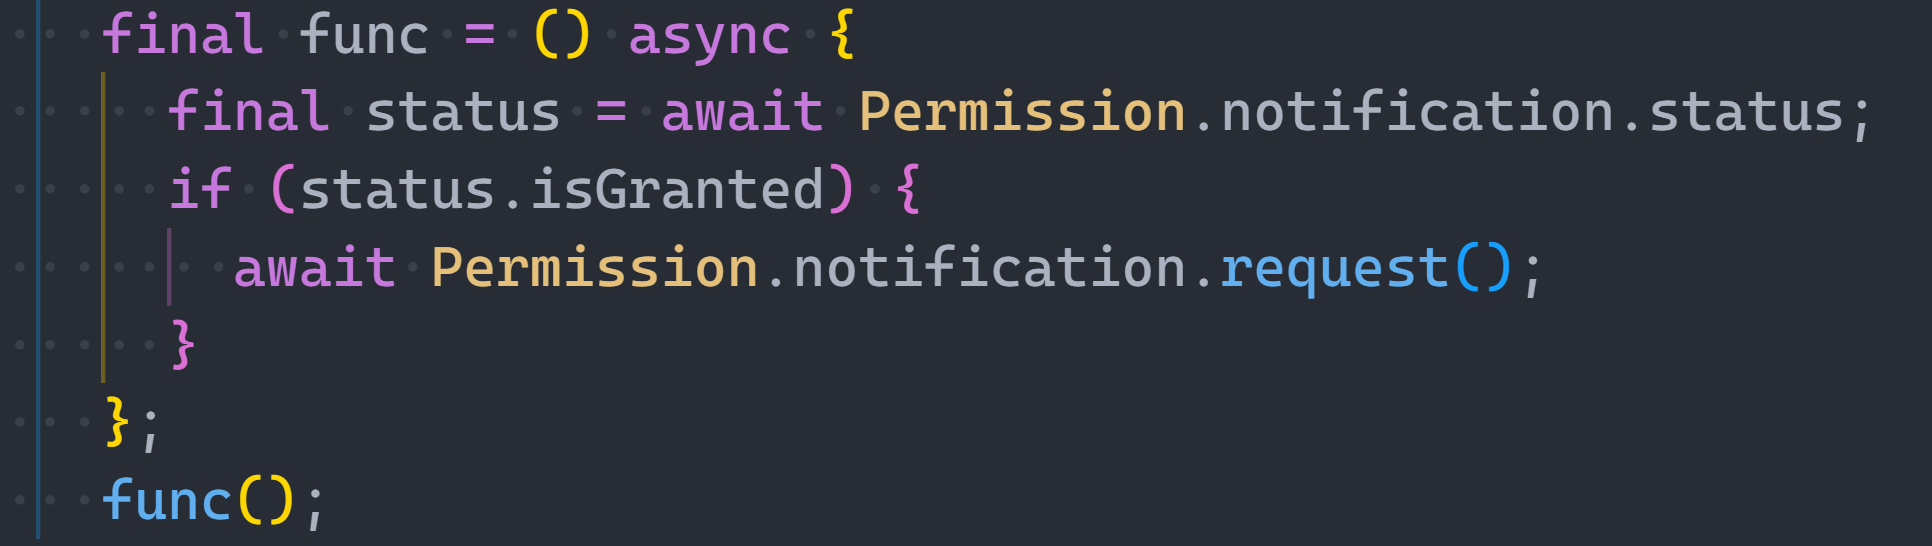
But the status property was returning a Dart Future — JavaScript’s Promise equivalent:
❌Before:
JavaScriptCopied!
class Permission {
  get status() {
    return new Promise((resolve) => {
      //
      resolve();
    });
  }
}

const notifications = new Permission();
await notifications.status;
It would have been so much better to use a method:
✅ After:
JavaScriptCopied!
class Permission {
  getStatus() {
    return new Promise((resolve) => {
      //
      resolve();
    });
  }
}

const notifications = new Permission();
await notifications.getStatus();
And now async/await can make things even more intuitive:
JavaScriptCopied!
class Permission {
  async getStatus() {
    //
  }
}

const notifications = new Permission();
await notifications.getStatus();
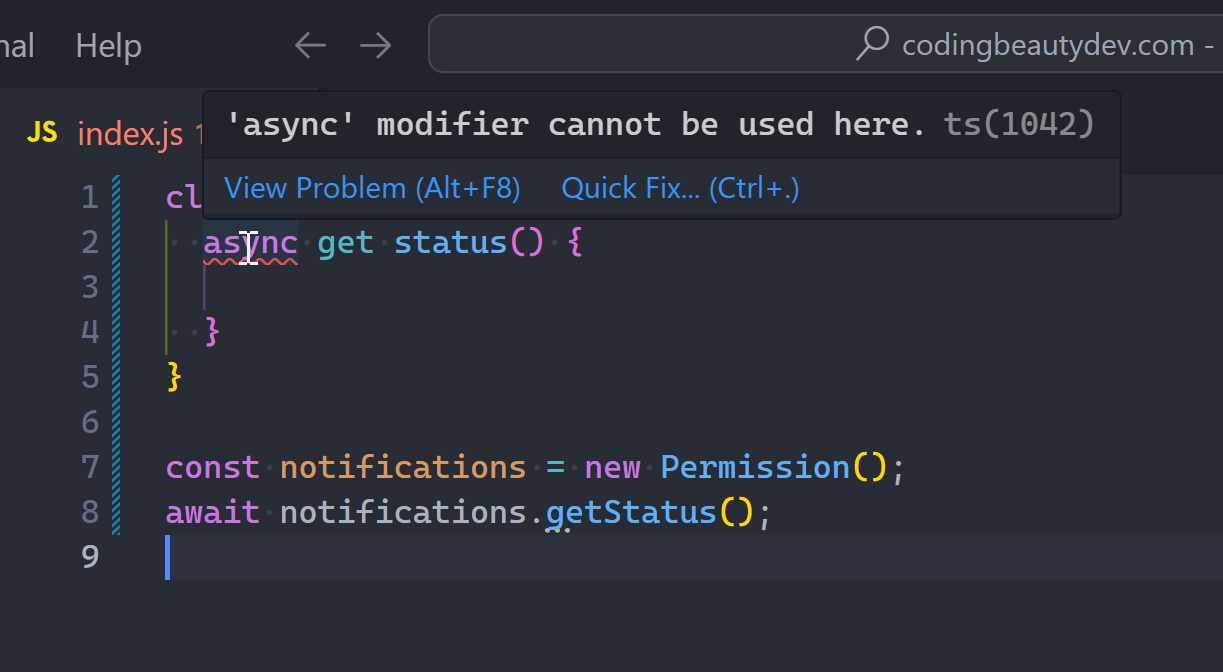
But guess what happens when you try async/await with properties?
Exactly. It’s a property.
This rule doesn’t just apply to async tasks, it applies to any long-running action, synchronous or not:
❌ Before:
JavaScriptCopied!
class ActionTimer {
  constructor(action) {
    this.action = action;
  }

  // ❌ Property
  get time() {
    const then = Date.now();
    for (let i = 0; i < 1000000; i++) {
      this.action();
    }
    const now = Date.now();
    return now - then;
  }
}

const splice = () => [...Array(100)].splice(0, 10);

const actionTimer = new ActionTimer(splice);

console.log(`[email protected]: ${actionTimer.time}`);
✅ After:
Let them know that the action is expensive enough to deserve caching or variable assignment:
JavaScriptCopied!
class ActionTimer {
  constructor(action) {
    this.action = action;
  }

  // ✅ Get method
  getTime() {
    const then = Date.now();
    for (let i = 0; i < 1000000; i++) {
      this.action();
    }
    const now = Date.now();
    return now - then;
  }
}

const splice = () => [...Array(100)].splice(0, 10);

const actionTimer = new ActionTimer(splice);

const theTime = actionTimer.getTime();
console.log(`[email protected]: ${theTime}`);
But sometimes it still doesn’t deserve to be a property with this.
Check this out — do you see the issue with the level setter property?
JavaScriptCopied!
class Human {
  site = 'codingbeautydev.com';
  status = '';
  _fullness = 0;
  timesFull = 0;

  set fullness(value) {
    this._fullness = value;
    if (this._fullness <= 4) {
      this.status = 'hungry';
    } else if (this._fullness <= 7) {
      this.status = 'okay';
    } else {
      this.status = 'full';
      timesFull++;
    }
  }
}

const human = new Human();
human.fullness = 5;
console.log(`I am ${human.status}`);
It doesn’t just modify the backing _fullness field — it changes multiple other fields. This doesn’t make sense as a property, as data.
It’s affecting so much aside from itself.
It has side-effects.
Setting this property multiple times modifies the object differently each time.
JavaScriptCopied!
const human = new Human();

human.fullness = 8;

console.log(human.timesFull); // 1

human.fullness = 9;

console.log(human.timesFull); // 2

console.log(`I am ${human.status}`);
So even though it doesn’t do much, it still needs to be a method.
JavaScriptCopied!
class Human {
  site = 'codingbeautydev.com';
  status = '';
  _fullness = 0;

  setLevel(value) {
    this._fullness = value;
    if (this._fullness <= 3) {
      this.status = 'hungry';
    } else if (this._fullness <= 7) {
      this.status = 'okay';
    } else {
      this.status = 'full';
    }
  }
}

const human = new Human();
human.setLevel(5);
console.log(`I am ${human.status}`);
Name them right
Natural code. Coding like natural language.
So always name the properties with nouns like we’ve been doing here.
JavaScriptCopied!
class ActionTimer {
  constructor(action) {
    this.action = action;
  }

  // ✅ Noun for property
  get time() {
    // ...
  }
}
But you see what we did when it was time to make it a property?
We made it a verb. Cause now it’s an action that does something.