Google’s new AI image generator is going to change everything
Woah this is huge.
Google’s Nano Banana Pro image model is spitting out crazier things than we ever expected.
Would you know this came from AI even no one ever told you?

How about this:

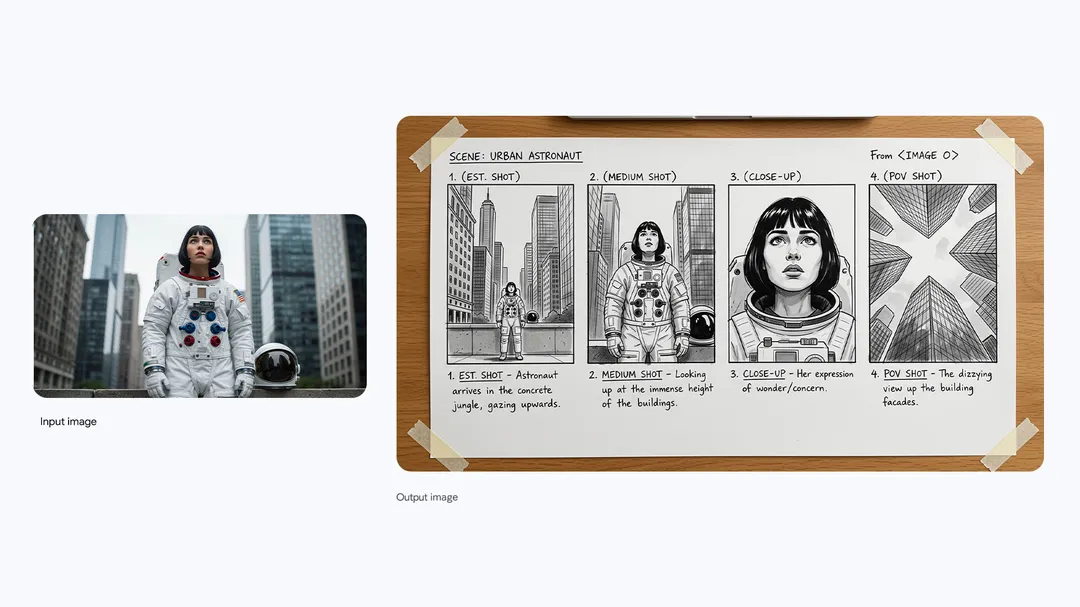
This one is absolutely insane:

Nano Banana Pro is built on Gemini 3 Pro and it’s taking Google’s visual AI ambitions far beyond playful edits and into the realm of professional-grade creative work.
The original Nano Banana became a global hit thanks to its ability to instantly enhance and remix images with little effort.
Nano Banana Pro keeps that simplicity but pairs it with the reasoning power and world knowledge of Gemini 3 Pro — giving us visuals that aren’t just attractive—they’re accurate, consistent, and deliberate.
Smarter, context-aware visuals

Nano Banana Pro is designed to generate reliable, information-rich images such as infographics, diagrams, mockups, and storyboards.
By grounding prompts in real-world data and Google Search, it reduces hallucinations and improves factual accuracy—especially useful for educational and informational media.
Dramatically improved text rendering

One of the biggest challenges for AI imagery has been producing clean, correct text inside images.
Nano Banana Pro finally solves this. It can render long, multi-language text clearly and consistently, making it ideal for posters, ads, packaging, UI mocks, lesson materials, and promotional graphics.
High control and consistent identity

The Pro model offers creators far more control.
It can blend up to 14 input images into a single cohesive scene while maintaining consistent character likenesses across multiple shots.

You can adjust lighting, camera angles, depth of field, and color grading with precision. Output quality reaches 2K and 4K, with support for multiple aspect ratios.
This unlocks everything from stable character storyboards to polished product prototypes and cinematic scenes.
Where can you use it?
Google is rolling out Nano Banana Pro across its ecosystem:
- Gemini app: Accessible globally; free users get limited Pro generations, while paid AI tiers receive expanded access.
- Search: Available in AI Mode for subscribers in supported regions.
- NotebookLM: Integrated for creating visuals tied to research or notes.
- Google Ads and Workspace: Replacing older image models for asset generation in Slides, Vids, and ads workflows.
- Developers: Offered through the Gemini API, Google AI Studio, and soon Vertex AI.
- Flow (Google’s film tool): Coming soon for Ultra subscribers needing granular video frame control.
Transparency through SynthID
All Nano Banana Pro images are embedded with SynthID, Google’s invisible watermarking technology.
You can even upload an image into Gemini and ask whether Google AI generated it. Free-tier generations include a visible watermark, while Pro-tier images keep only the invisible SynthID layer.
Nano Banana Pro marks a shift: image generation is no longer just about aesthetic novelty. It’s becoming a foundational tool for education, advertising, product design, content creation, and storytelling.
With reliable text, image consistency, and advanced editing capabilities, Google is positioning Nano Banana Pro as a practical, everyday creative companion—not just a novelty generator.
Nano Banana Pro turns AI imaging from fun into functional, opening doors for creators, students, professionals, and developers alike.