DeepSeek v4 Flash is absolutely insane
Imagine having a model that’s 30 times cheaper than Claude models — yet just as intelligent?
China just turned the entire AI race on its head with the new DeepSeek v4 Flash model. This is unbelievable.
We are talking cents here — it’s not even up to 1 dollar per million tokens. It’s not even up to 50 cents.
We’ve never seen something like before.
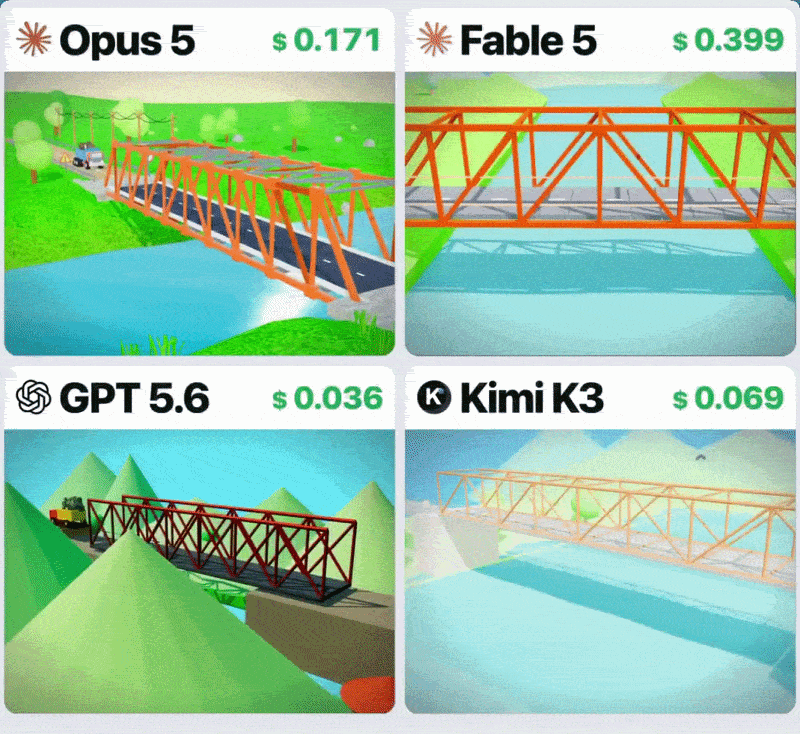
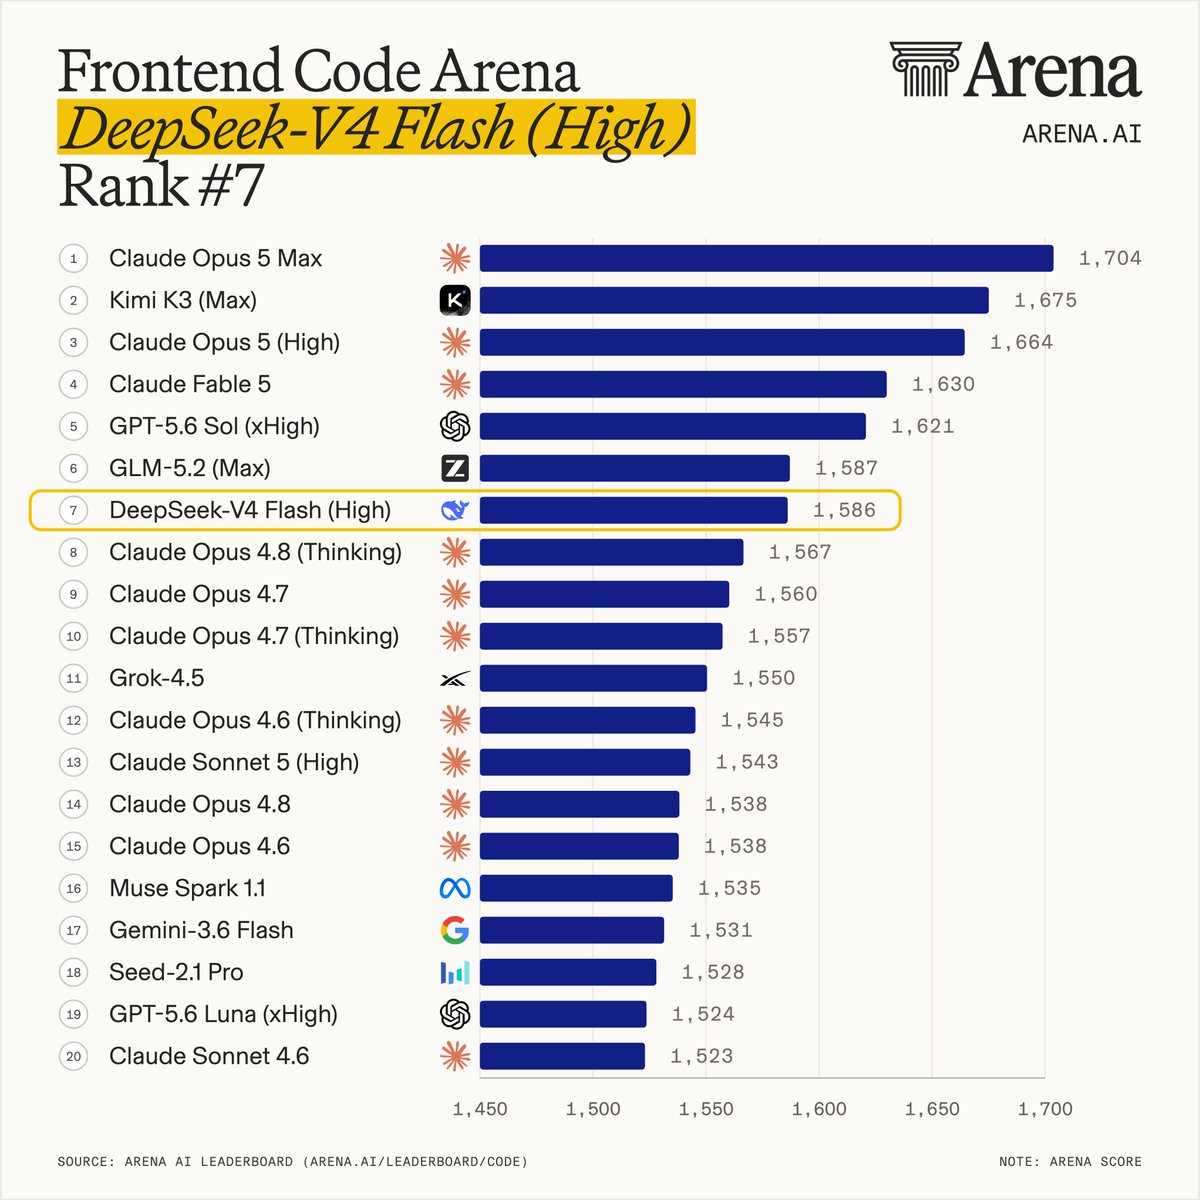
It even dominates almost all the Opus in some benchmarks — like the Frontend Code AI Arena — and keep in mind that it’s at least 35 times cheaper than all the close-sourced models that rank above it here:
And this shockingly cheap intelligence is just one of the many things that make this new model so incredible.
It uses a state-of-the-art thinking system that makes it exponentially more efficient and powerful than models of a similar size.
It uses a sophisticated token processing system that dramatically improves the quality of the 1 million token context window it has.
This is going to be a major major game changer for so many developers.
Insane coding and agentic ability and incredible results
It was clearly built from the ground up and optimized for AI agents and software engineering.
The model gives us significant gains on several challenging coding benchmarks.
DeepSeek V4 Flash achieved 79.0% on SWE-bench Verified, finishing within 1.8 percentage points of Claude Opus 4.7 (80.8%) and 1.6 points of DeepSeek V4 Pro (80.6%) while delivering significantly lower inference costs.
DeepSeek also reports a 12+ percentage point reduction in hallucination rates compared to previous generations.
For autonomous agents, that means:
- fewer incorrect commands
- more reliable tool usage
- better multi-step execution
- less manual intervention
These improvements also make v4 Flash a more than excellent choice to use with Claude Code and OpenClaw.
Ridiculously cheap pricing
You’re basically paying next to nothing:
- $0.14 per million input tokens
- $0.28 per million output tokens
Compare to that Claude Opus 5 and see the massive difference:
- $5.00 per million tokens (35 times more expensive)
- $25.00 per million tokens (90 times more expensive)
Those numbers alone make V4 Flash one of the most affordable frontier-class models available.
The real game changer, however, is the 98% prompt cache discount on the first-party API.
Cached input tokens cost just $0.0028 per million tokens.
For AI agents that repeatedly process the same:
- system prompts
- codebases
- documentation
- conversation history
…this dramatically reduces operating costs.
Instead of paying to reprocess identical context on every request, cached prompts become almost free — making long-running coding agents and autonomous workflows far more economical.
State-of-the-art architecture keeps it lightweight & efficient
On LiveCodeBench, DeepSeek V4 Flash achieved an impressive 91.6%, coming within just 0.1 percentage points of Gemini 3.1 Pro (91.7%) while outperforming Claude Opus 4.6 (88.8%)—placing it among the world’s top coding model
On paper V4 Flash is enormous — it contains 284 billion total parameters.
Yet it activates only 13 billion parameters per token thanks to its Mixture-of-Experts (MoE) architecture.
Instead of running the full model every time, it dynamically selects only the experts needed for each token.
This gives us:
- lower compute requirements
- faster inference
- reduced serving costs
- frontier-level capability with lightweight performance
DeepSeek also introduced native MXFP4/FP8 mixed-precision quantization, allowing community-built GGUF versions to run locally on capable consumer hardware.
That makes experimentation and self-hosting much more accessible without requiring enterprise GPU clusters.
Sophisticated token processing system for 1 million tokens
Long-context reasoning has become one of the biggest challenges for modern language models.
Rather than relying solely on traditional Multi-Head Attention, V4 Flash introduces a Hybrid Attention architecture combining:
- Compressed Sparse Attention (CSA)
- Heavily Compressed Attention (HCA)
This enables a native 1 million-token context window while significantly reducing:
- KV-cache memory usage
- per-token compute (FLOPs)
For us developers this means entire codebases, large document collections, research archives, and long-running conversations can remain in a single context without the heavy performance penalties typically associated with extremely long inputs.
Dynamic thinking budgets
Another standout feature is DeepSeek’s configurable reasoning system.
We can now choose how much reasoning the model performs before generating a response.
Available modes include:
- Non-Think – optimized for low latency, structured outputs, and simple chat.
- Think High – allocates additional reasoning for debugging, planning, and more complex coding tasks.
- Think Max – provides the largest reasoning budget, allowing V4 Flash to approach the reasoning quality of much larger frontier models on difficult problems.
This flexibility lets developers balance intelligence, latency, and cost based on the task instead of paying for maximum reasoning on every request.
DeepSeek V4 Flash represents a different direction for frontier AI.
Its combination of:
- industry-leading API pricing
- a 98% prompt cache discount
- strong agentic and coding performance
- 284B total parameters with only 13B active per token
- a 1 million-token context window
- configurable reasoning budgets
makes it one of the most compelling production-ready AI models available today.
For developers building AI agents, coding assistants, or enterprise applications, V4 Flash loudly shows us that frontier-level intelligence no longer has to come with frontier-level costs.