To change the style of an element on click in Vue:
- Create a boolean state variable to conditionally set the style on the element depending on the value of this variable.
- Set a
clickevent handler on the element that toggles the value of the state variable.
For example:
App.vue
<template>
  <div id="app">
    <p>Click the button to change its color.</p>

    <button
      role="link"
      @click="handleClick"
      class="btn"
      :style="{
        backgroundColor: active ? 'white' : 'blue',
        color: active ? 'black' : 'white',
      }"
    >
      Click
    </button>
  </div>
</template>

<script>
export default {
  data() {
    return {
      active: false,
    };
  },
  methods: {
    handleClick() {
      this.active = !this.active;
    },
  },
};
</script>

<style>
.btn {
  border: 1px solid gray;
  padding: 8px 16px;
  border-radius: 5px;
  font-family: 'Segoe UI';
  font-weight: bold;
}
</style>

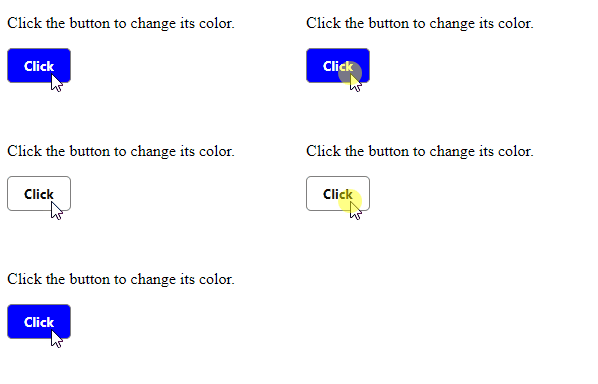
The active state variable determines the style that will be applied to the element. When it is false (the default), a certain style is applied.
We set a click event handler on the element, so that the handler will get called when it is clicked. The first time this handler is called, the active variable gets toggled to true, which changes the style of the element.
Note
To prevent the style from changing every time the element is clicked, we can set the state variable to true, instead of toggling it:
handleClick() {
  this.active = true

  // this.active = !this.active
},
We used ternary operators to conditionally set the backgroundColor and color style on the element.
The ternary operator works like an if/else statement. It returns the value before the ? if it is truthy. Otherwise, it returns the value to the left of the :.
const treshold = 10;

const num = 11;

const result = num > treshold ? 'Greater' : 'Lesser';

console.log(result) // Greater
So if the active variable is true, the backgroundColor and color are set to white and black respectively. Otherwise, they’re set to blue and white respectively.
Change element style on click with classes
To change the style of an element on click in Vue, we can also create classes containing the alternate styles and conditionally set them to the class prop of the element, depending on the value of the boolean state variable.
For example:
App.vue
<template>
  <div id="app">
    <p>Click the button to change its color.</p>

    <button
      role="link"
      @click="handleClick"
      class="btn"
      :class="active ? 'active' : 'non-active'"
    >
      Click
    </button>
  </div>
</template>

<script>
export default {
  data() {
    return {
      active: false,
    };
  },
  methods: {
    handleClick() {
      this.active = !this.active;
    },
  },
};
</script>

<style>
.btn {
  border: 1px solid gray;
  padding: 8px 16px;
  border-radius: 5px;
  font-family: 'Segoe UI';
  font-weight: bold;
}

.active {
  background-color: white;
  color: black;
}

.non-active {
  background-color: blue;
  color: white;
}
</style>
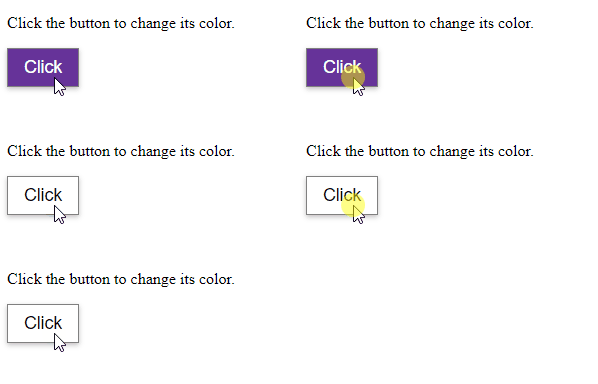
We create two classes (active and non-active) with different styles, then we use the ternary operator to add the active class if the active variable is true, and add the non-active class if otherwise.
The advantage of using classes is that we get to cleanly separate the styles from the template markup. Also, we only need to use one ternary operator.
Change element style on click with event.currentTarget.classList
There are other ways to change the style of an element in Vue without using a state variable.
With classes defined, we can use the currentTarget.classList property of the Event object passed to the click event handler to change the style of the element.
For example:
App.vue
<template>
  <div id="app">
    <p>Click the button to change its color.</p>

    <button
      role="link"
      @click="handleClick"
      class="btn non-active"
    >
      Click
    </button>
  </div>
</template>

<script>
export default {

  methods: {
    handleClick(event) {
      // 👇 Change style
      event.currentTarget.classList.remove('non-active');
      event.currentTarget.classList.add('active');
    },
  },
};
</script>

<style>
.btn {
  border: 1px solid gray;
  padding: 8px 16px;
  font-family: Arial;
  font-size: 1.1em;
  box-shadow: 0 2px 5px #c0c0c0;
}

.active {
  background-color: white;
  color: black;
}

.non-active {
  background-color: rebeccapurple;
  color: white;
}
</style>

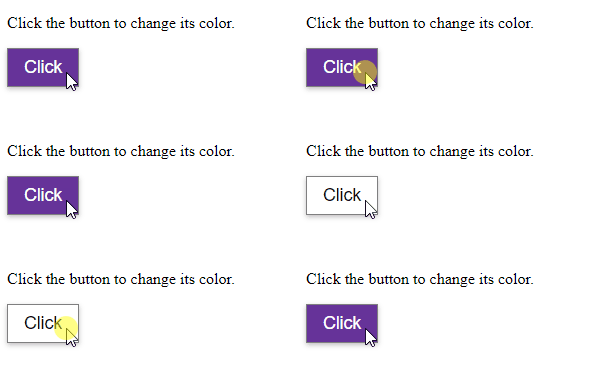
We don’t use a state variable this time, so we add the non-active class to the element, to customize its default appearance.
The click event listener receives an Event object used to access information and perform actions related to the click event.
The currentTarget property of this object returns the element that was clicked and had the event listener attached.
We call the classList.remove() method on the element to remove the non-active class, then we call the classList.add() method on it to add the active class.
Notice that the style of the element didn’t change anymore after being clicked once. If you want to toggle the style whenever it is clicked, you can use the toggle() class of the element to alternate the classes on the element.
App.vue
<template>
  <div id="app">
    <p>Click the button to change its color.</p>

    <button
      role="link"
      @click="handleClick"
      class="btn non-active"
    >
      Click
    </button>
  </div>
</template>

<script>
export default {
  methods: {
    handleClick(event) {

      // 👇 Alternate classes
      event.currentTarget.classList.toggle('non-active');
      event.currentTarget.classList.toggle('active');
    },
  },
};
</script>

<style>
.btn {
  border: 1px solid gray;
  padding: 8px 16px;
  font-family: Arial;
  font-size: 1.1em;
  box-shadow: 0 2px 5px #c0c0c0;
}

.active {
  background-color: white;
  color: black;
}

.non-active {
  background-color: rebeccapurple;
  color: white;
}
</style>

The classList.toggle() method removes a class from an element if it is present. Otherwise, it adds the class to the element.
Every Crazy Thing JavaScript Does
A captivating guide to the subtle caveats and lesser-known parts of JavaScript.


Worked like a charm. Thanks for the tutorial!
You’re very welcome