Authentication is critical for verifying the identity of your users in order to know what data they should have access to and what privileged actions they should be able to perform. The Firebase platform provides powerful libraries that let us easily integrate authentication into our projects.
In this article, we are going to implement authentication by building a RESTful API and a web app that allows a user to sign up with a secure note that will be accessible only to the user. We’ll be using Node.js and Express to build the API, and React.js to create the single-page web app.
The complete source code for the app is available here on GitHub.
What You’ll Need
- Node.js installed
- A Google account – to use Firebase
- Basic knowledge of React.js and Node.js
- A code editor – like Visual Studio Code
Setting up Firebase
Before we start coding, let’s head over to the Firebase console and create a new project, so that we can access Firebase services. I’m naming mine cb-auth-tutorial, but you can name yours whatever you like.

After giving it a name, you’ll be asked whether you want to enable Google Analytics. We won’t be using the service for this tutorial, but you can turn it on if you like.
After completing all the steps, you’ll be taken to the dashboard, where you can see an overview of your Firebase project. It should look something like this:
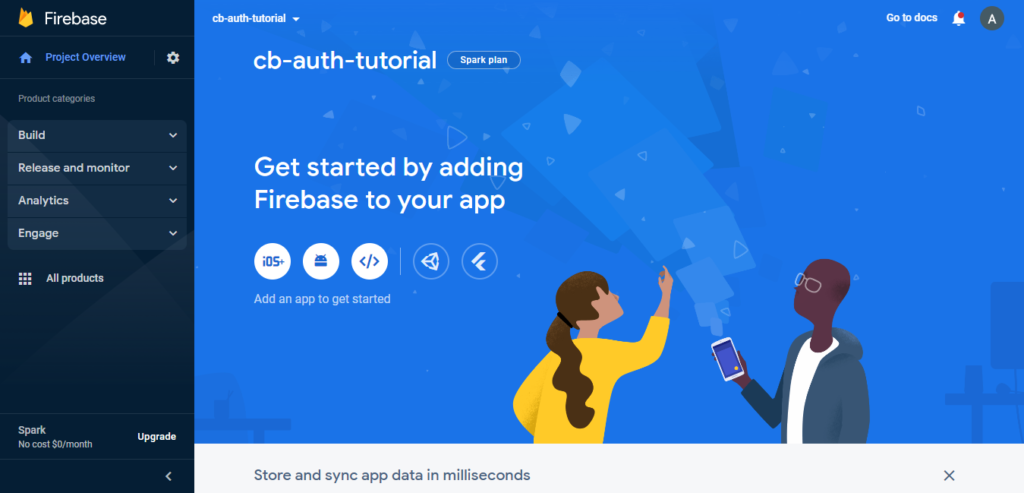
Let’s create a web app. Click this icon button to get started:

You’ll be asked to enter a nickname for the app. This can also be anything you like. I’m naming mine CB Auth Tutorial, for symmetry with the project name.

After registering the app, you’ll be provided with a configuration that you’ll need to initialize your app with to be able to access the various Firebase APIs and services.
From the dashboard sidebar, click on Build > Authentication, then click on Get started on the screen that shows to enable Firebase Authentication. You’ll be asked to add an initial sign-in method.
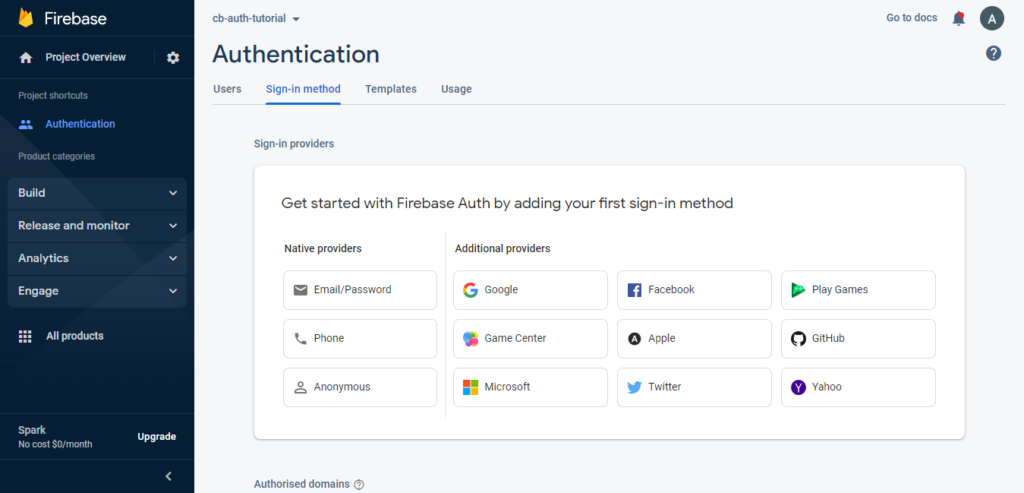
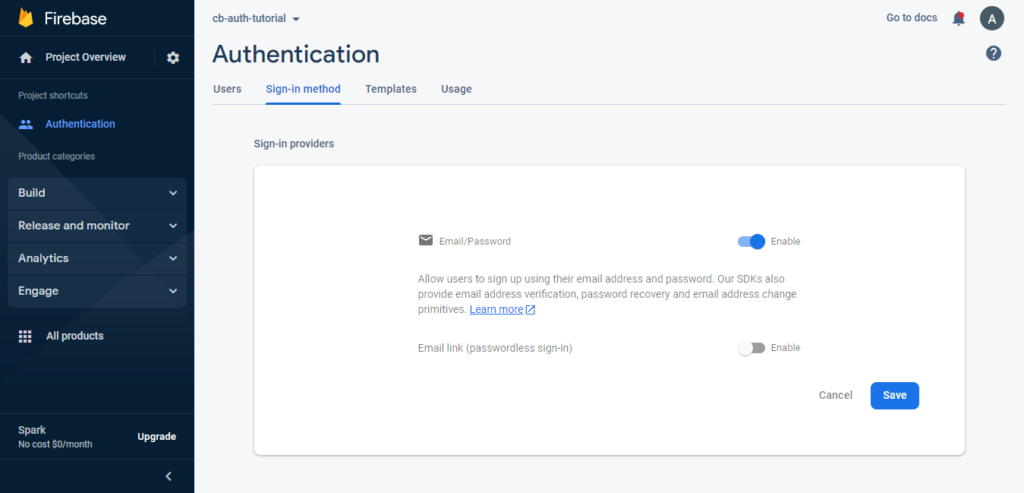
Click on Email/Password and turn on the switch to enable it.
Next, we’ll set up Firebase Firestore.
Click on Build > Firestore Database in the sidebar, then click the Create database button on the page that shows to enable Firestore.
You’ll be presented with a dialog that will take you through the steps to create the database.
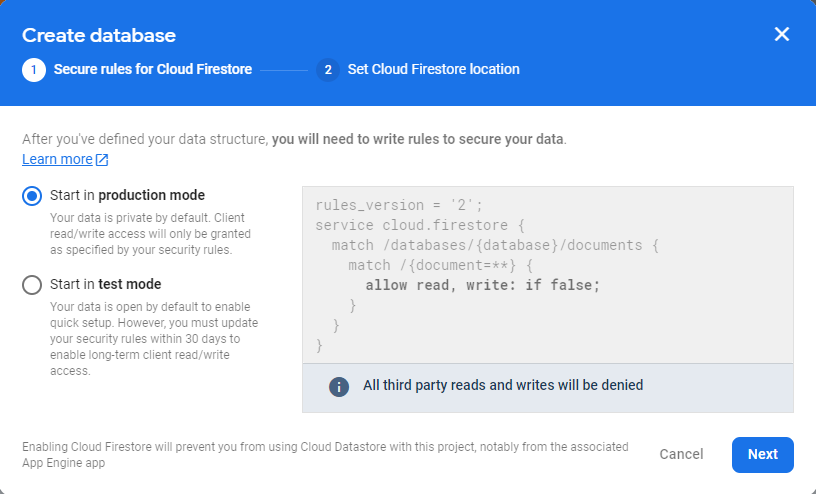
We won’t be accessing Firestore from the client-side, so we can create the database in production mode. Firebase Admin ignores security rules when interacting with Firestore.
Next, we’ll need to generate a service account key, which is a JSON file containing information we’ll initialize our admin app with to be able to create the custom web tokens that we’ll send to the client. Follow these instructions in the Firebase Documentation to do this.
Let’s install the Firebase CLI tools with NPM. Run the following command in a terminal to do so:
npm i -g firebase-toolsLet’s create a new folder for the project. I’m naming mine auth-tutorial for symmetry with the Firebase project, but you can name it whatever you like.
Initialize Firebase in the project directory with the following command:
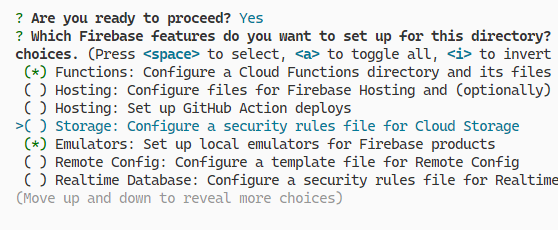
firebase initWe’ll be using Firebase Functions and Firebase Emulators, so select these when asked to choose the features you want to set up for the project directory.
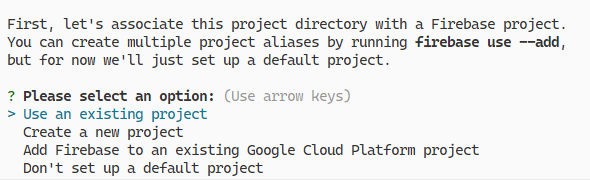
The next prompt is for you to associate the project directory with a Firebase project. Select Use an existing project and choose the project you created earlier.
We’ll be using plain JavaScript to write the functions, so choose that when asked about the language you want to use.
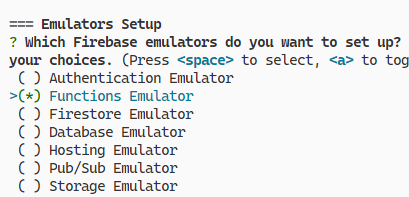
We’ll be using the Firebase Functions emulator to test our functions, so select it when asked to set up the emulators.
After you’ve initialized Firebase, your project directory structure should look like this:

Creating the REST API
We’ll need the following NPM packages to write our function:
express: Node.js web framework to speed up development.cors: Express middleware to enable CORS (Cross-Origin Resource Sharing).morgan: Logger middleware for Express.is-email: For server-side email validation.firebase: To authenticate users with the Firebase Web SDK.
Let’s install them all with one command:
npm i express cors morgan is-email firebaseLet’s write the handler function for the /register endpoint. Create a new folder named express in the functions directory, containing a sub-folder named routes, and create a new register.js file in routes with the following code:
functions/express/routes/register.js
const {
  getAuth,
  createUserWithEmailAndPassword,
} = require('firebase/auth');
const {
  getAuth: getAdminAuth,
} = require('firebase-admin/auth');
const firestore = require('firebase-admin').firestore();

async function register(req, res) {
  const { email, password, secureNote } = req.body;
  if (!secureNote) {
    res
      .status(400)
      .json({ error: { code: 'no-secure-note' } });
    return;
  }

  try {
    const auth = getAuth();
    const credential = await createUserWithEmailAndPassword(
      auth,
      email,
      password
    );
    const adminAuth = getAdminAuth();
    const token = await adminAuth.createCustomToken(
      credential.user.uid
    );
    await firestore
      .doc(`users/${credential.user.uid}`)
      .set({ secureNote });
    res.status(201).json({ token });
  } catch (err) {
    const { code } = err;
    if (code === 'auth/email-already-in-use') {
      res.status(400);
    } else {
      res.status(500);
    }
    res.json({
      error: {
        code: code ? code.replace('auth/', '') : undefined,
      },
    });
  }
}

module.exports = register;
If all validation is successful, the secure note of the new user will be saved in the Firestore database. Let’s create the function that will handle POST requests to the /login endpoint in a new login.js file, also saved in the routes directory.
functions/express/routes/login.js
const {
  getAuth: getClientAuth,
  signInWithEmailAndPassword,
} = require('firebase/auth');
const {
  getAuth: getAdminAuth,
} = require('firebase-admin/auth');

async function login(req, res) {
  const { email, password } = req.body;
  try {
    const credential = await signInWithEmailAndPassword(
      getClientAuth(),
      email,
      password
    );
    const token = await getAdminAuth().createCustomToken(
      credential.user.uid
    );
    res.status(200).json({ token });
  } catch (error) {
    if (
      error.code === 'auth/wrong-password' ||
      error.code === 'auth/user-not-found'
    ) {
      res.status(403);
    } else {
      res.status(500);
    }
    res.json({
      error: { code: error.code.replace('auth/', '') },
    });
  }
}

module.exports = login;
Notice that the /login and /register route handlers don’t perform validation on the email or password sent in a request. This is because we’ll be creating custom Express middleware to do this instead. Create a new middleware sub-folder in the express folder, and create a new validate-email-and-password.js file in it, containing the following code:
functions/express/middleware/validate-email-and-password.js
const isEmail = require('is-email');

function validateEmailAndPassword(req, res, next) {
  const { email, password } = req.body;

  if (!email) {
    res.status(400).send({ error: { code: 'no-email' } });
    return;
  }

  if (!isEmail(email)) {
    res
      .status(400)
      .send({ error: { code: 'invalid-email' } });
    return;
  }

  if (!password) {
    res
      .status(400)
      .send({ error: { code: 'no-password' } });
    return;
  }

  next();
}

module.exports = validateEmailAndPassword;
Here we check that a password and a valid email are specified in the request body. If they are, the request is passed on to the next middleware. Otherwise, we end the request with an error.
Let’s create the endpoint that will allow the fetching of the secure note of a logged-in user. We’ll do this in a new get-user.js file saved in the routes folder.
functions/express/routes/get-user.js
const firestore = require('firebase-admin').firestore();

async function getUser(req, res) {
  const userId = req.params.id;
  if (!userId) {
    res.status(400).json({ error: { code: 'no-user-id' } });
    return;
  }

  if (userId !== req.token.uid) {
    res
      .status(403)
      .json({ error: { code: 'unauthorized' } });
  }

  const snapshot = await firestore
    .collection('users')
    .doc(userId)
    .get();
  if (!snapshot.exists) {
    res
      .status(404)
      .json({ error: { code: 'user-not-found' } });
    return;
  }
  const user = snapshot.data();

  res.status(200).json({ secureNote: user.secureNote });
}

module.exports = getUser;
We respond with an error if a user is not specified, or the user making the request for the data is not the owner.
req.token.uid is supplied by another middleware that verifies the token sent along when making an authenticated request to the API. Let’s create this middleware in a firebase-auth.js file located in the express/middleware folder.
functions/express/middleware/firebase-auth.js
const { getAuth } = require('firebase-admin/auth');

async function firebaseAuth(req, res, next) {
  const regex = /Bearer (.+)/i;
  try {
    const idToken =
      req.headers['authorization'].match(regex)?.[1];
    req.token = await getAuth().verifyIdToken(idToken);
    next();
  } catch (err) {
    res
      .status(401)
      .json({ error: { code: 'unauthenticated' } });
  }
}

module.exports = firebaseAuth;
We verify that the JSON web token sent is a valid token and assign it to the req.token property if so. Otherwise, we send a 401 error.
Now it’s time to integrate all these modules together in an Express app that will respond to any request made to the api cloud function. Replace the index.js file in the functions folder with the following code:
const functions = require('firebase-functions');
const express = require('express');
const admin = require('firebase-admin');
const validateEmailAndPassword = require('./express/middleware/validate-email-and-password');
const firebaseConfig = require('./firebase.config');
const { initializeApp } = require('firebase/app');
const cors = require('cors');
const morgan = require('morgan');
const serviceAccount = require('./service-account-key.json');

admin.initializeApp({
  credential: admin.credential.cert(serviceAccount),
});
initializeApp(firebaseConfig);

const register = require('./express/routes/register');
const login = require('./express/routes/login');
const firebaseAuth = require('./express/middleware/firebase-auth');
const getUser = require('./express/routes/get-user');

const app = express();
app.use(cors());
app.use(morgan('dev'));

app.post('/login', validateEmailAndPassword, login);
app.post('/register', validateEmailAndPassword, register);
app.get('/users/:id', firebaseAuth, getUser);

exports.api = functions.https.onRequest(app);
This file will be run to start Firebase Functions. We used the initializeApp() method from the firebase-admin module to initialize the Firebase Admin SDK with the service account key file you should have created earlier.
We also used the initalizeApp() method from the firebase/app module to initialize Firebase Web with a configuration stored in a firebase.config.js file. You were given this configuration earlier when you created the web app in the Firebase console.
functions/firebase.config.js
/**
  Enter the configuration for your Firebase web app
  module.exports = {
  apiKey: ...,
  authDomain: ...,
  projectId: ...,
  storageBucket: ...,
  messagingSenderId: ...,
  appId: ...,
  measurementId: ...
}; */
We can now start Firebase Functions in the emulator, by running the following command in the project directory.
firebase emulators:start --only functionsTesting the API
We haven’t written client code yet but we can test our API with a tool like Postman, or we can use one of the methods described here in the Firebase documentation.
Here we’re test the /register endpoint with Postman:
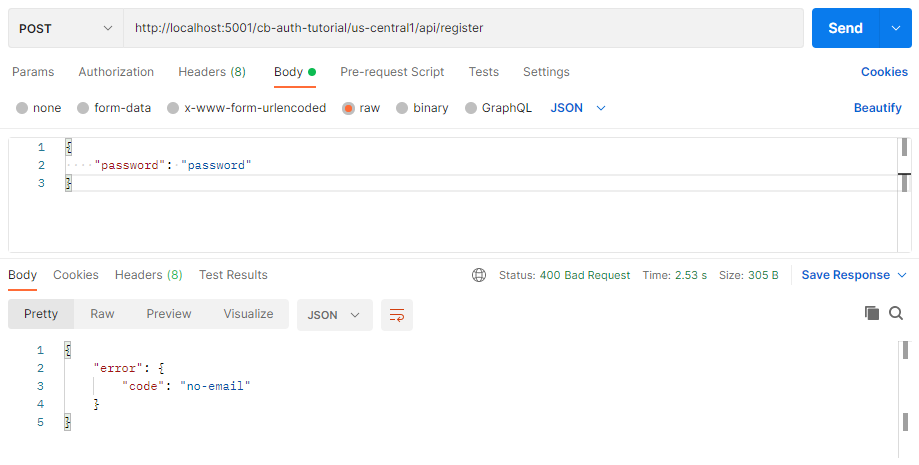
/register endpoint with Postman Creating the Client App with React
Let’s write the client app that will interact with our RESTful API. Create a new React app with Create React App.
npx create-react-app clientWe’ll be using the following NPM packages in the React app:
- Material UI (
@mui/material,@emotion/react,@emotion/styled): To style our client UI and make it attractive. axios: To make HTTP requests to the API we’ve created.react-router-dom: For single-page app routing.react-hook-form: For easier React form validation.firebase: The Firebase Web SDK library.react-firebase-hooks: Provides a set of reusable React hooks for Firebase.is-email: For client-side email validation.
npm install @mui/material @emotion/react @emotion/styled axios react-router-dom react-hook-form firebase react-firebase-hooks is-emailTo finish setting up Material UI, we’ll add the Roboto font by placing this link element within the head tag in our client/public/index.html file.
<link
  rel="stylesheet"
  href="https://fonts.googleapis.com/css?family=Roboto:300,400,500,700&display=swap"
/>
Start React in the client directory with:
npm startTest that the app is up and running by opening localhost:3000 in your browser. You’ll see the results of the standard React.js boilerplate in your client/src/App.js file. We’ll edit this file later.
The URL origin of the cloud functions running in an emulator is different from the one it has when running in a production environment. Let’s create a .env file to specify the different origins. The values you’ll need to specify will depend on the name you gave your Firebase project.
client/src/.env
REACT_APP_CF_PROD_=https://us-central1-cb-auth-tutorial.cloudfunctions.net
REACT_APP_CF_DEV=http://localhost:5001/cb-auth-tutorial/us-central1
We’ll also create a functions-origin.js module that will provide the correct origin depending on our current Node environment.
client/src/functions-origin.js
export const CLOUD_FUNCTIONS_ORIGIN =
  process.env.NODE_ENV === 'development'
    ? process.env.REACT_APP_CF_DEV
    : process.env.REACT_APP_CF_PROD;
Let’s create a module that would be responsible for making the HTTP requests to our RESTful API using axios. Create this module in an api-service.js file.
Here’s the code for the module:
client/src/api-service.js
import axios from 'axios';
import { CLOUD_FUNCTIONS_ORIGIN } from './functions-origin';

const apiUrl = `${CLOUD_FUNCTIONS_ORIGIN}/api`;

export async function signIn({ email, password }) {
  const url = `${apiUrl}/login`;
  const res = await axios.post(url, { email, password });
  return res.data;
}

export async function signUp({
  email,
  password,
  secureNote,
}) {
  const url = `${apiUrl}/register`;
  const res = await axios.post(url, {
    email,
    password,
    secureNote,
  });
  return res.data;
}

export async function getUserData({ userIdToken, userId }) {
  const url = `${apiUrl}/users/${userId}`;
  const res = await axios.get(url, {
    headers: {
      Authorization: `Bearer ${userIdToken}`,
    },
  });
  return res.data;
}
After this, we’ll need to create a few utilities to help with authentication. Create a new auth.js file with the following code:
client/src/auth.js
import * as apiService from './api-service';
import { useLocation, Navigate } from 'react-router-dom';
import {
  useEffect,
  createContext,
  useContext,
} from 'react';
import {
  getAuth,
  signInWithCustomToken,
  signOut as firebaseSignOut,
} from 'firebase/auth';
import { useAuthState } from 'react-firebase-hooks/auth';

export function RequireAuth({ children }) {
  let auth = useAuth();
  let location = useLocation();

  useEffect(() => {}, [auth.loading]);

  return auth.loading ? undefined : auth.user ? (
    children
  ) : (
    <Navigate
      to="/signin"
      state={{ from: location }}
      replace
    />
  );
}

export const AuthContext = createContext(undefined);

export function useAuth() {
  return useContext(AuthContext);
}

export function AuthProvider({ children }) {
  const auth = getAuth();
  const [user, loading] = useAuthState(auth);

  const signIn = async ({ email, password }) => {
    const { token } = await apiService.signIn({
      email,
      password,
    });
    await signInWithCustomToken(auth, token);
  };

  const signUp = async ({
    email,
    password,
    secureNote,
  }) => {
    const { token } = await apiService.signUp({
      email,
      password,
      secureNote,
    });
    await signInWithCustomToken(getAuth(), token);
  };

  const signOut = async () => {
    const auth = getAuth();
    await firebaseSignOut(auth);
  };

  const value = { user, loading, signIn, signOut, signUp };

  return (
    <AuthContext.Provider value={value}>
      {children}
    </AuthContext.Provider>
  );
}
Wrapping a route component in the RequireAuth component will ensure that only authenticated users will be able to view it. If not signed in, the user will be taken to the /signin route and then redirected back to the route that they trying to view after a successful sign-in.
The AuthProvider component allows its children to access important authentication-related data and methods using a React context and its provider. The useAuth() hook will provide the context values to the child components with the useContext() hook.
The signIn() and signUp() methods make requests to the API. If successful, a token will be received and passed the signInWithCustomToken() method from the firebase/auth module to authenticate the user in the browser.
Now it’s time to create the sign-up page. Users sign up with an email, a password, and a secure note. We’ll do this in a SignUp.jsx file in a new routes folder.
client/src/routes/SignUp.jsx
import {
  Box,
  Button,
  LinearProgress,
  TextField,
  Typography,
} from '@mui/material';
import { useState } from 'react';
import { useForm, Controller } from 'react-hook-form';

import isEmail from 'is-email';
import { useAuth } from '../auth';
import { useNavigate } from 'react-router-dom';

export default function SignUp() {
  const {
    control,
    handleSubmit,
    setError,
    formState: { errors },
  } = useForm();
  const [errorMessage, setErrorMessage] =
    useState(undefined);
  const [isSigningUp, setIsSigningUp] = useState(false);
  const { signUp } = useAuth();
  const navigate = useNavigate();

  const onSubmit = async (data) => {
    const { email, password, secureNote } = data;
    setIsSigningUp(true);
    setErrorMessage(undefined);
    try {
      await signUp({ email, password, secureNote });
      navigate('/');
    } catch (error) {
      const res = error.response;
      if (res) {
        const code = res.data?.error?.code;
        if (code === 'email-already-in-use') {
          setError('email', {
            message: 'This email is taken',
          });
          return;
        }
      }
      setErrorMessage("Can't sign up right now");
    } finally {
      setIsSigningUp(false);
    }
  };

  return (
    <Box
      sx={{
        height: '100%',
        display: 'flex',
        justifyContent: 'center',
        alignItems: 'center',
      }}
    >
      <form
        onSubmit={handleSubmit(onSubmit)}
        style={{ display: 'flex', flexDirection: 'column' }}
      >
        <Controller
          control={control}
          name="email"
          rules={{
            required: 'Enter an email',
            validate: {
              validateEmail: (email) =>
                isEmail(email) || 'Enter a valid email',
            },
          }}
          render={({ field }) => (
            <TextField
              {...field}
              label="Email"
              helperText={errors?.email?.message}
              error={Boolean(errors.email)}
              type="email"
            />
          )}
        />
        <Controller
          control={control}
          name="password"
          rules={{ required: 'Enter a password' }}
          render={({ field }) => (
            <TextField
              label="Password"
              {...field}
              helperText={errors?.password?.message}
              error={Boolean(errors.password)}
              sx={{ marginTop: 2 }}
              type="password"
            />
          )}
        />
        <Controller
          control={control}
          name="secureNote"
          rules={{ required: 'Enter a secure note' }}
          render={({ field }) => (
            <TextField
              {...field}
              label="Secure note"
              helperText={errors?.secureNote?.message}
              error={Boolean(errors?.secureNote)}
              sx={{ marginTop: 2 }}
            />
          )}
        />
        <LinearProgress
          variant="indeterminate"
          sx={{
            marginTop: 2,
            visibility: isSigningUp ? 'visible' : 'hidden',
          }}
        />
        <Button
          variant="contained"
          type="submit"
          sx={{ marginTop: 2 }}
        >
          Sign up
        </Button>
        <Box sx={{ marginTop: 2, textAlign: 'center' }}>
          <Typography
            sx={{
              visibility: errorMessage
                ? 'visible'
                : 'hidden',
            }}
            color="error"
          >
            {errorMessage}
          </Typography>
        </Box>
      </form>
    </Box>
  );
}
We use the Controller component from react-hook-form to register the Material UI TextField component with react-hook-form. We set validation rules with the Controller rules prop to ensure that the user enters a valid email, a password, and a secure note.
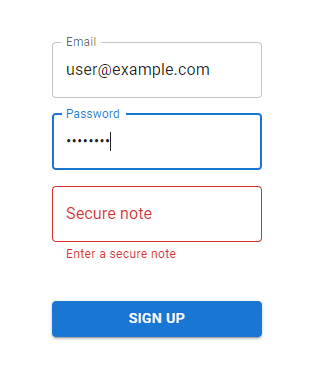
react-hook-form ensures that the onSubmit() function is only called when all the validation rules have been satisfied. In this function, we register the user with the signUp() method from the useAuth() hook we created earlier. If successful, we take the user to the index route (/). Otherwise, we display the appropriate error message.
Let’s also create the sign-in page in a SignIn.jsx file in the same routes folder.
client/src/routes/SignIn.jsx
import {
  Box,
  Button,
  LinearProgress,
  TextField,
  Typography,
} from '@mui/material';
import { useState } from 'react';
import { useForm, Controller } from 'react-hook-form';
import isEmail from 'is-email';
import { useNavigate } from 'react-router-dom';
import { useAuth } from '../auth';

export default function SignIn() {
  const {
    control,
    handleSubmit,
    setError,
    formState: { errors },
  } = useForm();
  const [errorMessage, setErrorMessage] =
    useState(undefined);
  const navigate = useNavigate();
  const { signIn } = useAuth();

  const onSubmit = async (data) => {
    const { email, password } = data;
    setIsSigningIn(true);
    setErrorMessage(undefined);
    try {
      await signIn({ email, password });
      navigate('/');
    } catch (error) {
      const res = error.response;
      if (res) {
        const code = res.data?.error?.code;
        if (code === 'user-not-found') {
          setError('email', {
            message: 'No user has this email',
          });
          return;
        }
        if (code === 'wrong-password') {
          setError('password', {
            message: 'Wrong password',
          });
          return;
        }
      }
      setErrorMessage("Can't sign in right now");
    } finally {
      setIsSigningIn(false);
    }
  };

  const [isSigningIn, setIsSigningIn] = useState(false);

  return (
    <Box
      sx={{
        display: 'flex',
        justifyContent: 'center',
        alignItems: 'center',
        height: '100%',
      }}
    >
      <form
        onSubmit={handleSubmit(onSubmit)}
        style={{
          display: 'flex',
          flexDirection: 'column',
        }}
      >
        <Controller
          control={control}
          name="email"
          rules={{
            required: 'Enter an email',
            validate: {
              validateEmail: (email) =>
                isEmail(email) || 'Enter a valid email',
            },
          }}
          render={({ field }) => (
            <TextField
              label="Email"
              {...field}
              helperText={errors.email?.message}
              error={Boolean(errors.email)}
              type="email"
            />
          )}
        />
        <Controller
          control={control}
          name="password"
          rules={{ required: 'Enter a password' }}
          render={({ field }) => (
            <TextField
              label="Password"
              {...field}
              helperText={errors.password?.message}
              error={Boolean(errors.password)}
              sx={{ marginTop: 2 }}
              type="password"
            />
          )}
        />
        <LinearProgress
          variant="indeterminate"
          sx={{
            visibility: isSigningIn ? 'visible' : 'hidden',
            marginTop: 2,
          }}
        />
        <Button
          variant="contained"
          type="submit"
          sx={{ marginTop: 2 }}
        >
          Sign in
        </Button>
        <Box
          sx={{
            marginTop: 2,
            textAlign: 'center',
          }}
        >
          <Typography
            sx={{
              visibility: errorMessage
                ? 'visible'
                : 'hidden',
            }}
            color="error"
          >
            {errorMessage}
          </Typography>
        </Box>
      </form>
    </Box>
  );
}
Unlike in the SignUp component, here we use the signIn() method from the useAuth() hook to sign the user in.
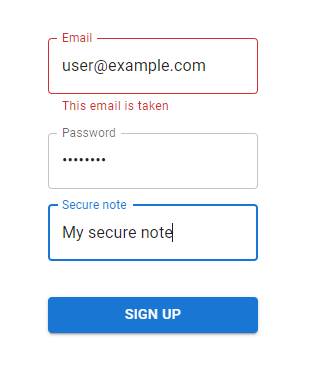
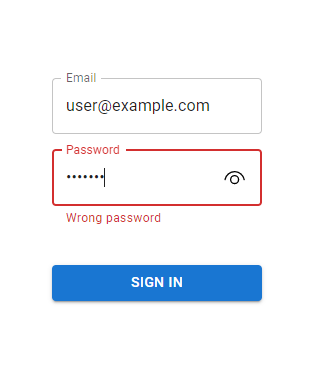
The HTTP errors we handle here are different from the ones we handle in SignUp. In SignUp, we display an error if the email the user attempted to sign up with has already been used. But here we display errors for a non-existent email or a wrong password.
Now let’s create the component that will be shown for our index route. Replace the contents of App.js with the following:
client/src/App.js
import logo from './logo.svg';
import './App.css';
import { useAuth } from './auth';
import { useEffect, useRef, useState } from 'react';
import { Button, Typography, Box } from '@mui/material';
import { Link } from 'react-router-dom';
import * as apiService from './api-service';

function App() {
  const { user, loading } = useAuth();
  const [dataState, setDataState] = useState(undefined);
  const secureNoteRef = useRef(undefined);

  useEffect(() => {
    (async () => {
      if (!loading) {
        if (user) {
          setDataState('loading');
          const userIdToken = await user.getIdToken();
          try {
            const { secureNote } =
              await apiService.getUserData({
                userIdToken,
                userId: user.uid,
              });
            secureNoteRef.current = secureNote;
            setDataState('success');
          } catch {
            setDataState('error');
          }
        }
      }
    })();
  }, [user, loading]);

  const child = loading ? (
    <></>
  ) : user ? (
    dataState === 'loading' ? (
      <Typography>Getting your data...</Typography>
    ) : dataState === 'error' ? (
      <Typography>An error occured.</Typography>
    ) : dataState === 'success' ? (
      <div>
        <Typography variant="h6">Secure note</Typography>
        <Typography>{secureNoteRef.current}</Typography>
      </div>
    ) : undefined
  ) : (
    <div>
      <Typography>You're not signed in</Typography>
      <Box
        sx={{
          marginTop: 2,
        }}
      >
        <Button LinkComponent={Link} to="/signin">
          Sign in
        </Button>
        <Button
          LinkComponent={Link}
          to="/signup"
          sx={{ marginLeft: 2 }}
        >
          Sign up
        </Button>
      </Box>
    </div>
  );
  return (
    <div
      style={{
        display: 'flex',
        justifyContent: 'center',
        alignItems: 'center',
        height: '100%',
      }}
    >
      {child}
    </div>
  );
}

export default App;
If the user hasn’t been authenticated, we let them know they’re not signed in and include the relevant links to do so.

If they’ve signed in, we make a request to the API to get the secure note and display it.

We used a dataState variable to keep track of the current state of the API request and display an appropriate view to the user based on this.
We set dataState to loading just before making the request to let the user know that their data is in the process of being retrieved.

dataState is loading.If an error occurs in this process, we let them know by setting dataState to error:

dataState is error.Finally, let’s initialize Firebase and set up the routing logic in our index.js file.
client/src/index.js
import React from 'react';
import ReactDOM from 'react-dom/client';
import './index.css';
import App from './App';
import reportWebVitals from './reportWebVitals';
import {
  BrowserRouter,
  Route,
  Routes,
} from 'react-router-dom';
import SignIn from './routes/SignIn';
import { AuthProvider } from './auth';
import { initializeApp } from 'firebase/app';
import firebaseConfig from './firebase.config';
import SignUp from './routes/SignUp';

initializeApp(firebaseConfig);

const root = ReactDOM.createRoot(
  document.getElementById('root')
);
root.render(
  <React.StrictMode>
    <AuthProvider>
      <BrowserRouter>
        <Routes>
          <Route path="/" element={<App />} />
          <Route path="/signin" element={<SignIn />} />
          <Route path="/signup" element={<SignUp />} />
        </Routes>
      </BrowserRouter>
    </AuthProvider>
  </React.StrictMode>
);

reportWebVitals();
There should be a firebase.config.js file in your src directory that contains the config you received when setting up the web app in the Firebase console. This is the same config we used to initialize the Web SDK in the Admin environment when we were writing the API.
client/src/firebase.config.js
/**
  Enter the configuration for your Firebase web app
  module.exports = {
  apiKey: ...,
  authDomain: ...,
  projectId: ...,
  storageBucket: ...,
  messagingSenderId: ...,
  appId: ...,
  measurementId: ...
}; */
The app should be fully functional now!
Conclusion
In this article, we learned how to easily set up authentication in our web apps using Firebase. We created a RESTful API with Node.js and the Express framework to handle requests from a client app that we built using React.js and Material UI.
11 Amazing New JavaScript Features in ES13
This guide will bring you up to speed with all the latest features added in ECMAScript 13. These powerful new features will modernize your JavaScript with shorter and more expressive code.